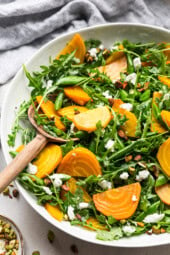
Golden Beet Salad featuring Goat Cheese and Walnuts
**Golden Beet Salad with Goat Cheese and Walnuts: A Healthy and Flavorful Treat**
Golden beet salad featuring goat cheese and walnuts is a colorful, nutrient-dense dish that merges earthy sweetness, creamy zest, and nutty crispness in every mouthful. This salad not only captivates the eye with its radiant golden shades and diverse textures, but it also provides a host of health advantages. Whether enjoyed as a light lunch, a side complement, or an elegant starter for a fancy dinner, this salad is bound to wow both taste buds and guests.
—
### What Are Golden Beets?
Golden beets are a type of beetroot distinguished by their bright yellow to deep orange interior. In contrast to their red relatives, golden beets possess a gentler, less robust flavor and a somewhat sweeter profile. Their tendency to avoid staining hands and utensils makes them a favored option among kitchen enthusiasts.
Golden beets boast an abundance of vital nutrients, such as:
– **Folate** – essential for cellular activity and tissue development
– **Potassium** – assists in managing blood pressure
– **Vitamin C** – boosts immune system functionality
– **Fiber** – supports healthy digestion
—
### Why Goat Cheese and Walnuts?
The interplay of goat cheese and walnuts enriches the salad’s complexity and harmony:
– **Goat Cheese**: Creamy and tangy, goat cheese elevates the beets’ sweetness while imparting a rich texture. Additionally, it is often easier to digest for some individuals compared to cheese made from cow’s milk.
– **Walnuts**: These nuts contribute a delightful crunch and are a superb source of omega-3 fatty acids, antioxidants, and protein. Toasting the walnuts intensifies their flavor and introduces a warm, nutty scent.
—
### Key Ingredients
To prepare a classic golden beet salad with goat cheese and walnuts, you’ll require:
– **Golden beets** (3–4 medium-sized)
– **Goat cheese** (approximately 4 oz, crumbled)
– **Walnuts** (1/3 cup, toasted)
– **Mixed greens** (such as arugula, spinach, or spring mix)
– **Red onion** (thinly sliced, optional)
– **Fresh herbs** (such as parsley or basil, for garnish)
**For the dressing:**
– Olive oil (3 tablespoons)
– Balsamic vinegar or lemon juice (1 tablespoon)
– Dijon mustard (1 teaspoon)
– Honey or maple syrup (1 teaspoon)
– Salt and pepper to your liking
—
### Preparation Steps
1. **Cook the Beets**: Wash the golden beets thoroughly and trim the ends. You may roast them in the oven at 400°F (200°C) for 45–60 minutes wrapped in foil, or boil them until tender (approximately 30–40 minutes). Once they have cooled, peel and cut into rounds or wedges.
2. **Toast the Walnuts**: In a dry pan over medium heat, toast the walnuts for 3–5 minutes until fragrant. Take care to avoid burning them.
3. **Prepare the Dressing**: In a small bowl, whisk together olive oil, balsamic vinegar (or lemon juice), Dijon mustard, honey, salt, and pepper until well combined.
4. **Assemble the Salad**: On a large serving platter or individual dishes, layer the mixed greens, sliced beets, crumbled goat cheese, and toasted walnuts. If desired, add red onion slices.
5. **Drizzle and Serve**: Just before serving, drizzle the dressing over the salad. Garnish with fresh herbs for an added burst of color and flavor.
—
### Variations and Tips
– **Add Fruit**: Incorporating sliced pears, apples, or dried cranberries can elevate the sweetness and introduce extra layers of flavor.
– **Use Different Nuts**: Pecans or almonds can replace walnuts for a different nutty flavor.
– **Try Different Cheeses**: Substitute goat cheese with feta or blue cheese for a unique taste experience.
– **Make It a Meal**: Incorporate grilled chicken, salmon, or quinoa to transform the salad into a fulfilling dish.
—
### Health Benefits
This salad is not only delicious but also loaded with nutrients:
– **Heart Health**: The fiber, potassium, and antioxidants found in beets and walnuts contribute to heart wellness.
– **Anti-Inflammatory**: Goat cheese and walnuts harbor anti-inflammatory properties that may assist in alleviating chronic inflammation.
– **Digestive Health**: The fiber in beets and greens fosters healthy digestion and overall gut health.
—
### Conclusion
Golden beet salad with goat cheese and walnuts is a delightful creation that harmonizes flavor, texture, and nutrition. Its attractive presentation and rich taste make it a remarkable addition to any meal. Whether you’re seeking a nutritious lunch option or a sophisticated dinner appetizer, this salad is a versatile and satisfying choice that’s bound to become a favorite.
Read More Golden Beet Salad featuring Goat Cheese and Walnuts
**Golden Beet Salad with Goat Cheese and Walnuts: A Flavorful and Nutritious Treat**
Golden beet salad featuring goat cheese and walnuts is an eye-catching, nutrient-rich dish that merges earthy sweetness, creamy tang, and nutty crunch in every mouthful. Be it as an appetizer, a side dish, or a light main course, this salad is both visually stunning and tastefully gratifying. In this article, we will delve into the ingredients, health advantages, preparation methods, and variations of this sophisticated salad.
—
### What Are Golden Beets?
Golden beets are a type of beetroot celebrated for their vibrant yellow-orange hue and a sweeter, milder taste compared to their red relatives. They are less prone to staining hands and cutting surfaces, making them a favored option for salads and roasted vegetable creations. Packed with fiber, potassium, and antioxidants, golden beets offer a stunning color and flavor contrast when combined with other ingredients.
—
### Essential Ingredients
1. **Golden Beets** – Cooked either by roasting or boiling until soft, golden beets shine as the centerpiece of this salad. Their inherent sweetness harmonizes beautifully with tangy and savory elements.
2. **Goat Cheese** – Soft, creamy goat cheese introduces a tangy richness that enhances the earthy beet flavor. It also adds a delightful smoothness.
3. **Walnuts** – Toasted walnuts bring a pleasing crunch and a mildly bitter, nutty richness that counters the beets’ sweetness and the cheese’s creaminess.
4. **Greens** – A foundation of arugula, spinach, or a medley of baby greens infuses freshness and a peppery kick.
5. **Vinaigrette** – A straightforward dressing crafted from olive oil, balsamic vinegar or citrus juice, Dijon mustard, and honey enhances the overall taste without overwhelming the other ingredients.
—
### Nutritional Advantages
This salad is not just tasty; it is brimming with beneficial nutrients:
– **Golden Beets**: Rich in fiber, folate, and antioxidants like betalains, known for their anti-inflammatory effects.
– **Goat Cheese**: A solid source of protein and calcium, often easier to digest than cheese from cows.
– **Walnuts**: Abundant in omega-3 fatty acids, antioxidants, and beneficial fats for heart health.
– **Leafy Greens**: Supply vitamins A, C, and K, along with iron and vital minerals.
When combined, these ingredients create a heart-healthy, anti-inflammatory, and nutrient-intensive dish.
—
### Steps to Create Golden Beet Salad
**Ingredients:**
– 3–4 medium golden beets
– 4 cups mixed greens (arugula, spinach, or spring mix)
– ½ cup crumbled goat cheese
– ½ cup toasted walnuts
– 2 tablespoons olive oil
– 1 tablespoon balsamic vinegar or lemon juice
– 1 teaspoon Dijon mustard
– 1 teaspoon honey (optional)
– Salt and pepper to taste
**Instructions:**
1. **Prepare the Beets**: Preheat your oven to 400°F (200°C). Rinse the beets and wrap them in foil. Roast for 45–60 minutes until fork-tender. Allow to cool, then peel and cut into wedges or slices.
2. **Toast the Walnuts**: In a dry skillet over medium heat, toast the walnuts for 3–5 minutes until they release a fragrant aroma. Let them cool.
3. **Prepare the Dressing**: In a small bowl, whisk together the olive oil, vinegar or lemon juice, Dijon mustard, honey, salt, and pepper.
4. **Build the Salad**: On a serving platter or in a large bowl, layer the greens, beet slices, crumbled goat cheese, and toasted walnuts. Drizzle with the vinaigrette just before serving.
—
### Variations and Enhancements
– **Incorporate Fruit**: Chopped pears, apples, or orange segments can elevate sweetness and provide a juicy bite.
– **Experiment with Nuts**: Consider using pecans, almonds, or pistachios for a unique flavor twist.
– **Add Grains**: Mix in cooked quinoa, farro, or couscous for a more substantial salad.
– **Different Cheeses**: Feta or blue cheese can substitute for goat cheese, offering a more robust flavor.
– **Make It Vegan**: Replace goat cheese with a plant-based alternative or slices of avocado.
—
### Serving Ideas
Golden beet salad with goat cheese and walnuts pairs wonderfully with grilled chicken, seafood, or hearty bread. It’s ideal for brunch gatherings, picnics, or as a vibrant addition to festive meals. Serve it chilled or at room temperature for optimal flavor.
—
### Final Thoughts
Golden beet salad with goat cheese and walnuts presents a delightful blend of flavors, textures, and nutrients. It is simple to prepare, highly adaptable, and guaranteed to impress guests or fulfill your desire for a nourishing meal.
Read More
Golden Beet Salad featuring Goat Cheese and Arugula
**Golden Beet Salad with Goat Cheese and Arugula: A Colorful and Wholesome Treat**
Golden beet salad featuring goat cheese and arugula is a striking, nutrient-packed dish that melds earthy sweetness, tangy creaminess, and peppery zest into a single, refined presentation. Ideal as an appetizer, side dish, or light main course, this salad is popular among health-conscious diners and culinary aficionados alike. In this article, we will delve into the components, health advantages, cooking tips, and variations of this enticing salad.
—
### What Are Golden Beets?
Golden beets are a type of beetroot celebrated for their bright yellow-orange hue and a flavor that is milder and sweeter than that of their red relatives. They are less prone to staining hands and cutting surfaces, making them a favored ingredient in many kitchens. Golden beets are abundant in fiber, potassium, and antioxidants like betalains, which may aid in detoxification and mitigate inflammation.
—
### Key Ingredients
1. **Golden Beets** – Whether roasted or boiled until soft, golden beets serve as a sweet, earthy foundation for the salad.
2. **Goat Cheese** – Creamy and tangy, goat cheese contributes a luscious texture that beautifully offsets the beets.
3. **Arugula** – This peppery green adds a refreshing bite that complements the beets’ sweetness and the cheese’s richness.
4. **Nuts (Optional)** – Toasted walnuts or pecans provide crunch and a nutty flavor profile.
5. **Citrus or Balsamic Vinaigrette** – A delicate dressing crafted from lemon juice or balsamic vinegar, olive oil, and a dash of honey elevates the salad’s overall taste.
6. **Fresh Herbs (Optional)** – Chopped parsley, mint, or basil can infuse a fresh, fragrant touch.
—
### Nutritional Benefits
This salad is not only appetizing but also loaded with essential nutrients:
– **Golden Beets**: High in dietary fiber, folate, and vitamin C.
– **Goat Cheese**: A beneficial source of protein, calcium, and healthy fats, and often easier to digest than cheese from cow’s milk.
– **Arugula**: Abundant in vitamins A, C, and K, along with antioxidants and phytochemicals that bolster immune function.
– **Olive Oil**: Contains heart-friendly monounsaturated fats and anti-inflammatory properties.
—
### How to Prepare Golden Beet Salad
**Ingredients:**
– 3–4 medium golden beets
– 4 cups fresh arugula
– 4 oz goat cheese, crumbled
– 1/4 cup toasted walnuts or pecans (optional)
– 2 tbsp extra virgin olive oil
– 1 tbsp balsamic vinegar or lemon juice
– 1 tsp honey or maple syrup
– Salt and pepper to taste
**Instructions:**
1. **Cook the Beets**: Preheat the oven to 400°F (200°C). Clean the beets, wrap them in foil, and roast for 45–60 minutes, or until tender. Allow to cool, then peel and slice into wedges or rounds.
2. **Make the Dressing**: In a small bowl, combine olive oil, balsamic vinegar or lemon juice, honey, salt, and pepper, whisking until blended.
3. **Assemble the Salad**: In a large bowl or on a platter, arrange arugula, beet slices, crumbled goat cheese, and nuts. Drizzle with the dressing and mix gently to combine.
4. **Serve**: If desired, garnish with fresh herbs and serve right away.
—
### Variations and Tips
– **Add Protein**: Enhance the dish with grilled chicken, shrimp, or chickpeas for a heartier meal.
– **Use Different Greens**: Swap arugula for spinach, mixed greens, or kale for varied texture and taste.
– **Try Different Cheeses**: Substitute goat cheese with feta or blue cheese for a stronger flavor.
– **Add Fruit**: Incorporate sliced pears, apples, or oranges that complement the other ingredients and provide a hint of sweetness.
—
### Final Thoughts
Golden beet salad with goat cheese and arugula is a flexible and visually appealing dish that’s as healthful as it is tasty. Its harmonious blend of flavors and textures makes it a highlight on any table, whether you’re entertaining guests or whipping up a quick lunch. With just a few straightforward ingredients and minimal preparation, this salad delivers a gourmet experience that showcases the natural flavors and beauty of wholesome foods.
Read More