
“Investigating the Adaptability and Applications of Raspberry Ribbons”
# Raspberry Ribbons: Scrumptious Jam-Stuffed Butter Cookies for the Festive Season
As the festive season draws near, the scent of cookies hot from the oven permeates the atmosphere, infusing homes worldwide with warmth and happiness. Among the array of delightful confections that adorn our tables during this celebratory period, **raspberry ribbons** shine as refined, buttery cookies resembling shortbread, filled with jam and coated with a sugary glaze. Known by various titles, including raspberry ribbon slices, these cookies are especially beloved in Finland and other Scandinavian nations like Denmark, where they are regarded as classic holiday treats.
## A Taste of Heritage
Raspberry ribbons are akin to the traditional thumbprint jam butter cookies, featuring a distinctive twist that embodies the essence of the holiday season. In Finland, they are frequently called Finnish holiday cookies, encapsulating the spirit of joy and unity. The blend of a tender, crumbly texture coupled with a fruity filling delivers a delightful contrast that is bound to satisfy both youngsters and adults alike.

*Raspberry Ribbons*
## Effortless Yet Delectable
One of the most attractive qualities of raspberry ribbons is their ease of preparation. With just a few ingredients and minimal effort, you can whip up a batch of these festive cookies ideal for sharing. The dough rolls out smoothly, allowing you to create a groove in the center of each log with your finger or the handle of a wooden spoon. This is where the fun begins, as you fill the groove with your preferred jam, infusing each bite with a burst of flavor.
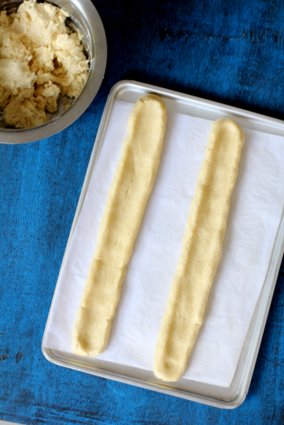
*Cookie Dough Before Baking & After Filling of Jam*
## Flexible Flavor Choices
A standout feature of raspberry ribbons is their adaptability. While raspberry jam is the classic choice, you can play around with different flavors to cater to your palate. Popular substitutions include mixed fruit, orange marmalade, pineapple, or mango jam. This adaptability gives you the freedom to personalize your cookies and make them distinctly yours. For example, if raspberry jam isn’t on hand, don’t hesitate to use mixed fruit or pineapple jam, as many bakers often do.

*Raspberry Ribbon Slices*
## Ideal for Gifting and Sharing
Raspberry ribbons are a lovely addition to any cookie platter, particularly during Christmas and New Year celebrations. Their lively colors and sophisticated presentation make them an eye-catching treat that is sure to wow your guests. Furthermore, they are perfect for homemade edible gifts, allowing you to spread the joy of baking to friends and family. The aromatic shortbread, paired with the sweet, fruity, and zesty filling, results in a cookie that is not only scrumptious but also visually appealing.
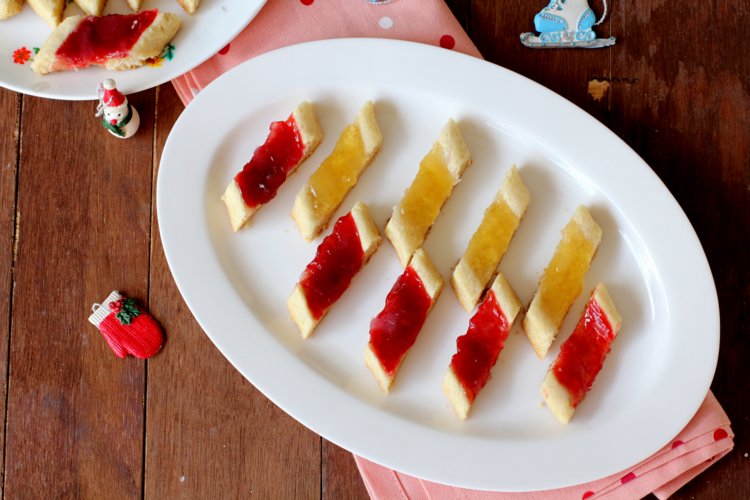
*Raspberry Ribbon Cookies*
## A Household Favorite
Raspberry ribbons have rapidly gained popularity in numerous homes, including that of Nehal, who has observed that both kids and adults enjoy these delightful treats. Their soft texture and delightful taste make them an irresistible choice for holiday gatherings, family festivities, or simply relishing with a cup of tea or coffee.
### Discover How to Create Raspberry Ribbons
If you’re eager to introduce the joy of raspberry ribbons into your home this festive season, you can easily locate recipes online to guide you through the steps. With just a handful of simple measures, you can produce these exquisite cookies that are poised to become a beloved tradition in your family.
In summary, raspberry ribbons represent more than just cookies; they epitomize a celebration of flavors, traditions, and the happiness of sharing. So, gather your ingredients, roll up your sleeves, and prepare to make a batch of these delightful jam-filled butter cookies that are sure to elicit smiles from everyone this holiday season!
Read More
How to Prepare Carrot Kheer: A Comprehensive Recipe Guide
# Carrot Kheer Recipe: An Exquisite Indian Sweet
As we welcome a new year, there’s no better way to commemorate the occasion than with a delightful Indian sweet! Carrot Kheer, fondly referred to as Gajar Ki Kheer, is a timeless dessert that merges the inherent sweetness of carrots with the creaminess of milk and the crunch of almonds. This luscious pudding is not only a feast for the palate but also a visual delight, making it ideal for special occasions such as New Year’s and Diwali.
## Ingredients
To craft this scrumptious dessert, you will require the following components:
– **500 grams of Delhi red carrots** (or any alternative variety)
– **1 liter of full-fat milk** (or skimmed milk, if preferred)
– **1 cup of sugar** (adjust according to taste)
– **1/4 cup of blanched almonds** (finely ground)
– **1/4 cup of ghee** (clarified butter)
– **4-5 green cardamom pods** (crushed)
– **Chopped nuts** (for garnish, optional)
## Instructions
### Step 1: Prepare the Carrots
1. **Wash and Peel**: Begin by thoroughly washing the carrots. Peel them and then grate finely. The Delhi red carrots are especially sweet and juicy, making them perfect for this dish.
### Step 2: Sauté the Carrots
2. **Heat Ghee**: In a sturdy pan, warm the ghee over medium heat.
3. **Sauté Carrots**: Add the grated carrots to the pan and sauté for about 5-7 minutes until they become tender and exude their natural sweetness. This step intensifies the flavor of the carrots.
### Step 3: Cook with Milk
4. **Add Milk**: Pour in the milk and let the mixture come to a boil. Once boiling, lower the heat and let it simmer. Stir occasionally to keep the milk from sticking to the bottom of the pan.
5. **Add Sugar and Cardamom**: After around 15-20 minutes of simmering, incorporate the sugar and crushed cardamom. Keep cooking until the kheer reaches your desired thickness, which may take another 15-20 minutes.
### Step 4: Blend for Creaminess
6. **Blend the Mixture**: For a creamier texture, consider taking a portion of the kheer and blending it into a smooth paste. Return it to the pan and stir well. This is optional but lends a delightful creaminess to the kheer.
### Step 5: Add Almonds
7. **Incorporate Ground Almonds**: Mix in the ground blanched almonds, which will impart a nutty flavor and smooth texture to the kheer. Cook for an additional 5 minutes.
### Step 6: Serve
8. **Garnish and Serve**: Once the kheer has reached your chosen consistency, remove it from heat. Enhance with chopped nuts if desired. Serve warm or chilled, based on your preference.
## Nutritional Benefits
Carrot Kheer is not merely a delectable treat; it also offers considerable nutritional value. Carrots are abundant in beta-carotene, beneficial for eye health, and provide essential vitamins and minerals. The milk adds calcium and protein, while almonds offer healthy fats and vitamin E.
## Conclusion
Carrot Kheer is a wonderful way to celebrate special events and indulge in a sweet delight. Its creamy consistency, aromatic spices, and nutty essence make it a beloved choice for many. Whether you’re welcoming the New Year or honoring any festive celebration, this dessert is sure to charm your family and friends. So, gather your ingredients and attempt this easy yet delicious recipe for a slice of Indian tradition! Enjoy your cooking and may the new year be filled with blessings!
Read More
How to Prepare Tawa Pulao: A Comprehensive Recipe Guide
# Tawa Pulao: Mumbai’s Cherished Street Delight
Tawa pulao is a colorful and savory vegetarian rice dish that has established itself as a key aspect of Mumbai’s lively street food landscape. Crafted on a flat iron skillet known as a “tawa,” this dish is a wonderful blend of spices, vegetables, and rice, appealing to both locals and visitors alike.
## The Heart of Tawa Pulao
Essentially, tawa pulao is a straightforward yet mouthwatering dish that merges boiled rice with an assortment of sautéed vegetables and a special spice mix called pav bhaji masala. This fragrant spice blend, initially developed for the famous street food pav bhaji, imbues the rice with a deep flavor that is difficult to resist. The dish is commonly topped with fresh coriander and accompanied by a cooling raita or yogurt, making it a wholesome meal.
### Ingredients and Cooking Process
To prepare tawa pulao, you will require the following key ingredients:
– **Boiled Rice**: Leftover rice is ideal for this recipe, as it is less sticky and easier to incorporate with the vegetables and spices.
– **Mixed Vegetables**: Popular choices include carrots, peas, capsicum, potatoes, and cauliflower. These vegetables should be blanched to preserve their crunch and vibrant appearance.
– **Pav Bhaji Masala**: The key ingredient that lends tawa pulao its distinctive flavor.
– **Butter**: Adds richness and complexity to the dish.
– **Tomatoes**: Fresh tomatoes contribute moisture and acidity, balancing the spices perfectly.
– **Fresh Coriander**: For garnish and added freshness.
### Cooking Instructions
1. **Sauté the Vegetables**: On a hot tawa or griddle, melt some butter and add chopped onions and tomatoes. Sauté until the onions become translucent and the tomatoes soften.
2. **Incorporate Spices**: Stir in the pav bhaji masala and any extra spices, such as red chili powder, to suit your taste.
3. **Mix in Rice and Vegetables**: Add the blanched vegetables and boiled rice to the tawa. Blend everything well, ensuring the rice is evenly coated with the masala.
4. **Garnish and Serve**: Top with a sprinkle of fresh coriander and serve hot alongside raita or yogurt.
### The Street Food Journey
To truly savor the genuine flavor of tawa pulao, one should indulge in it from the street vendors that line the streets of Mumbai, particularly in popular areas like Juhu Beach. The vibrant energy of the city, combined with the enticing aroma of spices in the air, creates an unforgettable dining experience. While you can replicate the dish at home, the unique flavors and atmosphere of street food are challenging to mimic.
### A Fast and Wholesome Meal
Tawa pulao is not just delightful but also a quick and healthy meal alternative. It is filled with vegetables, making it a fantastic option for children’s lunchboxes. The dish is adaptable, allowing you to personalize it with your preferred vegetables or even utilize leftover pav bhaji for quicker preparation.
### Conclusion
Tawa pulao is more than a mere dish; it embodies the essence of Mumbai’s dynamic street food culture. Its blend of spices, vegetables, and rice forms a flavorful one-pot meal that is simultaneously satisfying and nourishing. Whether enjoyed from a street vendor or prepared at home, tawa pulao is a culinary treasure that deserves a spot in every food enthusiast’s collection. Therefore, the next time you’re in Mumbai, seize the opportunity to relish this iconic dish!
Read More
Recipe for Khoya Matar Paneer: A Rich Indian Cuisine with Peas and Cottage Cheese
# Khoya Matar Paneer: A Luscious and Creamy North Indian Gem
Khoya matar paneer is an exquisite vegetarian delicacy that captures the spirit of North Indian gastronomy. This indulgent, creamy curry features khoya (condensed milk solids), green peas, and paneer, offering a delightful experience that is ideal for festive occasions and celebrations. Whether presented at an extravagant feast or a cozy family gathering, khoya matar paneer is bound to dazzle with its opulent flavors and textures.
## The Unique Ingredients Behind Its Charm
At the core of khoya matar paneer lies khoya, created by cooking full-fat milk until it reduces to a thick, creamy form. This component not only imparts richness but also a distinct flavor that enhances the dish. Paneer, a fresh cheese widely used in Indian cuisine, provides a tender and melt-in-your-mouth experience that harmonizes wonderfully with the creamy sauce.
Green peas serve as another essential ingredient, contributing a splash of color and a hint of sweetness that offsets the richness of the khoya and paneer. The dish is gently spiced, allowing the natural tastes of the components to emerge.
## A Festive Dish for Memorable Moments
Khoya matar paneer is frequently prepared for important celebrations, including weddings, festivals, and family gatherings. Its lavish appearance and rich flavor make it a favored selection for buffet spreads in Indian eateries. This dish pairs excellently with various Indian breads such as naan, paratha, or rumali roti, as well as aromatic rice dishes like pulao or biryani.
For a recent New Year’s lunch, khoya matar paneer was served with tawa pulao and masala paratha, crafting a festive and fulfilling meal that charmed the guests.
## A Jain-Friendly Variation
One of the attractive features of khoya matar paneer is its adaptability. This specific recipe follows Jain cuisine principles, meaning it is made without onions and garlic. For those seeking a richer base, a blanched onion paste can be incorporated along with ginger and green chili paste. Alternatively, cashew nut paste can be added to boost flavor and texture while adhering to Jain dietary customs.
## Simple and Quick Preparation
Preparing khoya matar paneer is quite easy, especially if you have paneer and khoya readily available. The main prep work includes blanching tomatoes and pureeing them to form a smooth, colorful sauce. Fresh green peas are preferred for their taste, but frozen peas can serve as a handy substitute.
### Step-by-Step Instructions for Making Khoya Matar Paneer
1. **Ingredients Required:**
– Khoya (either store-bought or homemade)
– Paneer, cubed
– Fresh or frozen green peas
– Blanched and pureed tomatoes
– Ginger and green chili paste
– Ghee (clarified butter)
– Spices (cumin, coriander powder, garam masala, etc.)
– Salt to taste
2. **Cooking Method:**
– Heat ghee in a pan and add the ginger and green chili paste. Sauté for one minute.
– Incorporate the tomato puree and cook until the oil separates from the mixture.
– Mix in the spices and khoya, ensuring a thorough blend.
– Gently stir in the paneer cubes and green peas, coating them in the sauce.
– Simmer for a few minutes until the peas are tender and the flavors combine.
– Adjust seasoning as required and serve hot with your preferred Indian bread or rice.
## Conclusion
Khoya matar paneer is a dish that embodies the richness of Indian cuisine, making it a splendid addition to any festive spread. Its creamy consistency, combined with the delightful tastes of khoya, paneer, and green peas, offers a comforting experience that is both satisfying and indulgent. Whether you’re commemorating a special event or simply treating yourself to a delicious dish, khoya matar paneer is sure to please. Relish this culinary treasure and share it with cherished ones for a truly unforgettable dining moment!
Read More
How to Prepare Boondi Raita: An Illustrated Guide
# Boondi Raita: A Tasty Yogurt Accompaniment
Boondi raita is an enjoyable and easy yogurt-based side that occupies a cherished spot in Indian culinary traditions. Frequently paired with aromatic rice dishes such as pulao, jeera rice, or alongside stuffed parathas, boondi raita not only complements the meal but also offers a cooling effect on the palate. This article explores the history, preparation, and importance of boondi raita in Indian cooking.
## What is Boondi Raita?
Boondi raita is a variety of raita, a yogurt dish typically found in North Indian cooking. Raita can include a wide range of ingredients, but boondi raita specifically showcases boondi—tiny, crunchy balls crafted from chickpea flour. The dish is celebrated for its creamy consistency and the delightful crunch of boondi, making it a well-loved accompaniment to numerous meals.
Beyond boondi raita, various other raita types are appreciated across India, such as onion raita, cucumber raita, and tomato raita. Each variant presents its distinctive flavor, but boondi raita remains particularly favored in numerous homes.
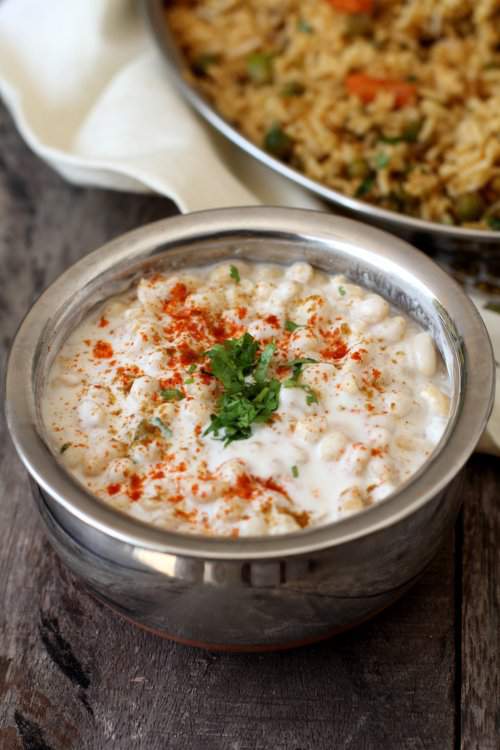
*Boondi Raita*
## The Importance of Raita in Indian Cuisine
Raita holds significant importance in Indian meals, especially in North India, where it is often served to temper the spices of main courses. It serves as a cooling component, offering respite from the spices in hotter dishes. In South Indian cooking, raita is known as “pachadi,” which often includes seasoning of spices like mustard seeds, asafoetida, and curry leaves, contributing an additional flavor dimension.
## The Components of Boondi Raita
The key ingredients for boondi raita consist of:
– **Yogurt (Curd)**: The foundational element of the raita, imparting creaminess and tanginess.
– **Boondi**: Crispy balls made from chickpea flour that add a contrasting texture.
– **Spices**: Typical spices used include roasted cumin powder, black salt, red chili powder, and pepper powder.
– **Herbs**: Fresh mint or coriander leaves can be added for decoration and flavor enhancement.
Although boondi can be homemade, it is readily available in Indian grocery outlets, making it convenient for quick raita preparation.
## Making Boondi Raita
Creating boondi raita is an uncomplicated process. Here’s a straightforward recipe to prepare this tasty side dish:
### Ingredients:
– 1 cup plain yogurt (curd)
– 1 cup boondi (ideally unflavored)
– 1/2 teaspoon roasted cumin powder
– 1/4 teaspoon black salt
– 1/4 teaspoon red chili powder (optional)
– Fresh mint or coriander leaves for topping
### Instructions:
1. **Prepare the Yogurt**: In a mixing bowl, whisk the yogurt until it is smooth. If the yogurt is too thin, you might want to drain it for a few minutes to achieve a thicker texture.
2. **Incorporate Spices**: Add roasted cumin powder, black salt, and red chili powder to the yogurt. Mix thoroughly to blend the flavors.
3. **Include Boondi**: Carefully fold the boondi into the yogurt mixture. For a softer texture, you may soak the boondi in lukewarm water briefly before adding, though this may lessen the flavor.
4. **Chill**: Refrigerate the raita for about 15-20 minutes to help the flavors meld.
5. **Garnish and Serve**: Before serving, sprinkle with fresh mint or coriander leaves. Boondi raita pairs wonderfully with parathas, pulaos, or can even be enjoyed as a standalone salad.
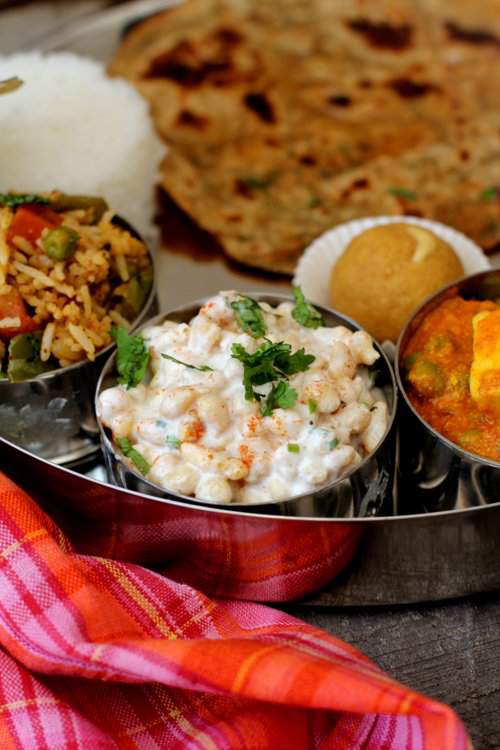
*Boondi Raita with Tawa Pulao*
## Conclusion
Boondi raita is more than just a side; it is a joyful amalgamation of flavors and textures that enriches any meal. Its ease and adaptability make it a common feature in many Indian kitchens. Whether enjoyed with spicy parathas or fragrant pulaos, boondi raita is bound to enhance your dining experience. So, when you next prepare an Indian feast, think about including this delightful yogurt-based dish on your table. Relish the explosion of flavors and the cooling sensation that boondi raita offers!
Read More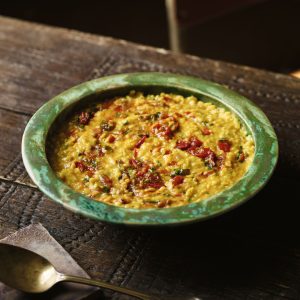
How to Make Urad Dal: A Comprehensive Recipe Tutorial
# Flavorful Urad Dal Recipe: A North Indian Treasure
Urad dal, referred to as split black gram or dhuli urad, is a fundamental component of North Indian gastronomy, renowned for its robust taste and healthful properties. This adaptable lentil dish complements rice, roti, or parathas wonderfully, making it a beloved choice in numerous homes. In this article, we will delve into the making of urad dal, its health advantages, and the best ways to serve it for an enjoyable dining experience.
## What is Urad Dal?
Urad dal originates from black gram, a legume abundant in protein and dietary fiber. It finds its way into numerous regional cuisines throughout India, especially in Hindi-speaking regions and Punjab. Characterized by its creamy consistency when cooked, urad dal can be prepared in numerous styles, ranging from a dry roast to a soupier form.
### Nutritional Benefits
Urad dal is not just tasty but also brimming with essential nutrients. It serves as a fantastic source of:
– **Protein**: Vital for muscle recovery and development.
– **Dietary Fiber**: Supports digestion and contributes to a healthy digestive system.
– **Vitamins and Minerals**: High in B vitamins, iron, and magnesium.
## Cooking Techniques
Preparing urad dal can be a pleasurable process, particularly if you choose traditional cooking methods. Although it can be pressure-cooked for efficiency, slow cooking over a wood fire adds a distinctive smoky taste reminiscent of dhaba-style cuisine. Follow these tips to achieve perfect urad dal:
1. **Roasting**: Lightly dry roast the urad dal on low heat for 5-6 minutes prior to cooking to lessen its natural stickiness.
2. **Cooking Method**: Either slow cook for a deeper flavor or use a pressure cooker for a faster option. Be sure to cook the dal to a tender state without it becoming mushy.
3. **Flavoring**: Incorporating ghee (clarified butter) in the tempering greatly enhances the dish’s flavor. For a garlic-free variation, asafoetida can serve as an alternative.
## Easy Urad Dal Recipe
Here’s a simple recipe to whip up delicious urad dal:
### Ingredients
– 1 cup urad dal (split black gram)
– 2 tablespoons ghee or oil
– 1 teaspoon cumin seeds
– 1-2 green chilies, slit
– 1 medium onion, finely chopped
– 2-3 cloves of garlic, minced (optional)
– 1 teaspoon ginger, grated
– Salt to taste
– Fresh coriander leaves for garnish
– Water as required
### Instructions
1. **Preparation**: Rinse the urad dal thoroughly under fresh water. Optionally, dry roast it on low heat for around 5-6 minutes until aromatic.
2. **Cooking**:
– **Pressure Cooker**: Combine the rinsed dal with 3 cups of water and salt in a pressure cooker. Cook for 3-4 whistles or until tender.
– **Slow Cooking**: For a pot method, add the dal and water, bring to a boil, then let it simmer on low heat until the dal is soft, stirring occasionally.
3. **Tempering**:
– In another pan, warm ghee or oil. Add cumin seeds and allow them to sputter.
– Incorporate the chopped onions, green chilies, ginger, and garlic (if using). Sauté until the onions are golden brown.
– Drizzle this tempering over the cooked dal and mix thoroughly. Fine-tune the salt as necessary.
4. **Garnishing**: Decorate with fresh coriander leaves before serving.
## Serving Suggestions
Urad dal is ideally enjoyed with:
– **Masala Paratha**: Spiced flatbreads that enhance the richness of the dal.
– **Rice**: Fluffy basmati rice or jeera rice pairs splendidly.
– **Boondi Raita**: A refreshing yogurt dish that balances the spices perfectly.
## Conclusion
Urad dal is a nourishing, hearty dish that captures the spirit of North Indian fare. Its rich taste and nutritional benefits make it a superb addition to any meal. Whether paired with rotis, parathas, or rice, this urad dal recipe is certain to become a staple in your kitchen. So, gather your ingredients and indulge in the delightful journey of cooking and enjoying this time-honored dish!
Read More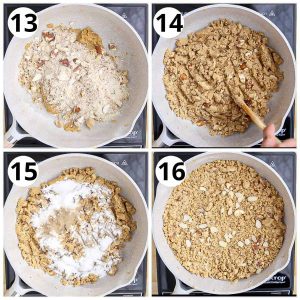
How to Prepare Panjiri: A Comprehensive Recipe Tutorial
# The Joyous Panjiri: A Classic Indian Confection for New Mothers
Panjiri, a beloved delicacy from the northern regions of India, especially Punjab, is a wholesome dessert crafted mainly from whole wheat flour (atta) and a medley of dried fruits. Traditionally given as prasad during festivals and special events, panjiri occupies a significant role in many people’s hearts, particularly as a nutritious option for new mothers post-delivery.
## What is Panjiri?
Panjiri is not merely a sweet treat; it represents affection and nurturing, often made during important life celebrations. This healthy delicacy is especially favored during festivals like Janmashtami and serves as a staple during the Satyanarayana pooja. In Pakistan, it is referred to as Hyderabadi panjeeri, highlighting its popularity across regions.
Preparing panjiri involves toasting whole wheat flour in pure desi ghee (clarified butter), creating a rich taste and enticing fragrance. The texture is often compared to wet sand due to the abundant ghee used, although some variations may have a looser, powdery feel.
## Ingredients and Variants
The fundamental components for panjiri consist of:
– **Whole Wheat Flour (Atta)**: The main ingredient forming the foundation of the sweet.
– **Desi Ghee**: Crucial for roasting the flour and imparting richness.
– **Sugar**: Added for sweetness, with jaggery serving as a healthier substitute.
– **Nuts**: Commonly includes almonds, pistachios, and walnuts for added texture and flavor.
– **Spices**: Green cardamom, dry ginger (saunth), fennel seeds, and black peppercorns are frequently added for their health advantages and flavor.
Panjiri boasts a variety of adaptations, including:
– **Dry Fruit Panjiri**: Infused with an assortment of dried fruits.
– **Dhaniya Panjiri**: Featuring coriander seeds for a distinctive taste.
– **Methi Panjiri**: Incorporating fenugreek for additional health benefits.
– **Semolina Panjiri**: A variant using semolina instead of whole wheat flour.
Each family might have its own distinctive recipe, passed down through generations, rendering every iteration unique.
## Health Benefits of Panjiri
Panjiri not only delights the palate but also brims with health advantages, especially for new mothers. The blend of whole wheat flour, ghee, and dry fruits provides crucial nutrients that assist in recovery after childbirth. Some prominent benefits include:
– **Nutritional Enhancement**: Rich in carbohydrates, proteins, and healthy fats, panjiri aids new mothers in regaining strength.
– **Digestive Support**: The spices utilized, such as fennel and dry ginger, promote digestion.
– **Lactation Aid**: Certain ingredients in panjiri are recognized for boosting milk production in breastfeeding mothers.
– **Warming Effects**: Perfect for consumption during colder months, panjiri helps maintain body warmth.
For children, panjiri can serve as a healthy snack when made without specific spices that may elevate body heat. It pairs well with warm milk, making it a nutritious beverage for growing kids.
## Making Panjiri at Home
Creating panjiri at home is a simple process. Here’s a straightforward recipe to follow:
### Ingredients:
– 2 cups whole wheat flour (atta)
– 1 cup desi ghee
– 1 cup powdered sugar (or to taste)
– 1/2 cup mixed nuts (almonds, pistachios, walnuts)
– 1 tsp green cardamom powder
– 1 tsp dry ginger powder (optional)
– 1/2 tsp fennel seeds (optional)
### Instructions:
1. **Roast the Flour**: In a heavy-bottomed pan, warm the desi ghee over medium heat. Stir in the whole wheat flour and roast it, continuously mixing until it turns golden brown and exudes a nutty fragrance.
2. **Incorporate Nuts and Spices**: After roasting the flour, add the mixed nuts, cardamom powder, and any other spices you wish to incorporate. Mix thoroughly to blend.
3. **Sweeten**: Take the pan off the heat and let it cool slightly. When it’s warm (not hot), add the powdered sugar and mix well.
4. **Cool and Store**: Let the panjiri cool completely before transferring it to an airtight container. It can be kept for up to 45 days.
## Conclusion
Panjiri stands as more than just a sweet; it is a nourishing delight that encapsulates tradition and care, particularly for new mothers. Whether enjoyed as prasad during festive occasions or as a soothing food for postpartum healing, panjiri continues to be a treasured aspect of Indian culinary customs. So, the next
Read More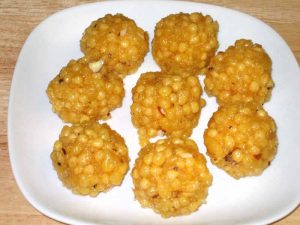
How to Prepare Besan Ladoo: A Detailed Recipe Guide
# Besan Ladoo Recipe: A Gluten-Free Treat for Celebrations
Besan ladoo is a beloved traditional Indian confection crafted from chickpea flour (referred to as ‘besan’ in Hindi) and ghee. This delightful dessert is commonly made during festivals such as Diwali and Ganesh Chaturthi, serving both as an offering to deities and a scrumptious treat for loved ones. With its rich taste and melt-in-your-mouth consistency, besan ladoo is celebrated as one of the top sweets in Indian culinary tradition.
## The Essence of Besan Ladoo
Besan ladoo transcends mere dessert; it symbolizes festivity and unity. These sweet, spherical balls are created by roasting besan in ghee until achieving a golden color and releasing a nutty fragrance. The roasted flour is mixed with powdered sugar, coarsely chopped nuts, and infused with cardamom powder. This straightforward yet fulfilling recipe is a mainstay in countless Indian homes, particularly during festive times.
### Nutritional Benefits
Chickpea flour is rich in nutrients, making besan ladoo a healthier sweet choice. It boasts high protein content, folate, and maintains a low glycemic index, making it suitable for various dietary preferences. The health advantages of besan are especially significant for pregnant women, who are often advised to enjoy besan ladoo for its nutritional benefits, which can assist in preventing birth defects and supplying essential nutrients.
## The Preparation Process
### Ingredients
To create besan ladoo, you’ll need these ingredients:
– 2 cups of besan (chickpea flour)
– 1 cup of ghee (clarified butter)
– 1 cup of powdered sugar (adjust according to taste)
– 1/2 cup of coarsely chopped nuts (like almonds or cashews)
– 1 teaspoon of cardamom powder
– A pinch of salt (optional)
### Step-by-Step Instructions
1. **Roasting the Besan**:
– Heat ghee in a heavy-bottomed skillet over low heat.
– Stir in the besan and mix continuously to prevent burning. The roasting is essential; it should take around 15-20 minutes until the besan is golden brown and releases a fragrant scent.
2. **Cooling the Mixture**:
– After roasting, take the pan off the heat and allow the mixture to cool slightly. It should feel warm but not hot to your fingers.
3. **Mixing Ingredients**:
– Incorporate the powdered sugar, crushed nuts, cardamom powder, and a pinch of salt (if using) into the roasted besan. Combine thoroughly until all ingredients are evenly distributed.
4. **Shaping the Ladoos**:
– While the mixture remains warm, take small amounts and roll them into round balls (ladoos) using your hands. If the mixture appears too dry and crumbly, adding a bit more warm ghee or milk can help bind it.
5. **Storing the Ladoos**:
– Arrange the ladoos on a plate and let them cool completely. Once cooled, store them in an airtight container. If khoya (reduced milk solids) is added, refrigerate the ladoos to prolong their freshness.
## Tips for Perfect Besan Ladoo
– **Roasting Technique**: Always roast the besan over low heat and stir continuously to avoid burning. The scent of roasted besan is a good sign that it’s ready.
– **Ghee Quantity**: While classic recipes call for a substantial amount of ghee, feel free to adjust the amount to your liking. Including khoya can amplify the flavor while lessening the need for excess ghee.
– **Texture**: For a coarser texture, consider using coarser besan or incorporating a tablespoon of semolina (sooji) into the mixture.
## Conclusion
Besan ladoo is a delightful, gluten-free sweet that encapsulates the essence of Indian celebrations. Its easy preparation and rich taste make it a favorite for both beginner and expert cooks. Whether you’re commemorating a special event or merely satisfying your sweet cravings, besan ladoo is sure to provide joy and contentment. So gather your ingredients and give this traditional sweet a try at home—your taste buds will express their gratitude!
Read More
“Classic Pahari Aloo Dish: A Guide to Preparing Aloo Gutke”
# Pahari Aloo Recipe: A Tasty Treat from the Uttarakhand Hills
The Pahari Aloo recipe, commonly referred to as Aloo Gutke, is a straightforward yet delectable potato fry that traces its origins to the scenic hill regions of Uttarakhand, India. The term “Pahari” comes from ‘pahad,’ which translates to mountain, and it pertains to the inhabitants of the Himalayan area. The culinary traditions of the Pahari folks are marked by simplicity and authenticity, showcasing the natural abundance and cultural legacy of the mountains.
## A Culinary Treasure from Uttarakhand
Pahari cuisine can be categorized into two primary regional styles: Garhwali and Kumaoni. Each of these cuisines features an array of hearty, nourishing, and wholesome recipes that predominantly focus on plant-based ingredients, making them not only tasty but also healthy. The components utilized in Pahari cooking are frequently sourced locally, incorporating cereals, pulses, and leafy greens. Noteworthy dishes include mandua (finger millet rotis), bhari roti (stuffed roti with cooked pulses), kandali saag (nettle leaves), kafuli (spinach dish), and of course, Pahari Aloo.
## The Distinct Taste of Pahari Aloo
The unassuming potato, referred to as “pahadi aloo,” is an essential part of the Pahari diet. It is cherished for its flavor, which is often considered superior to that of potatoes cultivated in the plains. The Pahari Aloo recipe is a no-onion, no-garlic preparation that acts as a soothing side dish, especially during the colder months. It is frequently savored as a snack by both locals and visitors, often available from roadside tea stall vendors.
### Essential Ingredients
One of the remarkable characteristics of Pahari cuisine is the inclusion of unique herbs and spices. Jakhiya, a spice native to the Himalayan area, is a crucial component in numerous Pahari recipes, including Aloo Gutke. Similar to mustard seeds, jakhiya possesses a unique fragrance and a crunchy consistency that enhances the dish’s flavor profile. Traditional Pahari cooking typically uses mustard oil or ghee for tempering, intensifying the overall taste.
## Making Pahari Aloo (Aloo Gutke)
### Ingredients:
– 3-4 medium-sized pahadi potatoes (or regular potatoes)
– 2 tablespoons mustard oil
– 1 teaspoon jakhiya
– 1 teaspoon cumin seeds
– 2-3 dried red chilies
– Salt to taste
– Fresh coriander leaves for garnish (optional)
### Instructions:
1. **Prepare the Potatoes**: Start by boiling the potatoes until they are tender. After cooking, let them cool and peel them. Slice the potatoes into thin lengthwise pieces or cubes.
2. **Tempering the Spices**: In a pan, warm the mustard oil over medium heat. When the oil is hot, add the cumin seeds and allow them to splutter. Next, incorporate the jakhiya and dried red chilies. Sauté briefly until fragrant.
3. **Cook the Potatoes**: Introduce the cut potatoes to the pan and add salt to taste. Mix well to coat the potatoes with the tempered spices. Cook on low heat, stirring occasionally, until the potatoes are soft, tender, and slightly crispy, which usually takes about 5-7 minutes.
4. **Serving**: After cooking, remove from the heat and garnish with fresh coriander leaves if desired. Serve the Pahari Aloo hot as a side dish with roti, puri, or as a delightful snack on its own.
## Conclusion
Pahari Aloo, or Aloo Gutke, represents more than merely a basic potato fry; it embodies the rich culinary traditions of the Pahari people from Uttarakhand. Its earthy flavors and comforting nature make it a favored dish among locals and tourists alike. Whether served as a side dish or enjoyed as a snack, this recipe is essential for anyone eager to discover the authentic flavors of Indian hill cuisine. So, gather your ingredients and embark on a culinary adventure to the hills of Uttarakhand with this delightful Pahari Aloo recipe!
Read More
How to Prepare Masala Paratha: A Comprehensive Guide
# Masala Paratha Recipe: A Tasty Indian Flatbread
Masala paratha is a scrumptious twist on the classic Indian flatbread, paratha. In contrast to the plain variant, masala paratha is enhanced with a blend of fragrant Indian spices, fresh herbs, and rich desi ghee (clarified butter), creating a flavorful and fulfilling dish. This recipe is not only simple to make but also requires minimal prep time, making it a perfect option for hectic mornings or a quick lunch.
## Ingredients
To prepare masala paratha, you will need these ingredients:
– **For the Dough:**
– 2 cups whole wheat flour
– Water (as needed)
– Salt (to taste)
– **For the Masala Filling:**
– 2 tablespoons desi ghee (melted)
– 1 teaspoon cumin seeds
– 1 teaspoon fennel seeds
– 1 teaspoon coriander powder
– 1 teaspoon red chili powder (to taste)
– 2 tablespoons finely chopped fresh coriander leaves
– 2 tablespoons finely chopped fresh mint leaves
– Optional: crushed roasted peanuts or sesame seeds for extra crunch
## Preparation Methods
There are two effective ways to prepare masala paratha:
### Method 1: Spice Paste Method
1. **Prepare the Dough:** In a mixing bowl, combine whole wheat flour and salt. Gradually add water and knead until you achieve a soft dough. Cover and let it rest for 15-20 minutes.
2. **Make the Spice Paste:** In a small bowl, blend melted ghee with cumin seeds, fennel seeds, coriander powder, red chili powder, chopped coriander, and mint leaves.
3. **Assemble the Paratha:**
– Divide the dough into equal sections and roll each piece into a ball.
– Flatten a dough ball and spread a layer of the spice paste on top.
– Roll the dough into a coil and then flatten it again to form a round shape.
### Method 2: Layering Method
1. **Prepare the Dough:** Follow the same steps as in Method 1 to create the dough.
2. **Assemble the Paratha:**
– Roll out a dough ball into a flat circle.
– Spread a layer of ghee over the rolled dough.
– Evenly sprinkle the spice mix and herbs on top.
– Roll the dough into a coil and flatten it again to shape a round paratha.
## Cooking the Masala Paratha
1. Heat a tawa (griddle) over medium heat and add a bit of ghee.
2. Place the rolled masala paratha on the heated tawa.
3. Cook for 2-3 minutes on one side until golden brown, then flip and cook the other side, adding more ghee as necessary.
4. Ensure both sides are thoroughly cooked and crispy.
5. Remove from the tawa and keep warm in a container lined with a kitchen towel.
## Serving Suggestions
Masala paratha can be enjoyed in several ways:
– **With Yogurt or Raita:** Serve alongside a bowl of yogurt or boondi raita for a refreshing contrast.
– **As Part of a Thali:** Include it in a North Indian thali with dishes like dal, aloo sabzi, or paneer curry.
– **For Lunch Boxes:** It’s an excellent lunch box item, especially paired with vegetables or a light curry.
## Variations
Feel free to play around with different spices and herbs to match your palate. You can add:
– **Cheese:** Grate cheese over the spice mix for a cheesy masala paratha.
– **Kasuri Methi:** Add dried fenugreek leaves for a distinctive flavor.
– **Nutty Crunch:** Incorporate crushed roasted peanuts or sesame seeds for additional texture.
## Conclusion
Masala paratha is not just a dish; it embodies an experience rich in flavors and aromas. Whether you savor it for breakfast, brunch, or during a festive occasion, this spiced flatbread is sure to delight. With its straightforward preparation and versatility, masala paratha is a must-try for anyone wanting to dive into the delightful realm of Indian cuisine. So, gather your ingredients and prepare to indulge in this delicious dish!
Read More