Peach Cobbler with a Crispy Almond Crust
**Introducing the Peach Cobbler of My Dreams!**
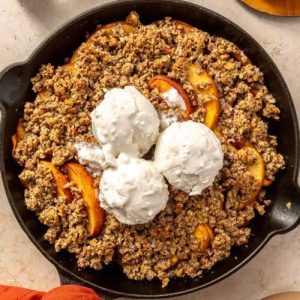
This delectable dessert showcases warm, bubbling peaches adorned with a golden cobbler crust that’s rugged on the edges and soft within. Create this recipe during mid-to-late summer when fresh peaches are in their prime.
This straightforward peach cobbler recipe is sweet but not overly so, allowing the wonderful peach taste to take center stage. The filling is sweetened with honey, while the topping has a light sweetness from zesty lemon sugar—both adding delightful complementary flavors that elevate this cobbler. The recipe would be incomplete without a hint of vanilla extract, a touch of cinnamon, and yogurt to provide a light, buttermilk-like tang.
The rich topping is crafted from almond flour, which yields a tender texture and subtle almond essence that complements the ripe peaches beautifully. I attempted this cobbler with regular all-purpose flour but found it far superior with almond flour. Thanks to almond flour, this recipe is gluten-free, regardless of dietary needs!
### Crafting the Ultimate Peach Cobbler
**You can find the complete recipe below.** Here’s a quick overview of the procedure and why it’s so effective:
1. Combine the filling ingredients directly in your baking dish to keep things tidy. Bake the filling for roughly 20 minutes while preparing the topping. This two-step baking method ensures you end up with a bubbly, concentrated peach filling and a perfectly golden crust. If you bake it all at once, the topping may brown too soon before the filling is cooked through (trust me, I learned the hard way).
2. The topping comes together easily in a few steps. Start by mixing the sugar and lemon zest in a small bowl, using your fingers to work the zest into the sugar (this takes about 20 seconds and enhances the lemon flavor). Grate cold butter into the flour to create a biscuit-like texture. Finally, whisk an egg with some yogurt before mixing it into the flour for even distribution.
3. Generously dollop spoonfuls of topping over the bubbling filling and bake until the topping is lightly golden. Enjoy your cobbler with vanilla ice cream or whipped cream. The leftovers are amazing the next day paired with Greek yogurt for breakfast!
### Peach Tips
The only challenging aspect of this recipe is sourcing excellent peaches. Hold off on making it until you can locate a bounty of ripe or nearly-ripe fresh peaches.
#### Selecting and Storing Peaches
**Choose medium-to-large peaches that are aromatic, blemish-free, and yield slightly to gentle pressure.** Handle them carefully to prevent bruising.
**If your peaches aren’t ripe yet,** leave them at room temperature until they reach ripeness (you can accelerate the process by placing them in a paper bag, but ensure each peach has some room to avoid molding).
**If your peaches are already ripe** and you can’t prepare the cobbler immediately, refrigerate them to keep them fresh for another day or two.
#### Peeling Peaches
**Peeling the peaches isn’t necessary** if you don’t mind a bit of texture in your dessert (I didn’t mind, though my husband did).
**To peel the peaches,** lightly score an “x” about two inches wide at the base of each peach, gently immerse them in a large pot of boiling water for 30 seconds to 1 minute, then transfer them to an ice bath. Start peeling from the incisions at the bottom, and the skin will come off effortlessly in strips.
#### Cutting Your Peaches
**Cut your peaches into one-inch chunks** rather than long strips. This results in ideal bites that don’t turn to mush. This handy tip came from Sally—thanks, Sally!
### More Peach Delights
Make the most of your ripe summer peaches with these delightful peachy creations:
**This is my first cobbler recipe on the blog, and it definitely won’t be my last.** I’ve always identified as a crisp enthusiast, but now that I’ve unlocked the secret to perfect cobblers, I can’t stop experimenting with every fruity flavor. Why not?
**I’d love to hear how your cobbler turns out in the comments!** Your feedback means a lot to me.
### Peach Cobbler with Almond Topping
This peach cobbler recipe features bubbling ripe peaches topped with a flawlessly golden crust. The topping consists of almond flour, which provides wonderful flavor and makes the recipe gluten-free. The recipe yields approximately 9 moderate servings.
#### Fresh Peach Filling
#### Topping
1. Preheat the oven to 375 degrees Fahrenheit, then prepare the filling: In a 9-inch square baking dish, combine the peaches, honey, starch, vanilla, and cinnamon. Bake the filling for 20 to 25 minutes until the mixture is bubbling around all four edges.
2. At the same time, prepare the topping
Read More
Thereâs a $99 Find in the IKEA Kidâs Section That Belongs in Your Dining Room

Itâs so customizable, too!
READ MORE…

I Havenât Thrown Out a Paper Towel Tube in 3 Years, Thanks to This Brilliantly Easy Trick

Itâs so heartwarming!
READ MORE…

A Seasonal Dish: Summer Affection Note and Zucchini Soup
### Zucchini Soup: A Creamy, Flavorful Treat
Zucchini soup is a flexible and wholesome dish that showcases the gentle flavor of zucchini while integrating a range of fresh ingredients. This creamy concoction is ideal for a light meal or as an appetizer for dinner. Below is a comprehensive guide on how to make this delightful dish, along with some serving ideas.
#### Ingredients
– **2 tbsp olive oil**: This healthy fat acts as the foundation for sautéing the vegetables, adding depth to the soup.
– **1 yellow onion**: Diced onion imparts sweetness and complexity of flavor.
– **1 celery stalk**: Celery adds a subtle earthiness and enriches the overall taste.
– **1-2 cloves garlic**: Fresh garlic brings aromatic warmth and enhances the flavor profile.
– **1 large or 2 smaller zucchini (courgette)**: The main ingredient, zucchini, introduces creaminess and a mild flavor.
– **A good handful of fresh spinach**: Spinach contributes color, nutrients, and a slight earthiness.
– **120 ml (1/2 cup) white wine**: A splash of white wine intensifies the flavors and adds acidity.
– **500 ml (2 cups) vegetable stock**: This acts as the soup’s foundation, providing moisture and flavor.
– **120 ml (1/2 cup) cream or coconut cream**: Cream imparts richness, whereas coconut cream serves as a dairy-free alternative with a touch of sweetness.
– **A handful of fresh herbs (dill and mint suggested)**: Fresh herbs enhance the soup with lively flavors.
– **1 lemon**: Fresh lemon juice brightens the dish and balances the richness.
– **Salt & black pepper**: Crucial for seasoning and amplifying the overall taste.
#### Toppings
– **1 cup cooked quinoa**: Adds protein and a nutty flavor, making the soup heartier.
– **Sour cream or smetana**: A dollop of sour cream contributes tanginess and creaminess.
– **Dill**: Fresh dill beautifully complements the soup’s flavors.
– **Red onion or chives, finely chopped**: These add a crunchy texture and a burst of flavor.
#### Preparation Instructions
1. **Sauté the Vegetables**: In a large pot, warm the olive oil over medium heat. Introduce the chopped onion and celery, cooking until softened, about 5-7 minutes. Add the minced garlic and cook for another minute until fragrant.
2. **Add Zucchini and Spinach**: Chop the zucchini into small pieces and mix it into the pot along with the fresh spinach. Cook for approximately 5 minutes, letting the zucchini soften.
3. **Deglaze with Wine**: Pour in the white wine, scraping the bottom of the pot to release any tasty bits. Let the wine simmer for a few minutes until reduced slightly.
4. **Add Stock**: Pour in the vegetable stock and bring the blend to a boil. Lower the heat and let it simmer for about 15 minutes, allowing the flavors to combine.
5. **Blend the Soup**: Using an immersion blender, puree the soup until smooth. Alternatively, carefully transfer the soup in batches to a blender. Return the blended soup to the pot.
6. **Stir in Cream and Herbs**: Incorporate the cream or coconut cream, fresh herbs, and the juice of one lemon. Season with salt and black pepper to taste. Heat gently until warmed through.
7. **Serve**: Pour the soup into bowls and top with cooked quinoa, a dollop of sour cream, fresh dill, and chopped red onion or chives.
#### Conclusion
Zucchini soup is not only simple to prepare but also a delightful way to savor the flavors of fresh vegetables and herbs. Its creamy consistency and vibrant taste make it a comforting dish that can be enjoyed any time of year. Whether served warm or chilled, this soup is sure to satisfy a crowd and can be easily adapted with your preferred toppings. Enjoy this healthy and delicious recipe as a staple in your culinary collection!
Read More
52 Brilliant Ways to Use Up Leftover Egg Yolks

Have you made an airy pavlova or crunchy meringue lately? Or did someone in your family abscond with all the egg whites for his breakfast scramble, leaving you with an excess of egg yolks? Don’t be annoyed! Step up to the challenge and look at this as an opportunity to use these protein-packed, sunny spheres in new recipes. We promise that whatever you choose to make, it’ll be delicious.
READ MORE…

Red Velvet Brownies: An Indulgent Dessert Recipe
# Savor Homemade Red Velvet Brownies
Valentine’s Day is swiftly approaching, and nothing expresses “I love you” quite like a homemade assortment of vibrant Red Velvet Brownies! These brownies aren’t just ideal for the holiday; they are a treat to enjoy throughout the year. With a moist, chewy consistency adorned with a zesty cream cheese frosting, they are bound to please anyone who samples them.
## Recipe Ingredients
– **Red Food Coloring**: Essential for imparting that vivid red hue to these brownies.
– **Cocoa Powder**: To achieve that authentic red velvet flavor profile.
– **Decorative Sprinkles**: An optional addition that provides a festive touch and extra texture atop your brownies.
For a comprehensive list of ingredients and their measurements, please see the recipe card below.
## How to Create Red Velvet Brownies
### Step 1:
Prepare a 9×9 inch pan with parchment paper and preheat your oven to 335 degrees Fahrenheit.
### Step 2:
In a stand mixer bowl or a large mixing bowl with an electric mixer, combine the white sugar, brown sugar, and 6 tablespoons of melted butter. Blend until well integrated.
### Step 3:
Next, incorporate the eggs, egg yolk, and 1 teaspoon of vanilla extract. Mix until just blended.
### Step 4:
Then, gently fold in the vegetable oil and cocoa powder into the mixture.
### Step 5:
Pour in the red food gel and whisk until well combined.
### Step 6:
Next, add the flour, cornstarch, and ¼ teaspoon salt. Mix until no lumps remain.
### Step 7:
Then, introduce the vinegar and mix thoroughly.
### Step 8:
Transfer the brownie batter into the prepared baking pan and bake in your oven for 20-25 minutes, or until a toothpick comes out clean.
### Step 9:
Take them out of the oven and let them cool completely before applying the frosting. While the brownies are cooling, prepare the frosting.
### Step 10:
In a medium mixing bowl, beat together the butter and cream cheese until smooth.
### Step 11:
Next, incorporate the powdered sugar until the mixture is light and fluffy.
### Step 12:
Then, add the vanilla and mix until fully integrated.
### Step 13:
Lastly, frost the top of the brownies, sprinkle with toppings, then slice with a sharp knife, serve, and relish!
## FAQs
**What alternative toppings can I use on these homemade red velvet brownies?**
You can opt for white chocolate chips, various types of sprinkles suitable for different celebrations, or even dust some moist brownie crumbs on top.
**Is red gel food coloring mandatory for these red velvet brownies?**
No, gel or liquid food coloring can be used. You can even skip the food coloring altogether if you prefer, but keep in mind that the brownies will not attain a red color.
## Storage Information
You can keep any leftover red velvet brownies in an airtight container at room temperature for 3-4 days. In the refrigerator, they will remain fresh for 5-7 days.
To freeze these brownies, wrap them individually and place them in a freezer-safe bag; they can be stored in your freezer for up to 2 months. To reheat, thaw them to refrigerator temperature and microwave for a few seconds until warm.
Savor these delightful Red Velvet Brownies, perfect for any occasion!
Read More
Recipe for Salmon with Honey Mustard Glaze
## Honey Mustard Salmon: A Tasty and Zesty Treat
This Honey Mustard Salmon dish is a tasty and healthy meal that merges the richness of soft, flaky salmon with a perfectly balanced sweet and tangy glaze. With just a handful of ingredients and a total prep time of only 35 minutes, it makes for an excellent option for an uncomplicated weeknight dinner.
### Reasons I Adore This Honey Mustard Salmon
– **Rapid Preparation**: It requires merely 35 minutes to prepare, making it suitable for hectic weeknights.
– **Basic Ingredients**: The recipe uses common ingredients that you probably already have available in your kitchen.
– **Flexible Serving Ideas**: Serve it as a main course or incorporate it into your preferred salad for a delightful variation.
### Ingredients for the Recipe
– **Honey**: Contributes a lovely sweetness to the sauce.
– **Mustard**: Delivers a robust flavor that amplifies the overall taste of the meal.
### Directions for Preparing Honey Mustard Salmon
**Step 1**: Preheat your oven to 375°F (190°C) and cover a rimmed baking sheet with aluminum foil. Lightly coat the foil with non-stick cooking spray and arrange your salmon fillets on the foil, skin side down if applicable.
**Step 2**: In a small bowl, whisk all the sauce ingredients together until they are thoroughly mixed.
**Step 3**: Spoon half of the honey mustard sauce over the salmon, making sure each piece is evenly coated. Be careful not to let the spoon touch the salmon to reserve some sauce for later use.
**Step 4**: Cover the salmon with another piece of aluminum foil and bake for 15-20 minutes, or until the salmon is nearly cooked through.
**Step 5**: Take the salmon out of the oven, remove the top sheet of foil, and switch your oven to broil on low.
**Step 6**: Drizzle a small amount of the remaining sauce over the salmon and broil uncovered for 3-5 minutes, until it reaches your preferred level of doneness.
**Step 7**: Lastly, pour the remaining sauce over the salmon, garnish with chopped parsley, and serve.
### Frequently Asked Questions
**Can I substitute Dijon mustard for regular mustard in this salmon recipe?**
Absolutely, Dijon mustard is an excellent replacement if you favor its flavor, although regular mustard provides a more intense taste.
**What should I serve with this Honey Mustard Salmon dish?**
This meal pairs beautifully with rice, an arugula salad, or fresh vegetables.
### Storage Guidelines
Keep leftovers in a sealed container in the refrigerator for 2-3 days. For extended storage, freeze the salmon for up to 2 months. To reheat, use the oven at 300°F (150°C) for about 10 minutes or microwave until heated through.
### Nutritional Details (per serving)
– **Calories**: 270
– **Carbohydrates**: 13g
– **Protein**: 31g
– **Fat**: 10g
– **Sodium**: 317mg
– **Potassium**: 786mg
– **Fiber**: 1g
– **Sugar**: 12g
This Honey Mustard Salmon recipe is not only quick and straightforward to make, but it also provides a delightful mix of flavors that will satisfy any taste. Savor this dish as a nourishing meal that is bound to impress!
Read More
Blood Orange Margarita Formula
## Explore This Zesty Blood Orange Margarita Recipe
Refreshing blood orange juice combined with tequila, lime juice, and simple syrup yields a vibrant, colorful cocktail perfect for spring. Blood oranges, known for their distinctive taste and striking deep red hue, add an enjoyable twist to any mixed drink, making this margarita an ideal selection for springtime festivities.
### Why Choose Blood Oranges?
As winter fades into spring, blood oranges become more accessible, offering a richer and creamier flavor compared to standard navel oranges. Their stunning deep red color not only boosts the visual allure of your drink but also introduces an intriguing taste that’s both sweet and tangy.
### Ingredients for the Recipe
– **Blood Oranges**: Fresh blood oranges are ideal, though blood orange juice can serve as an alternative.
– **Fresh Lime Juice**: Contributes a sharp flavor that counterbalances sweetness.
– **Simple Syrup**: Adds a hint of sweetness to the drink.
### Steps to Craft a Blood Orange Margarita
1. **Fill a cocktail shaker with ice.**
2. **Add tequila, lime juice, simple syrup, and blood orange juice.**
3. **Shake energetically for 30 seconds.**
4. **Strain into your preferred cocktail glass filled with ice and savor!**
### Professional Tips
– **Selecting Your Blood Oranges**: The hue of the blood orange can influence both the flavor and quantity of juice produced. Oranges with a more orange hue will result in lighter juice and more yield, while those with darker red skin may yield richer juice but in smaller amounts.
– **Strain Your Blood Orange Juice**: If using fresh blood oranges, strain the juice to eliminate pulp and seeds prior to mixing.
– **Alternative Sweeteners**: If you don’t have simple syrup on hand, agave nectar can serve as a suitable swap.
### Frequently Asked Questions
– **How can I garnish the rim of my cocktail for these Blood Orange Margaritas?**
For these margaritas, coat the rim in kosher salt and place a few blood orange slices on the edge. You can also utilize a wedge of lime or orange.
– **Which tequila is best for making this blood orange margarita?**
Silver tequila is recommended, though reposado or Blanco tequila can be used based on your taste preference.
### Storage Guidelines
Any leftover Blood Orange Margarita can be refrigerated for 2-3 days.
### Additional Cocktail Recipes to Try
If you like this Blood Orange Margarita, check out these other fruit-infused margaritas:
– [Cranberry Margarita](https://thewanderlustkitchen.com/cranberry-margarita/)
– [Pineapple Margarita](https://thewanderlustkitchen.com/pineapple-margarita/)
– [Blueberry Margarita](https://thewanderlustkitchen.com/blueberry-margarita/)
### Nutritional Details
– **Serving Size**: 1 drink
– **Calories**: 253 kcal
– **Carbohydrates**: 32 g
– **Protein**: 1 g
– **Fat**: 0.2 g
– **Sodium**: 18 mg
– **Potassium**: 222 mg
– **Sugar**: 28 g
– **Vitamin C**: 51 mg
Savor this zesty Blood Orange Margarita responsibly and embrace the arrival of spring with this delightful drink!
Read More
Creamy Green One-Pot Pasta Dish
### The Emergence of TikTok Pasta: A Culinary Phenomenon
In recent times, social media platforms have revolutionized how we find and share culinary recipes. A prime example is the trending “TikTok pasta,” which boasts a straightforward yet delightful mix of baked feta cheese and cherry tomatoes, blended into a creamy sauce that perfectly envelops your preferred pasta. This dish has won over numerous hearts (and palates), highlighting the appeal of quick and simple recipes in today’s fast-moving environment.
#### A Touching Culinary Experience
Not long ago, I had the pleasure of observing my daughter, Elsa, whip up this TikTok pasta on her own. It was a moment of pride for me as a parent, seeing her self-assurance in the kitchen. However, it also made me aware of the considerable impact platforms like TikTok have on our children’s cooking abilities, often exceeding our own lessons. The dish turned out to be scrumptious, reinforcing the notion that straightforward recipes can unite families.
#### The Allure of Fast and Simple Pasta Dishes
The charm of quick pasta dishes is unmistakable. They cater to hectic lives while still providing taste and satisfaction. Motivated by this trend, I’ve created a swift and creamy pasta recipe that includes kale—ideal for lunch, especially when trying to incorporate some greens.
#### Creamy Kale Pasta Recipe
This recipe can be made in under 15 minutes and requires few ingredients and minimal equipment. Here’s how to prepare it:
**Ingredients:**
– Bucatini pasta (or your preferred type of pasta)
– Fresh kale
– Olive oil
– Garlic
– Parmesan cheese
– Salt and pepper
– Optional: nuts (such as walnuts or pine nuts) for extra texture
**Instructions:**
1. **Cook the Pasta:** In a large pot of boiling salted water, add the bucatini pasta. After a minute, introduce the kale into the pot to wilt it.
2. **Blend the Sauce:** Set aside a cup of pasta water, then drain the pasta and kale. In a blender, mix the kale, a splash of olive oil, garlic, Parmesan cheese, and a little of the reserved pasta water. Blend until it reaches a smooth and creamy consistency.
3. **Combine:** Mix the pasta with half of the sauce, making sure it’s thoroughly coated. Serve the remaining sauce at the base of the plates for an appealing presentation.
4. **Garnish:** Finish with extra Parmesan, nuts, or a drizzle of olive oil if you wish.
This approach, inspired by Jamie Oliver’s 5-ingredient cookbook, has been modified to create a heartier meal. The addition of bucatini offers a distinctive touch, as its tubular shape allows it to beautifully capture the sauce.
#### Join the Cookalong!
I’ll be conducting a Lunch Therapy cookalong on Instagram Stories on Wednesday, March 3, around noon CET. Collect your ingredients and join me for an enjoyable cooking experience! Remember to post your versions on Instagram and tag me @gkstories. I’ll showcase your photos in a future update of this post.
#### Conclusion
The TikTok pasta craze underscores the joy of cooking and the simplicity of crafting delightful meals. Whether you’re a seasoned cook or a beginner in the kitchen, quick and easy recipes like this creamy kale pasta can spark creativity and bring families together at the dining table. Embrace the culinary trends and relish the joy of cooking with those you love!
Read More
Orange, Date, and Avocado Salad Recipe for Ample Affection April
### Celebrating Citrus: A Spring Salad Recipe
As winter wanes and spring arrives, citrus fruits stand out as a lively and tasty choice for salads. This article presents an exquisite citrus salad recipe that merges the zest of seasonally available fruits with rich textures and flavors, ideal for your Easter holiday celebrations.
#### Ingredients
– Varied citrus fruits (oranges, grapefruits, mandarins)
– Bitter greens (arugula, radicchio, or frisée)
– Smooth avocado
– Baked feta cheese
– Crisp hazelnuts
– Sweet dates
– Extra virgin olive oil
– Fresh bread (for soaking up juices)
– Salt and pepper to taste
#### Instructions
1. **Prepare the Citrus**: Peel and segment the citrus fruits, discarding any seeds. Arrange them in a large salad bowl.
2. **Add the Greens**: Rinse and dry your selected bitter greens. Tear them into bite-sized pieces and incorporate them into the bowl with the citrus.
3. **Incorporate the Creamy Elements**: Slice the avocado and crumble the baked feta cheese over the salad.
4. **Add Crunch and Sweetness**: Coarsely chop the hazelnuts and dates, then scatter them atop the salad.
5. **Dress the Salad**: Drizzle with extra virgin olive oil and season with salt and pepper to taste. Toss gently to blend all ingredients.
6. **Serve**: Present the salad immediately with slices of fresh bread on the side to absorb the delicious juices.
#### Why Citrus?
Citrus fruits are not only invigorating but also rich in vitamins and antioxidants. Their bright flavors enhance the bitterness of greens and the creaminess of avocado, crafting a balanced dish that is both healthy and pleasurable.
#### Conclusion
This citrus salad is a tribute to spring flavors, excellent for Easter or any gathering. Its simplicity permits the ingredients to shine, making it a delightful addition to your holiday feast. Relish the vibrant flavors of citrus while they are in season!
Read More