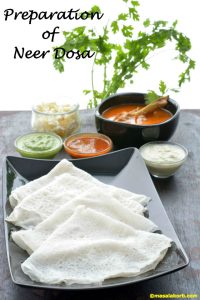
How to Prepare Neer Dosa: A Detailed Guide
### Mangalore Style Chicken Curry with Neer Dosa Recipe
Neer Dosa is an authentic dish from Karnataka, India, celebrated for its airy, lacy texture and ease of preparation. The word “Neer” means “water” in Kannada and Tulu, indicative of the liquid-like consistency of the batter used to create these delicate crepes. This recipe combines Neer Dosa with Mangalore-style Chicken Curry, resulting in a wonderful meal that highlights the tastes of coastal Karnataka.
#### Ingredients
**For Neer Dosa:**
– 1 cup rice (ideally soaked for 4-6 hours)
– Water (as required)
– Salt (to preference)
– Oil or ghee (for frying)
**For Mangalore Chicken Curry:**
– 500 grams chicken, cut into pieces
– 2 tablespoons oil
– 1 large onion, finely chopped
– 2 tomatoes, diced
– 1 tablespoon ginger-garlic paste
– 2-3 green chilies, slit
– 1 teaspoon turmeric powder
– 2 teaspoons red chili powder
– 2 teaspoons coriander powder
– 1 teaspoon garam masala
– Salt (to preference)
– Fresh coriander leaves (for garnish)
– 1 cup coconut milk (optional)
#### Instructions
**Making Neer Dosa:**
1. **Soak the Rice:** Wash the rice well and soak it in water for 4-6 hours. Drain the excess water.
2. **Prepare the Batter:** Blend the soaked rice with sufficient water to create a smooth, flowing batter. The consistency should be akin to buttermilk. Add salt to your preference.
3. **Cook the Dosa:** Preheat a non-stick pan or tava over medium heat. Lightly grease with oil or ghee. Pour a ladle of the batter onto the pan, swirling to create an even layer. Cook for about 1-2 minutes until the edges lift and the dosa is cooked through. Repeat with the leftover batter.
**Making Mangalore Chicken Curry:**
1. **Heat Oil:** In a large skillet, heat oil over medium heat. Add the chopped onions and sauté until they attain a golden color.
2. **Incorporate Aromatics:** Add the ginger-garlic paste and green chilies, cooking for an additional minute until fragrant.
3. **Add Tomatoes:** Incorporate the diced tomatoes and cook until they soften.
4. **Spice It Up:** Stir in the turmeric powder, red chili powder, coriander powder, and salt. Cook for a few minutes to meld the spices.
5. **Incorporate Chicken:** Add the chicken pieces, stirring to coat them in the spice blend. Cook for about 5-7 minutes until the chicken is browned.
6. **Simmer:** Add coconut milk (if using) and, if necessary, a little water. Cover and simmer for 15-20 minutes, until the chicken is tender and cooked through. Sprinkle garam masala before serving.
#### Serving Suggestions
Serve the Neer Dosa warm alongside a generous helping of Mangalore Chicken Curry. Garnish with fresh coriander leaves for enhanced flavor. Neer Dosa can also be complemented with various sides such as spicy tomato chutney, coconut chutney, or even a sweet blend of jaggery and coconut.
#### Tips for Flawless Neer Dosa
– Ensure the batter has the correct consistency; it should be thin and liquid.
– Utilize a non-stick pan to avoid sticking.
– Cook on medium heat to prevent the dosa from burning.
Neer Dosa paired with Mangalore Chicken Curry is an exquisite combination that showcases the deep culinary heritage of Karnataka. Savor this flavorful dish for breakfast, lunch, or dinner!
Read More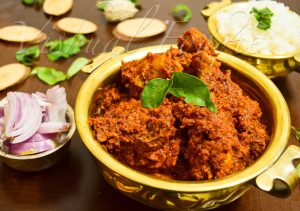
Mangalorean Chicken Curry Recipe
### Mangalorean Chicken Curry with Coconut – Kori Gassi
Mangalorean chicken curry, referred to locally as Kori Gassi, is a beloved dish within the Tulu-speaking Bunt community of coastal Karnataka, India. This dish is acclaimed for its deep and intense flavors, establishing it as a mainstay in Mangalorean cuisine. The making of Kori Gassi incorporates a variety of spices and coconut, which is a fundamental ingredient giving the dish its distinct flavor.
#### Ingredients
The list of ingredients for Kori Gassi might appear considerable, yet each item is vital in forming the dish’s signature flavor profile. The key ingredients consist of:
– Chicken (ideally bone-in for enhanced flavor)
– Fresh coconut, grated
– Dried red chilies
– Black peppercorns
– Coriander seeds
– Cumin seeds
– Fenugreek seeds
– Cloves
– Cinnamon
– Onions
– Ginger
– Garlic
– Tamarind (for tartness)
– Salt
– Oil (ideally coconut oil)
#### Flavor Profile
Kori Gassi is noted for its spicy and fragrant gravy. The inclusion of hot red chilies adds heat, while the coconut’s sweetness offsets the spice, resulting in a balanced blend of flavors. The combination of spices like black pepper, coriander, and cumin enriches the curry’s complexity, making it a comforting dish that is sure to please.
#### Preparation
The process of preparing Kori Gassi consists of several steps:
1. **Roasting Spices**: The dried red chilies, black peppercorns, coriander seeds, cumin seeds, fenugreek seeds, cloves, and cinnamon are lightly toasted to bring out their essential oils and flavors.
2. **Making the Masala**: The roasted spices are ground into a fine paste together with grated coconut, ginger, and garlic, producing a rich masala that serves as the foundation of the curry.
3. **Cooking the Chicken**: In a pot, onions are sautéed until they turn golden brown, followed by adding the chicken pieces. The masala paste is incorporated, along with water to reach the desired thickness. Tamarind is added for a zesty flavor, and the mixture is simmered until the chicken is tender and thoroughly cooked.
4. **Serving**: Kori Gassi is traditionally enjoyed hot alongside accompaniments such as pundi (rice balls), rotti, neer dosa, or steamed rice, creating a well-rounded meal.
#### Conclusion
Mangalorean chicken curry, known as Kori Gassi, is more than merely a dish; it embodies the rich culinary heritage of Mangalore. Its intricate flavors and comforting qualities make it a favorite for many. Whether you are well-acquainted with Mangalorean cuisine or sampling it for the first time, Kori Gassi offers a delightful experience that encapsulates the spirit of coastal Indian cooking.
Read More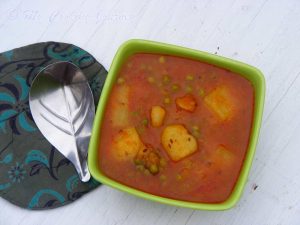
Banarasi-Style Potato and Pea Curry
### Banarasi Aloo Matar Sabji: A Straightforward Yet Tasty Recipe
Banarasi Aloo Matar Sabji is a charming and homestyle meal that highlights the ease and depth of Indian culinary tradition. This vegan potato curry is not only simple to make but also bursting with flavors, making it a beloved choice in numerous homes.
#### Ingredients
The allure of Banarasi Aloo Matar is found in its straightforward ingredients. To create this dish, you will require:
– Potatoes (Aloo)
– Green peas (Matar)
– Tomatoes (blanched and pureed)
– Cumin seeds
– Turmeric powder
– Red chili powder
– Water (for the sauce)
– Salt (to taste)
– Oil (for frying)
#### Preparation Method
1. **Blanch and Puree Tomatoes**: Begin by blanching the tomatoes in boiling water for a few minutes. Once tender, peel and puree them into a smooth blend.
2. **Sauté the Spices**: Heat oil in a skillet and add cumin seeds. Allow them to splutter, releasing their fragrant aroma.
3. **Incorporate Tomato Puree**: Add the pureed tomato and cook until the oil starts to separate from the mixture. This step intensifies the dish’s flavor.
4. **Mix in Spices**: Sprinkle in turmeric powder and red chili powder to the tomato blend. Stir well to combine.
5. **Add Potatoes and Peas**: Toss in diced potatoes and green peas into the skillet. Combine everything thoroughly.
6. **Pour in Water**: Based on your desired gravy thickness, add water. For a thinner sauce, add more water; for a thicker one, use less.
7. **Simmer**: Cover the skillet and let the mixture simmer until the potatoes are fully cooked and soft.
8. **Season**: Sprinkle salt to taste and stir one last time.
#### Serving Suggestions
Banarasi Aloo Matar Sabji is best enjoyed hot with Indian flatbreads like Masala Paratha or even with steamed rice. The union of the flavorful curry with the crispy parathas creates a warm and gratifying dish.
#### Conclusion
This straightforward yet delectable Banarasi Aloo Matar Sabji exemplifies the notion that simplicity can be enriching in cooking. With just a handful of ingredients, you can prepare a meal that is comforting and rich in flavor. Whether you are an experienced chef or new to cooking, this recipe is destined to become a favorite in your kitchen. Savor the warmth and richness of this classic Indian dish!
Read More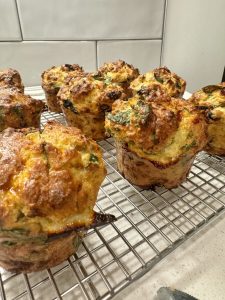
Savory Muffin Formulas
### Savory Muffins – Quick and Simple Breakfast Ideas for Kids
Savory muffins serve as a tasty and healthy choice for breakfast or snacks, particularly appealing to kids. They are easy to make, adaptable, and can be filled with various ingredients to suit different preferences. This article presents a straightforward savory muffin recipe that is bound to become a hit in your home.
#### Why Opt for Savory Muffins?
Savory muffins stand out as a fantastic substitute for sweet muffins, offering a well-rounded meal that may contain vegetables, proteins, and whole grains. They are ideal for hectic mornings, school snacks, or even outdoor gatherings. Their convenience makes them an ideal selection for parents aiming to provide nutritious options for their children.
#### Fundamental Recipe for Savory Muffins
**Ingredients:**
– 1/2 cup all-purpose flour
– 1/2 cup whole grain flour
– 1/4 cup ground oats
– 1 cup corn kernels (fresh or frozen)
– 1/2 cup green peas (optional)
– 2 tablespoons green chili paste (or to taste)
– 1/4 cup chopped cilantro
– 1 cup shredded cheese (cheddar or your preference)
– 1 teaspoon baking powder
– Salt to taste
– 1 cup milk
– 1/4 cup oil or melted butter
– 2 eggs
**Instructions:**
1. Preheat your oven to 375°F (190°C) and prepare a muffin tray with paper liners or light greasing.
2. In a large mixing bowl, blend the all-purpose flour, whole grain flour, ground oats, baking powder, and salt.
3. In a separate bowl, beat together the milk, oil, and eggs until fully mixed.
4. Combine the wet mixture with the dry ingredients and stir until just blended.
5. Gently mix in the corn, green peas, green chili paste, cilantro, and shredded cheese.
6. Distribute the batter into the muffin tray, filling each cup about two-thirds of the way.
7. Bake for 20-25 minutes or until the muffins turn golden brown and a toothpick inserted in the center comes out clean.
8. Let the muffins cool slightly before serving.
#### Variations to Experiment With
The charm of savory muffins lies in their adaptability. Here are several variations you might consider:
– **Spinach & Corn:** Incorporate fresh spinach into the batter for added nutrition.
– **Roasted Bell Peppers & Corn:** Mix in roasted bell peppers for a sweet and smoky taste.
– **Sausages & Eggs:** Fold in cooked sausage chunks and scrambled eggs for a more filling muffin.
#### Conclusion
Savory muffins provide an excellent method to incorporate a range of flavors and nutrients into your child’s meals. They are quick to whip up, customizable, and suitable for any time throughout the day. Using this basic recipe and suggested variations, you can whip up delicious muffins that your kids will adore, making breakfast hassle-free. Enjoy the baking process and try out different ingredients to discover your family’s favorite blends!
Read More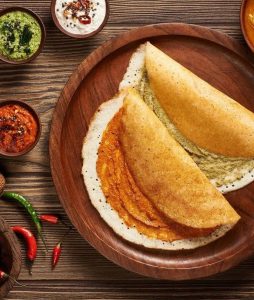
Coconut Sevai: A Classic South Indian Rice Noodle Recipe Infused with Coconut Tastes
### Coconut Sevai (Thengai Idiyappam) – Simple Tiffin Recipes
Coconut Sevai, or Thengai Idiyappam, is a charming South Indian breakfast or tiffin meal that showcases both ease and taste. This dish utilizes sevai, which are rice noodles or string hoppers, and can be swiftly made with either homemade or commercially available sevai.
#### What is Idiyappam?
Idiyappam is a classic South Indian recipe created from rice flour dough that is pressed through an idiyappam maker or chakli press and subsequently steamed. The outcome is fine, slender strands of rice noodles that act as the foundation for various flavored sevai preparations.
#### Making Coconut Sevai
To make Coconut Sevai, gather the following ingredients:
– Cooked sevai (idiyappam)
– Freshly grated coconut
– Roasted cashew nuts
– Salt to taste
– Optional: Green chilies, curry leaves, and mustard seeds for tempering
**Instructions:**
1. **Cook the Sevai:** For store-bought sevai, adhere to the cooking instructions on the package. If preparing from scratch, use an idiyappam maker to create the idiyappam.
2. **Prepare the Coconut Mixture:** In a mixing bowl, blend the cooked sevai with freshly grated coconut. Modify the amount of coconut according to your desired taste and texture.
3. **Tempering (Optional):** In a small skillet, warm a bit of oil, add mustard seeds, and allow them to splutter. Introduce green chilies and curry leaves, sautéing for one minute. Drizzle this tempering over the coconut sevai mixture.
4. **Add Cashews:** Incorporate roasted cashew nuts for extra crunch and flavor.
5. **Mix and Serve:** Carefully combine all the ingredients, ensuring the coconut is well distributed. Serve warm as a light tiffin or breakfast dish.
#### Varieties of Sevai
Coconut Sevai is merely one of the many varieties of sevai that can be created. Other popular options include:
– **Lemon Sevai:** Enhanced with lemon juice and zest for a zesty flair.
– **Tomato Sevai:** Prepared with sautéed tomatoes and spices for a savory alternative.
– **Milagu Sevai:** With black pepper for a spicy punch.
– **Vegetable Sevai:** Combined with various vegetables for a healthy meal.
– **Puli Sevai:** Incorporates tamarind for a sweet and tangy taste.
Coconut Sevai is distinguished by its lightness and rich flavor, making it a preferred choice among simple tiffin recipes. The inclusion of roasted cashew nuts elevates its flavor and texture, making it a treasure in South Indian cuisine. Savor this delightful dish as a quick breakfast or a fulfilling snack at any time of the day.
Read More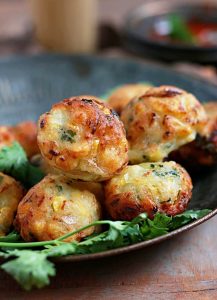
Corn Fritters Recipe
### Corn Pakoda: Treats with Sweet Corn
Corn Pakoda, often referred to as corn fritters, is a delightful treat that goes hand in hand with a cup of tea or coffee, especially on rainy days. This dish is particularly loved for its crunchy texture and the inherent sweetness of corn, making it a favorite among snack enthusiasts.
#### Ingredients
The charm of Corn Pakoda is in its simplicity. The main ingredient is corn, ideally from the desi (Indian) variety, although sweet corn can also be utilized. Here’s a fundamental list of ingredients you will require:
– Fresh corn kernels (grated or coarsely ground)
– Besan (gram flour)
– Spices (including cumin, chili powder, and salt)
– Fresh herbs (such as coriander or mint)
– Water (as needed for the batter)
– Oil (for deep frying)
#### Preparation
1. **Prepare the Corn**: If using fresh corn, grate the kernels or cut them from the cob and coarsely grind them. This process helps release the natural sweetness and moisture, which is vital for the pakodas.
2. **Make the Batter**: In a mixing bowl, mix the grated corn with besan and spices. Adjust the taste according to your preference. Gradually add water to create a thick batter that binds the corn together.
3. **Heat the Oil**: In a deep frying pan, warm up the oil over medium heat. To test if the oil is ready, drop a small amount of batter into the oil; if it sizzles and floats to the top, the oil is hot enough.
4. **Fry the Pakodas**: Gently drop spoonfuls of the corn batter into the hot oil. Fry in small batches, ensuring not to crowd the pan. Cook until the pakodas are golden brown and crispy all around.
5. **Drain and Serve**: After cooking, take the pakodas out of the oil and place them on paper towels to absorb excess oil. Serve hot with green chutney or ketchup.
#### Enjoying Corn Pakoda
Corn Pakoda is best relished fresh and warm. The crunchy outside and soft, sweet inside make it an ideal snack for rainy days or as an appetizer for gatherings. Pair it with a hot cup of masala chai to enhance the experience.
#### Conclusion
Corn Pakoda is a straightforward yet tasty snack that showcases the natural sweetness of corn. With minimal ingredients and simple preparation, it’s a perfect option for anyone wanting to create a quick and satisfying treat. Whether enjoyed alone or shared with friends, this snack is sure to offer comfort and happiness.
Read More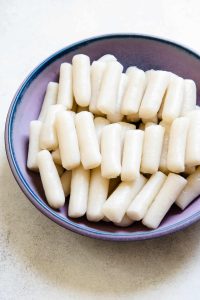
How to Prepare Rice Flour at Home: A Comprehensive Step-by-Step Guide
### Rice Flour – How to Create Rice Flour at Home to Make Snacks
Rice flour, referred to as biyyam pindi in Telugu, serves as a fundamental component in South Indian households. This gluten-free flour is adaptable and is utilized to make a variety of snacks (pindi vantalu) such as murukku, jantikalu, and palakayalu, along with prasadam (offerings to God) like kudumulu, undrallu, appalu, and ammini kozhukottai. Crafting rice flour at home is an uncomplicated task that demands a little effort but results in fresh and tasty flour for your cooking requirements.
#### Ingredients and Preparation
To prepare rice flour at home, you will require:
– Raw white rice (like sona masuri)
– Water for soaking
#### Step-by-Step Process
1. **Soaking the Rice**: Begin by soaking the rice in water for at least one hour. For optimal results, soak the rice for 2 to 3 hours. This soaking method aids in producing a softer flour.
2. **Draining and Drying**: Once soaked, drain the rice and lay it out on a cotton cloth over a newspaper. Let the rice dry in the shade until it is nearly dry but still holds a little moisture. This step is vital as it stops the flour from becoming overly sticky during grinding.
3. **Grinding the Rice**: After the rice has dried sufficiently, place it into a mixer grinder. Grind the rice into a fine powder. Depending on the amount, this may need to be done in batches.
4. **Sieving the Flour**: After grinding, sift the flour to differentiate the fine rice flour from any larger particles. The leftover, known as rice rava, can be ground further for a smoother texture or utilized in recipes that require coarsely ground rice.
5. **Storing the Flour**: Keep the freshly made rice flour in an airtight container to preserve its freshness. It can be utilized right away or stored for future use.
#### Tips for Making Rice Flour
– **Quality of Rice**: Opt for high-quality raw white rice for optimal outcomes. Sona masuri is a favored selection.
– **Batch Size**: While you can create small batches at home, for larger quantities (over 1 kg), consider taking the soaked and dried rice to a nearby flour mill for grinding.
– **Usage**: Freshly prepared rice flour can be integrated into a wide range of recipes, enhancing the flavor and texture of your snacks and prasadam.
#### Conclusion
Producing rice flour at home is a gratifying endeavor that enables you to create authentic South Indian snacks and offerings. With just a few straightforward steps, you can generate a fresh and flavorful ingredient that enhances your cooking. Whether for special occasions or daily meals, homemade rice flour is a crucial addition to your kitchen.
Read More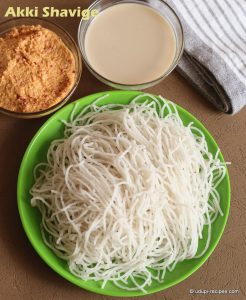
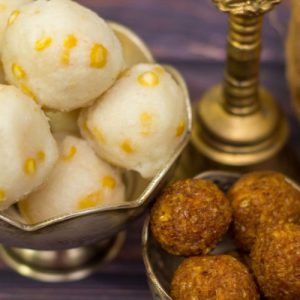
Recipe for Bellam Undrallu: A Classic Vinayaka Chavithi Offering
### Bellam Undrallu Recipe with Rice Flour or Rice Rava – Vinayaka Chavithi Prasadam Recipe
Vinayaka Chavithi, commonly referred to as Ganesh Chaturthi, is an important festival in India that commemorates the birth of Lord Ganesha. A traditional offering during this festive occasion is Bellam Undrallu, a delectable sweet dish made with either rice flour or rice rava combined with jaggery. This dish is not only tasty but also carries cultural importance as it is believed to be a favorite of Lord Ganesha.
#### Ingredients:
– **Rice Rava (Coarsely milled rice)** or **Rice Flour**: 1 cup
– **Jaggery**: 1 cup (can be replaced with sugar)
– **Moong Dal**: 1/4 cup
– **Water**: As required
– **Cardamom Powder**: 1/2 tsp (optional)
– **Ghee**: For greasing
#### Preparation Steps:
1. **Cook Moong Dal**:
– Wash the moong dal well and cook it in water until tender. Drain and set aside.
2. **Prepare Jaggery Syrup**:
– In a pan, combine jaggery with a small amount of water. Heat until the jaggery is fully dissolved. Strain if necessary to eliminate impurities.
3. **Combine Ingredients**:
– In another bowl, blend together the rice rava or rice flour with the cooked moong dal. Slowly mix in the jaggery syrup, stirring continuously to prevent lumps.
4. **Cook the Mixture**:
– Return the mixture to low heat and cook until it thickens and forms a sticky consistency. Keep stirring to avoid it sticking to the pan.
5. **Shape the Undrallu**:
– When the mixture is cool enough to handle, grease your hands with ghee and form the mixture into small balls (undrallu).
6. **Steam the Undrallu**:
– Place the formed undrallu in a steamer and steam for approximately 10-15 minutes until thoroughly cooked.
7. **Offer to Lord Ganesha**:
– After steaming, let them cool slightly before presenting them as naivedhyam (offering) to Lord Ganesha.
#### Serving Suggestions:
Bellam Undrallu can be enjoyed warm or at room temperature. They are typically savored as a sweet delicacy during the festival and can be kept for several days.
#### Conclusion:
Bellam Undrallu is a beloved prasadam during Vinayaka Chavithi, representing devotion and sweetness. The mix of rice, moong dal, and jaggery not only makes it a wholesome offering but also a delightful treat that enhances the celebration. Enjoy preparing this traditional recipe and reveling in the essence of Ganesh Chaturthi!
Recipes for Vinayaka Chavithi Bellam Kudumulu
### Bellam Kudumulu – Vinayaka Chavithi Recipes Andhra
Bellam Kudumulu, referred to as Teepi Kudumulu, is a beloved traditional dessert from Andhra Pradesh, typically made for the Vinayaka Chavithi festival, which honors Lord Ganesha. This scrumptious delicacy is primarily crafted from rice flour, jaggery, coconut, and cardamom, creating a sticky blend that is both tasty and fragrant.
#### Ingredients and Preparation
The essential ingredients for Bellam Kudumulu consist of:
– **Rice Flour**: The foundation of the dish, giving it form.
– **Jaggery**: Contributes sweetness and a deep flavor.
– **Coconut**: Improves the texture and taste.
– **Cardamom**: Adds a delightful aroma.
To make Bellam Kudumulu, the rice flour is boiled with jaggery and coconut until it turns into a sticky dough. This dough is then kneaded and formed into flat rounds. The rounds are steamed, yielding a soft, chewy consistency that is gently sweet and aromatic thanks to the cardamom.
For a flavorful variation, a handful of soaked chana dal can be stirred into the boiling water prior to adding the rice flour. This enhancement lends an earthy taste, making the dish even more delightful. Bellam Kudumulu serves as not only a festive treat but also a wholesome snack for both children and adults.
#### Serving Suggestions
The steamed dumplings are best savored warm and can be offered as prasadam (blessing) during Ganesh pooja. Their irresistible quality makes them an ideal evening snack, pairing perfectly with tea or coffee.
#### Related Recipes
For those wishing to diversify their festive spread, here are some additional Andhra-style recipes appropriate for Vinayaka Chavithi:
– [Undrallu](https://www.sailusfood.com/2009/08/24/uppu-kudumulu-undrallu/)
– [Bellam Undrallu](https://www.sailusfood.com/2014/08/27/bellam-undrallu-vinayaka-chavithi/)
– [Paala Undrallu](https://www.sailusfood.com/2006/08/27/paala-undrallu-kudumulu-vinayaka-chavathi-naivedyam/)
– [Kudumulu](https://www.sailusfood.com/2006/08/27/paala-undrallu-kudumulu-vinayaka-chavathi-naivedyam/)
– [Uppu Kudumulu](https://www.sailusfood.com/2009/08/24/uppu-kudumulu-undrallu/)
– [Pulihora](https://www.sailusfood.com/2008/10/30/pulihora-andhra-tamarind-rice/)
– [Payasam](https://www.sailusfood.com/2008/10/28/diwali-sweets-badam-halwa-bobbatlu-annam-payasam/)
– [Appalu](https://www.sailusfood.com/2012/09/18/appalu-andhra-sweet-recipe/)
– [Garelu (Vada)](https://www.sailusfood.com/2011/09/29/navratri-special-vada/)
Bellam Kudumulu is a wonderful expression of Andhra cuisine, reflecting the essence of celebration and reverence during Vinayaka Chavithi. Enjoy preparing and sharing this sweet delight with family and friends!
Read More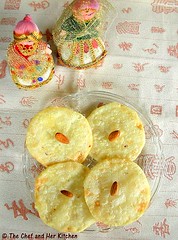
Pappulo Undrallu Recipe for Celebrating Ganesh Chaturthi
# Pappulo Undrallu Recipe – Special for Ganesh Chaturthi
Ganesh Chaturthi is observed with immense zeal throughout India, with each locality presenting its distinct festive foods. One such traditional recipe from Andhra Pradesh is Pappulo Undrallu, a delightful dish primarily made using rice flour. This dish plays a significant role in the Vinayaka Chavithi festivities, during which various offerings are rendered to Lord Ganesh.
## Ingredients
– **For Undrallu:**
– 2 cups rice flour
– Water (as required)
– A pinch of salt
– **For the Moong Dal Mixture:**
– 1 cup yellow moong dal
– 1 cup jaggery (grated)
– 1 cup fresh grated coconut
– 1 teaspoon cardamom powder
– 2 cups water
## Preparation Steps
### Step 1: Prepare the Undrallu
1. **Make the Dough:** In a bowl, combine rice flour with a pinch of salt. Gradually incorporate water and knead to achieve a smooth, soft dough.
2. **Shape the Balls:** Portion the dough and roll it into small balls (about the size of a marble).
3. **Steam the Balls:** Place the balls in a steamer and steam for about 10-15 minutes until fully cooked. Set aside.
### Step 2: Prepare the Moong Dal Mixture
1. **Cook the Moong Dal:** Wash the moong dal and cook it in 2 cups of water until it becomes soft but not mushy. Drain any extra water.
2. **Combine Ingredients:** In a pan, add the cooked moong dal, grated jaggery, and fresh grated coconut. Cook on low heat until the jaggery melts and blends well with the dal.
3. **Add Flavor:** Mix in the cardamom powder and stir well.
### Step 3: Combine and Serve
1. **Mix Undrallu with Moong Dal Mixture:** Carefully fold the steamed undrallu into the moong dal mixture, making sure they are well-coated.
2. **Serve Warm:** Pappulo Undrallu can be enjoyed warm as a sweet offering to Lord Ganesh during the celebrations.
## Unique Flavors
Pappulo Undrallu stands out for its earthy and sweet taste, enriched by the freshness of coconut and the fragrant cardamom. This dish not only pleases the palate but also carries cultural importance during Ganesh Chaturthi.
## Other Andhra Style Recipes for Ganesh Chaturthi
In addition to Pappulo Undrallu, you might want to prepare these other traditional dishes for your Ganesh pooja:
– [Undrallu](https://www.sailusfood.com/2009/08/24/uppu-kudumulu-undrallu/)
– [Ammini Kozhukottai](https://www.sailusfood.com/2013/09/07/ammini-kozhukattai-vinayaka-chavithi/)
– [Bellam Undrallu](https://www.sailusfood.com/2014/08/27/bellam-undrallu-vinayaka-chavithi/)
– [Paala Undrallu](https://www.sailusfood.com/2006/08/27/paala-undrallu-kudumulu-vinayaka-chavathi-naivedyam/)
– [Kudumulu](https://www.sailusfood.com/2006/08/27/paala-undrallu-kudumulu-vinayaka-chavathi-naivedyam/)
– [Uppu Kudumulu](https://www.sailusfood.com/2009/08/24/uppu-kudumulu-undrallu/)
– [Bellam Kudumulu](https://www.sailusfood.com/2014/08/27/bellam-kudumulu-vinayaka-chavithi/)
– [Pulihora](https://www.sailusfood.com/2008/10/30/pulihora-andhra-tamarind-rice/)
– [Payasam](https://www.sailusfood.com/2008/10/28/diwali-sweets-badam-halwa-bobbatlu-annam-payasam/)
– [Appalu](https://www.sailusfood.com/2012/09/18/appalu-andhra-sweet-recipe/)
– [Garelu (Vada)](https://www.sailusfood.com/2011/09/29/navratri-special-vada/)
Pappulo Undrallu is essential for anyone wishing to celebrate Ganesh Chaturthi with genuine Andhra tastes. Relish the celebrations and the delectable offerings!
Read More