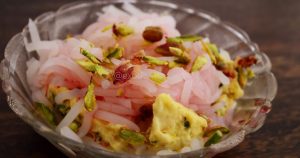
Recipe for Falooda Kulfi
### Kulfi Falooda Recipe: A Dessert in Indian Street Food Style
Kulfi falooda is a scrumptious and cooling Indian dessert that captures the spirit of summer beautifully. Celebrated for its indulgent flavors and smooth texture, this treat merges traditional kulfi, a form of Indian ice cream, with falooda, a sweet noodle-like delicacy. Here’s how to create this scrumptious dessert right at home.
#### Ingredients
**For Kulfi:**
– 1 liter full-cream milk
– 1 cup sugar (to taste)
– 1/2 cup heavy whipping cream
– 1/4 cup khoya (optional)
– 1/2 teaspoon cardamom powder
– 1/4 cup chopped nuts (almonds, pistachios)
– A few strands of saffron (optional)
**For Falooda:**
– 1/2 cup falooda sev (thin noodles from starch)
– 2 tablespoons sweet basil seeds (sabja)
– 2 cups water
– 1/4 cup rose syrup
– 1/4 cup khus syrup (optional)
**For Garnishing:**
– Chopped nuts
– Fresh fruits (mango, banana, etc.)
– Jelly (optional)
#### Instructions
**Step 1: Make the Kulfi**
1. In a heavy-bottomed pot, bring the full-cream milk to a boil. Lower the heat and simmer until the milk reduces to approximately half its original volume, stirring occasionally.
2. Incorporate sugar, heavy whipping cream, khoya (if using), cardamom powder, and saffron. Mix thoroughly and cook for an additional 5-10 minutes.
3. Take off the heat and allow it to cool. Once cooled, mix in the chopped nuts.
4. Distribute the mixture into kulfi molds or any small containers. Freeze for at least 6-8 hours or until entirely set.
**Step 2: Make the Falooda**
1. Boil water in a pot and add falooda sev. Cook as per the package instructions until tender. Drain and rinse under cold water to halt the cooking.
2. In a different bowl, soak sweet basil seeds in water for about 30 minutes until they bloat. Drain any excess water.
**Step 3: Construct the Kulfi Falooda**
1. In serving glasses, place a layer of cooked falooda sev at the bottom.
2. Add a layer of the soaked basil seeds.
3. Drizzle rose syrup and khus syrup over the layers.
4. Gently place a scoop of kulfi on top of the layered ingredients.
5. Decorate with chopped nuts, fresh fruits, and jelly if preferred.
#### Serving Suggestions
Serve kulfi falooda right after assembling for the finest experience. This dessert is ideal for warm summer days and is guaranteed to dazzle your family and friends with its vivid colors and exquisite flavors.
#### Tips
– For a faster alternative, you can use store-bought kulfi and falooda sev to save time.
– You can personalize your kulfi falooda by adding various fruits or flavors to match your preferences.
Relish this exquisite Indian street food-style dessert that is not only a delight for the palate but also a visual treat!
Read More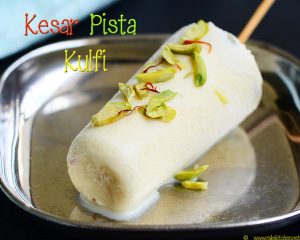
Recipe for Kesar Pista Kulfi
### Kesar Pista Kulfi Recipe: A Chilled Indian Delight Ideal for Cooling Down
Kesar pista kulfi is a charming Indian frozen delicacy that provides a cool reprieve from the heat. This luscious, creamy dessert is a variation of classic kulfi, commonly known as Indian ice cream, and is particularly favored in the hotter months. The fusion of saffron (kesar), cardamom, and pistachios delivers a distinctive flavor that is both fragrant and decadent.
#### Ingredients
– **Full-fat milk**: 1 liter
– **Malai (fresh cream)**: 1 cup
– **Saffron strands**: 1 teaspoon
– **Cardamom powder**: 1 teaspoon
– **Chopped unsalted pistachios**: ½ cup
– **Cornflour**: 2 tablespoons
– **Sugar**: ¾ cup (adjust as desired)
– **Rose syrup** (optional, for garnish)
#### Instructions
1. **Prepare the Milk**: In a sturdy pan, bring the full-fat milk to a boil. Once boiling, lower the heat and let it simmer. Stir now and then to avoid it sticking to the bottom. Cook until the milk is reduced to roughly half.
2. **Add Cornflour**: In a small bowl, combine the cornflour with a few tablespoons of cold milk to form a smooth paste. Once the milk has thickened, add this paste to the simmering milk while stirring constantly. This aids in achieving a creamy consistency and prevents clumping.
3. **Incorporate Flavors**: Stir in the saffron strands, cardamom powder, and sugar into the thickened milk. Mix well until the sugar is fully dissolved. Continue cooking for a few additional minutes to allow the flavors to meld.
4. **Add Cream and Nuts**: Take the pan off the heat and let it cool slightly. Mix in the malai (fresh cream) and chopped pistachios, stirring well to blend.
5. **Set the Kulfi**: Transfer the mixture into kulfi molds, stainless steel katori, or terracotta pots. Cover with lids or plastic wrap. Place in the freezer and allow to set for at least 6-8 hours or until fully frozen.
6. **Serve**: To serve, run the kulfi molds under warm water for a few seconds to loosen the kulfi. Serve drizzled with rose syrup and topped with extra chopped pistachios for added flair.
#### Tips for Perfect Kulfi
– **Quality Ingredients**: Opt for high-quality saffron and fresh unsalted pistachios for optimal flavor.
– **Avoid Shortcuts**: While using milk powder or condensed milk may seem easier, slow-cooking full-fat milk provides a richer and more authentic taste.
– **Low-Fat Option**: For a lighter alternative, replace full-fat milk with skimmed milk while retaining the cornflour to keep the creamy texture.
Kesar pista kulfi transcends being merely a dessert; it’s a nostalgic reminiscence of relishing this treat from street vendors in lively markets. With its deep flavors and silky texture, this kulfi is sure to impress at any gathering or simply serve as a personal treat on warm days. Have fun creating and enjoying this traditional Indian masterpiece!
Read More
How to Create Ice Cream at Home: A Comprehensive Guide
### Homemade Eggless Vanilla Ice Cream Without an Ice Cream Maker
Creating ice cream in your own kitchen can be a fun and satisfying endeavor, particularly when you can whip up a smooth, tasty dessert without utilizing eggs or an ice cream maker. This straightforward vanilla ice cream recipe is ideal for the warm summer months and only requires a handful of ingredients.
#### Ingredients
– 2 cups whole milk
– 1 cup heavy whipping cream
– 1/2 cup sugar (to taste)
– 2 tablespoons cornstarch
– 1 teaspoon vanilla essence
– A pinch of salt
#### Instructions
1. **Boil the Milk**: In a pot, heat the whole milk to a boil over medium heat. Stir occasionally to keep it from sticking to the bottom.
2. **Prepare Cornstarch Mixture**: In a small bowl, combine the cornstarch with a few tablespoons of cold milk to form a smooth paste. This will aid in thickening the ice cream.
3. **Thicken the Milk**: When the milk reaches a boil, add the cornstarch mixture to the pot while stirring continuously. Cook for another 2-3 minutes until the mixture becomes slightly thicker. Remove from the heat and allow it to cool to room temperature.
4. **Combine Ingredients**: In a large mixing bowl, mix the cooled milk mixture, heavy cream, sugar, vanilla essence, and a pinch of salt. Whisk until the sugar has dissolved completely.
5. **Chill the Mixture**: Cover the bowl and place the mixture in the refrigerator for at least 2 hours, or until it is thoroughly chilled.
6. **Freeze and Stir**: Transfer the chilled mixture into a shallow dish. Place it in the freezer. After 30 minutes, take it out and vigorously stir it with a fork or whisk to break up any ice crystals. Repeat this every 30 minutes for about 2-3 hours, or until the ice cream is firm and creamy.
7. **Blend for Smoothness**: For an ultra-smooth consistency, blend the ice cream in a blender for a few seconds after it has set before serving.
8. **Serve**: Scoop the ice cream into bowls or cones and relish your homemade eggless vanilla ice cream!
#### Tips for Success
– **Stirring is Key**: Consistent stirring throughout the freezing phase is crucial to preventing ice crystals from forming, resulting in a more velvety texture.
– **Flavor Variations**: Don’t hesitate to include mix-ins such as chocolate chips, fruit, or nuts during the final stirring session for extra flavor and texture.
– **Storage**: Keep any surplus ice cream in a sealed container in the freezer. Allow it to sit at room temperature for a few minutes before scooping, since it may become hard.
This eggless vanilla ice cream is not only simple to prepare but also fantastically delicious. Ideal for enjoying as a dessert after a meal or as a cooling treat on a hot day, this recipe is bound to become a cherished one in your household. Indulge in the creamy delight of homemade ice cream without the hassle!
Read More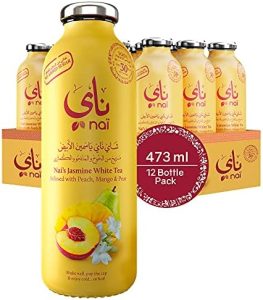
Mango-Infused Iced Tea Drink
### Mango Iced Tea: An Ideal Summer Beverage to Combat the Heat
Mango iced tea is an exquisite, tropical summer drink that fuses two of the most cherished ingredients: tea and fresh mango puree. This revitalizing beverage is a preferred selection for many during the warm summer days, providing a wonderful means to cool off and savor the tastes of the season.
#### The Attraction of Mango Iced Tea
As we navigate through the rainy season, often marked by elevated humidity and minimal precipitation, few things are as invigorating as a chilled glass of mango iced tea on a scorching day. The sugary notes of ripe mango complement the robust flavor of tea, crafting a seamless blend that is both energizing and gratifying.
Mango iced tea transcends being just a drink; it’s an occasion. The lively hue and fruity aroma enhance its visual charm and scent. Including mint leaves as a garnish boosts its freshness, making it an even more tempting choice for summer get-togethers or a leisurely afternoon at home.
#### Making the Most of Mango Season
With the mango season winding down, it’s an excellent opportunity to capitalize on this scrumptious fruit. Besides mango iced tea, think about preparing other mango-based treats like fresh mango juice, mango smoothies, mango kulfi, and mango ice cream. Each of these delights illustrates the adaptability of mango and its capacity to elevate any drink or dessert.
#### How to Prepare Mango Iced Tea at Home
Creating mango iced tea at home is straightforward and requires only a handful of ingredients. Here’s a simple recipe to kick things off:
**Ingredients:**
– 2 cups of cooled brewed black tea
– 1 cup of ripe mango puree
– 2 tablespoons of honey or sugar (to taste)
– Fresh mint leaves (for garnish)
– Ice cubes
**Instructions:**
1. Brew the black tea and let it cool to room temperature.
2. In a blender, combine the ripe mango and honey (or sugar) until smooth.
3. In a pitcher, blend the cooled tea with the mango puree until well mixed.
4. Serve over ice and top with fresh mint leaves.
This recipe is easily customizable; feel free to experiment with various types of tea or sweeteners to discover your ideal mix.
#### Conclusion
Mango iced tea is not merely a delightful summer beverage but also a cooling way to appreciate the flavors of ripe mango. Its vibrant, enticing flavor ensures it’s a drink you’ll want to enjoy all day. Make sure to include this delightful recipe in your summer beverage repertoire and relish the taste of summer in every sip!
Read More
How to Prepare Mango Kulfi: A Comprehensive Guide
### Mango Kulfi Recipe – Irresistible Indian Dessert
Mango kulfi is an exquisite Indian frozen dessert that encapsulates the spirit of summer with its luscious mango taste. This velvety treat is an ideal way to beat the heat during warm weather, making it a top pick for mango aficionados. Here’s a straightforward and swift recipe to prepare mango kulfi in your own kitchen.
#### Ingredients
– 2 ripe mangoes (mashed)
– 1 can (14 oz) sweetened condensed milk
– 1 cup heavy whipping cream
– 1/2 teaspoon cardamom powder (optional)
– Chopped nuts (pistachios or almonds) for topping
#### Instructions
1. **Prepare the Mango Pulp**: Skin the ripe mangoes and blend them until they reach a smooth consistency. You should obtain approximately 1 to 1.5 cups of mango pulp.
2. **Mix Ingredients**: In a mixing bowl, blend the mango pulp, condensed milk, and heavy cream. If desired, incorporate the cardamom powder for added flavor. Stir thoroughly until all components are well mixed.
3. **Pour into Molds**: Transfer the mixture into kulfi molds or small cups. If molds are unavailable, ice cube trays or any small containers will work.
4. **Freeze**: Seal the molds with a lid or plastic wrap and place them in the freezer. Let the kulfi freeze for a minimum of 6-8 hours, or until fully hardened.
5. **Serve**: After freezing, take the kulfi out from the molds. If you have trouble unmolding, briefly run the molds under warm water. Sprinkle with chopped nuts before serving.
#### Tips for the Ultimate Mango Kulfi
– **Choosing Mangoes**: Select ripe, sweet mangoes for optimal flavor. Varieties such as Alphonso or Himsagar are recommended.
– **Texture**: For a smoother texture, ensure the heavy cream is well-whipped prior to mixing.
– **Flavor Variations**: Feel free to experiment by adding different flavors like saffron or rose essence to elevate the kulfi.
Mango kulfi is more than just a dessert; it’s a celebration of flavors and textures that reflects the essence of Indian summer. With this simple recipe, you can savor a homemade indulgence that is both tasty and revitalizing. Perfect for celebrations or a casual family dessert, mango kulfi is certain to delight everyone!
Read More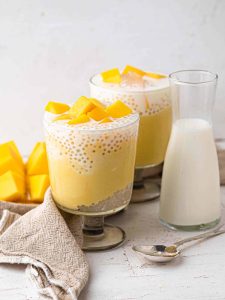
Mango Sago Delight Recipe: A Comprehensive Step-by-Step Tutorial
### Mango Sago Recipe: Simple Mango Desserts to Cool Off
Mango sago is a charming and revitalizing dessert that melds the sweetness of fresh mango pulp with the distinct texture of tapioca pearls. This straightforward pudding is particularly favored in South Asian regions such as Singapore, Thailand, and Hong Kong, where many variations exist. While classic recipes typically use coconut milk and palm sugar, this rendition opts for dairy and standard white sugar, making it easier to prepare.
#### Ingredients
– 1 cup large tapioca pearls (sago)
– 2 ripe mangoes, peeled and chopped
– 2 cups milk (or coconut milk for a richer taste)
– ½ cup sugar (adjust to your preference)
– 1 teaspoon cardamom powder (optional)
– Water for soaking and cooking
#### Instructions
1. **Prepare the Tapioca Pearls**:
– Rinse the tapioca pearls well under cold water to eliminate excess starch.
– Soak the pearls in water for around 20 minutes.
2. **Cook the Tapioca Pearls**:
– Following the soaking, drain the pearls and place them into a pot filled with plenty of water.
– Bring the water to a rolling boil and cook the pearls until they become transparent and chewy, roughly 15-20 minutes.
– Once cooked, drain and rinse the pearls with cold water to stop the cooking. Set aside.
3. **Make the Mango Mixture**:
– In a blender, mix the diced mangoes, milk, sugar, and cardamom powder (if desired). Blend until smooth and creamy.
4. **Combine**:
– In a large mixing bowl, mix the cooked tapioca pearls with the mango mixture. Stir gently to blend, ensuring the pearls are evenly incorporated.
5. **Chill**:
– Pour the mango sago mixture into serving bowls or cups. Chill for a minimum of 2 hours to enable the flavors to blend and the pudding to set.
6. **Serve**:
– Serve chilled, adorned with extra mango pieces or a dusting of cardamom if preferred.
#### Why Mango Sago?
This mango sago pudding is not only simple to make but also provides a delightful mix of textures. The creamy, velvety mango base complements the chewy tapioca pearls, producing a dessert that is both fulfilling and refreshing. It’s ideal for warm summer afternoons or as a light dessert following a hearty meal.
#### Conclusion
Rather than choosing store-bought desserts, think about preparing this homemade mango sago pudding for your upcoming event. It’s a simple yet remarkable treat that highlights the vibrant tastes of fresh mangoes. With its egg-free recipe, it accommodates various dietary preferences, making it a perfect option for any gathering. Relish this tropical delight and cool off with every spoonful!
Read More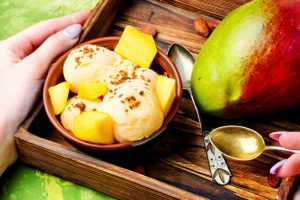
How to Prepare Mango Ice Cream: A Detailed Recipe
### Eggless Mango Ice Cream Recipe (No Ice Cream Machine Required)
Mango ice cream is a delicious indulgence, particularly on warm summer days. This egg-free, no-churn method allows you to whip up a creamy, flavorful dessert without an ice cream maker. With merely four straightforward ingredients, you can relish the essence of fresh mango in a cool frozen delight.
#### Ingredients
1. **Fresh Mango Pulp**: 2 cups (approximately 2-3 ripe mangoes)
2. **Condensed Milk**: 1 cup
3. **Whipping Cream**: 1 cup (chilled)
4. **Vanilla Extract**: 1 teaspoon (optional)
#### Instructions
1. **Prepare the Mango Pulp**:
– Peel and chop the ripe mangoes. Blend them in a blender until smooth to yield about 2 cups of mango pulp. Set aside.
2. **Whip the Cream**:
– In a large bowl, pour in the chilled whipping cream. Using an electric mixer, whip the cream until soft peaks develop. Take care not to over-whip, aiming for a light and airy consistency.
3. **Combine Ingredients**:
– Carefully fold the mango pulp into the whipped cream. Incorporate the condensed milk and vanilla extract (if using) into the mixture. Gently fold everything together until evenly blended, making sure to keep the lightness of the whipped cream intact.
4. **Transfer to a Container**:
– Pour the mixture into a container safe for freezing. Smooth out the top with a spatula.
5. **Freeze**:
– Cover the container with a lid or plastic wrap and place it in the freezer. Let the ice cream freeze for a minimum of 6 hours or overnight for optimal texture.
6. **Serve**:
– After freezing, take the ice cream out of the freezer and allow it to sit at room temperature for a few minutes to soften slightly. Scoop into bowls or cones and savor your homemade mango ice cream!
#### Tips
– **Mango Selection**: Opt for ripe, sweet mangoes to achieve the best flavor. Varieties like Alphonso or Haden are wonderful options.
– **Serving Suggestions**: Top with fresh mango slices, mint leaves, or a drizzle of honey for added taste.
– **Storage**: Keep any leftovers in the freezer, but consume within a week for maximum freshness and texture.
This mango ice cream is not only simple to prepare but also a fantastic way to enjoy the mango season. Its creamy consistency and rich flavor make it an irresistible dessert for any celebration. Relish this refreshing treat at summer gatherings, birthdays, or simply as a delightful means to cool off on a hot day!
Read More
Mango Scented Rice Pudding (Phirni)
### Mango Phirni: An Exquisite North Indian Delicacy
Mango phirni, commonly referred to as aam ki phirni, is a cherished North Indian delicacy that melds the luscious flavors of mango with the smooth consistency of phirni. This straightforward dessert is ideal for celebratory events and is a favorite of mango enthusiasts.
#### Ingredients
– **Full-fat milk**: Crucial for achieving a rich and creamy consistency.
– **Basmati rice**: Soaked and ground into a paste, it thickens the phirni.
– **Sugar**: For sweetening the dessert.
– **Cardamom**: Imparts a fragrant spice that pairs well with mango.
– **Fresh mango puree**: The key component that enriches the dessert with fruity sweetness.
– **Almond paste**: Optional, for an extra layer of richness and flavor.
– **Chopped pistachios**: For decoration.
#### Preparation Steps
1. **Boil the Milk**: Begin by boiling full-fat milk in a heavy-bottomed vessel until it reduces to three-fourths of its initial volume. This enhancement deepens the flavor and creaminess of the milk.
2. **Prepare Rice Paste**: Soak raw basmati rice in water for several hours. Drain and grind it into a fine paste, incorporating a little milk to aid the grinding process.
3. **Combine Ingredients**: Gradually introduce the rice paste into the simmering milk while stirring constantly. This prevents the formation of lumps and guarantees uniform cooking.
4. **Cook and Thicken**: Keep cooking the mixture on low heat, stirring often, until it attains a pudding-like thickness.
5. **Add Flavorings**: Mix in sugar, almond paste, and cardamom. Cook for a few additional minutes until everything is thoroughly integrated.
6. **Incorporate Mango Puree**: Once the mixture has cooled to room temperature, gently fold in the fresh mango puree, blending until uniform.
7. **Chill and Serve**: Spoon the mango phirni into serving bowls and refrigerate until it is chilled. Garnish with chopped pistachios prior to serving.
#### Enjoying Mango Phirni
Mango phirni can be savored warm or cold, though it is predominantly favored chilled, especially during warm weather. The creamy consistency, paired with the sweet and tangy notes of mango, renders it a refreshing dessert. The addition of cardamom provides a delicate spice that counterbalances the sweetness, making it a delightful indulgence for any occasion.
#### Perfect for Celebrations
This egg-free dessert is a superb option for festivals such as Ramzan or for birthday celebrations. Its rich flavor and velvety texture are bound to impress guests and family alike. For those in search of additional eggless Indian dessert alternatives, mango phirni emerges as a luxurious choice that is both simple to make and scrumptious.
In conclusion, mango phirni is a straightforward yet opulent dessert that encapsulates the essence of Indian sweets. With its lively flavor and creamy texture, it is an essential experience for anyone eager to indulge in a delightful mango treat.
Read More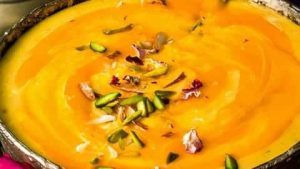
Mango-Scented South Indian Seasoned Broth (Mango Rasam)
### Mango Rasam: A Delight from South India
Mango rasam, often called saar, saaru, or charu, is a classic soup from South India that highlights the distinct taste of raw mango. This soothing dish is especially favored in Telugu households, where it is frequently made alongside various raw mango dishes like avakai (mango pickle), pachadi, pulusu, and pappu (dal).
#### Variations by Region
In South India, notably in Tamil Nadu, Andhra Pradesh, and Karnataka, mango rasam becomes a seasonal favorite, generally prepared during the mango harvesting period. In the Mangalore region, it is known as appe huli and is commonly served at weddings and special events. The dish goes by different names in various locales: maavina saar or saaru in Kannada, mamidikaya chaaru in Telugu, and pacha manga rasam or mangai rasam in Tamil. While there are minor differences in the method of preparation and seasoning, the main ingredients consistently highlight the zesty flavor of raw mango.
#### Health Benefits
Raw mango not only tastes great but is also loaded with nutrients. It boasts high levels of vitamin C, B vitamins, and antioxidants, making it a nutritious addition to your meals. The light and refreshing quality of mango rasam makes it an ideal dish for warm climates, offering a delightful diversion from standard rasam.
#### Essential Ingredients and Method
To create mango rasam, it is essential to choose a green mango that is just starting to ripen, as this will lend a subtle sweetness to the dish. The blend of spices, jaggery, and the tangy mango broth results in a tropical flavor that is both soothing and refreshing. Traditionally paired with rice, mango rasam can also be served as a lively soup or a vegetarian appetizer at gatherings.
#### Final Thoughts
Mango rasam is an essential experience for anyone wishing to delve into South Indian culinary flavors. Its straightforward preparation and rich flavor make it beloved by many. For those on the lookout for simple and tasty raw mango dishes, this recipe is certainly worthy of saving. Relish the exquisite taste of mango rasam as part of your culinary explorations!
Read More
Simple North Indian Rajma Recipe Without Onions and Garlic
### Rajma Recipe: Simple North Indian Style No Onion No Garlic Kidney Beans Curry (Satvik)
Rajma, or kidney beans curry, is a cherished dish in North Indian cuisine, recognized for its deep flavors and soothing qualities. This specific recipe is a satvik variant, indicating it is made without onion and garlic, making it ideal for those adhering to Jain dietary traditions or anyone seeking a lighter meal alternative.
#### Ingredients:
– 1 cup kidney beans (rajma)
– 2 large tomatoes (preferably not overly sour)
– 1 teaspoon cumin seeds
– 1/4 teaspoon asafoetida (hing)
– 1 teaspoon ginger paste
– 1 teaspoon red chili powder (adjust to preference)
– 1/2 teaspoon turmeric powder
– 1 teaspoon garam masala
– Salt to taste
– Fresh coriander leaves for garnish
– 2 tablespoons oil or ghee
– Water as required
#### Instructions:
1. **Soak the Kidney Beans**:
– Wash the kidney beans well and soak them in water for at least 6-8 hours or overnight. This aids in softening the beans and reduces cooking duration.
2. **Prepare Tomato Puree**:
– Blanch the tomatoes in boiling water for a minute, then switch them to cold water. Remove the skin and blend the tomatoes into a smooth puree.
3. **Cook the Kidney Beans**:
– In a pressure cooker, add the soaked kidney beans with enough water and a pinch of salt. Cook for about 4-5 whistles or until the beans are tender. Set aside.
4. **Make the Curry**:
– In a pan, warm oil or ghee over medium heat. Add cumin seeds and let them sizzle.
– Incorporate asafoetida and ginger paste, sauté for a minute until aromatic.
– Pour in the tomato puree and cook until the oil begins to separate from the mixture.
– Add red chili powder, turmeric powder, and salt. Combine thoroughly and cook for another 2-3 minutes.
5. **Combine Beans and Curry**:
– Introduce the cooked kidney beans to the tomato mixture. Modify the consistency by adding water as necessary. Allow it to simmer for 10-15 minutes, letting the flavors meld.
– Stir in garam masala and cook for an additional minute.
6. **Garnish and Serve**:
– Garnish with freshly chopped coriander leaves. Serve warm with steamed rice, jeera rice, or naan.
#### Tips for Best Results:
– **Freshly Ground Spices**: Utilizing freshly ground or hand-pounded spices boosts the flavor and aroma of the dish.
– **Smooth Tomato Puree**: A well-blended puree contributes to the creaminess of the curry. Ensure the tomatoes are evenly blended.
– **Mashed Kidney Beans**: For extra creaminess, mash a portion of the cooked kidney beans and incorporate them into the curry.
This satvik rajma recipe is not only straightforward to make but also a nutritious dish that can be relished by all. It complements rice or flatbreads perfectly, making it a wonderful addition to your North Indian meal collection. Savor the comforting essence of this kidney beans curry, a true showcase of vegetarian cuisine at its finest!
Read More