
I Canât Believe I JUST Learned That Every Dishwasher Does This (Itâs So Helpful!)

I wish I knew sooner.
READ MORE…

I Put a Dish-Drying Rack in My Tiny Bathroom, and It Changed Everything

I canât believe I didnât try it sooner.
READ MORE…
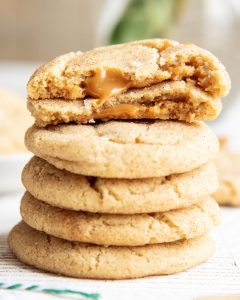
Brown Butter Snickerdoodle Cookie Recipe
### Brown Butter Snickerdoodles: The Ultimate Autumn Indulgence
As the foliage changes color and the temperatures dip, the commencement of snickerdoodle season ushers in a flood of sweet memories and comfort. The aroma of cinnamon and sugar drifting through the home can swiftly whisk you back to snug fall afternoons. This article delves into the charming transformation of the traditional snickerdoodle cookie, presenting a recipe that lifts this adored treat to higher realms.
#### The Heart of Snickerdoodles
In essence, snickerdoodles are known for their soft, chewy consistency and a delightful dusting of cinnamon sugar. The traditional recipe commonly features cream of tartar, which imparts the cookies their distinct tanginess and chewy nature. Yet, this fresh interpretation of snickerdoodles introduces imaginative ingredients that enrich both flavor and texture.
#### What Sets This Recipe Apart?
1. **Thicker and More Tender**: In contrast to classic snickerdoodles, which may be slightly flat, this recipe produces cookies that are thicker and more tender due to the inclusion of cream cheese. This component adds a nuance that elevates the cookie from mundane to magnificent.
2. **Brown Butter**: The incorporation of brown butter introduces a sumptuous, nutty taste that enhances the overall flavor. The browning process unlocks its inherent sweetness and builds depth, making each mouthful a decadent delight.
3. **Vanilla Bean**: Adding vanilla bean paste enriches the flavor profile, providing a fragrant and aromatic touch that pairs wonderfully with the cinnamon. This enhancement is not merely aesthetic; it genuinely deepens the cookie’s flavor.
4. **High-Quality Cinnamon**: Opting for a high-grade cinnamon, such as Burlap & Barrel’s Royal Cinnamon, can significantly influence the taste. While it’s not essential, it contributes a distinctive warmth and richness that elevates the entire cookie experience.
#### The Recipe: Brown Butter Snickerdoodles
**Ingredients**:
– 1 cup (8 ounces or 225 grams) unsalted butter
– 3 tablespoons (45 grams) water
– 3 cups (400 grams) all-purpose flour
– 1 1/4 cups (250 grams) granulated sugar + 3 tablespoons (40 grams) for rolling
– 1 teaspoon baking powder
– 1/4 teaspoon baking soda
– 1 1/2 teaspoons kosher salt
– 1/4 cup (2 ounces, 55 grams) cream cheese, in chunks
– 1 large egg
– 1 1/2 teaspoons vanilla extract or vanilla bean paste
– 1 1/2 tablespoons (10 grams) ground cinnamon
**Instructions**:
1. **Brown the Butter**: In a medium saucepan, melt the butter over medium-high heat. Let it foam and transform to a golden brown with toasted flecks. Remove from heat, transfer to a bowl, and mix in the water. Chill in the freezer until solid.
2. **Prepare the Dough**: In a food processor, combine the flour, sugar, baking powder, baking soda, and salt. Add the cold brown butter and cream cheese, pulsing until the mixture resembles crumbs. Incorporate the egg and vanilla, blending until smooth.
3. **Chill the Dough**: If the dough seems too soft, refrigerate for 20 minutes.
4. **Preheat the Oven**: Adjust your oven to 375°F (190°C).
5. **Shape the Cookies**: Line baking sheets with parchment paper. Combine the remaining sugar and cinnamon in a bowl. Scoop dough into 1.5-tablespoon balls, roll in the cinnamon sugar, and gently flatten them on the baking sheet.
6. **Bake**: Bake for 10 to 11 minutes. The cookies will look soft but will set as they cool. Allow them to rest on the baking sheet for 2 minutes before transferring to a wire rack.
7. **Storage**: These cookies can be kept in an airtight container at room temperature for up to a week.
#### Conclusion
This brown butter snickerdoodle recipe offers a delightful way to savor the tastes of autumn. With its distinctive mix of ingredients, it is sure to become a beloved part of your baking collection. Whether paired with a warm cup of cider or shared amongst friends, these cookies embody the spirit of fall and the joy of baking at home.
Read More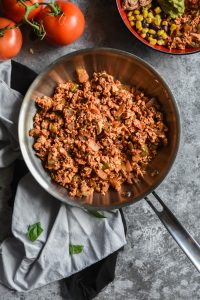
Chipotle-Inspired Sofritas Recipe
This dish was influenced by Chipotle’s tofu variety known as “sofritas.” Have you given it a try? I frequently include it in my burrito bowl for that extra plant-based protein boost. It’s filling, saucy, and has a kick, making the additional three-dollar charge for guacamole worth it.
I modeled this recipe closely on Chipotle’s ingredient lineup. Afterward, I adjusted the proportions and the preparation method until the flavor was just perfect. Honestly, I prefer this variation even more! It tastes vibrant, delicious, and well-seasoned. At times, Chipotle’s sofritas can be so spicy they overpower the other flavors in my bowl.
Sofritas Ingredients
Chipotle’s formulation draws inspiration from sofrito, a fragrant mixture of garlic, onions, and peppers commonly used in Spanish and Latin American dishes. The complete recipe is detailed below, but here’s what you need and why.
Olive oil: Traditionally, sofrito is cooked in olive oil, so these sofritas follow suit. I always opt for extra-virgin olive oil for cooking purposes.
Tofu: Select extra-firm tofu and crumble it with a fork to achieve a texture similar to Chipotle’s. When sautéed in olive oil until golden, it acquires a pleasant, subtly smoky flavor. The crumbled tofu has ample surface area that can soak up seasonings effectively.
Onion, red bell pepper, and garlic: This trio forms the flavorful foundation of the dish. If red bell peppers are unavailable, yellow or orange will suffice.
Tomato paste and canned diced tomatoes: Diced tomatoes contribute moisture and softness, while the umami-rich tomato paste intensifies the tomato taste.
Adobo sauce or chopped chipotle peppers: Both ingredients originate from a can of chipotle peppers in adobo sauce. Chipotle peppers deliver a smoky and spicy flavor, adding essential taste.
Recipe Tip
Store leftover tomato paste and chipotle peppers in adobo sauce in their own small freezer bags. Be sure to expel the air before sealing the bag. Flatten the bags prior to freezing, allowing you to easily tear off what you need for your next cooking endeavor.
Red wine vinegar: A hint of acidity brightens up the overall taste. Sherry vinegar would serve as a suitable alternative.
Dried spices: A blend of ground cumin, smoked paprika, and oregano will be used. The smoked paprika complements the chipotle peppers nicely.
Uses for Sofritas
Sofritas are a protein-packed enhancement for your preferred Mexican and Tex-Mex dishes. I always pair my sofritas with rich, creamy guacamole or sour cream to temper the heat.
Consider adding sofritas to your burritos and burrito bowls, sprinkling it over nachos, mixing it into cheese prior to making quesadillas, or using it as a filling for your tacos. I also enjoy sofritas with eggs, whether scrambled or fried.
Assemble your meal with these complementary additions:
More Recipes to Enjoy
If you enjoy these sofritas, check out these recipes with Mexican culinary influence.
Share your experiences with the sofritas in the comments! I love hearing from you, and I’m keen to know how you serve this dish.
Sofritas (Chipotle-Style)
This sofritas recipe draws inspiration from Chipotle’s variation. It’s hearty and well-seasoned, adding plant-based protein and vegetables to various meals. The recipe serves 4 to 6, depending on your serving size.
Instructions
1. Heat 2 tablespoons of olive oil in a large skillet over medium-high heat until it shimmers. Add the tofu and cook, stirring every few minutes, until it’s lightly golden brown on the edges, about 10 minutes. Transfer the tofu to a bowl and set aside. Carefully wipe the skillet mostly clean with a towel, then return it to heat.
2. Heat the remaining 1 tablespoon of olive oil. Add the onion, bell pepper, and ¼ teaspoon salt. Cook, stirring occasionally, until the onion turns translucent, about 3 to 5 minutes.
3. Incorporate the tomato paste, vinegar, adobo sauce, and garlic, stirring to mix. Cook until the mixture becomes fragrant and the tomato paste deepens in color, about 1 minute. Add the cumin, paprika, and dried oregano alongside the tomatoes, cooking until fragrant, about 30 seconds more.
4. Stir in the diced tomatoes and cook until the bell peppers become tender enough to easily pierce with a fork, about 2 to 3 minutes. Return the tofu to the skillet and cook until thoroughly combined, stirring often, and some of the sauce is absorbed by the tofu, about 1 minute.
5. Take the skillet off the heat and adjust seasoning to taste. If it’s not spicy enough for your liking, incorporate more adobo sauce by the teaspoon until it reaches your desired spice level (I’ve added up to 3). Season with salt (up to
Read More
The “Gooey and Delicious” Frozen Cinnamon Rolls I’m Stocking Up on ASAP

You’ll be back for more.
READ MORE…

One Editor Canât Get This Snack Out of Her Head (and Itâs on Sale!)
They also have zero carbs, and are gluten-free!
READ MORE…
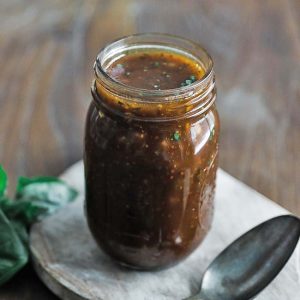
Easy Balsamic Vinaigrette Recipe with Four Basic Ingredients
This simple balsamic vinaigrette can be prepared in just a few minutes with merely four basic ingredients. Its sweet and tangy flavor profile makes it ideal for salads or grain bowls!
I still recall the “aha” moment from my early cooking experiences when I realized I could whip up salad dressing at home. That straightforward homemade balsamic vinaigrette was fresher and more vibrant than any bottled version I had ever tasted, and it took me under five minutes to create.
Today, this 4-ingredient recipe has become my all-time favorite dressing. After over a decade of refining it, our friends and family continuously ask for it! It enhances everything from strawberry salads to roasted veggies to grain bowls during the week!
Why You’ll Adore This Recipe
Here’s why this recipe is bound to win you over:
– Just 4 essential ingredients: All you need are balsamic vinegar, olive oil, Dijon mustard, and maple syrup.
– Ready in 5 minutes: Faster than making a trip to the store for a bottle.
– Flavor perfectly balanced: Sweet and tangy with just the right level of acidity.
– Remains emulsified: The Dijon mustard ensures creaminess and prevents separation.
5-Star Reader Feedback
⭐⭐⭐⭐⭐ “Made for a girls’ weekend, and the salad and dressing received high praise. Simple to prepare and delicious every time we used it. Will certainly make again.” -Cyn
⭐⭐⭐⭐⭐ “This is genuinely the best balsamic vinaigrette! Made it last night for your beet and goat cheese salad, and everyone loved it. Surprisingly, my family isn’t really into salad, so that’s a solid endorsement.” -Josianne
Ingredient Insights
I’ve discovered that with such few ingredients, quality is important. Here’s what you’ll require:
– Aged balsamic vinegar: The quality of your balsamic truly impacts the flavor! I suggest a mid-priced commercial-grade balsamic vinegar, also referred to as balsamic vinegar of Modena (IGP). It has an excellent balance of tangy and sweet flavors without being overly expensive (look for bottles priced between $8-15). Traditional aged balsamic (DOP) is too pricey for dressing, and the lowest-priced condiment-grade versions lack depth.
– Dijon mustard: This component lends tangy flavor and assists in creating a thick and creamy dressing, maintaining the emulsion. This technique is applicable in many other vinaigrette salad dressing recipes, like this Italian dressing recipe.
– Maple syrup or honey: I favor real maple syrup for its rich flavor, but honey works wonderfully as well. Start with 1 tablespoon for a more savory dressing, or use 2 for something sweeter (great for fruit salads).
– Extra virgin olive oil: Opt for high-quality olive oil that you enjoy on its own. You can replace it with avocado oil for a more neutral taste, but I adore the fruity characteristics that good olive oil imparts (plus, it’s one of the healthiest cooking oils).
How to Create Balsamic Vinaigrette Dressing
Making homemade balsamic vinaigrette is surprisingly straightforward, but the technique is crucial for achieving proper emulsification. Here’s my foolproof approach:
Pro tip: You can use the jar-shake method if you’re in a hurry. Combine all ingredients in a mason jar, seal it tightly, and shake vigorously for 30 seconds. The limited space creates agitation, allowing everything to emulsify rapidly. Additionally, you can store it right in the jar.
If your vinaigrette separates after being stored, just re-whisk or shake it back together. The Dijon mustard makes re-emulsifying a breeze. For optimal results, let it sit at room temperature first.
Ways to Utilize It
This balsamic vinaigrette recipe is exceptionally adaptable: it serves more purposes than just as a salad dressing! Here are my favorite ways to use it:
Storage Instructions
Keep your homemade balsamic vinaigrette in an airtight container (I frequently use a mason jar) in the refrigerator for 2 to 3 weeks. The olive oil will solidify when chilled, which is entirely normal. Allow the dressing to sit at room temperature for a few minutes before use, then give it a vigorous shake or whisk to re-emulsify.
Avoid freezing vinaigrettes: the texture of the emulsion won’t revert correctly when thawed. Since it only requires 5 minutes to prepare, it’s simpler to create a fresh batch.
If you observe separation during storage, that’s perfectly normal! Just shake or whisk before each use.
Dietary Information
This balsamic vinaigrette recipe is vegetarian, gluten-free, vegan, plant-based, and dairy-free.
Common Inquiries
Is balsamic vinaigrette healthy?
This homemade version is significantly healthier than store-bought alternatives. It contains heart-healthy olive oil, no preservatives or artificial ingredients, and you can control the level of sweetness.
What’s the optimal ratio
Read More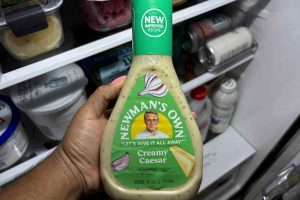
How Long Is Salad Dressing Good After You Open It? We Asked a Food Safety Expert and Did Not See the Answer Coming
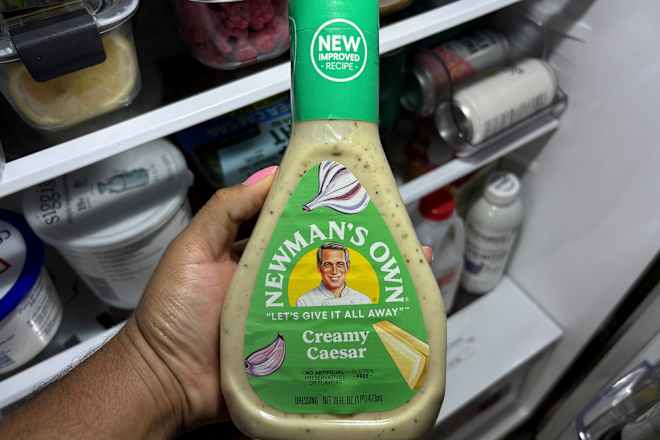
The answer might shock you.
READ MORE…
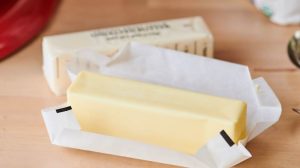
Fishwifeâs New Limited-Edition Butter Is So Versatile, Youâll Want to Use It on Everything

Slather it on a BLT or drizzle it over pizza.
READ MORE…

This âSo Tenderâ Salmon Fillet Is the Best Iâve Ever Had (Iâm Stocking Up!)
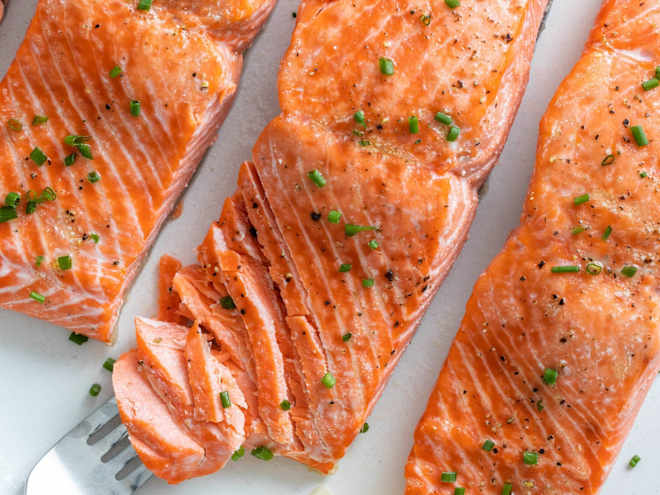
Despite consistently ordering it when I eat out, I tend to avoid cooking fish in my own kitchen. It’s just not as simple as making something like chicken or burgers — its leanness means that it can easily become overcooked — and even though I try to branch out every once in a while, I tend to play it safe with my weeknight dinners. However, there is one seafood dish that I’ll regularly take a chance on at home: salmon.
READ MORE…