
Make-Ahead Breakfast Casseroles for Holidays and Weekdays
**Title: Breakfast Casseroles You Can Prepare Ahead for Holidays and Weekdays**
As life becomes more hectic, securing time for a healthy breakfast can prove difficult. Be it the bustling rush of a weekday morning or the leisurely vibe of a holiday, breakfast casseroles that can be prepared ahead present a handy and flavorful option. These adaptable dishes allow for advance preparation, enabling you to relish a calm morning with a substantial meal ready and waiting.
**Why Opt for Breakfast Casseroles?**
There are multiple reasons to favor breakfast casseroles:
1. **Convenience:** Make them the evening prior or even several days in advance. Just place them in the oven when morning arrives.
2. **Versatility:** Personalize with your preferred ingredients—vegetables, meats, cheeses, and beyond.
3. **Portion Control:** Effortlessly serve a large group or create smaller servings for individual meals.
4. **Nutritional Balance:** Blend proteins, carbs, and vegetables for a well-rounded dish.
**Common Ingredients and Variations**
1. **Egg-Centered Casseroles:** Eggs serve as a fundamental component in breakfast casseroles, adding protein and a light texture. Pair with cheese, spinach, mushrooms, or bacon for a traditional favorite.
2. **Bread-Centered Casseroles:** Employ stale bread or croissants as the foundation. Incorporate items like sausage, cheddar, and bell peppers for a tasty treat.
3. **Hash Brown Casseroles:** Shredded potatoes or hash browns provide a robust base. Combine with eggs, onions, and ham for an enjoyable meal.
4. **Sweet Casseroles:** For those who prefer a sweeter option, think of a French toast casserole with cinnamon, vanilla, and maple syrup. Toss in fruits such as berries or apples for added taste.
**Preparation Suggestions**
– **Plan in Advance:** Select recipes that align with your timetable. Some casseroles can be assembled and frozen for weeks, whereas others are better made a day before.
– **Layering:** Ensure uniform cooking by correctly layering ingredients. Start with a strong base, add fillings, and finish with cheese or a crumbly topping.
– **Baking Time:** Modify baking durations based on the dimensions and depth of your casserole dish. A deeper dish might need a more extended cooking period.
– **Storage:** Keep prepared casseroles in the refrigerator for up to 3 days or freeze them for longer preservation. Defrost frozen casseroles in the refrigerator overnight prior to baking.
**Recipe Suggestions**
1. **Traditional Sausage and Egg Casserole:** Sauté sausage until browned and combine with beaten eggs, milk, and cheddar cheese. Pour over cubed bread in a baking dish and chill overnight. Bake until the top is golden and set.
2. **Vegetarian Spinach and Feta Casserole:** Sauté spinach and onions, then mix with eggs, feta cheese, and cherry tomatoes. Pour over a layer of hash browns and bake until solid.
3. **Blueberry French Toast Casserole:** Stack slices of bread with cream cheese and blueberries. Pour a blend of eggs, milk, and vanilla over the ensemble. Refrigerate overnight and bake until puffy and golden.
**Conclusion**
Breakfast casseroles that can be prepared ahead are invaluable for hectic mornings and festive occasions. With unlimited customization possibilities, they accommodate various palates and dietary requirements. By organizing and preparing early, you can savor a delicious, homemade breakfast without the morning frenzy. Whether it’s a weekday or a special holiday, these casseroles guarantee you begin your day with a gratifying meal.
Read More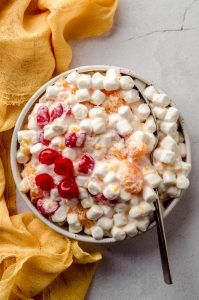
Fast and Simple One-Bowl Ambrosia Salad Recipe
# Ambrosia Salad: A Beloved Family Favorite
Ambrosia Salad, commonly known as the “food of the gods,” is a charming dish that has been a beloved family staple for generations. This airy and creamy salad, which can serve as a dessert, is a must-have at holiday festivities and potlucks. With just a few ingredients, it’s remarkably simple to make and adds a refreshing sweetness to any meal.
## What is Ambrosia Salad?
Ambrosia Salad is a special blend that merges tropical fruits with a creamy foundation, usually made from sour cream or yogurt. The traditional version includes pineapple, coconut, mandarin oranges, and miniature marshmallows, all blended to produce a sweet and tangy flavor combination.
### Key Features:
– **Flavor:** A delightful combination of sweet, tangy, and tropical notes.
– **Skill Level:** Easy to prepare, often referred to as a “5 cup salad” because of its five main components, and requires only about five minutes of preparation.
– **Swaps:** You can easily replace sour cream with Greek yogurt or modify the fruits according to your taste.
– **Serving Suggestions:** Perfect for potlucks, since it can be prepared in advance and served chilled.
## Ingredient Notes
1. **Yogurt/Sour Cream:** Traditionally, sour cream is utilized for its creamy tang, but plain or vanilla Greek yogurt can offer a sweeter option.
2. **Marshmallows:** Mini marshmallows provide a fluffy texture and sweetness. For a playful variation, consider fruit-flavored marshmallows.
3. **Fruit:** The traditional mix features shredded coconut, canned mandarin oranges, and pineapple chunks. Be sure to drain the fruit thoroughly to prevent a watery salad, and handle the mandarin oranges with care to keep them whole.
## Variations
– **Add Fruit:** Boost the salad by adding chopped maraschino cherries, fresh bananas, grapes, kiwi, or strawberries. You can also replace pineapple with peaches.
– **Add Nuts:** For extra crunch, include chopped nuts such as walnuts or pecans.
## How to Make Ambrosia Salad
### Instructions:
1. In a large mixing bowl, combine sour cream, marshmallows, coconut, and pineapple tidbits. Stir until thoroughly blended.
2. Carefully fold in the mandarin oranges.
3. Chill for at least 4 hours or overnight to let the flavors meld. Serve cold.
### Tips:
– Always drain canned fruit well to avoid excess moisture.
– Make the salad ahead of time to enhance flavor and soften the marshmallows.
– For a fluffier outcome, substitute half of the sour cream with whipped topping.
– Serve the salad in a glass trifle bowl for a beautiful holiday presentation.
## Nutritional Information (per serving)
– **Calories:** 156
– **Carbohydrates:** 20g
– **Protein:** 1g
– **Fat:** 9g
– **Saturated Fat:** 6g
– **Cholesterol:** 17mg
– **Sodium:** 45mg
– **Potassium:** 152mg
– **Fiber:** 2g
– **Sugar:** 15g
Ambrosia Salad is more than just a dish; it’s a nostalgic symbol of family gatherings and celebrations. With its vibrant hues and refreshing flavor, it’s sure to be a favorite at your next occasion. Savor this delightful treat and incorporate it into your family customs!
Read More
Recipe for a Passion Fruit Martini Drink
# Savor this Enjoyable and Fruity Passion Fruit Martini Recipe
This passion fruit martini is a lively and exotic drink that infuses a wave of tropical taste into any celebration. Crafted with smooth vodka, zesty passion fruit purée, alongside a hint of simple syrup and lemon juice, it offers both refreshment and indulgence.
## Reasons We Adore This Passion Fruit Martini
– It’s a straightforward recipe utilizing basic ingredients and genuine fruit puree.
– Preparation takes just 5 minutes and can significantly enhance a date night or get-together.
– This martini and its fruity notes are delightful to pour and enjoy from your favorite martini glasses.
## Ingredients for the Recipe
– **Vodka** – Standard vodka serves as the foundation of this traditional martini. You may also opt for gin if preferred.
– **Passion Fruit Puree** – A robust puree to ensure this beverage boasts the finest passion fruit flavor.
– **Simple Syrup** – The uncomplicated sugar syrup contributes a touch of sweetness to the mix.
– **Lemon Juice** – To introduce a bit of citrus zest. If lemon juice isn’t available, alternatives include lime juice, pineapple juice, or even fresh passion fruit juice.
Refer to the recipe card below for a complete list of ingredients and their quantities.
## Steps to Create a Passion Fruit Martini
1. **Fill a cocktail shaker with ice.**
2. **Include the vodka, passion fruit puree, simple syrup, and lemon juice.**
3. **Shake thoroughly for 30 seconds.**
4. **Pour into your preferred martini glass, garnish with a slice of passion fruit, and savor!**
## Frequently Asked Questions
**What other spirits can I use in this passion fruit martini?**
If vodka isn’t to your liking, gin makes an excellent choice, as does prosecco. For a more intense passion fruit flavor, consider substituting with a passion fruit liqueur, like Passoa.
**Can I prepare a batch of these passion fruit martinis?**
Definitely! You can adjust the servings in the recipe card to match the number of martinis you’d like to create, and the ingredient amounts will modify accordingly.
## Storage Guidelines
Any leftover passion fruit martini can be kept in your refrigerator for up to 1 day.
## Additional Delicious Cocktail Recipes to Explore
Relish this tropical treat throughout the year and elevate your cocktail experience with this straightforward and invigorating passion fruit martini recipe. Enjoy responsibly!
Read More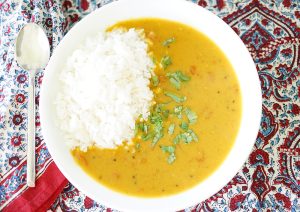
Classic Gujarati Lentil Recipe
# Gujarati Dal Recipe
Gujarati Dal is a scrumptious meal that highlights the distinct culinary heritage of Gujarat, a state in western India renowned for its lively flavors and varied vegetarian dishes. This recipe exemplifies the region’s hallmark blend of sweet and tangy tastes, making it a cherished staple in numerous households.
## Ingredients
– **For the Dal:**
– 1 cup toor dal (pigeon peas)
– 1/2 teaspoon turmeric powder
– 1-2 green chilies, slit
– 1 tablespoon ginger, grated
– Salt, to taste
– 4 cups water
– **For the Tempering:**
– 2 tablespoons ghee or oil
– 1 teaspoon mustard seeds
– 1 teaspoon cumin seeds
– 1-2 dried red chilies
– A pinch of asafoetida (hing)
– 1 tablespoon jaggery or sugar (adjust as needed)
– 1 tablespoon tamarind pulp (or juice of 1 lemon)
– Fresh coriander leaves, chopped (for garnish)
## Instructions
### Step 1: Cook the Dal
1. Wash the toor dal under running water until it is clear.
2. In a pressure cooker, combine the washed dal, turmeric powder, green chilies, ginger, salt, and water.
3. Cook on medium heat for approximately 3-4 whistles or until the dal is tender and mushy. If using a pot, it may take around 30-40 minutes to cook.
### Step 2: Prepare the Tempering
1. In another pan, heat ghee or oil over medium heat.
2. Add mustard seeds and allow them to splutter. Next, add cumin seeds, dried red chilies, and a pinch of asafoetida.
3. Sauté for a few seconds until aromatic.
### Step 3: Combine and Flavor
1. After cooking the dal, mash it gently with a whisk or spoon for a smooth texture.
2. Mix the tempering mixture into the cooked dal.
3. Incorporate jaggery (or sugar) and tamarind pulp (or lemon juice). Adjust salt and sweetness according to preference.
4. Allow the dal to simmer for 5-10 minutes for the flavors to blend.
### Step 4: Serve
1. Garnish with fresh coriander leaves.
2. Serve hot with phulkas (Indian flatbreads) or steamed rice, alongside a side of vegetables or raita.
## Conclusion
Gujarati Dal is not merely a dish; it’s an experience that encapsulates the essence of Gujarati cuisine. The khati meeti (tangy and sweet) flavor profile renders it a versatile dish that complements various accompaniments. Whether relished on a hectic weekday or served at a festive gathering, this dal is bound to impress and satisfy. Enjoy your culinary adventure with this delightful recipe!
Read More
Tasty Recipes for Thanksgiving Sweets
**The Ultimate Dessert Recipes for an Incredible Thanksgiving**
Thanksgiving is a moment to unite with family, express gratitude, and savor a banquet that honors the richness of the harvest season. While the turkey may take center stage, it’s frequently the dessert that captures hearts. With autumn’s harvest providing a multitude of flavors, from pumpkins and apples to luxurious chocolates, the dessert table becomes a canvas for innovation and indulgence. Here are some of the finest dessert recipes that guarantee to make your Thanksgiving exceptionally memorable.
**1. Traditional Pumpkin Pie**
No Thanksgiving dessert display is complete without the legendary pumpkin pie. This timeless treat merges a creamy, spiced pumpkin filling with a flaky, buttery crust. To save time, you can make the pie a day or two prior, allowing the flavors to blend beautifully.
**2. Apple Crisp**
For a dessert that’s both soothing and simple to make, apple crisp is an outstanding option. Sweet apples are baked beneath a crunchy layer of oats, brown sugar, and cinnamon. Serve it warm with a scoop of vanilla ice cream for an irresistible delight.
**3. Pecan Pie**
Luscious and indulgent, pecan pie is a Southern favorite that’s sure to satisfy. The mix of crunchy pecans and a sweet, gooey filling makes it a beloved choice for any dessert table. Just like pumpkin pie, pecan pie can be prepared ahead of time, allowing you to concentrate on other dishes on the big day.
**4. Chocolate Tart**
For chocolate enthusiasts, a chocolate tart provides a refined and luxurious choice. A crisp pastry shell filled with a silky chocolate ganache is both sophisticated and delectable. Top with a sprinkle of sea salt or a dollop of whipped cream for extra flair.
**5. Carrot Cake with Cream Cheese Frosting**
Carrot cake adds a hint of spice and sweetness to the spread, boasting moist layers and creamy frosting. This cake can be made ahead and stored in the refrigerator, making it a practical choice for hectic holiday preparations.
**6. Cranberry Cheesecake**
Introduce a splash of color and tartness with a cranberry cheesecake. The creamy cheesecake base pairs wonderfully with a zesty cranberry topping, resulting in a dessert that’s visually captivating and delightful.
**7. Pear and Almond Tart**
For a dessert that’s both refined and simple to whip up, consider a pear and almond tart. The blend of sweet pears and nutty almond cream in a crisp pastry shell creates a charming way to celebrate the flavors of autumn.
**8. Chocolate Pumpkin Brownies**
Merge the best of both realms with chocolate pumpkin brownies. These fudgy delights are infused with pumpkin puree and warm spices, yielding a dessert that’s both decadent and seasonal.
**9. Maple Pecan Bars**
For a delightful treat that’s easy to share, maple pecan bars are a wonderful choice. The buttery shortbread base is topped with a layer of maple-flavored pecans, creating a dessert that evokes pecan pie but in a convenient bar format.
**10. Spiced Apple Cake**
Embrace the essence of fall with a spiced apple cake. This moist cake incorporates chunks of apples and warm spices, making it a comforting and flavorful addition to your dessert selection.
With these dessert recipes, you can craft a Thanksgiving celebration that concludes on a sweet and fulfilling note. Whether you opt for tried-and-true classics or venture into something new, these desserts are guaranteed to impress your guests and make your holiday festivities truly unforgettable.
Read More
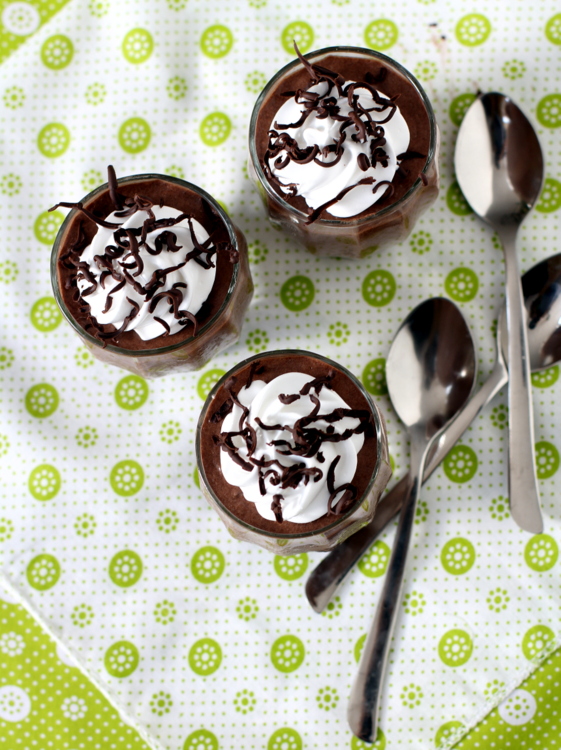
A Manual for Preparing Chocolate Mousse
# Chocolate Mousse: Simple Dessert Recipes for Kids
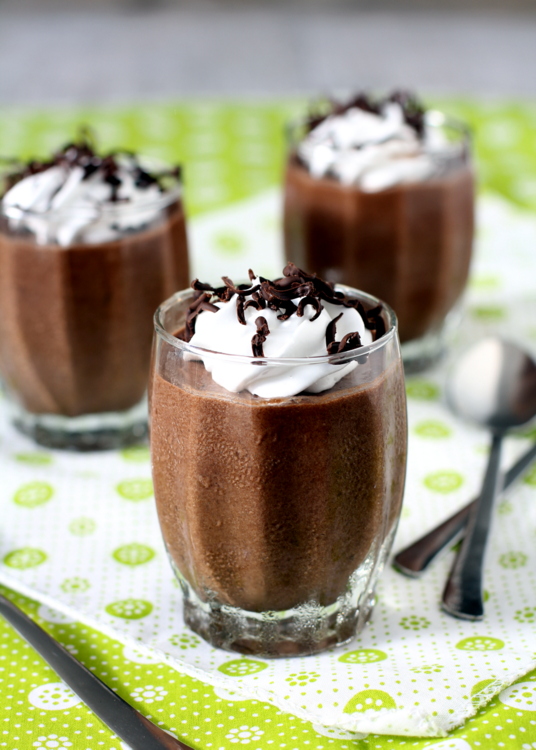
*Chocolate Mousse topped with whipped cream and shredded chocolate*
Savoring decadent desserts is a joyous affair, and chocolate frequently ranks highest among favorites. When crafted into a luscious and creamy chocolate mousse, it turns into an exquisite delight. This dessert is ideal for celebrations or even just to satisfy a sweet tooth.
## Why Choose Chocolate Mousse?
At first glance, chocolate mousse may appear daunting to prepare, yet it is quite simple. This recipe results in a light, creamy, and indulgent chocolate mousse that is loved by both children and adults. It stands out among easy dessert options, making it a fantastic choice for cooking alongside kids. Opting for premium dark chocolate intensifies the taste and overall enjoyment.
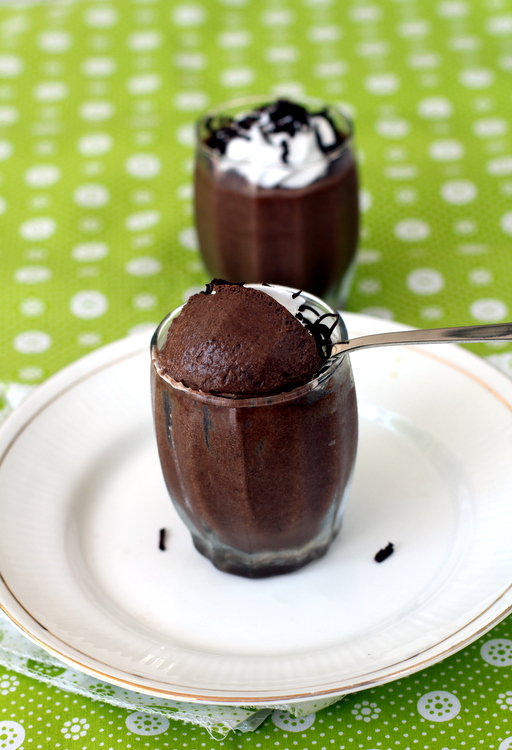
## Serving Ideas
To enhance your chocolate mousse, finish it off with a spoonful of whipped cream and sprinkle with shredded chocolate. This straightforward touch transforms the dessert into an impressive display that will wow any chocolate enthusiast.
### Conclusion
Chocolate mousse is a wonderful dessert that is simple to prepare and great for kids to participate in. Its rich taste and silky consistency make it a beloved choice for many. Whether for a special event or simply a treat, this chocolate mousse recipe is bound to be a success!
Read More
Coriander Poha Dish: Kothimeera Atukulu
### Kids Tiffin Recipes – Kothimeera Atukulu/Fresh Coriander Poha
Poha, often known as flattened rice or beaten rice, is a fundamental ingredient in numerous Indian homes. It consists of dehusked rice that has been flattened into light, dry flakes of varying thickness. Commonly called poha, aval, avalakki, and atukulu, this adaptable ingredient can be utilized to prepare a diverse array of dishes, both savory and sweet.
For busy mothers in search of quick and wholesome tiffin recipes for their children, poha serves as a reliable choice. Of the many poha-based dishes, Kothimeera Atukulu, or Coriander Poha, is particularly noted for its ease of preparation and flavor. This dish is not only simple to make but is also filled with the benefits of fresh ingredients.
#### Ingredients:
– 1 cup poha (flattened rice)
– 1/2 cup finely chopped fresh coriander leaves
– 1/4 cup grated fresh coconut
– 1 small onion, finely chopped (optional)
– 1-2 green chilies, finely chopped (adjust to preference)
– 1/2 teaspoon mustard seeds
– 1/2 teaspoon urad dal (split black gram)
– 1/2 teaspoon turmeric powder
– Salt to taste
– 1-2 tablespoons oil
– Lemon juice (optional, for garnish)
#### Instructions:
1. **Preparation of Poha**: Rinse the poha in water and drain thoroughly. Allow it to rest for about 10-15 minutes to soften.
2. **Tempering**: Heat oil in a pan over medium heat. Add mustard seeds and wait until they splutter. Then, include urad dal and sauté until it attains a golden brown color.
3. **Adding Aromatics**: Incorporate the chopped onions and green chilies into the pan. Sauté until the onions turn translucent.
4. **Mixing Ingredients**: Stir in turmeric powder and salt. Mix well, then add the softened poha to the pan. Combine all ingredients gently.
5. **Incorporating Freshness**: Add grated coconut and chopped coriander leaves. Mix thoroughly and cook for an additional 2-3 minutes, allowing the flavors to blend.
6. **Serving**: Take off the heat and serve hot, optionally garnished with a squeeze of lemon juice.
#### Nutritional Benefits:
Coriander Poha is not only tasty but also nutritious. It is gentle on the stomach, making it a fitting breakfast or snack choice for children. The inclusion of fresh coriander and coconut amplifies the flavor while supplying essential vitamins and minerals. This dish is also ideal for fasting during festivals, making it a versatile recipe to keep handy.
#### Conclusion:
Kothimeera Atukulu, or Fresh Coriander Poha, is a delightful and healthy tiffin recipe that can quickly become a favorite for kids. Its swift preparation and flavorful profile make it an excellent alternative to more typical dishes like upma. Add this recipe to your cooking collection for a refreshing change that is sure to satisfy both children and adults alike.
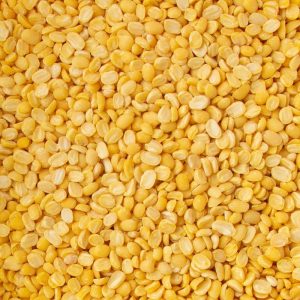
Yellow Moong Dal Ladoo: A Wholesome Indian Treat Crafted from Split Yellow Lentils
### Moong Dal Ladoo: An Exquisite Indian Treat for Diwali
With the Diwali festival on the horizon, the anticipation is unmistakable, and the arrangements for this splendid celebration are underway. A key feature of Diwali is the selection of sweets, known as Mithai, which are crafted and exchanged among loved ones. Among these charming delicacies, Moong Dal Ladoo emerges as a wholesome and tasty choice that is simple to prepare and cherished by many.
#### What is Moong Dal Ladoo?
Moong Dal Ladoo is a classic Indian confection primarily made from moong dal (green gram lentils). This treat is not only abundant in protein but also presents a distinctive taste and texture that makes it a favorite during celebrations. Known by various names across the country, including pesara sunnaundalu in Andhra Pradesh and pasi paruppu laddu in Tamil Nadu, this ladoo can be crafted using either yellow moong dal or whole green gram.
#### Ingredients
To create Moong Dal Ladoo, you will require the following components:
– 1 cup moong dal (yellow or green)
– 3/4 cup jaggery (grated or powdered)
– 1/4 cup ghee (clarified butter)
– 1/2 teaspoon cardamom powder
– Chopped nuts (optional, for decoration)
#### Preparation Steps
Creating Moong Dal Ladoo is a simple endeavor that can be accomplished in just four easy steps:
1. **Roast the Moong Dal**: Start by dry roasting the moong dal in a pan over medium heat until it turns golden brown and releases a nutty scent. This step is essential as it enhances the dal’s flavor.
2. **Powder the Dal**: After the dal is roasted and cooled, blend it into a fine powder using a blender or food processor. Make sure there are no lumps for a smooth consistency.
3. **Mix Ingredients**: In a mixing bowl, blend the powdered moong dal with grated jaggery, ghee, and cardamom powder. Combine thoroughly until all ingredients are well mixed. If you wish, you can incorporate chopped nuts for extra texture and taste.
4. **Shape the Ladoos**: Take small amounts of the mixture and form them into round ladoos using your hands. Ensure they are compact and retain their shape.
#### Storage
Roasted and ground moong dal can be prepared ahead of time and stored in an airtight container, making it easy for quick preparations. The ladoos can also be kept in a cool, dry location for several days, enabling you to savor this sweet delight throughout the Diwali celebrations.
#### Conclusion
Moong Dal Ladoo is not only a delightful addition to your Diwali sweet collection but also a nutritious one. Its ease of preparation and rich nutritional benefits make it a must-try during the festival of lights. Whether you are celebrating with family or sharing with friends, these ladoos are certain to add joy and sweetness to your Diwali festivities. Enjoy the celebrations and partake in the delightful tastes of Moong Dal Ladoo!
Read More
Chiroti: A Classic Indian Dessert Pastry
### Chiroti (Chirote) ~ Indian Sweets Recipes for Diwali
Chiroti, referred to as Chirote, is a classic sweet from Karnataka, India, that occupies a prominent role in festive celebrations, especially during Diwali. This scrumptious dessert is also valued in Maharashtrian cooking, highlighting its appeal across different regions.
#### What is Chiroti?
Chiroti is a layered pastry crafted from all-purpose flour, notable for its fine concentric layers. The process includes frying the pastry until it acquires a golden-brown color, producing a crispy texture. After frying, Chiroti is generally dusted with an ample amount of cardamom-scented powdered sugar or immersed in a sweet cardamom syrup, enriching its taste.
An alternative version of this sweet, known as Pathir Pheni, utilizes “chiroti rava,” a mixture of all-purpose flour and fine semolina (sooji). This variation is usually paired with badami haalu, a sweetened almond milk infused with saffron and cardamom, rendering it a luxurious and sumptuous delicacy.
Chiroti is not merely a festive treat; it is a vital component of Kannadiga wedding meals, often savored by attendees during festivities. Its distinct texture and flavor render it essential for anyone eager to delve into traditional Indian sweets.
#### How to Make Chiroti
Creating Chiroti might appear challenging, but it is a simple procedure that even novice cooks can manage. Here’s an easy guide to whip up this delightful sweet:
**Ingredients:**
– All-purpose flour
– Rice flour (for layering)
– Water (for the dough)
– Oil (for frying)
– Cardamom powder (for flavoring)
– Sugar (for sprinkling or syrup)
**Instructions:**
1. **Prepare the Dough:** Combine all-purpose flour with water to create a soft dough. Allow it to rest for approximately 30 minutes.
2. **Make the Layering Paste:** Prepare a paste using rice flour and water. This will be applied between the layers.
3. **Roll Out the Dough:** Divide the dough into small balls. Roll each ball into thin rotis.
4. **Layer the Rotis:** Apply the rice flour paste on each roti and stack three to four rotis atop one another.
5. **Roll and Slice:** Roll the stacked rotis into a cylindrical log and cut them into ½ inch thick slices.
6. **Flatten and Fry:** Take each slice and roll it thin once more. Deep fry in hot oil until they are golden brown and crispy.
7. **Finish with Sugar:** Once fried, sprinkle with cardamom-flavored powdered sugar or dip in sweet syrup.
Chiroti is a crunchy treat that is sure to be a favorite during Diwali celebrations. Its irresistible nature may tempt you to indulge more than you intended, so be ready to share with loved ones!
#### Conclusion
Chiroti is a quintessential Indian sweet that captures the essence of celebration. Its rich flavors and delightful texture make it an outstanding choice for Diwali festivities. Whether enjoyed as a singular delight or alongside badami haalu, Chiroti is bound to bring happiness to your festive events.
Read More
Cornflakes Mixture
Cornflakes Mixture ~ South Indian Bakery Style
Cornflakes mixture is a cherished savory snack available in bakeries across India, especially in the southern regions. This delightful snack is a blend of various crispy items, mainly cornflakes, and is spiced to provide a flavorful experience.
What is Cornflakes Mixture?
Mixture is a classic Indian snack that features a variety of savory components made from chickpea flour, including murukku, sev, and boondi. The foundation of cornflakes mixture usually contains a substantial portion of cornflakes, which are combined with other crunchy ingredients such as roasted peanuts, cashews, fried beaten rice, and assorted chickpea flour snacks. The mixture is flavored with red chili powder and additional spices, allowing for a customizable taste profile that can be sweet, spicy, or tangy.
During festive times like Diwali, families make large quantities of mixture to share with friends and relatives, often storing them in stainless steel containers called dabbas. This tradition underscores the significance of mixture in Indian culture, particularly during celebrations.
Ingredients for Cornflakes Mixture
The essential ingredients of cornflakes mixture comprise:
– Cornflakes: The main element, offering a crispy texture.
– Chickpea flour snacks: Such as murukku and sev, which contribute taste and diversity.
– Beaten rice (poha): Provides extra crunch.
– Nuts: Roasted peanuts and cashews amplify the richness of the mixture.
– Spices: Red chili powder and other seasonings for flavor enhancement.
– Herbs: Curry leaves for an aromatic essence.
Preparation
To prepare cornflakes mixture, the following steps are usually undertaken:
1. Fry the Snacks: Make sev and murukku following traditional recipes. These can be prepped ahead of time and stored.
2. Combine Ingredients: In a sizable bowl, blend the cornflakes, fried snacks, beaten rice, and nuts.
3. Season: Introduce red chili powder and any other preferred spices, mixing thoroughly to ensure an even coating.
4. Serve: Relish the mixture as a standalone snack or utilize it as a topping for chaat.
Serving Suggestions
Cornflakes mixture can be savored in multiple ways:
– As a Snack: Serve it plain alongside a cup of masala chai for a delightful tea-time indulgence.
– In Chaat: Transform the mixture into a chaat by adding diced onions, tomatoes, fresh coriander, green chutney, sweet chutney, and a splash of lemon juice. For an added twist, think about incorporating sweetened curd.
Conclusion
Cornflakes mixture is more than just a snack; it represents the essence of Indian hospitality and celebration. Its crunchy texture and spicy flavor make it a versatile treat that can be enjoyed solo or as part of a broader meal. Whether made for a festival or a casual get-together, cornflakes mixture is guaranteed to please everyone who tastes it.
Read More