Sautéed Mushrooms Instructions
### Mushroom Fry: A Quick and Flavorful Indian Stir Fry
Mushroom fry is an enjoyable and straightforward dish that acts as an excellent accompaniment for chapati or rotis. This simple stir fry highlights the adaptability of mushrooms, which are a favored ingredient in numerous Indian households. Although they are widely loved, mushroom recipes frequently receive less attention in home cooking blogs, making this delectable mushroom fry a must-try.
#### The Role of Mushrooms in Indian Cuisine
In India, mushrooms are referred to by various names: “kumbh” in North India and “puttagodugu” in Andhra Pradesh. They are valued for their distinct taste, health benefits, and function as a meat alternative in vegetarian meals. With the increasing interest in plant-based eating, mushrooms have become even more significant.
#### A Tasty Recipe
This mushroom fry recipe is not only quick and straightforward but also allows for flexibility in spice combinations and textures. The essential aspect is to use spices judiciously to accentuate, rather than overshadow, the mushrooms’ natural flavor. The dish can be made as a completely dry sauté or with a semi-wet texture, depending on individual taste.
**Ingredients:**
– Fresh Indian mushrooms (kumbh/puttagodugu)
– Ghee or oil
– Coconut milk
– Freshly crushed peppercorns
– Lemon juice
– Salt to taste
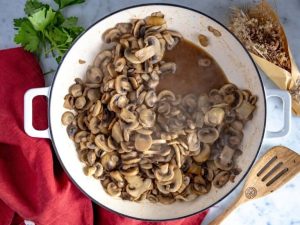
**Instructions:**
1. Clean and slice the mushrooms.
2. Heat ghee or oil in a pan.
3. Add the sliced mushrooms and sauté until they release moisture.
4. Stir in coconut milk and freshly crushed peppercorns.
5. Cook until the mushrooms are tender and the mixture reaches the desired consistency.
6. Finish with a splash of lemon juice and salt to taste.
#### Serving Suggestions
Mushroom fry pairs wonderfully with chapati, roti, or rice, making it a flexible component of any meal. Its rich flavors and fragrant profile will astonish and please anyone who samples it.
#### Conclusion
This simple mushroom fry is a fantastic way to add mushrooms to your diet, showcasing their tastiness in an uncomplicated Indian-style preparation. Whether you are an experienced cook or a novice, this recipe is a valuable addition to your collection of Indian food recipes. Try it out and relish the delightful flavor of mushroom fry!
Read More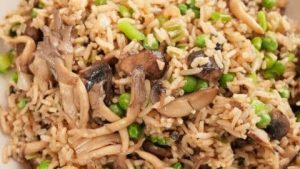
Mushroom Fried Rice Dish
### Mushroom Fried Rice: A Timeless Indian-Chinese Comfort Food
Mushroom fried rice is a cherished dish that merges the deep tastes of mushrooms with a variety of vegetables, resulting in a cozy and fulfilling meal. This Indian-Chinese vegetarian fried rice is not only simple to make but also adaptable, permitting a range of ingredient variations.
#### Fast and Simple Preparation
One of the finest features of mushroom fried rice is its straightforwardness. If you have leftover chilled rice, you can prepare this dish in under 20 minutes. The ingredients are few, usually comprising mushrooms, capsicum, carrots, beans, cabbage, corn, and cauliflower. This dish can be enjoyed by itself or paired with different proteins such as eggs, chicken, or prawns, making it a flexible choice for any meal.
#### Ingredients and Flavor Profile
The main elements of mushroom fried rice consist of:
– **Mushrooms**: The primary ingredient, contributing an earthy taste.
– **Vegetables**: Fresh produce like capsicum and beans improve the dish’s texture and nutritional value.
– **Aromatics**: Chopped garlic and spring onions add layers of flavor.
– **Seasonings**: Soy sauce, vinegar, pepper powder, and salt form a perfect mixture of sweet, salty, and spicy notes.
#### Cooking Tips for Ideal Fried Rice
To achieve restaurant-quality fried rice, keep these tips in mind:
1. **Select Quality Rice**: The rice should be cooked and allowed to rest for a few hours or refrigerated to reduce moisture.
2. **Keep Grains Separate**: Make sure each grain of rice is distinct and dry to prevent clumping.
3. **Stir-Fry on High Heat**: Prepare the rice at high heat with constant stirring to get a crispy texture and smoky taste.
4. **Utilize a Wide Wok**: A well-seasoned wok ensures even cooking and avoids sticking. Ample oil is crucial for properly roasting the ingredients.
#### Serving Suggestions
Mushroom fried rice can be savored as a standalone dish or accompanied by various sides. It pairs wonderfully with sweet and sour vegetables or schezwan vegetables for extra zest. Alternatively, serving it with tomato sauce or ketchup can elevate the flavor profile, creating a satisfying one-pot vegetarian meal.
#### Conclusion
Mushroom fried rice is a delightful dish that embodies the spirit of Indian-Chinese cuisine. Its flavor balance and ease of preparation make it a favorite among many families. Whether you’re seeking a quick meal or a comforting dish to enjoy with loved ones, mushroom fried rice is guaranteed to please. Try this recipe to savor the flavors reminiscent of restaurant-style fried rice right in your kitchen.
Read More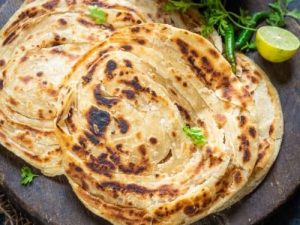
How to Prepare Lachha Paratha: A Detailed Guide
### Lachha Paratha: A Crispy, Flaky, Layered North Indian Flatbread
Lachha paratha is a cherished Indian flatbread recognized for its distinctive flaky texture and numerous layers. Hailing from Punjab, this flatbread is generally prepared using whole wheat flour, or atta, and is also known as lachedar paratha. It enjoys particular popularity in North India, especially in the well-known Paranthe Wali Gali in Old Delhi, where street vendors offer an array of parathas, with lachha paratha being a notable favorite.
#### Ingredients and Preparation
To prepare lachha paratha, the main ingredients consist of:
– Whole wheat flour (atta)
– Salt
– Oil or ghee (clarified butter)
– Water
For those who prefer a softer texture, a blend of all-purpose flour and whole wheat flour in equal parts can be utilized. Nonetheless, solely using atta is healthier due to its high fiber content and lower glycemic index.
#### Step-by-Step Guide to Making Lachha Paratha
1. **Prepare the Dough**: In a bowl, combine whole wheat flour with salt. Incorporate a tablespoon of oil or ghee and mix thoroughly. Gradually add warm water to achieve a soft dough. Knead for several minutes and let it rest for 10 minutes.
2. **Divide the Dough**: Pinch off lemon-sized portions from the dough and roll them into smooth balls. Dust the working surface with flour.
3. **Roll the Dough**: Flatten one ball into a circle approximately 7-8 inches in diameter. Drizzle it with oil or ghee and sprinkle flour on top to boost flakiness.
4. **Create Pleats**: Beginning at one end, fold the rolled flatbread into ½ inch pleats.
5. **Form a Coil**: After creating the pleats, stretch the dough slightly and coil it into a spiral shape, akin to a Swiss roll.
6. **Rest the Coils**: Set the coiled dough on the working surface, dust it with flour, and repeat the process with the remaining dough. Allow the coils to rest for 30 minutes beneath a damp cloth.
7. **Roll Again**: Once rested, take a coiled dough piece, dust it with flour, and roll it out again into a flat round shape.
8. **Cook the Paratha**: Preheat an iron tawa or griddle. Place the rolled paratha on the hot surface and cook for about 20 seconds over medium-high heat before flipping. Continue cooking until brown spots emerge, gently pressing with a flat ladle to assist in puffing. Drizzle some oil or ghee and roast until both sides are nicely browned.
#### Serving Suggestions
Lachha paratha is best savored hot from the griddle, accompanied by various side dishes like palak methi paneer, palak paneer, dal makhani, or mushroom masala. It can be enjoyed at any meal of the day, making it a flexible addition to your dining experience. If preparing ahead of time, wrap the parathas in a kitchen towel to maintain warmth, or freeze them for future use.
#### Conclusion
Preparing lachha paratha at home is a fulfilling endeavor that fills your kitchen with enticing aromas. Once you try this recipe, you might find yourself choosing homemade parathas over takeout. Savor the crispy, flaky layers of lachha paratha, a genuine staple of North Indian cuisine!
Read More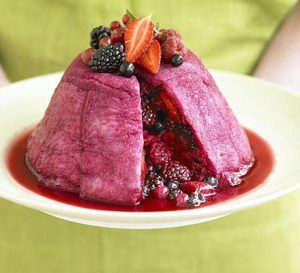
Strawberry Pudding Recipe and Preparation Instructions
### Strawberry Pudding Recipe: A Creamy, Eggless Dessert Featuring Fresh Strawberries and Agar Agar
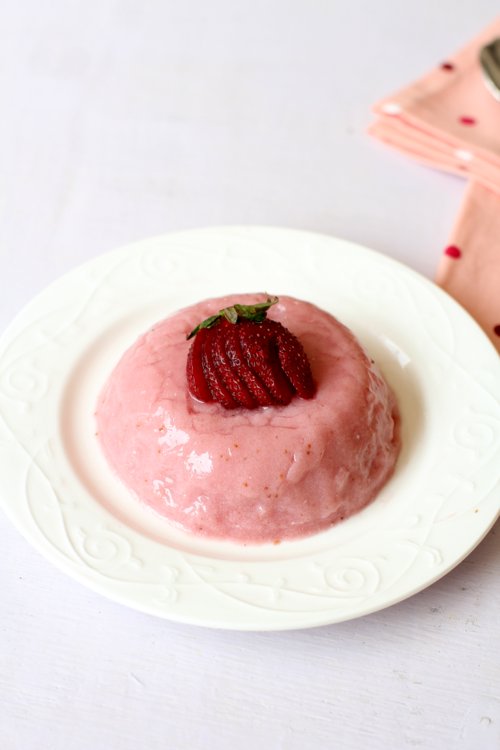
*Strawberry Pudding*
Strawberry pudding is the perfect sweet treat for Valentine’s Day, highlighting the bright pink color and pleasing sweet-tart taste of fresh strawberries. This recipe is not just straightforward but also egg-free, catering to various dietary needs. With just a few ingredients and a simple preparation method, this creamy dessert is ideal for any celebratory event.
#### Why Opt for Homemade Strawberry Pudding?
Homemade strawberry pudding outshines store-bought instant varieties. By incorporating fresh ingredients, you can craft a pudding that is flavorful and textured. This recipe calls for low-fat milk and agar agar (known as china grass) instead of gelatin, making it vegetarian-friendly. For an even creamier consistency, you may replace low-fat milk with whole milk.
The finished dessert is light and not overly sweet, showcasing a smooth texture akin to classic puddings. This strawberry pudding serves as a wonderful delight to savor post-dinner or as an after-school treat.
#### Ingredients
– 2 cups fresh strawberries, blended
– 2 cups low-fat milk (or whole milk)
– 1/2 cup sugar (adjust based on preference)
– 1/4 cup agar agar (china grass)
– 1 teaspoon vanilla extract (optional)
#### Instructions
1. **Prepare the Agar Agar**: Soak the agar agar in 1 cup of warm water for around 10-15 minutes until it becomes soft.
2. **Heat the Milk**: In a saucepan, warm the milk over medium heat. Add the sugar and stir until it completely dissolves.
3. **Combine Agar Agar**: Once the milk is heated, incorporate the soaked agar agar into the saucepan. Stir continuously until the agar agar is fully dissolved.
4. **Add Strawberry Puree**: Take the saucepan off the heat and mix in the strawberry puree and vanilla extract (if desired). Stir thoroughly to blend.
5. **Set the Pudding**: Pour the mixture into individual serving cups or a larger bowl. Let it cool to room temperature, then chill in the refrigerator for at least 2-3 hours or until set.
6. **Serve**: Once set, serve the pudding cold. You can garnish it with strawberry syrup, whipped cream, or fresh diced strawberries to enhance the flavor.
#### Conclusion
This eggless strawberry pudding recipe yields four servings and is a delightful method to relish the taste of fresh strawberries. The silky, smooth texture combined with the mild tartness of the strawberries makes each bite enjoyable. It’s a dessert that children will love, easy to make and utterly delicious, making it essential for your dessert collection.
If you adore strawberries, be sure to explore other strawberry recipes, like the [strawberry cupcakes recipe](https://www.sailusfood.com/2013/02/13/strawberry-cupcakes-recipe/).
Enjoy preparing this wonderful strawberry pudding from scratch and dazzle your loved ones with this exquisite treat!
Read More
How to Create a Strawberry Milkshake: A Detailed Recipe
# Strawberry Milkshake Recipe: A Creamy, Refreshing Dessert Drink
Strawberry milkshake is a delightful drink that fuses the sweetness of fresh strawberries with the creamy texture of ice cream, making it a beloved choice for both children and adults. This refreshing beverage is ideal for an after-school treat or as a dessert, particularly during strawberry season.
## Nutritional Advantages of Strawberries
Strawberries are not only tasty but also loaded with nutrients. They contain high levels of Vitamin A and K, antioxidants, fiber, and folic acid. Including fresh seasonal fruits like strawberries in your meals can provide essential nutrients while satisfying your cravings for sweetness. A strawberry milkshake is an excellent method to reap these health benefits in an enjoyable and flavorful way.
## Essential Components for an Ideal Strawberry Milkshake
The key to a superb strawberry milkshake is using top-notch ingredients. Here’s what you will require:
– **Fresh Strawberries**: The main attraction, fresh strawberries deliver the primary flavor and sweetness.
– **Strawberry Ice Cream**: Necessary for that creamy consistency; the quality of the ice cream significantly influences the final flavor.
– **Milk**: Whole milk is recommended for a richer taste, but you can opt for any milk of your choice.
– **Optional Add-ins**: Sugar or honey for added sweetness, and whipped cream for garnish.
## Preparation Suggestions
1. **Chill Ingredients**: For a smooth and creamy milkshake, pre-chill the strawberries and milk. This helps create a refreshing beverage.
2. **Freeze Strawberries**: You can also freeze the strawberries or utilize strawberry puree to achieve a thicker texture.
3. **Blend Thoroughly**: Put the strawberries, ice cream, and milk into a blender. Blend until smooth and creamy, adjusting the milk amount to achieve your preferred consistency.
## Easy Strawberry Milkshake Recipe
### Ingredients:
– 2 cups fresh strawberries, hulled and chopped
– 2 cups strawberry ice cream
– 1 cup milk (adjust for desired thickness)
– Sugar or honey to taste (optional)
### Instructions:
1. **Prepare Strawberries**: Rinse and hull the strawberries. If using frozen strawberries, allow them to sit at room temperature for a few minutes.
2. **Blend Ingredients**: In a blender, add the strawberries, strawberry ice cream, and milk. Blend until smooth.
3. **Taste and Adjust**: Sample the milkshake and add sugar or honey if needed. Blend again to combine.
4. **Serve**: Pour the milkshake into tall glasses. Top with whipped cream if desired and decorate with a strawberry.
## Conclusion
Creating a strawberry milkshake is quick and effortless, especially when you have the necessary ingredients available. This creamy, luxurious drink not only satisfies your taste buds but also allows you to enjoy the nutritional advantages of strawberries. So, the next time you have fresh strawberries, treat yourself to this delightful strawberry milkshake recipe!
Read More
Recipe for Manchurian with Mushrooms
### Mushroom Manchurian Recipe: An Appetizing Indian Chinese Starter
Mushroom Manchurian is a cherished dish in the realm of Indian Chinese cuisine, recognized for its crunchy texture and tasty sauce. This dish often serves as a popular starter in numerous Indian eateries and food carts, making it essential for anyone who appreciates Indo-Chinese flavors. Here’s a straightforward recipe to bring this delightful dish to life in your own kitchen.
#### Ingredients
– **For the Mushroom Balls:**
– 250 grams of button mushrooms, cleaned and diced
– 1/2 cup all-purpose flour (maida)
– 1/4 cup cornflour
– 1 teaspoon ginger-garlic paste
– 1/2 teaspoon red chili powder
– Salt as per taste
– Water as needed
– Oil for deep frying
– **For the Sauce:**
– 2 tablespoons oil
– 1/2 cup spring onion whites, chopped
– 1 tablespoon ginger-garlic, finely minced
– 2 tablespoons soy sauce
– 1 tablespoon green chili sauce
– 1 tablespoon tomato ketchup
– 1 teaspoon sugar
– Salt as necessary
– Spring onion greens and fresh coriander for decoration
#### Instructions
1. **Prepare the Mushroom Balls:**
– In a mixing bowl, blend all-purpose flour, cornflour, ginger-garlic paste, red chili powder, and salt. Combine thoroughly.
– Gradually add water to achieve a thick batter. The batter should sufficiently coat the mushrooms without dripping.
– Immerse the chopped mushrooms into the batter, ensuring a good coating.
2. **Deep Fry the Mushroom Balls:**
– Heat oil in a deep skillet over medium heat.
– Gently place the batter-covered mushrooms into the hot oil, frying in batches to prevent overcrowding.
– Fry until they turn golden brown and crispy. Remove them with a slotted spoon and let them drain on paper towels.
3. **Prepare the Sauce:**
– In a separate pan, warm 2 tablespoons of oil over medium heat.
– Incorporate the chopped spring onion whites and ginger-garlic. Sauté until aromatic.
– Add the soy sauce, green chili sauce, tomato ketchup, and sugar. Mix thoroughly and cook for a minute.
– Modify the seasoning with salt if required.
4. **Combine and Serve:**
– Introduce the fried mushroom balls into the sauce and gently toss to ensure even coating.
– Garnish with sliced spring onion greens and fresh coriander.
– Serve hot as a starter or snack.
#### Tips for Perfect Mushroom Manchurian
– **Batter Consistency:** Verify that the batter is thick enough to coat the mushrooms without being excessively runny.
– **Frying Temperature:** Keep the oil temperature consistent to guarantee that the mushroom balls are crispy instead of soggy.
– **Serving:** Serve promptly after combining with the sauce to maintain the crispiness of the mushroom balls.
Mushroom Manchurian is not only simple to create but also a delightful dish that can captivate your family and friends. Savor this restaurant-style starter at home with your preferred drinks!
Read More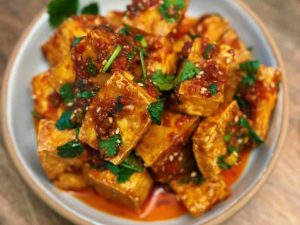
Chilli Mushroom Recipe: A Comprehensive Guide to Crafting a Zesty Meal
### Chilli Mushroom Recipe: An Authentic Indian Chinese Appetizer
Chilli mushroom is a scrumptious Indian Chinese appetizer that merges crunchiness with a blend of sweet, tangy, and spicy tastes. This dish serves as not only a comforting meal but also a highly addictive starter that will undoubtedly captivate your guests. With its lively flavors and textures, chilli mushroom is a sought-after selection in restaurants, and now you can bring this dish to life in your own kitchen.
#### Ingredients
– **For the Mushrooms:**
– 250 grams of button mushrooms, washed and halved
– 1/2 cup all-purpose flour
– 1/4 cup corn flour
– Water (as required for batter)
– Salt (to taste)
– Oil (for deep frying)
– **For the Sauce:**
– 2 tablespoons red chili paste (prepared from soaked and blended dry red chilies)
– 1 tablespoon minced ginger
– 1 tablespoon minced garlic
– 2 tablespoons soy sauce
– 1 tablespoon tomato sauce
– 1 tablespoon sugar
– 1 tablespoon vinegar
– 1 tablespoon corn flour (dissolved in 2 tablespoons water)
– 1/2 cup chopped spring onions
– 1/2 cup diced green capsicum
– Salt (to taste)
– Oil (for sautéing)
#### Instructions
1. **Prepare the Red Chili Paste:**
– Soak dry red chilies in warm water for approximately 10 minutes.
– Drain and purée the chilies into a smooth paste. Set aside.
2. **Make the Batter:**
– In a bowl, combine all-purpose flour, corn flour, salt, and sufficient water to form a smooth batter.
3. **Fry the Mushrooms:**
– Heat oil in a deep frying pan on medium heat.
– Dip the mushroom halves into the batter, making sure they are thoroughly coated.
– Deep fry the mushrooms until they turn golden brown and crispy. Remove and drain on paper towels.
4. **Prepare the Sauce:**
– In a different pan, warm a tablespoon of oil.
– Add the minced ginger and garlic, and sauté until aromatic.
– Incorporate the red chili paste, soy sauce, tomato sauce, sugar, and vinegar. Mix thoroughly.
– Add the corn flour slurry and cook until the sauce is thickened.
– Toss in the fried mushrooms, spring onions, and green capsicum. Stir until the mushrooms are evenly coated with the sauce.
5. **Serve:**
– Serve the chilli mushroom hot as an appetizer. Toothpick skewers can be used for convenient serving.
#### Tips
– For a vegan alternative, make sure the sauces utilized are devoid of animal ingredients.
– Tailor the spice level by adjusting the quantity of red chili paste based on your taste.
– This dish complements vegetable fried rice or noodles beautifully, making it an excellent addition to any meal.
Chilli mushroom is more than just a dish; it’s a culinary adventure that captures the essence of Indian Chinese cuisine right in your home. Whether for a celebration or a relaxed family dinner, this recipe is bound to be a success. Enjoy the explosion of flavors and the crispy texture that makes this dish beloved among mushroom enthusiasts!
Read More
Recipe for Cheese Corn Fritters
### Cheese Corn Balls Recipe: A Tasty Vegetarian Snack for Children
Cheese corn balls are an exciting treat that merges the sweetness of corn, the creaminess of cheese, and the heartiness of potatoes. This straightforward recipe is ideal for children and works wonderfully as a party appetizer that everyone will appreciate.
#### Ingredients
– 2 medium potatoes (boiled and mashed)
– 1 cup sweet corn (cooked)
– 1 cup shredded cheese (cheddar or mozzarella)
– 1 teaspoon ginger (grated)
– 1-2 green chilies (finely chopped)
– 2 tablespoons fresh coriander leaves (chopped)
– Salt to taste
– Bread crumbs (for coating)
– Corn flour (for batter)
– Oil (for deep frying)
#### Instructions
1. **Prepare the Mixture**: In a mixing bowl, combine the boiled and mashed potatoes, cooked sweet corn, shredded cheese, ginger, green chilies, coriander leaves, and salt. Mix thoroughly until all ingredients are well combined.
2. **Shape the Balls**: Take small amounts of the mixture and form them into balls. If you desire a cheesy surprise, insert a small cube of cheese in the center of each ball before sealing it.
3. **Coat the Balls**: Roll each ball in corn flour batter, then coat it with bread crumbs. Ensure a uniform coating for a crunchy exterior.
4. **Chill**: Put the coated balls in the refrigerator for approximately 15-30 minutes. This helps them retain their shape during frying.
5. **Fry the Balls**: Heat oil in a deep frying pan over medium heat. Once hot, carefully add the cheese corn balls in batches. Fry until they turn golden brown and crispy on the outside. Remove and drain on paper towels.
6. **Serve**: Serve hot with your preferred dipping sauces such as mayonnaise, ketchup, or barbecue sauce.
#### Tips for Perfect Cheese Corn Balls
– **Avoid Moisture**: Ensure that the potatoes are not overcooked and are fully cooled before mashing. Excess moisture can render the mixture too wet.
– **Flavor Variations**: Feel free to incorporate spices like red chili flakes, oregano, or garlic powder to boost the flavor.
– **Freezing Option**: For party preparations, you can freeze the shaped balls after coating them with breadcrumbs. Thaw before frying for a quick snack.
These cheese corn balls are not only popular with kids but also serve as a fantastic addition to any gathering. Their crunchy exterior and soft, cheesy interior provide a delightful contrast that’s hard to resist. Enjoy this easy yet scrumptious recipe at home and watch your family relish these delicious treats!
Read More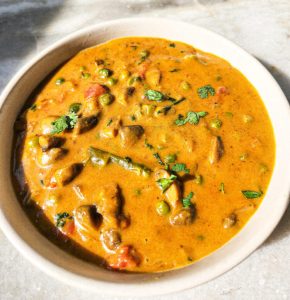
Recipe for Mushroom Matar Dish
### Matar Mushroom Recipe: A Creamy Indian Mushroom Gravy
Matar mushroom curry is a scrumptious vegetarian meal that melds the rich tastes of mushrooms with the sweetness of green peas (matar). This creamy, restaurant-quality gravy is ideal for a warm dinner, particularly when served with naan or chapati. The dish is not only flavorful but also filled with nutrients, making it a healthy option for any dining occasion.
#### Ingredients
– 250 grams mushrooms, sliced
– 1 cup green peas (fresh or frozen)
– 2 medium tomatoes, blanched and pureed
– 1 medium onion, finely chopped
– 1-2 green chilies, slit (adjust to your preference)
– 1 tablespoon ginger-garlic paste
– 10-12 cashew nuts (soaked in warm water)
– 1/2 cup fresh cream (or coconut milk for a vegan alternative)
– 2 tablespoons ghee or butter
– 1 teaspoon cumin seeds
– 1 teaspoon garam masala
– 1/2 teaspoon turmeric powder
– 1 teaspoon red chili powder (adjust to your preference)
– Salt to taste
– Fresh coriander leaves for garnish
#### Instructions
1. **Prepare the Cashew Paste**: Blend the soaked cashew nuts into a smooth paste using a bit of water. Set it aside.
2. **Sauté the Mushrooms**: In a pan, heat ghee or butter over medium heat. Add the sliced mushrooms and fry until they are slightly browned. Remove from the pan and set aside.
3. **Cook the Onions**: In the same pan, add cumin seeds and let them splutter. Add the chopped onions and green chilies. Sauté until the onions are golden brown.
4. **Add Ginger-Garlic Paste**: Mix in the ginger-garlic paste and cook for another minute until the raw scent disappears.
5. **Make the Gravy**: Add the blanched tomato puree, turmeric powder, red chili powder, and salt. Cook the mixture until the oil begins to separate from the gravy.
6. **Combine Ingredients**: Add the sautéed mushrooms and green peas to the gravy. Stir well and cook for a few minutes.
7. **Add Cashew Paste and Cream**: Incorporate the cashew paste and fresh cream. If the gravy is too thick, add a little water to achieve the desired consistency. Simmer for 5-7 minutes.
8. **Finish with Garam Masala**: Sprinkle garam masala and mix thoroughly. Cook for an additional minute.
9. **Garnish and Serve**: Garnish with fresh coriander leaves and serve hot with naan or chapati.
#### Tips for Best Results
– **Blanching Tomatoes**: Blanching tomatoes enhances the flavor and texture of the gravy. If you’re pressed for time, store-bought tomato puree can be used.
– **Vegan Option**: For a vegan alternative, replace fresh cream with coconut milk or cooked pumpkin puree for a creamy consistency.
– **Make Ahead**: The gravy can be made in advance and frozen. Just sauté the mushrooms and peas before serving.
Matar mushroom curry is a flexible dish that can be enjoyed solo or as part of a bigger meal. Its rich, creamy texture and flavor combination make it a favorite in many homes. Whether you’re cooking for a family dinner or hosting guests, this recipe is bound to impress. Savor the delightful taste of matar mushroom with your preferred Indian bread!
Read More
Vegan Caesar Salad featuring Oyster Mushrooms
### Vegan Caesar Salad with Sear-Crisped Mushrooms
As summer gives way to fall, it’s an ideal moment to delve into fresh and innovative culinary endeavors. This article features an enchanting vegan take on the traditional Caesar salad, highlighting the mushrooms that play a pivotal role in this recipe.
#### The Inspiration Behind the Recipe
I recently presented this recipe during a Lunch Therapy cookalong on Instagram, and the feedback was incredibly encouraging. Following our recent relocation to Denmark, we’ve been addressing the obstacles of acclimating to a new home, but the thrill of cooking and sharing recipes continues to be a consistent source of happiness. This vegan Caesar salad not only highlights the adaptability of mushrooms but also offers a comforting dish that you can prepare at your leisurely pace.
#### The Technique: Searing Mushrooms
A notable aspect of this recipe is the distinctive technique used for the mushrooms. Drawing inspiration from various culinary traditions, the method consists of pressing the mushrooms between two pans over medium-high heat. This approach allows the mushrooms to emit their natural juices while achieving a delightfully crunchy exterior. The outcome is a dish that combines crispiness and juiciness, brimming with flavor.
This inventive cooking method for mushrooms is attributed to Derek Sarno, a prominent name in the plant-based culinary scene. The texture produced through this technique is akin to chicken, making it a superb alternative for those wishing to decrease meat intake without giving up on flavor or satisfaction.
#### Ingredients for the Vegan Caesar Salad
– **For the Sear-Crisped Mushrooms:**
– Fresh mushrooms (such as portobello or cremini)
– Olive oil
– Salt and pepper
– Marinade (your preference, but a blend of soy sauce, garlic, and herbs works wonderfully)
– **For the Vegan Caesar Dressing:**
– Vegan mayonnaise
– A dash of vinegar (apple cider or lemon juice)
– Capers (as a substitute for traditional anchovies)
– Salt and pepper to taste
– **For the Salad:**
– Chopped romaine lettuce
– Warm chickpeas (to serve as a hearty replacement for croutons)
#### Preparation Steps
1. **Sear the Mushrooms:**
– Heat two pans over medium-high heat.
– Position the mushrooms between the pans and press firmly.
– Cook for several minutes until golden and crispy on the exterior.
– Remove from heat and toss in your marinade, allowing them to absorb the flavors.
2. **Make the Dressing:**
– In a bowl, blend vegan mayonnaise, a dash of vinegar, and capers. Mix thoroughly and season with salt and pepper as desired.
3. **Assemble the Salad:**
– In a large bowl, toss the chopped romaine lettuce with the dressing until well-coated.
– Incorporate the warm chickpeas and top with the seared mushrooms.
4. **Serve and Enjoy:**
– Plate the salad and relish this colorful, delicious dish that is guaranteed to impress.
#### Conclusion
This vegan Caesar salad featuring sear-crisped mushrooms is not only a delectable meal but also a reflection of the creativity found in plant-based cooking. Whether you’re a long-time vegan or simply seeking to add more plant-based dishes to your meals, this recipe stands out as a fantastic choice. Try it and share your feedback!
Read More