
Top 30 Tasty and Healthy Fruit Smoothie Recipes
Alex & Sonja: Culinary Innovators and Cookbook Writers
Introducing Alex and Sonja Overhiser, the lively pair behind the beloved culinary site, A Couple Cooks. As the writers of two celebrated cookbooks, dedicated parents, and a genuine couple who share a zeal for cooking, Alex and Sonja have established a unique space in the realm of food blogging. Their adventure commenced in 2010 when they unveiled A Couple Cooks, a platform devoted to presenting straightforward, seasonal recipes and the happiness that accompanies cooking as a team.
Throughout the years, Alex and Sonja have assembled an extensive array of thousands of original recipes, each made with attention and imagination. Their website is a goldmine of culinary inspiration, showcasing everything from speedy weeknight meals to intricate dishes for special events. Each recipe is carefully composed and stunningly photographed by the couple, guaranteeing that readers have a clear and appealing roadmap to follow.
What distinguishes Alex and Sonja is their dedication to making cooking approachable and delightful for everyone. They offer a wealth of cooking insights and meal planning suggestions, facilitating a smoother experience for home cooks to navigate the kitchen with assurance. Their recipes are not only tried and true by the couple themselves but also by their children, ensuring that they are family-friendly and enticing to a diverse array of tastes.
Through A Couple Cooks, Alex and Sonja have cultivated a community of food lovers who share their passion for nutritious, flavorful meals. Their relatable approach and genuine enthusiasm for cooking have struck a chord with readers worldwide, establishing them as trusted voices in the culinary domain. Whether you’re an accomplished chef or a kitchen beginner, Alex and Sonja’s recipes provide something for everyone, encouraging you to explore the pleasure of cooking and the joy of sharing a meal with those you care about.
Read More
40 Easy and Tasty Chicken Dinner Ideas
Alex & Sonja: The Culinary Pair Behind A Couple Cooks
Introducing Alex and Sonja Overhiser, the vibrant pair who have transformed their love for cooking into a flourishing online community. As the creators of two celebrated cookbooks and the founders of the well-loved website A Couple Cooks, Alex and Sonja have been motivating home cooks globally since 2010. Their adventure started with a straightforward goal: to spread the joy of cooking through straightforward, seasonal recipes.
Residing in Indianapolis, Indiana, Alex and Sonja are not only life partners but also kitchen collaborators. Their joint method of cooking has led to thousands of unique recipes that are both tasty and easy to make. Whether you’re an experienced chef or a kitchen beginner, their recipes aim to make cooking fun and hassle-free.
The Overhisers’ philosophy focuses on employing fresh, seasonal ingredients to prepare nourishing meals. They believe that cooking should be an enjoyable activity, one that unites people and promotes a sense of community. This principle is reflected in every recipe they provide, ranging from hearty breakfasts to fulfilling dinners and all that lies between.
Alongside recipes, Alex and Sonja provide an abundance of cooking tips and meal planning suggestions, simplifying the process for busy families to savor home-cooked dishes. Their website is a goldmine of culinary ideas, featuring beautiful photography and step-by-step directions that assist readers in preparing each meal.
As active parents, Alex and Sonja are aware of the difficulties in balancing family life with a passion for cooking. Their recipes are tested with their own kids, ensuring they are not just nutritious but also approved by children. This family-oriented approach has won them countless fans who value their practical yet imaginative view of home cooking.
Through A Couple Cooks, Alex and Sonja have established a lively community of food lovers who share their enthusiasm for good food and delightful company. Their commitment to encouraging a healthy, balanced way of life is apparent in every facet of their endeavors, from their cookbooks to their engaging blog entries.
If you wish to broaden your culinary skills or are simply looking for inspiration for your next meal, Alex and Sonja Overhiser provide a wealth of resources to assist you on your cooking adventure. With their support, you’ll uncover the pleasure of crafting delicious, seasonal dishes that gather people around the table.
Read More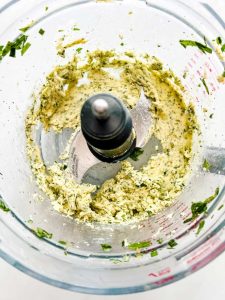
Steps for Making Compound Butter
Learn how to create compound butter using straightforward ingredients, featuring simple sweet and savory variations! It’s ideal for steaks, vegetables, and more.
I can still recall the first occasion I experienced compound butter at a dinner gathering years ago. The burst of herby, garlicky creamy butter on a slice of crusty bread was nothing short of phenomenal.
From that moment, I committed to mastering its preparation at home — and I’ve discovered it only requires 5 minutes with no special tools! Over the years, I’ve experimented with several variations, utilizing it on bread, salmon, and even pasta for a quick sauce. It’s no surprise this French method has been a kitchen essential for centuries!
Why You’ll Adore This Recipe
– Gourmet taste: Your guests will believe you’re a culinary genius when you present it (truly! I’ve tested it)
– Highly adaptable: You can employ compound butter recipes for everything from steak to breakfast toast
– Make ahead: You can create it weeks prior and simply slice off portions as needed
How to Create Compound Butter
Compound butter is softened butter blended with flavorings such as herbs, spices, and salt. It is traditionally associated with French cuisine and can be enjoyed as a sauce or spread for bread, crackers, vegetables, steak, seafood, and more. Compound butter is remarkably easy to make at home: it requires only a few minutes and can be prepared in advance. Here are the fundamental steps:
1. Soften the butter. Slice the butter in half lengthwise, then divide it into approximately 12 pieces total. Allow it to sit at room temperature for around 15 minutes until it softens. Ensuring the butter reaches room temperature is crucial for mixing in the seasonings.
2. Combine with seasonings. Place the butter in a bowl. Add the herbs and seasonings, then mash and mix the butter until all ingredients are fully blended.
3. Use plastic wrap to mold it into a log. Position the butter on a sheet of plastic wrap or parchment paper, then roll it into a log shape using the wrap. You may need to repeat this step to achieve the desired shape. Twist the ends closed and chill until serving. This method allows for easy slicing to use in recipes.
Pro Tips: Fresh herbs yield the best results for compound butter, but if only dried herbs are available, use about one-third of the amount. If your butter appears gritty or grainy, it was likely too cold when mixed: ensure it is soft before incorporating the ingredients.
Flavor Variations
The compound butter recipe provided below features my favorite classic flavor: fresh chives, thyme, and garlic powder create an herbaceous, salty, and savory spread. Here are some creative ideas for crafting different types of compound butter:
– Lemon thyme butter: Stir in 1 tablespoon fresh grated lemon zest, 2 tablespoons chopped thyme, and a scant ½ teaspoon salt.
– Basil Parmesan butter: Incorporate ¼ cup grated Parmesan, ¼ cup chopped basil, and a scant ½ teaspoon salt.
– Jalapeño lime butter: Mix 1 finely minced jalapeño (seeds removed), 1 tablespoon lime zest, 2 tablespoons chopped cilantro, and ½ teaspoon salt. Excellent on grilled corn or sweet potatoes.
– Smoked paprika butter: Combine 1 teaspoon smoked paprika, 2 tablespoons chopped chives, and a scant ½ teaspoon salt.
– Rosemary butter: Blend in 1 tablespoon finely chopped rosemary and a scant ½ teaspoon salt.
– Honey butter: Add 1 tablespoon honey, 1 tablespoon chopped thyme, and a scant ½ teaspoon salt. Wonderful on cornbread muffins or skillet cornbread.
– Maple cinnamon butter: Introduce 1 tablespoon maple syrup, ½ teaspoon cinnamon, and a slight pinch of salt. Incredible on pancakes, waffles, or warm biscuits.
Serving Suggestions
There are numerous ways to utilize compound butter, but my favorite is straightforward: use it as a delightful appetizer with crusty no-knead bread or sourdough bread. It feels far more luxurious than the effort required! You can also feature it on a cheese board or charcuterie platter. Here are more ideas for employing compound butter:
Storage & Freezing
Although you might typically keep butter at room temperature, with the added flavorings it’s advisable to store it in the refrigerator or freezer:
– Refrigerate compound butter for up to 1 month.
– Freeze compound butter for up to 3 months. Allow to thaw at room temperature before using.
Dietary Notes
This compound butter recipe is vegetarian and gluten-free.
Frequently Asked Questions
Why use unsalted butter and add salt separately? Employing unsalted butter grants you full control over the salt content. Salted butter can greatly vary between brands: some are much saltier than others. By beginning with unsalted butter and adding salt to your preference, you can tailor the flavor.
Read More
Steps to Make Basic Syrup
Here’s a quick and easy method to prepare simple syrup in only 5 minutes using sugar and water! This vital cocktail sweetener dissolves seamlessly and can be kept for weeks in the fridge.
Were you aware that you can create it from scratch in just 5 minutes? Simple syrup serves as a liquid sweetener for a wide range of cocktails and coffee beverages. As a certified mixologist with over 300 cocktail recipes to my name, I quickly understood that mastering homemade simple syrup is a crucial skill.
Crafting your own simple syrup requires exactly 5 minutes and costs mere pennies! Having a jar in your refrigerator is essential for whipping up the ideal whiskey sour or gimlet at a moment’s notice.
What Is Simple Syrup?
Simple syrup is a liquid sweetener made from equal quantities of sugar and water. The heat thoroughly dissolves the sugar, resulting in a clear syrup that easily mixes into cold drinks. I utilize it in everything from classic cocktails to iced coffee, making it one of those kitchen essentials I always have readily available.
How to Make Simple Syrup: The Basic Formula
Simple syrup offers a clean, neutral sweetness to drinks like the whiskey sour or a latte. If you have granulated sugar, water, and 5 minutes, you can create it right at home. The idea is to combine equal parts sugar and water by volume (a 1:1 ratio) and heat them until the sugar is dissolved and a syrupy consistency is reached. Here’s how to do it:
1. Combine equal parts granulated sugar and water in a saucepan and heat over medium heat. (Utilize ½ cup each of sugar and water to yield ¾ cup of simple syrup, or 1 cup of each to produce 1 ½ cups of syrup.)
2. Stir until the sugar completely dissolves, approximately 1 to 2 minutes. Remove from heat before it comes to a simmer (or when the temperature reaches 140°F).
3. Allow it to cool to room temperature prior to use. Store in a sealed container in the fridge for up to 1 month.
Variations to Try
There are numerous ways to modify the basic simple syrup recipe to infuse cocktails and coffee or tea drinks with different flavors. Here are a few ideas:
– Rich simple syrup: Create rich simple syrup in the same manner as traditional simple syrup, but use a 2:1 ratio of sugar to water. This results in a sweeter and more potent syrup that doesn’t dilute the drink’s flavors. It offers a richer, fuller mouthfeel compared to standard simple syrup.
– Brown sugar syrup: Produce brown sugar syrup using the same process but with brown sugar. This syrup has notes of molasses and caramel and pairs well with bourbon and whiskey drinks like the whiskey sour.
– Demerara syrup: Craft demerara syrup using demerara sugar, which introduces a nutty, caramel flavor profile to drinks.
– Honey syrup: You can substitute natural sweeteners like honey to create a honey syrup using the same basic formula. Using pure honey directly in cocktails can be challenging since it doesn’t dissolve well in its raw state. (Try it in recipes like the Bees Knees or Gold Rush.)
Flavored Simple Syrups
Simple syrup can also be infused with herbs, spices, and other flavors to impart additional notes to beverages. Prepare the simple syrup, then let it sit at room temperature with the flavoring ingredient. Strain it out, and it becomes a delicious infused syrup you can use in drinks or give as gifts. Keep in mind that homemade infused simple syrups tend to lose flavor more quickly than store-bought varieties.
Natural Sweetener Alternatives
Several natural sweeteners can be used in cocktails and beverages without the need for syrup preparation:
– Maple syrup: Pure maple syrup can serve as an alternative to simple syrup in cocktail recipes. It introduces subtle hints of vanilla and caramel that enhance the flavor of most drinks! Contrary to what one might expect, it sweetens drinks without infusing a maple flavor (you would need maple extract for that). Give it a try in this classic Whiskey Sour for a flavor boost.
– Agave syrup: Agave syrup also functions as a substitute for simple syrup in cocktails, coffee, and tea drinks. If the label reads agave syrup (not agave nectar), it can be used as a 1:1 replacement. Light agave provides a clean, neutral flavor, amber agave offers some caramel notes, and dark agave imparts richer caramel flavors.
Storage & Shelf Life
Simple syrup will last for 1 month when stored in a sealed container in the refrigerator. I prefer to use a clean glass jar with a lid.
If you notice any cloudiness, odors, or mold, discard the syrup and prepare a fresh batch. I’ve never experienced a batch go bad before I consumed it, but always check before using syrup that has been previously stored.
Frequently Asked Questions
How much simple syrup does 1 cup sugar make? Combine 1 cup of water and 1 cup of sugar to produce 1 ½ cups of simple syrup. Basic math shows that 1 cup plus 1 cup equals
Read More
Easy and Tasty Orzo Dish
**Enhancing Orzo: Suggestions for Tasty and Creamy Dishes**
Orzo, a flexible pasta that resembles rice, can be changed into a delightful dish with a few straightforward methods. Here are several suggestions to enhance your orzo recipes:
**Toasting Option:** For a richer flavor, toast the uncooked orzo in 1 tablespoon of butter or olive oil over medium heat for 1 to 2 minutes prior to adding the cooking liquid. This process deepens the flavor profile, providing the orzo with a toasty, rich taste.
**Broth Substitution:** Rather than cooking orzo in plain water, opt for chicken broth or vegetable broth to give the pasta additional flavor. This replacement brings a savory depth, making the orzo more substantial and enjoyable.
**Creamier Version:** To attain a creamy consistency, add 2-3 tablespoons of heavy cream, mascarpone, or cream cheese along with the butter. This inclusion results in a rich, velvety texture, ideal for a cozy meal.
**Lemon Adjustment:** Start with 2 tablespoons of lemon juice and modify to your preference. The citrusy brightness counterbalances the dish’s richness. Keep in mind that the lemon flavor will soften after refrigeration, so consider squeezing in fresh juice when reheating to restore its zesty flavor.
**Storage Tip:** Orzo tends to firm up when cooled. To regain its moisture and creaminess during reheating, include a splash of broth or water. This ensures the orzo stays soft and pleasurable, keeping its delightful texture.
By utilizing these suggestions, you can craft a tasty and creamy orzo dish that pleases the palate with each bite.
Read More
Top 21 Healthy Salad Recipes for a Wholesome Meal
Alex & Sonja: The Culinary Team Behind A Couple Cooks
Introducing Alex and Sonja Overhiser, the energetic pair behind the well-known cooking website, A Couple Cooks. As authors of two celebrated cookbooks and active parents, Alex and Sonja have perfected the skill of juggling family responsibilities alongside their love for cooking. Their adventure started in 2010 when they created their website to express their passion for straightforward, seasonal recipes and the joy that comes from cooking.
Throughout the years, A Couple Cooks has evolved into an extensive resource for home chefs, offering thousands of unique recipes that highlight fresh, nourishing ingredients. Each recipe is carefully developed and tested by Alex and Sonja, guaranteeing that they are not only tasty but also approachable for cooks of varying expertise. Their website serves as a rich source of culinary ideas, featuring everything from quick weeknight meals to intricate dishes ideal for special celebrations.
Beyond recipes, Alex and Sonja share useful cooking tips and meal planning guidance, assisting their audience in navigating the often daunting realm of home cooking. Their content is both educational and visually captivating, as all recipes are beautifully captured through the lens of the couple themselves. This personal touch adds a genuine and relatable dimension to their work, allowing readers to see the authentic results of each creation.
A distinctive feature of A Couple Cooks is the couple’s dedication to including their children in the cooking journey. By trying out recipes with their kids, Alex and Sonja guarantee that their meals are family-friendly and appealing to even the most selective eaters. This method not only enhances their family connections but also nurtures a love for cooking in the younger generation.
Through their website, cookbooks, and social media engagement, Alex and Sonja have cultivated a lively community of food lovers who share their enthusiasm for cooking. Their approachable attitude and sincere passion render them relatable figures in the culinary scene, motivating countless people to appreciate the pleasures of home cooking.
Regardless of whether you’re an experienced chef or a newcomer to the kitchen, Alex and Sonja’s A Couple Cooks provides something for everyone. Their commitment to crafting straightforward, delectable, and seasonal recipes has established them as a cherished resource for anyone aiming to elevate their cooking skills and enjoy the art of cooking at home.
Read More
Passion Fruit Martini Drink Recipe
# Savor This Entertaining and Fruity Passion Fruit Martini Recipe
This passion fruit martini is a colorful and exotic cocktail that introduces a surge of tropical taste to any celebration. Crafted with smooth vodka, zesty passion fruit purée, and a hint of simple syrup and lemon juice, it’s both revitalizing and decadent.
## Why We Adore This Passion Fruit Martini
– It is a straightforward recipe that incorporates basic ingredients and genuine fruit puree.
– It takes merely 5 minutes to prepare and can significantly enhance a date night or get-together.
– This martini, along with its fruity notes, is delightful to pour and sip from your preferred martini glasses.
## Recipe Ingredients
– **Vodka** – Standard vodka is the foundation of this traditional martini. You may also swap it out for gin if you favor it.
– **Passion Fruit Puree** – A rich puree that imparts the finest overall passion fruit flavor to this beverage.
– **Simple Syrup** – The uncomplicated sugar syrup contributes a touch of sweetness to this mix.
– **Lemon Juice** – To infuse a hint of citrus. Should you lack lemon juice, lime juice, pineapple juice, or even fresh passion fruit juice could serve as alternatives.
## How to Create a Passion Fruit Martini
1. **Fill a cocktail shaker with ice.**
2. **Incorporate the vodka, passion fruit puree, simple syrup, and lemon juice.**
3. **Shake energetically for 30 seconds.**
4. **Transfer into your beloved martini glass, adorn with a slice of passion fruit, and relish!**
## FAQs
**What other spirits can I utilize for this passion fruit martini?**
If vodka isn’t to your liking, gin is an excellent substitute, as is prosecco. For a stronger passion fruit flavor, you might also consider using a passion fruit liqueur, like Passoa.
**Can I prepare a batch of these passion fruit martinis?**
Absolutely! You can adjust the servings on the recipe card to determine how many martinis you wish to create, and the quantities will modify accordingly.
## Storage Information
Any remaining passion fruit martini can be kept in your refrigerator for up to 1 day.
## More Tasty Cocktail Recipes to Explore
– Lavender Martini
– Cucumber Martini
– Candy Cane Martini
Drink Responsibly. This article and recipe are meant for individuals of legal drinking age.
Read More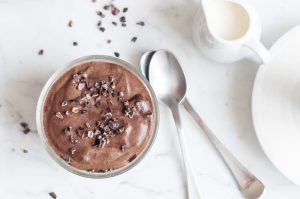
A Handbook for Preparing Chocolate Mousse
# Chocolate Mousse: Simple Dessert Recipes for Kids
Chocolate mousse is a charming dessert that provides a rich, velvety sensation that both children and adults can appreciate. This straightforward treat is ideal for special events or as a sweet finish after a meal. With its smooth consistency and deep chocolate taste, chocolate mousse is likely to become a favorite in your home.
## Why Choose Chocolate Mousse?
Chocolate is an adored ingredient across the globe, and when made into a mousse, it transforms into an extravagant dessert that feels luxurious yet is quite easy to prepare. The light, airy nature of the mousse makes it an excellent conclusion to any meal, and it can be enhanced with toppings such as whipped cream and shaved chocolate for a sophisticated look.
## Ingredients
To create a basic chocolate mousse, you will require:
– High-quality dark chocolate
– Eggs
– Sugar
– Heavy cream
– Vanilla extract (optional)
These components blend to form a rich and fluffy dessert that is both delightful and satisfying.
## Easy Steps to Create Chocolate Mousse
1. **Melt the Chocolate**: Begin by melting the dark chocolate in a heat-resistant bowl over simmering water or in the microwave. Stir until it becomes smooth, then allow it to cool slightly.
2. **Whip the Cream**: In a different bowl, whip the heavy cream until soft peaks appear. This will provide the mousse with its light consistency.
3. **Beat the Eggs**: In another bowl, whisk the eggs with sugar until they become pale and fluffy. This process incorporates air into the mixture, aiding in the lightness of the mousse.
4. **Combine Ingredients**: Gently incorporate the melted chocolate into the egg mixture, then add the whipped cream. Take care not to deflate the mixture; the aim is to maintain its airiness.
5. **Chill**: Spoon the mousse into serving bowls and refrigerate for a minimum of one hour to set.
6. **Serve**: Garnish with whipped cream and grated chocolate before serving for an additional touch of luxury.
## Tips for Success
– **Quality Ingredients**: Opt for premium dark chocolate for the finest flavor. The chocolate is the highlight, so select one you adore.
– **Temperature is Key**: Make sure the melted chocolate is not overly hot when mixing with the eggs to prevent them from cooking.
– **Involve the Kids**: This recipe is a fantastic way to engage children in the kitchen. They can assist with measuring, mixing, and decorating the finished mousse.
## Conclusion
Chocolate mousse is not only a delight for the palate but also an enjoyable and educational recipe for kids to learn and savor. With its straightforward steps and few ingredients, it is an excellent option for aspiring chefs. Whether for a birthday celebration, a family gathering, or just a weekend indulgence, chocolate mousse is guaranteed to impress and delight chocolate enthusiasts of any age. Enjoy this simple dessert and see it become a favorite in your dessert collection!
Read More
Coriander Poha: An Authentic Indian Cuisine with Kothimeera
### Kids Tiffin Recipes – Kothimeera Atukulu/Fresh Coriander Poha
Poha, often referred to as beaten rice or flattened rice, is a fundamental component in numerous Indian households. It consists of dehusked rice that is flattened into light, dry flakes, which can vary in thickness. Commonly called poha, aval, avalakki, and atukulu in different areas, this adaptable ingredient can be used to create a variety of dishes, both savory and sweet.
Mothers frequently seek quick and wholesome tiffin recipes for their children, and poha serves as an exceptional foundation for such meals. Among the many poha creations, Kothimeera Atukulu, or Fresh Coriander Poha, is notable for its simplicity and taste. This recipe is not only straightforward to prepare but is also filled with the freshness of coconut and coriander, making it a delightful choice for breakfast or a snack.
#### Ingredients
– 1 cup poha (flattened rice)
– 1/2 cup fresh coriander leaves, chopped
– 1/4 cup grated fresh coconut
– 1-2 green chilies, finely chopped (adjust to preference)
– 1/2 teaspoon mustard seeds
– 1/2 teaspoon cumin seeds
– 1/4 teaspoon turmeric powder
– Salt to taste
– 1 tablespoon oil
– Lemon juice (optional)
– Peanuts (optional, for extra crunch)
#### Preparation Steps
1. **Rinse the Poha**: Place the poha in a sieve and rinse it under running water for a few seconds. Allow it to drain and soften for around 10 minutes.
2. **Temper the Spices**: In a pan, heat the oil over medium heat. Add mustard seeds and cumin seeds. When they begin to splutter, add the chopped green chilies and sauté for a minute.
3. **Add Turmeric**: Sprinkle the turmeric powder and mix thoroughly.
4. **Combine Ingredients**: Add the softened poha to the pan, along with salt to taste. Carefully mix everything together, ensuring the poha is coated with the spices.
5. **Incorporate Coconut and Coriander**: Add the grated coconut and chopped coriander leaves. Mix until well integrated, allowing the flavors to blend.
6. **Serve**: Remove from heat and, if desired, drizzle with lemon juice for added zest. Garnish with peanuts for extra texture.
#### Nutritional Benefits
Kothimeera Atukulu is not only tasty but also nutritious. Poha serves as a good source of carbohydrates, offering energy for children throughout the day. The fresh coriander adds vitamins and minerals, while coconut offers healthy fats. This dish is light on the stomach, making it a suitable option for kids, particularly during school hours.
#### Conclusion
Kothimeera Atukulu is a wonderful addition to your collection of kid-friendly tiffin recipes. Its distinct flavor profile, combined with the health advantages of its ingredients, makes it a great choice for hectic mornings or as a quick snack. With its simple preparation and delightful taste, this dish is sure to please both kids and adults.
Read More
Yellow Moong Dal Ladoo Recipe: A Healthy Indian Confection
### Moong Dal Ladoo: An Exquisite Indian Sweet for Diwali
Diwali, the festival of lights, brings a season of joy, merriment, and the enjoyment of delightful sweets. Among the plethora of festive delicacies, Moong Dal Ladoo shines as a wholesome and delicious choice. This classic Indian confection is not only simple to make but also rich in protein, making it an ideal addition to your Diwali festivities.
#### Ingredients
To create Moong Dal Ladoo, you will require the following ingredients:
– 1 cup yellow moong dal (split yellow lentils)
– 1 cup jaggery (grated or powdered)
– 2 tablespoons ghee (clarified butter)
– 1/4 teaspoon cardamom powder
– A handful of chopped nuts (cashews, almonds, or pistachios) for topping
#### Preparation Steps
1. **Roast the Moong Dal**: In a skillet, dry roast the yellow moong dal over low heat until it becomes golden brown and releases a nutty fragrance. This process enhances the dal’s flavor and contributes a rich taste to the ladoos.
2. **Powder the Dal**: After roasting, let the dal cool down. Blend it into a fine powder using a blender or food processor. Make sure there are no lumps for a smooth consistency.
3. **Mix Ingredients**: In a mixing bowl, blend the powdered moong dal, grated jaggery, ghee, and cardamom powder. Stir well until all the components are completely mixed. The heat from the roasted dal will assist in melting the jaggery, binding the mixture cohesively.
4. **Shape the Ladoos**: When the mixture is cool enough to handle, take small portions and mold them into round balls (ladoos) with your hands. If desired, top with chopped nuts.
#### Tips for Perfect Moong Dal Ladoo
– **Storage**: Keep the ladoos in an airtight container to preserve their freshness. They can last for a week at room temperature or longer if stored in the fridge.
– **Variations**: Feel free to experiment with different types of dal, such as whole green gram, to create variations of this treat.
– **Serving Suggestions**: Moong Dal Ladoo is perfect as a snack or dessert and makes a wonderful gift during festivities.
#### Conclusion
Moong Dal Ladoo is a straightforward yet delightful sweet that captures the essence of Diwali. Its rich flavor and health benefits are favored by families celebrating this joyous occasion. With just a few ingredients and simple steps, you can prepare this traditional delicacy and share it with loved ones, sweetening your Diwali celebrations. Enjoy the festivities and the deliciousness of Moong Dal Ladoo!
Read More