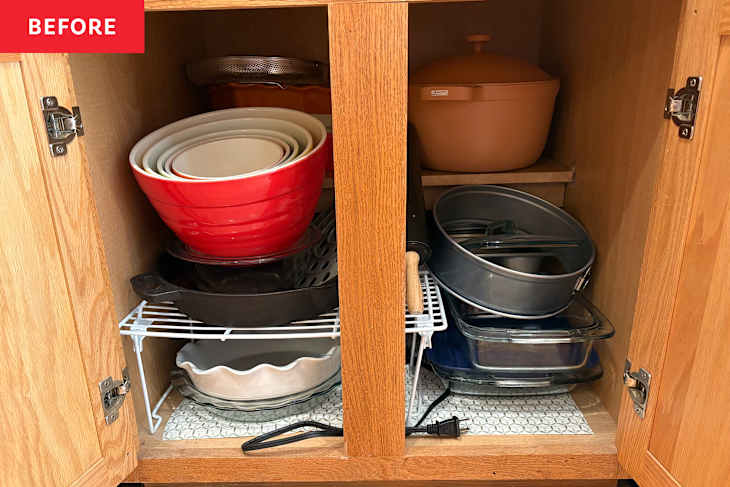
When my husband and I first moved into our two-bedroom townhome, we were thrilled with the spacious kitchen. The cabinets, stretching all the way to the ceiling, provided more than enough room for all our kitchen essentials. We thought we had it made — pots, pans, and utensils went inside, and we didn’t give much thought to organizing the space. After all, there was room to spare.
But fast-forward a few years, and we had accumulated more kitchen tools, gadgets, and equipment than we ever imagined. And that’s not all — I recently launched an at-home bakery! Now, every weekend is filled with baking cookies, bread, and other goodies, and I quickly realized that keeping my kitchen cabinets organized is no longer optional.
With the constant addition of mixing bowls and baking sheets, it became clear that my baking cabinet needed a complete overhaul. So I turned to professional organizer Mindy Godding, founder of Abundance Organizing, to help me out. Here’s how the process unfolded.
Take Everything Out and Categorize
The first task was to declutter. Godding advised to pull everything out of the cabinet and sort by type. “Evict any items that are no longer serving you and get rid of duplicates or excess,” she said. As I began sorting, I realized the cabinet wasn’t just full of baking supplies — it also had non-baking items like a big pot and a cast-iron skillet. Since this space was going to be dedicated to my bakery essentials, I moved those items to another cabinet. I also found duplicate pie plates and a stray muffin tin that had gotten pushed toward the back of the shelf and forgotten about.
Optimize Cabinet Functionality
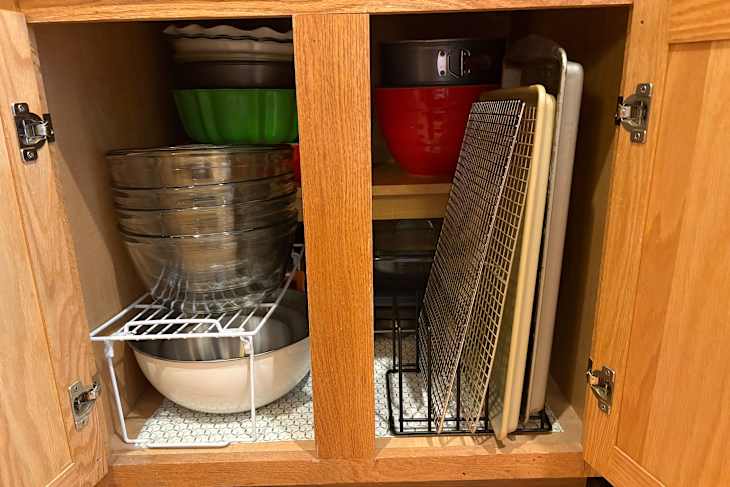
Godding quickly noted the challenges of my cabinets, particularly the deep half-shelf at the back. “We need to focus on products that enhance accessibility and visibility,” she said. She recommended rotating the shelf stacker that I already had to create more space, as well as using a divider tool to organize cookie sheets and cooling racks vertically. The divider tool was the best addition to the cabinet. It works wonderfully for organizing my baking sheets and cooling racks, and I still have room for more as my business grows.
Organize for Easy Access
Godding recommended moving infrequently used items to the back of the cabinet to maximize accessibility. Even though I wanted to dedicate this cabinet to bakery supplies, I still had a few baking tools that I don’t use every weekend — pie pans, muffin tins, and cake pans. I placed them at the back of the shelf. The items I use most frequently, like mixing bowls, baking sheets, and cooling racks, were placed at the front for easy access. Since I have a lot of mixing bowls (last weekend I had six loaves of bread proofing in bowls!), I stacked them on a portable shelf and kept extra ones at the back for when I need them.
Enjoy an Organized Space
I’m always surprised by how simple some organizing projects can be. I tend to overthink them, imagining they’ll take an entire afternoon. But this project only took about half an hour! The hardest part was decluttering, but it felt so good to clear out unnecessary items and see only what I need. From there, it was just about placing everything back in an organized, aesthetically pleasing way. Now, I have a functional, organized bakery cabinet that makes my bake days much more enjoyable!
This post originally appeared on Apartment Therapy. See it there: My Kitchen Storage Was a Mess Until a Pro Organizer Helped Me Fix It