Balsamic Marinade Recipe for Tasty Chicken
**Balsamic Marinade Recipe for Delicious Chicken**
If you aim to enhance your chicken meals with robust, tangy, and slightly sweet notes, a balsamic marinade serves as an easy yet impactful choice. This adaptable marinade not only boosts the flavor of chicken but also aids in tenderizing the meat, resulting in juicy and mouthwatering bites. Whether you’re grilling, baking, or pan-searing, this balsamic marinade recipe will imbue your chicken with captivating taste.
—
### Why Opt for a Balsamic Marinade?
Balsamic vinegar is a deep, dark vinegar crafted from grape must. Its intricate flavor profile—sweet, tangy, and faintly woody—makes it a fantastic foundation for marinades. When paired with suitable ingredients, balsamic vinegar assists in breaking down the proteins in chicken, permitting flavors to seep in deeply while ensuring the meat remains moist and tender.
—
### Essential Components for a Balsamic Chicken Marinade
Here’s a list of the key ingredients you’ll require:
– **Balsamic Vinegar (1/4 cup):** The star ingredient, imparting tangy sweetness.
– **Olive Oil (1/4 cup):** Contributes richness and aids in evenly distributing flavors.
– **Garlic (3 cloves, minced):** Brings savory richness and aromatic flair.
– **Honey or Brown Sugar (1 tablespoon):** Offsets the acidity with a hint of sweetness.
– **Dijon Mustard (1 tablespoon):** Introduces a mild tang and aids in emulsifying the marinade.
– **Fresh or Dried Herbs (1 teaspoon each of thyme, rosemary, or oregano):** Infuses the chicken with earthy, herbal tones.
– **Salt and Pepper (to taste):** Elevates all other flavors.
– **Optional: Red Pepper Flakes (1/2 teaspoon):** Adds a slight kick.
—
### How to Prepare the Marinade
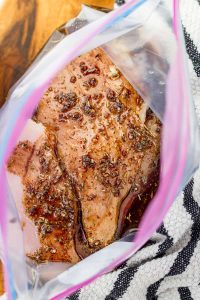
1. **Mix Ingredients:** In a medium bowl or a resealable plastic bag, whisk together the balsamic vinegar, olive oil, garlic, honey (or brown sugar), Dijon mustard, herbs, salt, and pepper.
2. **Add Chicken:** Put your chicken pieces (breasts, thighs, or drumsticks) into the bowl or bag, ensuring they are thoroughly coated with the marinade.
3. **Marinate:** Seal the bag or cover the bowl and place it in the refrigerator for at least 30 minutes. For optimal results, marinate for 2–4 hours. Avoid marinating for over 24 hours, as the acidity can overly break down the meat and alter its texture.
4. **Cook:** Take the chicken out of the marinade and cook using your chosen method—grill, bake, or sauté—until the internal temperature reaches 165°F (75°C).
—
### Cooking Tips
– **Grilling:** Preheat the grill to medium-high heat. Grill chicken for 6–7 minutes per side, depending on thickness.
– **Baking:** Preheat oven to 400°F (200°C). Bake chicken in a baking dish for 25–30 minutes.
– **Pan-Searing:** Heat a skillet over medium heat with a bit of oil. Cook chicken for 6–8 minutes per side.
*Tip:* For added flavor, reduce the leftover marinade (that has not come into contact with raw chicken) in a saucepan over medium heat and drizzle it over the cooked chicken as a glaze.
—
### Serving Ideas
Balsamic-marinated chicken pairs wonderfully with various sides:
– Roasted vegetables (carrots, zucchini, bell peppers)
– Garlic mashed potatoes
– Quinoa or wild rice
– Fresh green salad with balsamic vinaigrette
—
### Concluding Thoughts
A balsamic marinade is a swift and simple way to turn ordinary chicken into a delightful and memorable meal. With just a handful of pantry staples, you can whip up a marinade that’s fantastic for weeknight dinners or weekend cookouts. Play around with additional herbs and spices to personalize the recipe, and relish the rich, savory-sweet flavors that balsamic vinegar adds to your dining experience.
—
**Try this recipe now and see how a simple marinade can make your chicken dishes shine!**
Read More
“Tasty Burger Bowls Drizzled with Signature Sauce and Accompanied by Ranch-Infused Fries”
# Burger Bowls: A Tasty Take on a Beloved Classic
When it comes to comfort food, few meals can compare to the timeless burger. Yet, a fresh trend is changing the game, elevating this cherished dish: the burger bowl. Picture all the tastes of a flavorful burger, neatly served in a bowl. This creative dish encompasses ranch-seasoned fries topped with a juicy burger patty, all the classic toppings, and a drizzle of a delectable house sauce.
## Why Burger Bowls are a Family Hit
For a busy mom, discovering meals that satisfy everyone can be difficult. Nonetheless, burger bowls have emerged as a staple for many households. Here’s why:
1. **Flexible Cooking Method**: The beef can be prepared in larger, juicier pieces, ensuring each bite bursts with flavor. Cooking at high heat for a great sear locks in moisture and produces a crispy exterior.
2. **Ranch Fries**: Waffle fries seasoned with ranch are not only tasty but also easy to eat with a fork. The ranch seasoning provides a flavor explosion that pairs wonderfully with the burger.
3. **House Sauce**: The creamy and tangy house sauce gives the dish an elevated taste. While creating your own sauce can be satisfying, ready-made options are also available for those pressed for time.
## The Ultimate Burger Bowls Recipe
### Ingredients
**For the Burger Bowls:**
– Ground beef (or your preferred protein)
– Burger seasoning
– Toppings: lettuce, tomatoes, pickles, onions, cheese, etc.
**For the Ranch Fries:**
– Frozen waffle fries
– Ranch seasoning mix
**For the House Sauce:**
– Mayonnaise
– Ketchup
– Mustard
– Pickle relish
– Optional spices (garlic powder, onion powder, etc.)
### Instructions
1. **Prepare the Ranch Fries**: Bake or fry the waffle fries as instructed on the package. Once they’re ready, toss them with ranch seasoning for an added kick.
2. **Cook the Beef**: In a hot skillet, cook the ground beef until it’s browned. Use a spatula to break it into larger chunks for a juicier bite. Season with your desired burger seasoning.
3. **Assemble the Bowls**: In a bowl, layer the ranch fries first, then add the cooked beef. Top with your chosen toppings, and finish with a generous drizzle of house sauce.
4. **Serve and Savor**: These burger bowls are best enjoyed right away while the fries are crispy and the beef is warm.
## Success Tips
– **Cooking the Beef**: Aim for a good sear on the outside while ensuring the inside remains juicy. Don’t hesitate to take the beef off heat while it’s still slightly pink in the center.
– **Choosing the Right Pan**: A cast iron skillet is perfect for that ideal sear due to its heat retention. However, a non-stick skillet can also work quite effectively.
– **Customize Your Bowls**: The charm of burger bowls lies in their adaptability. Feel free to explore various toppings, sauces, and even different types of fries to match your family’s tastes.
## Conclusion
Burger bowls offer a fun and tasty way to savor all the flavors of a classic burger in a fresh format. They are ideal for family dinners, gatherings, or even meal prep for the week. Given their customizable nature, you can please everyone’s palate while keeping the meal straightforward and enjoyable. So, the next time you’re looking for a crowd-pleaser, try these burger bowls—you won’t be let down!
Read More
Three-Cheese Shrimp Pizza Instructions
Introducing Alex & Sonja Overhiser: The Creators of A Couple Cooks
Alex and Sonja Overhiser are the imaginative forces and culinary spirits behind A Couple Cooks, a beloved food blog that has motivated numerous home cooks since it began in 2010. As authors of cookbooks, parents, and partners in life and cooking, Alex and Sonja have established a reliable brand based on simplicity, seasonality, and the joy of cooking as a team.
The Origin of A Couple Cooks
The tale of A Couple Cooks commenced when Alex and Sonja chose to start a journey towards healthier eating and home cooking. What started as a personal endeavor swiftly transformed into a comprehensive blog, where they began sharing their cherished recipes, kitchen trials, and culinary philosophies. Their accessible approach and dedication to fresh, whole ingredients struck a chord with readers, and the blog flourished into a lively online community.
Authors of Cookbooks and Culinary Innovators
Capitalizing on their blog’s success, Alex and Sonja have written two cookbooks that embody their culinary principles. Their publications are replete with straightforward recipes, beautiful photography, and useful tips for everyday cooking. Whether you’re a beginner in the kitchen or an experienced home chef, their cookbooks provide inspiration for crafting delightful, nourishing meals with assurance.
Cooking Together as a Couple—and Family
A remarkable aspect of A Couple Cooks is the collaboration between Alex and Sonja. As a real-life couple, they infuse a collaborative and joyful energy into their cooking. Their teamwork goes beyond developing recipes—they photograph each dish themselves and test all recipes with their family, ensuring that the meals are both delicious and family-oriented.
Now, as busy parents, Alex and Sonja recognize the difficulties of preparing wholesome meals. Their blog reflects this understanding, providing time-saving tips, meal planning resources, and recipes that are appealing to both kids and adults.
What Awaits You on A Couple Cooks
With thousands of original recipes featured on their site, A Couple Cooks serves as an essential resource for anyone aiming to cook more at home. Their offerings include:
- Easy, seasonal recipes that showcase fresh ingredients and international flavors
- Vegetarian and plant-forward meals that are both satisfying and nutritious
- Meal planning advice to help busy families stay organized and motivated
- Cooking tutorials and guides for mastering fundamental kitchen skills
- Personal anecdotes that link food to family, travel, and everyday experiences
Encouraging a Passion for Cooking
At the core of Alex and Sonja’s mission is a wish to inspire others to relish the cooking journey. They maintain that preparing meals at home can be both enjoyable and rewarding, and they aim to make it accessible to everyone. Through their blog, books, and social media engagement, they persist in sharing their enthusiasm for food and family with an expanding audience worldwide.
Connect with A Couple Cooks
Whether you’re in search of your next favorite dinner recipe, strategies for catering to a selective toddler, or simply some culinary inspiration, Alex and Sonja welcome you into their kitchen through A Couple Cooks. Become a part of their community and uncover the joy of cooking together—one delightful recipe at a time.
Read More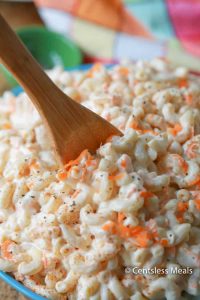
Classic Macaroni Salad Recipe
# Traditional Macaroni Salad: A Potluck Classic
Macaroni salad is an enduring dish that has been featured at countless potlucks, barbecues, and family reunions. With its tender elbow macaroni, creamy dressing, and a variety of fresh ingredients, this salad is not only tasty but also remarkably easy to make. Whether you’re an experienced chef or just starting out, this macaroni salad recipe is bound to impress.
## Ingredient Suggestions for Macaroni Salad
When preparing macaroni salad, the ingredients are pivotal for achieving the ideal flavor and texture. Here are some tips to help you select the finest components for your salad:
– **Pasta**: Although elbow macaroni is the traditional selection, feel free to try other short pasta varieties like ditalini, small shells, or mini farfalle (bow ties). Each shape contributes its own distinct texture to the salad.
– **Red Onion**: Finely chopped red onion introduces a burst of flavor. If you prefer something milder, soak the diced onion in cold water for a few minutes or use green onions as a substitute.
– **Add-Ins**: Add diced celery, red bell pepper, and shredded carrots for freshness and crunch. These ingredients not only boost the flavor but also bring vibrant colors to your dish.
## Dressing for Macaroni Salad
The dressing is the essence of any macaroni salad. Here’s how to whip up a creamy and tangy dressing that perfectly complements the pasta:
– **Mayonnaise**: Serving as the dressing’s base, mayonnaise brings creaminess and depth.
– **Tang**: A dash of white vinegar or apple cider vinegar brightens the flavor and balances the richness of the mayo.
– **Sweetness**: A pinch of sugar and a spoonful of sweet pickle relish help to counterbalance the tanginess, resulting in a harmonious flavor profile.
## Variations
Macaroni salad is adaptable, and you can easily modify it to cater to your personal preferences. Here are a few variations to explore:
– **Dressing**: For a different taste, consider using store-bought coleslaw dressing instead of homemade. For a lighter version, swap half of the mayonnaise for Greek yogurt.
– **Add-Ins**: Let your imagination run wild with your add-ins! Think about incorporating cheese, bacon bits, diced ham, hard-boiled eggs, or even sweet peas for a fun twist.
## For Optimal Results, Prep in Advance!
To achieve the most flavorful result, it is advisable to chill your macaroni salad for at least **one to two hours** prior to serving. This allows the flavors to blend together, and the dressing to permeate the pasta. In fact, you can prepare it up to **24 hours** beforehand, which makes it an excellent option for busy days.
## More Simple Potluck Favorites
If your family enjoys this macaroni salad, consider trying other effortless potluck favorites such as coleslaw, potato salad, or a refreshing pasta primavera. These dishes are guaranteed to please a crowd!
## Conclusion
This traditional macaroni salad recipe transcends mere food; it’s a tradition that unites people. With its creamy dressing and delightful crunch from fresh vegetables, it’s sure to be a hit at any gathering. Please remember to leave a comment and rating below if you give it a try!
### Recipe Overview
– **Prep Time**: 20 minutes
– **Cook Time**: 15 minutes
– **Chill Time**: 1 hour
– **Total Time**: 1 hour 35 minutes
– **Servings**: 6
### Ingredients
– Elbow macaroni
– Mayonnaise
– White or apple cider vinegar
– Sugar
– Sweet pickle relish
– Mustard
– Salt and pepper
– Add-ins: celery, red bell pepper, red onion, shredded carrots
### Instructions
1. Cook the elbow macaroni in salted water according to package instructions. Drain and rinse under cold water.
2. In a large bowl, mix mayonnaise, vinegar, sugar, relish, mustard, salt, and pepper to form the dressing.
3. Combine the drained macaroni, celery, carrots, red pepper, and onion into the dressing. Toss thoroughly to coat.
4. Chill for at least 1 hour before serving.
### Nutrition Information (per serving)
– Calories: 432
– Carbohydrates: 37g
– Protein: 6g
– Fat: 29g
– Fiber: 2g
Savor your delicious macaroni salad, and happy cooking!
Read More
Crispy Spring Rolls Stuffed with Salmon
**Crispy Spring Rolls Stuffed with Salmon: A Delectable Fusion Treat**
Spring rolls are a cherished starter in numerous Asian culinary traditions, recognized for their crunchy outer layer and savory fillings. While classic recipes typically include vegetables, pork, or shrimp, a contemporary variation that is gaining traction is the inclusion of salmon as the main filling. Crispy spring rolls stuffed with salmon merge the fish’s subtle richness with the delightful crunch of a golden wrapper, resulting in a dish that is both sophisticated and enticing.
—
### The Charm of Salmon-Stuffed Spring Rolls
Salmon is a flexible and nutrient-dense fish, valued for its abundant omega-3 fatty acids, protein, and vital vitamins. When incorporated into spring rolls, salmon contributes a sumptuous texture and a mildly sweet, savory taste that complements a range of herbs, vegetables, and dipping sauces.
This fusion creation connects traditional Asian tastes with modern culinary styles, making it a favorite among food lovers and health-conscious diners alike.
—
### Ingredients and Flavor Composition
The secret to a successful salmon spring roll lies in achieving the right balance between flavors and textures. Here are the typical elements of the filling:
– **Fresh or cooked salmon**: Whether grilled, baked, or gently pan-seared, the salmon should be flaked into manageable pieces.
– **Julienned vegetables**: Carrots, bell peppers, cabbage, and bean sprouts introduce crunch and vibrancy.
– **Aromatic herbs**: Fresh cilantro, mint, or Thai basil elevate the roll’s freshness.
– **Seasonings**: Soy sauce, sesame oil, garlic, and ginger add depth and umami.
– **Optional additions**: Cream cheese or avocado can be included for a creamy contrast, particularly in fusion-style creations.
The filling is encased in thin spring roll wrappers (not to be mistaken for rice paper used in fresh rolls) and then deep-fried or air-fried until golden and crispy.
—
### Cooking Instructions
**1. Prepare the Filling:**
Cook the salmon and let it cool briefly. Flake it into a bowl and combine it with finely chopped vegetables, herbs, and seasonings.
**2. Assemble the Rolls:**
Lay a spring roll wrapper on a clean surface with one corner facing you. Place a small amount of filling near the bottom corner, fold the corner over the filling, tuck in the sides, and roll tightly. Seal the edge with a dab of water or beaten egg.
**3. Fry to Perfection:**
Heat oil in a deep pan or fryer to 350°F (175°C). Fry the rolls in batches until they turn golden brown and crispy, about 3–4 minutes. Drain on paper towels.
**4. Serve Hot:**
Enjoy the rolls with dipping sauces such as sweet chili sauce, soy-ginger glaze, or a creamy wasabi mayo.
—
### Healthier Options
For a lighter alternative, consider baking or air-frying the spring rolls. Lightly brush them with oil and bake at 400°F (200°C) for 15–20 minutes, flipping halfway through. This approach provides a crispy exterior with significantly reduced fat content.
—
### Pairing and Presentation
Crispy salmon spring rolls serve as an excellent appetizer or a light main dish. Pair them with:
– A refreshing white wine such as Sauvignon Blanc or a dry Riesling
– A side of Asian slaw or cucumber salad
– Steamed jasmine rice or a light noodle dish
For presentation, arrange the rolls on a serving platter with small bowls of dipping sauces, garnished with fresh herbs and lime wedges.
—
### Final Reflections
Crispy spring rolls stuffed with salmon represent an exciting culinary advancement that unites the finest elements of East and West. Whether served at a gathering or enjoyed as a casual meal, they provide a satisfying crunch, rich flavor, and limitless opportunities for personalization. With their attractive appearance and gourmet flavor, these rolls are guaranteed to delight both guests and family.
Read More
Revitalizing Strawberry Spinach Salad Recipe
# Vibrant Strawberry Spinach Salad: A Fresh and Enticing Treat
As we enter the warmer months of spring and summer, lively, fresh salads become a fixture on our dinner tables. One such enchanting dish is the **Vibrant Strawberry Spinach Salad**. This salad not only captivates the eye with its vivid hues but is also loaded with flavor and nutrients, making it an ideal addition to any meal or celebration.
## A Tasty Medley
This strawberry spinach salad features a delightful mix of sweet strawberries, crunchy candied pecans, creamy feta cheese, and tangy red onions, all combined in a light and zesty white balsamic dressing. The blend of tastes delivers a delightful experience that excites the palate.
### Flavor Highlights
– **Natural Sweetness**: The strawberries offer a refreshing sweetness that enhances the other ingredients.
– **Crunch Factor**: Candied pecans contribute a pleasing crunch, improving the salad’s texture.
– **Zesty Kick**: The white balsamic dressing provides a refreshing tang that unites all the flavors.
### Skill Level
Preparing this salad is remarkably straightforward. Just whisk the dressing ingredients, mix them with the salad components, and serve. It’s a quick and easy dish that anyone can create!
### Budget-Friendly Suggestion
If you have extra dressing, think about using it as a marinade for grilled chicken or sautéed shrimp. This not only reduces waste but also amplifies the flavors of your main courses.
### Ingredient Alternatives
Though strawberries take center stage in this salad, feel free to replace them with other berries like blueberries, blackberries, or raspberries, based on your tastes or what’s in season.
### Time-Saving Hint
Short on time? Choose a bag of prewashed baby spinach or a spring mix to eliminate the washing and drying step.
## Ingredient Suggestions
### Greens
Fresh spinach forms the foundation of this salad, but you can also incorporate a blend of baby greens or arugula for a distinctive flavor.
### Strawberries
Ripe, juicy strawberries are crucial for this recipe. However, you’re welcome to try other berries if you wish.
### Nuts
Candied pecans deliver a sweet crunch, but you can swap them for toasted almonds, walnuts, or even nut-free alternatives like sunflower seeds or pumpkin seeds.
### Cheese
Feta cheese provides a creamy, salty note to the salad. If you’re not keen on it, goat cheese or blue cheese crumbles can be used instead.
## Dressing for Strawberry Salad
The dressing for this salad is an easy mix of olive oil, white balsamic vinegar, honey, garlic powder, salt, and pepper. For those who prefer pre-made dressings, poppyseed, balsamic vinaigrette, or raspberry vinaigrette are excellent options.
### Variations
To elevate the salad, think about adding diced avocado, mandarin slices, or halved grapes. For a more substantial meal, top the salad with grilled chicken or salmon patties.
## Storing Strawberry Spinach Salad
If you have any leftovers, store the salad in a covered container in the refrigerator. To keep it fresh, consider adding fresh cheese, nuts, and dressing right before serving.
## Conclusion
The **Vibrant Strawberry Spinach Salad** is a refreshing, wholesome, and striking dish that is ideal for spring and summer events. Its assortment of flavors and textures makes it a crowd favorite, while its simplicity ensures that anyone can prepare it in no time. Whether presented as a side dish or a light main course, this salad is guaranteed to impress.
**Did you enjoy this Strawberry Spinach Salad Recipe? Leave your thoughts or a rating below!**
Read More