Fast and Simple No-Heat Meal Suggestions for Hectic Days
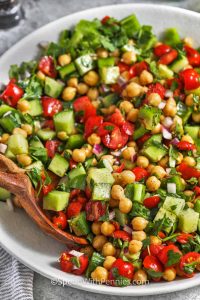
# Chickpea Salad: A Vibrant and Tasty Treat
Chickpea Salad is a lively, crunchy creation that is filled with fresh tastes. This salad is not only simple to make but also keeps well in the refrigerator, making it a fantastic option for lunches or gatherings.
## Holly’s Recipe Highlights: Chickpea Salad
– **Flavor:** Refreshing and vibrant with crisp veggies, chickpeas, and a zesty cumin-lemon dressing.
– **Why Make It:** Quick to chop, mix, and chill, and it improves in flavor after resting.
– **Tools:** A vegetable chopper can expedite prep and ensure consistent chopping of bell peppers and cucumbers.
– **Serving Suggestions:** Enjoy as a side, fill into pita, or top with grilled chicken breasts or oven-roasted shrimp for a fantastic meal.
**Total Time:** 1 hr 25 mins
**Servings:** 6
**Cooking Method:** Chilled
## Ingredient Notes
– **Chickpeas:** Canned chickpeas make this recipe fast and easy. Rinse thoroughly and pat dry for optimal flavor. If using homemade chickpeas, make sure they are tender and not overcooked.
– **Tomatoes:** Cherry tomatoes are ideal for a fresh, sweet taste, although canned diced tomatoes can be an alternative.
– **Cucumbers:** English or Persian cucumbers maintain their crunch and require minimal preparation. If using backyard cucumbers, peel and remove seeds to prevent a soggy salad.
– **Green Pepper:** Green bell pepper contributes a nice crunch. Red, yellow, or orange bell peppers may be used for a sweeter flavor.
– **Red Onion:** Imparts a sharp taste; finely chop to avoid overwhelming the salad. Soaking briefly in cold water can soften the flavor.
– **Avocado:** Optional, but adds a creamy texture. Best added just before serving or lightly combined with lemon juice to prevent browning.
The dressing is straightforward, highlighting the oil’s flavor. Opt for a mild extra-virgin olive oil for a subtle taste or a strong one for a peppery note. Avocado oil is a neutral substitute.
## How to Prepare Chickpea Salad
1. In a medium bowl, mix together tomatoes, cucumber, chickpeas, bell pepper, parsley, and red onion.
2. Incorporate olive oil, vinegar, cumin, salt, and pepper. Toss thoroughly to combine.
3. If using, chop the avocado into cubes and place in a small bowl. Drizzle juice from half a lemon over the avocado and gently mix. If avocado is not included, squeeze 1 to 2 tablespoons of lemon juice over the salad and toss.
4. Chill for at least one hour prior to serving.
### Preparation Tips
– **Cut Vegetables Evenly:** This ensures each bite has a balance of flavors and textures.
– **Prep Ahead of Time:** Add avocado just before serving for optimal texture.
– **Taste After Chilling:** Cold salads might need additional salt or a hint of lemon.
## Storing Leftovers
– **Refrigerate:** Store leftover chickpea salad in an airtight container in the fridge for up to 5 days. Keep avocado separate and add it just before serving to preserve its texture.
– **Serving:** Stir before serving as the dressing can settle. Revive leftovers with a splash of red wine vinegar, olive oil, or lemon juice.
– **Freezing:** Not advisable.
## What to Pair with Chickpea Salad
Chickpea Salad complements a wide array of dishes, making it a flexible addition to any meal. Relish it as a side dish, in a pita, or as a topping for grilled proteins.
Did you enjoy this Chickpea Salad Recipe? Leave a comment and rating below!
Read More
Tasty Traditional Stuffed Peppers Recipe
### Stuffed Peppers: A Flavorful All-in-One Meal
Stuffed Peppers offer a tasty and simple meal choice that unites vibrant bell peppers with a mouthwatering mixture of beef, sausage, and marinara sauce. This dish is both aesthetically pleasing and remarkably convenient, making it an ideal option for hectic evenings. Able to be prepared in advance and frozen, stuffed peppers are a flexible component of any meal regimen.
#### Holly’s Recipe Highlights: Stuffed Peppers
– **Flavor**: Each morsel is a luscious fusion of seasoned meat, fluffy rice, sweet bell peppers, and zesty marinara sauce, resulting in a comforting and fulfilling meal.
– **Why Make It**: Cooking the rice directly in the tomato concoction allows it to soak up all the delightful flavors, guaranteeing a moist and tasty filling.
– **Serving Suggestions**: While these peppers stand alone as a complete meal, they complement a crunchy green salad and warm garlic bread beautifully, which is ideal for soaking up any leftover marinara sauce.
**Total Time**: 1 Hour 20 Minutes
**Servings**: 6
**Cooking Method**: Oven Baked
### Ingredient Notes
– **Bell Peppers**: Any variety can be utilized. Green peppers provide a sharper taste, whereas red, yellow, and orange peppers are on the sweeter side.
– **Meat**: A mix of lean ground beef and Italian sausage creates a robust filling. Select mild, sweet, or spicy sausage according to your taste, and make sure to drain excess fat after browning.
– **Long Grain White Rice**: Uncooked rice cooks in the tomato blend, absorbing the flavors. If cooked rice is used, omit the water and warm the filling just until combined.
– **Marinara Sauce**: Opt for a marinara sauce you favor, as it greatly influences the dish’s flavor. Sample the filling before adding additional salt, as sauces differ in salt content.
### Tips for Ideal Stuffed Peppers
– **For Softer Peppers**: Boil or air fry the peppers before filling them. For a tender-crisp outcome, you can skip this step.
– **Drain the Peppers**: Be sure they are well-drained after boiling to prevent a soggy dish.
– **Taste the Filling**: Always taste the filling prior to stuffing to modify seasoning as required.
– **Do Not Pack Tightly**: Lightly press the filling into the peppers, avoiding packing it too tightly.
– **Spoon the Sauce**: Before layering cheese, spoon sauce from the bottom of the dish over the peppers for extra moisture and flavor.
### Save Every Stuffed Pepper
– **Leftovers**: Keep in an airtight container in the fridge for up to 4 days.
– **Reheating**: Reheat in the microwave loosely covered or in the oven at 350°F with a bit of marinara or water, covered with foil.
– **To Freeze**: Assemble the peppers without baking, allow the filling to cool completely, cover tightly, and freeze. Thaw overnight in the fridge before baking, adding about 15 minutes if necessary.
### More Stuffed Pepper Favorites
Stuffed Peppers aren’t simply a dish; they offer a platform for creativity in the kitchen. Feel free to try various fillings, spices, and sauces to personalize this recipe.
Did you enjoy this Stuffed Peppers Recipe? Share a comment and rating below!
Read More
An Abundant Portion of Classic Comfort Cuisine
# Chicken and Dumplings: The Pinnacle of Comfort Cuisine
Chicken and Dumplings is a traditional dish that captures the heart of comfort cuisine. Featuring succulent chicken, homemade dumplings, and a rich, savory broth, this dish is ideal for providing warmth from the inside out. Whether you desire a snug family dinner or a meal to uplift your spirit, Chicken and Dumplings is a straightforward yet fulfilling choice that can be prepared from scratch any evening of the week.
## Holly’s Recipe Highlights: Chicken and Dumplings
### Taste
The blend of a savory broth, tender chicken, and fluffy dumplings results in a substantial dish that is both comforting and flavorful. The homemade essence is a signature of this timeless recipe.
### Essential Tools
To efficiently create this dish, it’s crucial to have the right utensils. A large stockpot, rolling pin, pizza cutter, and cheesecloth will assist in achieving optimal results.
### Serving Ideas
Complement your Chicken and Dumplings with a light green salad for a balanced meal that enhances the richness of the dish.
### Overall Time
– **Total Time:** 1 Hour 35 Minutes
– **Serves:** 8
– **Cooking Method:** Stovetop
## Ingredient Insights
– **Whole Chicken:** Utilizing a whole chicken produces a rich broth and ample tender meat. Bone-in chicken thighs can serve as a fantastic alternative.
– **Carrots and Celery:** These vegetables boost the broth’s flavor. You can chop and return them to the pot for a heartier soup or discard them for a smoother broth.
– **Bay Leaf or Poultry Seasoning:** These components are optional but contribute depth to the broth. Consider incorporating thyme or sage for a traditional flavor.
– **All-Purpose Flour:** This serves as the foundation for the dumplings. Keep extra flour accessible to avoid sticking during rolling and cutting.
– **Variations:** For added color and sweetness, mix in frozen peas. A splash of cream can elevate the dish, and for a quicker alternative, use pre-cooked shredded chicken.
## Success Tips
– **For Uniform Cooking:** Roll the dumplings to approximately ¼ inch thickness.
– **To Avoid Clumping:** Generously flour the dough before cutting to prevent sticking.
– **For Softer Dough:** Gradually add milk to create a soft, non-sticky dough.
– **Avoid Over-Kneading:** A few folds are enough to combine the dough.
– **Simmer Gently:** Steer clear of a vigorous boil to maintain the dumplings’ integrity.
– **Add Cornstarch Slurry Gradually:** The broth thickens rapidly, so add it slowly.
## Storing Leftovers
– **Refrigeration:** Keep leftovers in an airtight container for up to 4 days.
– **Freezing:** The chicken and broth can be frozen for up to 3 months. For optimal texture, freeze before adding dumplings and prepare fresh dumplings when reheating.
– **Reheating:** Warm gently on the stovetop or in the microwave, adding broth or water as needed.
## Cozy Chicken Meals
Chicken and Dumplings is more than just a dish; it’s a cherished experience that brings warmth and comfort to your dining table. Relish this recipe with family and friends, and enjoy the delightful flavors that make it an adored classic.
Read More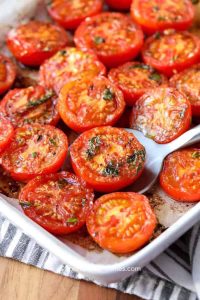
Rapid 15-Minute Oven-Roasted Tomatoes Recipe
# Roasted Tomatoes: An Easy and Tasty Side Dish
Roasted tomatoes serve as a straightforward yet tasty side dish that can enhance any dining experience. With only a few ingredients, such as fresh tomatoes, olive oil, garlic, fresh herbs, and a dash of balsamic vinegar, this dish is simple to create and delicious. Topped with a sprinkle of Parmesan cheese, these oven-roasted tomatoes are ideal alongside grilled chicken breast or a succulent steak dinner.
## Holly’s Recipe Highlights: Roasted Tomatoes
– **Flavor**: Sweet, juicy, and slightly caramelized tomatoes blended with savory garlic, aromatic basil, and a touch of tangy balsamic vinegar.
– **Why Make**: Roasting emphasizes the tomatoes’ inherent sweetness and flavor, resulting in a rich side dish with little effort.
– **Serving Suggestions**: Serve these roasted tomatoes with grilled chicken breasts, mix them into egg noodles, or enjoy them on crusty no-knead bread.
**Total Time**: 15 Minutes
**Servings**: 6
**Cooking Method**: Oven Roasted
## Ingredient Notes
– **Tomatoes**: Choose the ripest tomatoes for optimal flavor. Roma tomatoes are heartier and may need a longer roasting duration, while cherry, grape, and Campari tomatoes roast swiftly and become delightfully juicy.
– **Balsamic Vinegar**: Contributes subtle tang and amplifies the tomatoes’ natural sweetness. For a deeper finish, drizzle with balsamic glaze once roasted.
– **Garlic**: Chopped garlic delivers robust flavor. For a gentler taste, consider garlic powder or roasting whole smashed cloves.
– **Basil**: Fresh basil brings brightness; dried basil serves as a suitable alternative. Other herbs like oregano, thyme, or Italian seasoning may also be utilized.
– **Parmesan Cheese (optional)**: A dash of Parmesan adds a savory touch but can be omitted if preferred.
## How to Make Roasted Tomatoes
1. Preheat the oven to 450°F.
2. Rinse and slice the tomatoes in half (or quarters for larger varieties).
3. Combine the tomatoes with olive oil, balsamic vinegar, garlic, basil, Parmesan (if using), salt, and pepper.
4. Arrange in a baking pan and roast for 10 to 20 minutes, or until your desired level of doneness is achieved.
### Tips for Perfect Roasted Tomatoes
– **Use Ripe Tomatoes**: They yield the sweetest taste.
– **Cut Evenly**: Ensure larger tomatoes are quartered to cook uniformly with smaller ones.
– **Roast in a Single Layer**: This avoids steaming and promotes proper roasting.
– **Avoid Over-Tossing**: Excessive tossing after roasting can lead to overly soft tomatoes.
– **Add Basil Wisely**: Fresh basil can be added after roasting for an enhanced flavor.
## Save Every Spoonful
– Store any leftovers in an airtight container in the refrigerator for up to 4 days or freeze for up to 3 months. Thaw in the refrigerator and reheat as necessary.
### Nutrition Information (per serving)
– **Calories**: 56
– **Carbohydrates**: 6g
– **Protein**: 1g
– **Fat**: 3g
– **Cholesterol**: 1mg
– **Sodium**: 34mg
– **Potassium**: 358mg
– **Fiber**: 1g
– **Sugar**: 4g
– **Vitamin A**: 1270 IU
– **Vitamin C**: 20.9mg
– **Calcium**: 35mg
– **Iron**: 0.4mg
Roasted tomatoes are not just a delicious enhancement to your meal but also a nutritious one, brimming with vitamins and taste. Relish this easy recipe as a versatile side dish that pairs well with various main courses.
Read More
Weekly Meal Schedule for August 3, 2026
### Receive Tasty New Recipes Each Day
In the current rapid-paced environment, finding time for cooking can pose a challenge. Nevertheless, with appropriate resources, you can easily uncover new and thrilling recipes that align with your lifestyle. Enrolling in a daily recipe service can revolutionize your cooking habits, making meal prep both enjoyable and efficient.
#### Reasons to Enlist in a Recipe Service
1. **Diversity**: Daily recipe subscriptions present a wide array of dishes, from swift weeknight dinners to elaborate weekend banquets. This diversity keeps your meals engaging and avoids the tedium of preparing the same dishes repeatedly.
2. **Ease**: With recipes sent straight to your inbox, you can strategize your meals in advance without the struggle of hunting for new ideas. This ease can conserve your time and diminish the anxiety of last-minute cooking.
3. **Healthier Options**: Many recipe services emphasize nutritious eating, offering healthy selections that accommodate various dietary preferences. This can assist you in sustaining a balanced diet and promote better eating habits.
4. **Skill Enhancement**: Experimenting with new recipes can improve your cooking abilities. With detailed instructions, you can glean new techniques and broaden your culinary skills.
5. **Community Involvement**: Numerous recipe services cultivate a community of food enthusiasts. By subscribing, you can connect with others who share your love for cooking, share advice, and even showcase your culinary masterpieces.
#### How to Enroll
Joining a daily recipe service is straightforward. Generally, you will need to input your email address and consent to receive updates. For example, you might see a subscription form that resembles this:
– **Email Address**: Input your email to get daily recipes.
– **GDPR Consent**: Acknowledge your agreement to receive emails.
– **Submit**: Hit the button to begin getting tasty recipes.
After subscribing, you can look forward to receiving a selection of recipes customized to your tastes, along with cooking advice and seasonal ideas.
#### Unsubscribe Anytime
Should you find that the service no longer suits your needs, most subscription services permit you to easily unsubscribe. Look for an “unsubscribe” link at the footer of the emails you receive.
#### Connect on Social Media
Besides email subscriptions, many recipe services have dynamic social media profiles. Following them on platforms like Facebook, Instagram, and Pinterest can offer you even more inspiration, cooking guidance, and community engagement.
### Final Thoughts
Enrolling in a daily recipe service can greatly improve your cooking journey. With a plethora of new recipes at your disposal, you’ll relish the meal preparation process and uncover new flavors and methods along the way. Begin your culinary adventure today and rejuvenate the excitement in your kitchen!
Read More
Crispy Pan-Seared Crab Cakes Showcasing a High Crab Meat Content with Little Filler
## Effortless Crab Cake Preparation
This effortless Crab Cake Preparation is a tasty meal that delivers bold flavors and is packed with crab in every mouthful. These crab cakes contain minimal filler, allowing the succulent, sweet crab meat to take center stage. Pan-fried to perfection, they boast a crunchy outer layer while remaining soft on the inside.
### Serving Ideas
For a traditional seafood-themed meal, pair these crab cakes with a homemade [tartar sauce](https://www.spendwithpennies.com/tartar-sauce-recipe/) and a rich [coleslaw](https://www.spendwithpennies.com/best-coleslaw-recipe/).
### Holly’s Key Recipe Features: Crab Cakes
– **Simple to Prepare**: Utilize lump crabmeat or canned crab for ease.
– **Tasty**: Every bite is flavorful and enriched with fresh herbs and a tangy citrus kick.
– **Perfectly Crunchy**: A quick pan-fry yields a wonderfully golden finish.
– **Adaptable**: Excellent as starters, side dishes, or the main dish.
**Total Duration**: 1 Hour 40 Minutes
**Yields**: 8 Crab Cakes
**Cooking Technique**: Stovetop
### Selecting Crab for Crab Cakes
For optimal taste, choose fresh crab meat or lump crab meat, which is commonly found in jars near the seafood section. Although lump crab features larger chunks, canned crab is also a reliable choice. Always sift through the meat to eliminate any shell fragments or cartilage.
### Additional Ingredient Tips
– **Seasonings**: Incorporate Dijon mustard, a touch of Worcestershire sauce, and Old Bay seasoning. Fresh herbs boost the flavor profile.
– **Breadcrumbs**: A minimal amount of filler is utilized—just enough to bind the mixture. Panko breadcrumbs combined with a touch of mayo offer the best texture, while crushed saltine cracker crumbs work well as an alternative.
### Crab Cake Variations
– Toss in 1 to 2 tablespoons of finely chopped red bell pepper or green onions for added taste.
– Mix in a dash of cayenne or Cajun seasoning for a subtle kick.
– Prepare mini crab cakes for appetizers, adjusting the cooking time as needed.
Serve with a squeeze of lemon juice and your favorite dipping sauce, such as [homemade tartar sauce](https://www.spendwithpennies.com/dill-pickle-tartar-sauce/), remoulade, or [garlic aioli](https://www.spendwithpennies.com/aioli/).
### Storing, Freezing, and Reheating
1. **Refrigerator**: Store cooked crab cakes in a sealed container for up to **3 days**.
2. **Reheat**: To restore crispiness, reheat in a dry sauté pan over medium heat or utilize an air fryer.
3. **Freeze**: Freeze cooled crab cakes for a maximum of 3 months. Thaw overnight in the refrigerator for best results, then pan-fry or air fry to warm them up.
Leftover crab cakes can be diced and incorporated into a [crab salad](https://www.spendwithpennies.com/crab-salad/) or blended into a [cheesy crab dip](https://www.spendwithpennies.com/crab-rangoon-dip-wonton-chips/).
### Fresh Sauces and Accompaniments for Crab Cakes
Did you prepare these simple Crab Cakes? Don’t forget to leave a rating and a comment below!
### Recipe Steps
1. Inspect the crab meat for any hard or sharp cartilage, remove, and toss.
2. In a bowl, blend together mayonnaise, beaten egg, Dijon mustard, Worcestershire sauce, and Old Bay seasoning.
3. Incorporate the crab meat, breadcrumbs, parsley, lemon zest, salt, and pepper. Carefully fold to mix, ensuring not to break the crab.
4. Form into 6-8 crab cakes using ⅓ cup each, then place on a plate. Cover with plastic wrap and chill for a minimum of 1 hour.
5. Heat oil in a large nonstick skillet over medium heat. Cook the crab cakes for 3-5 minutes on each side or until golden brown.
6. Serve right away with tartar sauce and lemon wedges.
### Additional Notes
– Handle the crab mixture gently to prevent breaking it apart.
– Chilling the mixture is essential for the crab cakes to hold together.
– To bake crab cakes, preheat the oven to 450°F. Position crab cakes on a foil-lined baking sheet and bake for 13-18 minutes until browned.
### Nutritional Information (per serving)
– **Calories**: 232
– **Carbohydrates**: 3g
– **Protein**: 11g
– **Fat**: 18g
– **Saturated Fat**: 2g
– **Chol

Fast and Easy Pork Stir Fry Recipe for Hectic Evenings
# Pork Stir Fry: A Rapid Skillet Meal
Pork Stir Fry is a rapid skillet meal prepared with tender pieces of pork, crunchy vegetables, and a sweet and savory pineapple sauce. This straightforward recipe comes together in one pan and is perfect served over rice or noodles for a tasty weeknight supper.
## Holly’s Recipe Highlights: Pork Stir Fry
– **Flavor:** This stir fry mixes succulent pork and vibrant veggies with a sweet, tangy, and savory glaze.
– **Technique:** Coating the pork with cornstarch prior to cooking assists it in forming a golden-brown crust while retaining moisture to keep the meat tender and juicy.
– **Recommended Tools:** A sizable skillet, wok, or sauté pan offers ample space for cooking the pork and vegetables evenly.
– **Serving Suggestions:** Ideally served over baked rice, lo mein noodles, or rice noodles to absorb the flavorful sauce.
**Total Time:** 45 Mins
**Servings:** 4
**Cooking Method:** Stove-top
## Ingredient Notes
– **Pork:** Boneless pork chops or pork tenderloin are both suitable for this dish. Cut the pork against the grain into thin, uniform strips to create tender, bite-sized pieces that cook swiftly.
– **Cornstarch:** Aids in achieving a lightly crispy, golden crust on the pork while keeping it tender. It’s also utilized to thicken the sauce, creating a smooth, glossy finish.
– **Mixed Vegetables:** Fresh or frozen veggies are excellent choices for this stir fry. Broccoli, bell peppers, snap peas, carrots, mushrooms, baby corn, and zucchini are all fantastic options to add color, texture, and flavor.
– **Pineapple:** Pineapple chunks introduce a sweet, juicy flavor burst that complements the savory sauce. Canned pineapple is a convenient alternative, and the reserved juice can be incorporated into the sauce, though orange juice is a good substitute if necessary.
## How to Prepare Pork Stir Fry
1. Season the pork, coat it with cornstarch, and allow it to rest.
2. Brown the pork, then stir fry the vegetables with garlic and ginger.
3. Simmer and thicken the sauce. Then return the pork, vegetables, and pineapple to the skillet until warmed through.
### Tips for Success
– **Prep First:** Prepare all ingredients before igniting the stove. Stir fry cooks rapidly.
– **Avoid Overcrowding the Pan:** Browning in batches enhances flavor and texture.
– **Utilize Medium-High Heat:** So that the vegetables remain tender-crisp instead of soft.
– **Incorporate Garlic and Ginger Later:** Add after the vegetables have cooked for a few minutes to prevent burning.
– **Employ a Meat Thermometer:** Pork is tender and juicy at 145°F, and a slight pink in the center is acceptable.
## Storing the Leftovers
– Store leftovers in an airtight container in the refrigerator for up to 4 days and in the freezer for up to 2 months.
– Thaw overnight in the refrigerator, then gently reheat in a skillet over medium heat or in the microwave, stirring halfway through.
### Nutrition Information (per serving)
– **Calories:** 393
– **Carbohydrates:** 43g
– **Protein:** 26g
– **Fat:** 15g
– **Saturated Fat:** 8g
– **Cholesterol:** 57mg
– **Sodium:** 675mg
– **Potassium:** 793mg
– **Fiber:** 8g
– **Sugar:** 12g
– **Vitamin A:** 9262 IU
– **Vitamin C:** 24mg
– **Calcium:** 71mg
– **Iron:** 3mg
Pork Stir Fry is a delightful meal that merges the savory flavor of pork with the sweetness of pineapple, making it a beloved choice for family dinners. Savor this quick and easy recipe any night of the week!
Read More
Tasty Sweet and Glazed Meatballs: A Beloved Recipe
### Hoisin Meatballs: An Easy and Flavor-Packed Recipe
These **Hoisin Meatballs** serve as a simple appetizer or dinner choice, featuring succulent pork meatballs enrobed in a sweet and savory sauce. They come together swiftly in the oven and are garnished with sesame seeds and green onions for a *quick, tasty dish*.
#### Recipe Highlights from Holly: Hoisin Glazed Meatballs
– **Flavor:** Enjoy a sweet and savory taste infused with ginger, sesame, and a touch of heat from sriracha.
– **Why Make It:** Baking the meatballs streamlines preparation and eliminates mess, while the glaze can be made in mere minutes.
– **Serving Suggestions:** Present these meatballs with toothpicks for an effortless appetizer or serve them over quick Instant Pot rice with a side of roasted broccoli.
– **Total Time:** 33 Minutes
– **Servings:** 4
– **Cooking Method:** Baked in Oven
### Ingredient Insights
– **Pork:** Ground pork offers a rich flavor and maintains the meatballs’ tenderness. Ground chicken or turkey can be substituted, but avoid extra-lean varieties for optimal texture.
– **Panko Bread Crumbs:** Panko keeps the meatballs light and fluffy rather than dense. Standard dry bread crumbs can be used, though they yield a slightly firmer texture.
– **Hoisin Sauce:** Hoisin sauce provides the basis for the glaze, with a thick consistency and a deliciously sweet, salty, and savory flavor that handles most of the seasoning.
– **Rice Vinegar:** Rice vinegar counteracts the sweetness of the hoisin sauce and honey, introducing a mild tang to the glaze. Apple cider vinegar can serve as a substitute if necessary.
– **Honey:** Honey contributes sweetness and gloss to the glaze while assisting the sauce in adhering to the meatballs. Brown sugar or maple syrup can be used as alternatives if necessary.
### Instructions for Preparing Hoisin Glazed Meatballs
1. Preheat your oven to 375°F.
2. In a large bowl, mix all meatball ingredients together until just combined. Shape into 24 meatballs and bake for 18-20 minutes or until fully cooked.
3. In a small saucepan, mix all sauce ingredients together. Bring to a boil over medium-high heat, allowing it to boil for 1-2 minutes. (The sauce will thicken a bit as it cools).
4. Once the meatballs are cooked, toss them in the sauce. If desired, garnish with sesame seeds and green onions.
### Tips for Perfect Meatballs
– **Gently Mix the Meatball Mixture:** Overmixing can make them tough.
– **Utilize a Cookie Scoop:** This ensures uniform meatballs that bake evenly.
– **Employ Parchment Paper:** Line the baking sheet with parchment for easier cleanup and reduced sticking.
– **For a Thicker Sauce:** Add more water to the sauce if it becomes too thick before the meatballs are ready.
– **For Added Browning:** Broil the meatballs for 1 to 2 minutes prior to tossing them in the sauce.
### Storing Sticky Meatballs
– **Refrigerate:** Store leftovers in an airtight container in the refrigerator for up to 4 days.
– **Freeze:** Can be frozen for 2 to 3 months. Although they can be frozen with the sauce, freezing them separately yields better texture.
– **Reheat:** Microwave, heat in a covered skillet over low heat, or place in a 350°F oven until warmed through. Add a splash of water if the glaze thickens excessively.
### Nutritional Information (per meatball)
– **Calories:** 79
– **Carbohydrates:** 5g
– **Protein:** 4g
– **Fat:** 5g
– **Sodium:** 118mg
These Hoisin Meatballs are not only straightforward to make but also provide a delightful flavor that is guaranteed to impress your family or guests. Relish them as either an appetizer or a main course!
Read More
A Flexible 20-Minute Mushroom Accompaniment for Any Dish
# Portobello Mushrooms in Garlic Butter
**Portobello Mushrooms in Garlic Butter** serve as a delicious 20-minute side dish that delivers a deep, earthy taste to your meal. These mushrooms are sautéed until they achieve a golden caramelization and then garnished with toasted breadcrumbs and Parmesan, making for a simple yet tasty recipe.
## Highlights of Holly’s Recipe: Portobello Mushrooms
– **Taste**: These delicious mushrooms are prepared with rich garlic butter, fragrant thyme, and a crispy breadcrumb topping that provides an appetizing crunch.
– **Reason to Make It**: Ready in just 20 minutes without needing the oven, this side dish complements nearly any main course!
– **Serving Ideas**: Pair these mushrooms with teriyaki pork tenderloin, grilled chicken, or garlic butter steak bites.
**Total Duration**: 20 Mins
**Servings**: 4
**Cooking Technique**: Skillet
## Notes on Ingredients
– **Portobello Mushrooms**: Select firm mushrooms with dry, smooth caps free of slimy patches. Clean them with a damp paper towel and remove the gills for enhanced texture and a neater dish.
– **Butter**: Splitting the butter allows the breadcrumbs to toast to a deep, golden hue while the remaining butter provides a savory garlic finish.
– **Panko Breadcrumbs**: Toasting breadcrumbs beforehand keeps the topping light, crisp, and golden brown. You can use standard breadcrumbs, but the texture will be finer and less crunchy.
– **Parmesan Cheese (optional)**: Contributes a savory, salty, and nutty taste to the crispy topping.
## Alternatives
– Finish the mushrooms with a drizzle of fresh lemon juice or balsamic vinegar.
– Include a dash of red pepper flakes with the garlic for extra heat.
– Substitute thyme with rosemary, parsley, or Italian herbs for a different flavor profile.
## Instructions for Preparing Portobello Mushrooms
1. Prepare the mushrooms and toast the Panko topping.
2. Sauté the mushrooms in olive oil with thyme and then stir in the remaining ingredients.
3. Complete the dish by sprinkling toasted breadcrumbs and Parmesan on top before serving.
### Success Tips
– **Opt for a Large Skillet**: This helps the mushrooms brown instead of steam.
– **Don’t Stir Immediately**: Allowing the mushrooms to rest aids in caramelization.
– **Add Garlic at the End**: To retain its aroma and prevent burning.
– **Toast Panko Separately**: To keep the topping crunchy.
## Preserving Leftovers
Store leftovers in an airtight container in the fridge for up to 4 days. Avoid freezing. Reheat in a skillet over medium heat until thoroughly warmed, adding a little butter if they appear dry. The breadcrumb topping may soften in the refrigerator, so consider introducing fresh toasted Panko before serving for added crunch.
### Nutritional Data (per serving)
– **Calories**: 136
– **Carbohydrates**: 6g
– **Protein**: 2g
– **Fat**: 11g
– **Saturated Fat**: 4g
– **Cholesterol**: 16mg
– **Sodium**: 111mg
– **Potassium**: 239mg
– **Fiber**: 1g
– **Sugar**: 1g
– **Vitamin A**: 175 IU
– **Vitamin C**: 0.2mg
– **Calcium**: 23mg
– **Iron**: 0.4mg
This recipe provides a delightful complement to any meal, delivering a quick and tasty side that pairs well with assorted main dishes. Relish the robust flavor of garlic butter along with the pleasing crunch of toasted breadcrumbs with these delectable Portobello mushrooms!
Read More
Fast and Simple 5-Component Slow Cooker Meal with Little Prep
### Crock Pot Mississippi Chicken: A Hearty Slow Cooker Treat
Crock Pot Mississippi Chicken is a simple slow cooker staple that mixes tender shredded chicken with pepperoncini, ranch seasoning, and gravy. With only five ingredients and little prep time, it’s a satisfying, flavorful dish that’s ideal for hectic weeknights.
#### Holly’s Recipe Highlights: Mississippi Chicken
This recipe is a variation of the beloved Mississippi pot roast. According to legend, a cook from the South introduced a packet of ranch and gravy mix along with some pepperoncini peppers to her roast in order to tone down the spice for her kids, and an iconic dish was created!
– **Flavor**: The taste is rich, savory, buttery, and tangy, complemented by the pepperoncini which contributes a gentle heat that perfectly balances the zesty ranch and robust gravy.
– **Technique**: Slow cooking ensures the chicken remains tender while allowing the ranch, au jus, butter, and pepperoncini to blend into a sumptuous, flavorful sauce.
– **Serving Suggestions**: Serve over mashed potatoes, egg noodles, or instant pot rice to absorb every drop of the sauce.
**Total Time**: 3 hours 20 mins
**Servings**: 4
**Cooking Method**: Slow Cooker
### Ingredients for Mississippi Chicken
– **Chicken Breasts**: Boneless, skinless chicken breasts are lean, tender, and easy to shred post-slow cooking. Boneless skinless chicken thighs are an excellent alternative and remain especially juicy and flavorful in the slow cooker.
– **Ranch Seasoning Mix**: A packet provides classic savory flavor with little effort, but homemade ranch seasoning works just as effectively.
– **Au Jus Gravy Mix**: Contributes rich, savory depth to the sauce. If an au jus mix isn’t available, substitute it with brown gravy mix for a comparable taste.
– **Pepperoncini Peppers and Juice**: The peppers introduce tang and gentle heat, while the juice aids in tenderizing and flavoring the chicken. Banana peppers can be used, although they impart a slightly sweeter and less sharp flavor.
### How to Make Crockpot Mississippi Chicken
1. Place the chicken breasts at the bottom of a 6-quart slow cooker.
2. Pour the ½ cup of pepperoncini juice over the chicken. Evenly sprinkle the ranch dressing mix and the au jus gravy mix on top.
3. Add the pepperoncini peppers and slices of butter atop the mixture.
4. Cover the slow cooker and set it to cook on high for 3 to 4 hours or low for 6 to 7 hours, or until the chicken is tender and achieves 165°F.
5. Take out the chicken and shred it with two forks. Return it to the juices in the slow cooker and stir to combine.
6. Serve it over mashed potatoes, egg noodles, or rice.
### Tips for Success
– **Similarly Sized**: Thick chicken breasts should be halved so they cook evenly.
– **Use an Instant Read Thermometer**: Ensure the chicken reaches an internal temperature of 165°F before shredding.
– **Shred While Warm**: Shred the chicken while it’s warm, then return it to the slow cooker to absorb the sauce.
– **Taste Before Adding Salt**: Ranch and gravy packets may already be salty, so sample the final dish before adding extra salt to avoid overwhelming saltiness.
– **For Sandwiches**: Allow the shredded chicken to sit on warm for a few minutes so the sauce thickens slightly before piling it onto buns.
### Storing the Leftovers
– Store leftovers in an airtight container in the refrigerator for up to 4 days and in the freezer for 3 months.
– Thaw in the refrigerator overnight. Reheat in the microwave or on a saucepan over low heat. If the sauce thickens too much, add a splash of broth or water.
– Incorporate leftovers into sandwiches, wraps, or salads for a hearty workday lunch.
### More Cozy Slow Cooker Chicken Dinners
Did you savor this Crockpot Mississippi Chicken Recipe? Leave a comment and rating below!
Read More