
We Tried 10 Tubs of Guacamole â And the Surprising Winner Could Totally Pass for Homemade

âChecks all of my boxes.”
READ MORE…

I Tried Joanna Gainesâ Favorite Lemon Bars

When life gives you lemons, make these bars!
READ MORE…
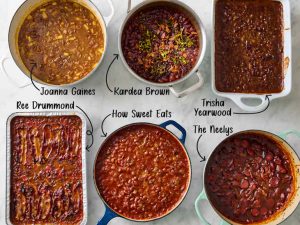
The Best Baked Beans Recipe (We Tested 6 Popular Contenders!)

Get ready for summer!
READ MORE…
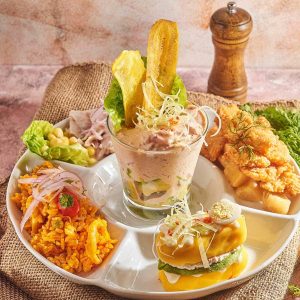
Revitalizing Shrimp Ceviche Recipe (No Cooking Needed)
### Diced Shrimp Ceviche with Crunchy Vegetables
Diced shrimp and crunchy vegetables blend in a lively and tangy citrus dressing, making it a fantastic choice for dipping with chips. This invigorating ceviche is excellent for parties, serving as a tasty snack, starter, or even a light meal.
#### Taste Profile
The ceviche features a lively taste profile, including zesty lime, plump tomatoes, and rich avocado. These elements create a delightful harmony, with the refreshing crispness of the vegetables enhanced by the citrusy flair of the marinade.
#### Preparation Skills and Steps
This recipe is simple to make and requires no cooking, making it suitable for chefs of all experience levels. The straightforward nature of the recipe allows everyone to relish both preparing and enjoying this scrumptious ceviche.
#### Time-Saving Advice
For those pressed for time, consider opting for a pre-packaged pico de gallo or mango salsa instead of slicing fresh vegetables. This shortcut can save you valuable time while still offering excellent taste.
#### Serving Ideas
Shrimp ceviche is adaptable and can be presented in various ways. Savor it with tortilla chips, atop a fresh salad, or tucked in lettuce wraps. It also pairs nicely as a topping for tacos or quesadillas.
### Ingredient Recommendations for Shrimp Ceviche
Ceviche traditionally involves soaking raw seafood in an acidic mixture, like citrus juice, which “cooks” the seafood without any heat. Here are some guidelines for picking and preparing your ingredients:
– **Shrimp**: Choose pre-cooked chopped or bay shrimp for convenience. If using raw shrimp, ensure it is extremely fresh. While classic ceviche uses raw seafood, cooked shrimp is a safer bet for those who might not have access to fresh seafood.
– **Citrus**: Freshly squeezed lemon, lime, and orange juice are crucial for optimal flavor. The orange juice balances the tartness of the lime, while lime juice amplifies the overall taste.
– **Vegetables**: Add vibrant veggies like tomatoes, jalapeños, red onions, and avocado. Finely sliced radishes and green onions can also contribute a delightful crunch.
### Alternatives
– Swap shrimp for scallops, allowing them to marinate in the citrus juice to “cook” before adding the other ingredients.
– For an additional kick, exchange jalapeños with serrano chiles.
### Accompaniments for Shrimp Ceviche
There are many ways to enjoy shrimp ceviche:
– Serve alongside tortilla chips or homemade crostini.
– Spoon into cucumber boats or avocado halves.
– Use as a salsa for tacos or quesadillas.
### Preserving Shrimp Ceviche
For the best taste and texture, consume shrimp ceviche the same day it is prepared. If necessary, keep it in a covered container in the fridge for up to one day.
### Final Thoughts
Shrimp ceviche is a delightful dish that merges fresh ingredients with vibrant flavors, making it an excellent choice for any event. Whether enjoyed as a snack, appetizer, or light meal, it is guaranteed to impress your guests and satiate your taste buds. Relish this refreshing dish and share your experience!
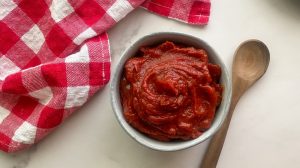
How to Prepare Ketchup in Your Kitchen
**How to Create Ketchup at Home: A Comprehensive Guide**
Ketchup is a cherished condiment that provides a zesty and sweet flavor to numerous dishes. Although store-bought options are handy, preparing ketchup at home gives you the ability to modify the flavor and regulate the ingredients. Here’s an easy guide to making your own ketchup from scratch.
**Ingredients:**
– 2 pounds of ripe tomatoes or 1 can (28 ounces) of whole peeled tomatoes
– 1 medium-sized onion, diced
– 2 cloves of garlic, minced
– 1/4 cup apple cider vinegar
– 1/4 cup brown sugar
– 1 tablespoon tomato paste
– 1 teaspoon salt
– 1/2 teaspoon ground mustard
– 1/2 teaspoon cinnamon
– 1/4 teaspoon allspice
– 1/4 teaspoon ground cloves
– 1/4 teaspoon cayenne pepper (optional, for heat)
– 1 tablespoon olive oil
**Instructions:**
1. **Prepare the Tomatoes:**
– For fresh tomatoes, core and chop them; for canned tomatoes, drain them thoroughly.
2. **Cook the Base:**
– In a large saucepan, heat the olive oil over medium heat. Add the chopped onion and garlic, sautéing until they are soft and translucent, which will take about 5 minutes.
3. **Combine Ingredients:**
– Add the tomatoes to the saucepan. Mix in the apple cider vinegar, brown sugar, tomato paste, salt, ground mustard, cinnamon, allspice, cloves, and cayenne pepper.
4. **Simmer the Mixture:**
– Bring the mixture to a boil, then lower the heat to simmer. Let it cook uncovered for approximately 45 minutes to 1 hour, stirring occasionally, until it thickens and reduces by around half.
5. **Blend for Smoothness:**
– Take the saucepan off the heat. Use an immersion blender to puree the mixture until smooth. Alternatively, you can blend the mixture in batches in a conventional blender, ensuring you handle hot liquids carefully.
6. **Strain the Sauce:**
– To achieve a smoother texture, strain the blended mixture through a fine-mesh sieve or cheesecloth into a clean saucepan, pressing down with a spoon to extract as much liquid as possible.
7. **Final Simmer:**
– Put the strained ketchup back into the saucepan. Simmer over low heat for another 15-20 minutes, stirring often, until it reaches your desired thickness.
8. **Cool and Store:**
– Let the ketchup cool entirely. Transfer it to a clean glass jar or bottle with a securely fitting lid. Store it in the refrigerator for up to 3 weeks.
**Tips for Customization:**
– **Sweetness:** Modify the amount of brown sugar as per your preference. For an alternative flavor, consider using honey or maple syrup.
– **Spices:** Try incorporating additional spices like paprika or nutmeg for a distinct variation.
– **Vinegar:** Experiment with various types of vinegar, such as balsamic or red wine vinegar, for different flavor nuances.
Crafting ketchup at home is a fulfilling endeavor that yields a tasty, preservative-free condiment tailored to your flavor desires. Savor your homemade ketchup with fries, burgers, or any dish that could benefit from a hint of tangy sweetness.
Read More
West Elmâs Outdoor Furniture Sale Includes This “Chic” Bistro Table

Itâs bound to sell out!
READ MORE…

Summer Officially Starts After I Buy This $10 Costco Staple

âA summertime savior.â
READ MORE…

My Dadâs Brilliant âNavy Dishwashingâ Trick Is the Simplest Way to Save Water Every Single Day

Itâs so easy, but makes such an impact!
READ MORE…

Burger Bowls With Signature Sauce and Ranch-Style Fries
### Burger Bowls with House Sauce and Ranch Fries
A burger served in a bowl! This scrumptious dish showcases ranch-seasoned fries adorned with succulent chunks of burger and all the trimmings, topped off with a splash of house sauce that elevates it to a new height. Ideal for families and get-togethers, burger bowls provide a playful and fulfilling twist on classic burgers.
#### Why This Recipe Appeals to Me
As a busy mom, identifying meals that satisfy everyone can pose a challenge. Burger bowls have turned into a preferred choice in our home for various reasons:
1. **Cooking Method**: Utilizing larger, juicier pieces of beef guarantees a fulfilling bite. This method, inspired by a friend, has revolutionized my burger experience.
2. **Ranch Fries**: Waffle fries are not only easy to eat with a fork but are also coated in ranch seasoning, making them delectably tasty.
3. **House Sauce**: This creamy, flavorful condiment imparts a delightful kick to the dish. If preparing it from scratch isn’t practical, a ready-made burger sauce performs just as well.
#### Ingredients
**For the Burger Bowls:**
– Ground beef
– Burger seasoning
**For the Ranch Fries:**
– Frozen waffle fries
– Butter
– Ranch seasoning
**For the House Sauce:**
– Mayonnaise
– Ketchup
– Pickles
– Seasoning (to taste)
#### Instructions
1. **Prepare the Ranch Fries**: Bake the fries as directed on the package. After cooking, mix them with melted butter and ranch seasoning to boost flavor.
2. **Make the House Sauce**: Combine mayonnaise, ketchup, and pickles in a bowl. Adjust seasoning according to taste, or opt for a store-bought version for ease.
3. **Cook the Beef**: Preheat a cast iron skillet over high heat without oil. Season one side of the ground beef with burger seasoning and place it in the hot pan, seasoned side down. Let it sear undisturbed for several minutes until a nice crust forms.
4. **Finish the Beef**: Once flipped, sprinkle the other side with seasoning. Break it into fork-sized pieces when browned, keeping it juicy.
5. **Assemble the Bowls**: Layer the ranch fries, chunks of beef, toppings of your choice (lettuce, tomatoes, cheese), and drizzle with house sauce.
#### Notes
– **Burger Seasoning**: Using a high-quality burger seasoning boosts the flavor. If you can’t find any, a straightforward mix of salt and pepper will do.
– **Cooking Technique**: The secret to juicy beef lies in high heat and minimal interference. Aim for a golden crust while ensuring the interior stays slightly pink for optimal juiciness.
– **Pan Choice**: While cast iron is preferred for its heat retention, non-stick pans can also work effectively.
#### Conclusion
These burger bowls are more than just a meal; they represent an experience that merges the finest aspects of burgers and fries in a playful, easy-to-eat presentation. Perfect for family dinners or relaxed gatherings, they are bound to become a favorite in your household. Relish the deliciousness of a burger in a bowl!
Read More
This Incredible $4 Cleaner Made My Filthy Kitchen Grout 5 Shades Lighter in Minutes

I canât believe how well it worked!
READ MORE…