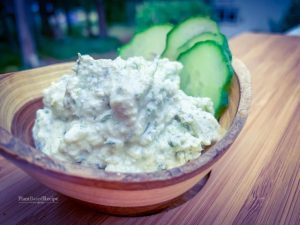
Genuine and Flavorful Tzatziki Sauce Recipe
This genuine tzatziki sauce recipe showcases Greek yogurt, cucumber, and fresh garlic for an exceptionally creamy dip! Ideal for Mediterranean meals, falafel, grilled chicken, and veggies.
I’ve been refining this homemade tzatziki recipe for years, and I can confidently assert it competes with what you’ll find at eateries! Following an unforgettable journey to Greece, Alex and I crafted a version to encapsulate the essence of our experience with this classic dip.
This recipe has graced our website for numerous years, and when I recently served it with my grilled chicken thighs at a dinner party, guests couldn’t stop praising it. Even Alex’s meat and potatoes uncle described it as “Incredible.” Alex and I have featured this at numerous dinner gatherings, and it consistently shines as the highlight. Whether you’re dipping pita chips or spreading it on a sandwich, I’m sure you’ll adore this one!
Key tzatziki components
Tzatziki is a yogurt and cucumber sauce prevalent in Mediterranean and Middle Eastern cuisines, particularly in Greek and Turkish dishes. It is frequently served as a side alongside pita or veggies, or as a sauce with gyros or falafel.
Countless opinions exist regarding this dip, especially about what constitutes the most genuine tzatziki recipe! Lacking Mediterranean or Middle Eastern heritage, we respect the rich tradition of this cuisine (here’s a traditional recipe by a Greek chef). Here are the typical ingredients found in tzatziki:
– Full-fat Greek yogurt: Utilizing full-fat yogurt is crucial to achieve the desired creaminess!
– Grated cucumber: Just the right amount to maintain a creamy texture. An English cucumber is preferable as it doesn’t need peeling or seeding!
– Garlic: Fresh garlic is vital here; avoid using jarred minced garlic.
– Olive oil: Oil contributes essential flavor and texture.
– Red wine vinegar: A touch of acidity adds some zest. While some opt for lemon, our findings indicate that vinegar is the most authentic choice.
– Fresh dill (optional): Fresh dill isn’t always present in traditional Greek tzatziki, but we appreciate how the herbal flavor elevates the dip.
– Salt: Salt is crucial for proper seasoning.
Pro tips for tzatziki sauce
There’s just one secret to tzatziki sauce: otherwise it’s simply a matter of combining ingredients! Cucumbers are water-laden, so it’s imperative to extract as much excess moisture as possible before integrating it into the dip. Here’s what to keep in mind:
– Peel and grate the cucumber, then salt it and let it sit for 10 minutes. This aids in drawing out the liquid.
– Squeeze out as much excess liquid as you can with your hands. This step is vital; otherwise, the dip will be overly watery.
– Mix! Then blend the cucumber with the Greek yogurt, garlic, olive oil, and seasonings.
Opt for an English cucumber
This tzatziki sauce is best made with an English cucumber rather than a regular one, but either variety works! English cucumber has a sweet taste and unnoticeable skin and seeds, making it easy to use in this recipe.
A standard cucumber can be utilized, but be sure to seed and peel it first, as the peel is quite bitter and the seeds are large. Persian cucumbers also work well: they’re akin to an English cucumber but smaller!
Vegan tzatziki sauce alternative
Recently, I dedicated hours to testing a vegan tzatziki sauce alternative since my son follows a dairy-free diet. I experimented with various substitutes (cashew cream, tahini, etc.), but nothing was satisfactory. Ultimately, I succeeded with coconut yogurt, which proved to be superb!
I used Cocojune coconut yogurt, known for its thickness and tanginess. I understand that brands can differ, so seek one that is plain, thick, and tangy. Leave a comment below if you have a preferred brand!
Tasty ways to enjoy tzatziki
This adaptable sauce complements numerous dishes, so I always keep a container in my fridge. Here are my favorite applications:
– Mediterranean mezze platter: I present it with classic hummus, marinated olives, and warm pita bread for an authentic Greek appetizer spread.
– Grilled proteins: It’s fantastic for summer grilling: try grilled chicken, grilled chicken thighs, grilled salmon, or my blackened chicken.
– Falafel and gyros: Indispensable for traditional falafel or falafel sandwiches.
– Vegetable dip: Fresh cucumber slices, bell pepper strips, cherry tomatoes, and carrots taste wonderful dipped in this sauce.
– Burger spread: I enjoy using it on chickpea burgers or salmon burgers in place of mayo.
– Fish cakes and fritters: It’s a perfect match for salmon cakes, tuna cakes, vegan crab cakes, corn fritters, or zucchini fritters.
Storage and preparation tips
Keep this homemade tzatziki in a sealed container in the refrigerator for up to 1 week.
Read More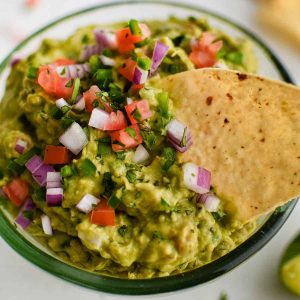
Easy Recipe for Preparing Guacamole at Home
# Creamy Guacamole Recipe: A Taste of Mexico
Filled with fresh avocados, onion, jalapeno, tomato, and cilantro, this creamy guacamole recipe gets a lift from a splash of lime juice to enhance all the lively flavors of Mexico! Ideal as a dip, spread, or dressing, this guacamole is a flexible complement to any dish.
## Flavor Profile
This guacamole provides a creamy, tangy, and lightly spicy taste, achieving the ideal harmony of flavor and texture. The freshness of the components boosts its allure, making it a hit at gatherings.
## Skill Level
This simple recipe comes together swiftly – just mash, combine, and serve. It’s appropriate for all skill levels, making it a perfect option for both beginners and seasoned chefs.
## Preparation Tips
– **Ingredient Preparation**: Finely dice all the ingredients or utilize a veggie chopper for the perfect blend in every scoop.
– **Time-Saving Tip**: To reduce prep time, consider using pre-diced onions or jalapeños.
## Serving Suggestions
Present this guacamole as a dip with tortilla chips, as a spread on sandwiches, or as a dressing for salads. Its adaptability makes it a wonderful addition to various dishes.
## Ingredient Tips for Guacamole
– **Avocados**: Select fresh, firm, ripe avocados with no bruises or tears on the skin for easy mashing and the best consistency.
– **Mix-Ins**: Incorporate fresh ingredients to boost flavor and texture. Fresh tomatoes add juiciness, jalapeños provide a spicy kick, onions deliver crunch, and lime juice adds tang while preventing browning.
– **Seasonings**: A pinch of fresh cilantro (optional), salt, and pepper is all you need to elevate the rich avocado flavor.
## Best Variations
– Mix in a couple of spoonfuls of your preferred salsa or pico de gallo.
– Include chopped black olives, corn kernels, serrano pepper, or green chiles for added flavor.
– Boost the taste with a sprinkle of taco seasoning or a spicy adobo blend.
## Storage Tips
To stop leftover guacamole from browning, place the pit in the bowl and press a piece of plastic wrap over the surface to touch the guacamole. Store in an airtight container in the refrigerator for up to 2 days.
## Nutritional Information (per serving)
– **Calories**: 171
– **Carbohydrates**: 11g
– **Protein**: 2g
– **Fat**: 14g
– **Saturated Fat**: 2g
– **Sodium**: 8mg
– **Potassium**: 554mg
– **Fiber**: 7g
– **Sugar**: 1g
– **Vitamin A**: 345 IU
– **Vitamin C**: 19.4mg
– **Calcium**: 18mg
– **Iron**: 0.7mg
## Conclusion
Guacamole is a traditional Mexican favorite that adds flavor and vibrancy to a variety of dishes. Its creamy consistency and fresh ingredients make it a beloved choice for many. Savor this delightful guacamole recipe at your next gathering or as a delicious complement to your meals!
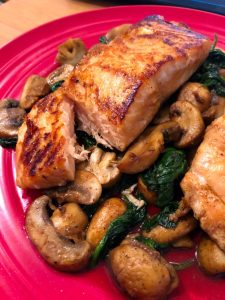
Sautéed Spinach and Mushrooms in a Pan
This simple sautéed spinach and mushrooms dish combines cremini mushrooms with spinach, garlic, and lemon to create a vibrant, healthy side! Ready in just 10 minutes, it’s perfect for hectic weeknights or as toppings for grilled cheese, lasagna, or pizza.
I have experimented with numerous variations of sautéed vegetables over the years, and here’s a delightful new mix I discovered that you’ll really want to try: sautéed spinach and mushrooms! It may not seem groundbreaking, but my family can’t get enough of this quick side every time we prepare it!
I appreciate how a few secret flavor enhancements can elevate these two straightforward ingredients into something incredibly satisfying and refreshing. The combination of earthy cremini mushrooms with zesty lemon juice and a dash of Parmesan cheese is absolutely divine! I typically serve this as an easy side, but it’s also an ideal topping for pizza or an addition to gourmet grilled cheese!
5-Star review
“This is incredibly flavorful and vibrant! We enjoyed it as a side with some chicken. I absolutely adore spinach and mushrooms together, and this was amazing with the lemon and Parmesan. Made for a delightful side that wasn’t too heavy. I plan to have some for lunch as part of a grilled cheese!” -Tanvee
Ingredient spotlight: baby bella mushrooms
For this dish, I prefer to use baby bella mushrooms, also known as cremini mushrooms. These offer significantly more flavor than standard white button mushrooms. They are actually the same breed as portobello mushrooms but harvested earlier.
Baby bellas maintain their shape when sautéed, and their hearty texture makes this side dish very fulfilling. If baby bellas are unavailable, regular white button mushrooms are also suitable. Other varieties like shiitake mushrooms can also be used.
Pro tips for sautéed spinach and mushrooms
After countless rounds of sautéed veggies, I’ve picked up a few tricks that can make a big difference:
– Avoid overcrowding the skillet. Use your largest frying pan. If you’re doubling the recipe, opt for a larger skillet or cook in batches. Crowded mushrooms will steam instead of sauté, so you’ll lose out on that desirable browning.
– Add garlic at the optimal moment. I prefer to wait until the mushrooms are almost finished before adding minced garlic, which keeps it from becoming burnt and delivers a more robust flavor.
– Enhance with brightness. Fresh lemon juice and a final pinch of salt are vital for flavor balance. Ensure you buy a fresh lemon; bottled juice doesn’t compare in taste.
A few serving suggestions
This sautéed spinach and mushrooms dish works wonderfully as a nutritious side, but it’s also very adaptable. Here are my top suggestions for utilizing it:
Storage and reheating tips
This recipe can be stored in the refrigerator for up to 4 days. Keep it in an airtight container and gently reheat in a skillet over medium heat. (I don’t advise freezing this dish, as it becomes quite watery once thawed.)
Dietary notes
This sautéed spinach and mushrooms recipe is vegetarian, vegan, plant-based, dairy-free, and gluten-free. It’s also suitable for the Mediterranean diet.
Sautéed Spinach and Mushrooms
This simple sautéed spinach and mushrooms dish combines cremini mushrooms with spinach, garlic, and lemon to create a vibrant, healthy side! Ready in just 10 minutes, it’s perfect for hectic weeknights or as toppings for grilled cheese, lasagna, or pizza.
Ingredients:
– 16 ounces baby bella (aka cremini) mushrooms
– 2 tablespoons olive oil
– ½ teaspoon kosher salt
– Fresh ground black pepper, to taste
– 2 garlic cloves, minced
– 5 ounces baby spinach leaves
– 2 tablespoons fresh lemon juice
– 1 sprinkle grated Parmesan cheese
Instructions:
1. Clean the mushrooms, then slice them.
2. In a large sauté pan or skillet, heat the olive oil over medium-high heat. Add the mushrooms and cook for 4 minutes, stirring frequently. Add the kosher salt and a few grinds of black pepper and cook for an additional 2 minutes, stirring occasionally, until most of the liquid has evaporated and the mushrooms are tender.
3. Add the garlic and cook for 1 more minute, then incorporate the spinach and cook for 2 minutes until it’s wilted.
4. Turn off the heat and stir in lemon juice and 2 pinches of salt. Taste and adjust with more salt or fresh ground pepper if needed. If you’d like, top with a sprinkle of Parmesan cheese. This would be fantastic in a grilled cheese, as a filling for lasagna, or as a pizza topping!
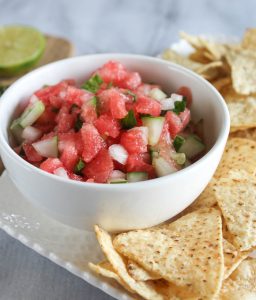
Invigorating Watermelon Salsa Recipe
This vibrant watermelon salsa combines sweet melon with lime, jalapeño, and cilantro for a lively dip! Perfect alongside chips or grilled meats, this simple recipe is an exciting summer starter that’s both vegan and gluten-free.
One summer, Alex’s mom presented watermelon salsa at a family barbecue, and although I was initially hesitant—one taste transformed my perspective! The blend of sweet, succulent watermelon with tangy lime and fiery jalapeño was enchanting. She recommended that Alex and I create our own twist on the recipe: and I’m truly thankful she did.
Now, this lively watermelon salsa has become a summer appetizer essential in my home! It’s straightforward to prepare, needs no cooking, and vanishes within moments during gatherings. It pairs well with tortilla chips, but is also delicious alongside grilled fish, chicken, or tacos. Just remember to serve it with a slotted spoon, as it’s incredibly juicy!
Key elements in watermelon salsa
Salsa translates to “sauce” in Spanish and encompasses a wide array of sauces in Mexican cuisine that can include or exclude tomatoes. The most common salsa features red tomatoes, but there are countless popular variations like corn salsa, peach salsa, and mango salsa.
This watermelon salsa adopts the same principle as a fresh tomato salsa but replaces tomatoes with cubed watermelon! I prefer to cut the cubes into smaller sizes for a cohesive texture, but you can opt for larger cubes for a chunkier look. The ingredients you’ll incorporate are:
– Fresh ripe watermelon: The highlight
– Tomato: Introduces classic salsa taste (optional but suggested)
– Red onion: I favor this over white onion for its gentler flavor
– Jalapeño pepper: Start with half and adjust based on spice preference
– Fresh cilantro: Vital for that genuine Mexican taste
– Fresh lime juice: Avoid bottled—fresh is essential
– Granulated sugar: Balances acidity and enhances sweetness
– Kosher salt: Unites all the flavors
How to cube a watermelon
We often felt intimidated when preparing watermelon recipes since this fruit is notoriously challenging to cut. However, here’s a technique for cutting a watermelon that simplifies and expedites the process:
1. Halve it. Use a large Chef’s knife to cut the watermelon in half through the center (not lengthwise).
2. Slice it. Turn the half over onto the flat side and slice it into pieces.
3. Remove the rind with a paring knife. Switch to a small paring knife (the smaller knife provides better control). Cut away the rind from each slice.
4. Create a grid for cubes. Switch back to the knife. Form a grid pattern to dice the watermelon into cubes.
Professional tips for watermelon salsa
Watermelon salsa is reminiscent of any fresh salsa: the only time-consuming aspect is chopping all the ingredients! Here are a few tips regarding flavor adjustments:
– Modify the spice level as desired. This watermelon salsa tends to be mild since we recommend removing the seeds from the jalapeño. However, if you enjoy spicier salsa, incorporate some seeds: or you can even use the whole pepper.
– Add sugar or salt to taste. Depending on the sweetness of your watermelon, you might need to include extra sugar in the salsa. Additionally, it may require a pinch or two more salt: always taste and adjust as needed!
Storage details
This watermelon salsa is best enjoyed the day it’s made. Nonetheless, it can be kept in the refrigerator for up to 2 days. It will accumulate liquid during storage, so you may want to drain it or use a slotted spoon when serving. I prefer consuming it the same day, especially with plenty of extra tortilla chips!
Serving suggestions
What’s the best way to enjoy watermelon salsa? Pair it with a large bag of tortilla chips, and you’re ready to go! It’s also fantastic with plantain chips or your preferred dippers. But don’t limit its use: it’s a zesty sauce that complements grilled fish and more. Here are some serving suggestions:
Dietary considerations
This watermelon salsa recipe is vegetarian, vegan, plant-based, dairy-free, and gluten-free.
Watermelon Salsa
This vibrant watermelon salsa combines sweet melon with lime, jalapeño, and cilantro for a lively dip! Perfect alongside chips or grilled proteins, this simple recipe is an exciting summer starter that’s both vegan and gluten-free.
Author: Sonja Overhiser
Prep Time: 20 minutes
Cook Time: 0 minutes
Total Time: 20 minutes
Yield: 8
Category: Appetizer
Method: No Cook
Cuisine: Mexican Inspired
Diet: Vegan
Ingredients
– 2 cups finely diced fresh ripe watermelon
– ½ cup diced tomato (optional)