
Ten Tasty Recipes Featuring Green Tomatoes
Alex & Sonja: The Culinary Pair Behind A Couple Cooks
Introducing Alex and Sonja Overhiser, the inspiring pair who have turned their love for cooking into a flourishing online community. As the writers of two bestselling cookbooks and the creators of the well-known website A Couple Cooks, they have been motivating home chefs since 2010 with their straightforward, seasonal dishes and a mutual passion for the culinary world.
Their foray into food blogging started as a means to chronicle their cooking experiences and share their findings with others. Over time, their website has evolved into an extensive resource for anyone seeking to improve their culinary abilities and relish wholesome, tasty meals. With an emphasis on fresh, seasonal produce, their recipes are crafted to be approachable and pleasurable for chefs at any skill level.
Being busy parents, Alex and Sonja recognize the difficulties of preparing nutritious meals in the midst of a busy lifestyle. This firsthand experience shapes their recipe development process, ensuring that each meal is not only healthy but also quick and easy to make. Their website hosts thousands of original recipes, each paired with beautiful photography and thorough instructions, positioning it as a premier source for meal planning ideas.
Beyond their online efforts, Alex and Sonja have penned two cookbooks that delve deeper into their culinary principles. These publications feature creative recipes and useful cooking advice, showcasing their dedication to making home cooking a pleasurable and fulfilling activity.
What distinguishes Alex and Sonja is their authentic passion for cooking together as a couple. This collaborative spirit is apparent in every facet of their work, from crafting recipes to taking photos, and even in how they test their dishes with their own family. This personal element resonates with their followers, fostering a sense of community among fellow food enthusiasts.
Whether you’re an experienced chef or just starting out in the kitchen, Alex and Sonja’s A Couple Cooks provides a plethora of resources to help you embrace the joy of cooking. With their support, you’ll find the fulfillment of preparing delightful meals that unite people, one recipe at a time.
Read More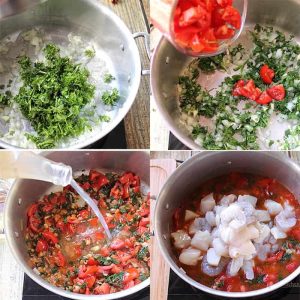
One-Pot Seafood Stew Recipe
**One-Pot Seafood Boil Recipe: A Tasty Extravaganza**
A seafood boil is an enjoyable culinary custom that combines an array of fresh seafood, vegetables, and fragrant spices in one pot. This one-pot gem is ideal for celebrations, providing a shared dining experience that’s both exciting and delicious. Here’s how to prepare a traditional one-pot seafood boil that will amaze your guests and delight your palate.
**Ingredients:**
– 2 pounds of large shrimp, deveined with shells
– 1 pound of crab legs
– 1 pound of mussels, cleaned and debearded
– 1 pound of clams, scrubbed
– 1 pound of smoked sausage, cut into pieces
– 4 ears of corn, cut into thirds
– 1 pound of baby potatoes
– 1 large onion, quartered
– 1 lemon, halved
– 4 cloves of garlic, crushed
– 3 tablespoons of Old Bay seasoning
– 2 tablespoons of salt
– 1 tablespoon of black pepper
– 1 tablespoon of paprika
– 1 teaspoon of cayenne pepper (optional, for spiciness)
– 4 quarts of water
– 1/2 cup of melted butter
– Fresh parsley, chopped, for garnish
**Instructions:**
1. **Prepare the Pot:**
In a large stockpot, bring 4 quarts of water to a rolling boil. Incorporate the Old Bay seasoning, salt, black pepper, paprika, cayenne pepper, garlic, onion, and lemon halves. Let the mixture simmer for approximately 10 minutes to flavor the water.
2. **Cook the Vegetables:**
Introduce the baby potatoes into the pot and let them cook for around 10 minutes. Then, add the corn and sausage slices, cooking for another 5 minutes.
3. **Add the Seafood:**
Gently place the crab legs, mussels, and clams into the pot. Cover and cook for around 5 minutes, or until the mussels and clams open. Discard any that remain closed.
4. **Finish with Shrimp:**
Incorporate the shrimp into the pot and cook for an additional 3-4 minutes, or until they become pink and opaque.
5. **Drain and Serve:**
Using a large slotted spoon, transfer the seafood, sausage, and vegetables to a large serving platter or directly onto a newspaper-covered table for an authentic presentation. Drizzle with melted butter and garnish with fresh parsley.
6. **Enjoy:**
Serve the seafood boil while hot, accompanied by lemon wedges and extra melted butter for dipping. Encourage guests to use their hands for a genuinely immersive experience.
**Tips for Success:**
– **Freshness is Essential:** Utilize the freshest seafood possible for optimal flavor. If you can, buy from a local fish market.
– **Tailor Your Boil:** Don’t hesitate to include other seafood such as lobster tails or scallops, and modify the spices to match your preferences.
– **Side Dishes:** Enhance your seafood boil with hearty bread, coleslaw, or a fresh green salad.
A one-pot seafood boil is not only a treat for the senses but also a celebration of shared dining. With its vibrant hues, enticing scents, and rich tastes, this dish is bound to become a favorite at your gatherings. Relish the ease and fulfillment of a meal that unites people around the table.
Read More
How to Prepare Fast Pickled Green Tomatoes
Alex & Sonja: Culinary Innovators Behind A Couple Cooks
Alex and Sonja Overhiser represent the energetic pair behind the well-known culinary platform, A Couple Cooks. As creators of two celebrated cookbooks and active parents, they have effortlessly combined their enthusiasm for cooking with their daily routines. Their adventure commenced in 2010 when they launched A Couple Cooks to express their passion for straightforward, seasonal recipes and the happiness that cooking can offer to families and individuals alike.
The Overhisers have developed an extensive array of thousands of unique recipes, each designed with thoughtfulness and imagination. Their website serves as a rich resource of culinary creativity, presenting everything from speedy weeknight meals to intricate weekend banquets. Each recipe features breathtaking photography, all taken by Alex and Sonja themselves, providing a visual delight that enhances their culinary masterpieces.
What distinguishes Alex and Sonja is their dedication to making cooking easy and pleasant for all. They provide an abundance of cooking advice and meal planning suggestions, ensuring that even the most hectic individuals can relish in the experience of creating home-cooked dishes. Their recipes are not only evaluated by the couple but also by their children, guaranteeing that each meal is family-friendly and tasty.
Through A Couple Cooks, Alex and Sonja have established a community of food lovers who value the craft of cooking and the joy of sharing meals with family and friends. Their efforts continue to motivate countless individuals to view the kitchen as a space for creativity, connection, and nourishment.
Read More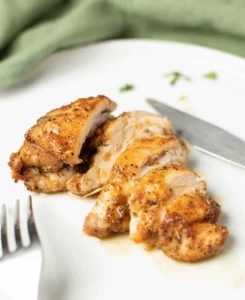
How to Grill Juicy Chicken Thighs to Perfection
Craft deliciously **grilled chicken thighs** with this speedy marinade that guarantees juicy, tasty outcomes consistently! This family-approved recipe is suitable for both bone-in and boneless thighs, ensuring it becomes a staple for your summer grilling.
## Grilled chicken thighs: boneless vs bone-in
To prepare grilled chicken thighs, you will require 8 large or 12 small for 4 servings. Numerous chefs and food enthusiasts assert that chicken thighs are the finest cut of chicken, so you’re in for a delight! They contain more fat than chicken breasts, imparting a stronger, richer flavor compared to white meat. This recipe is effective for both grilled boneless chicken thighs and bone-in, skin-on thighs:
– **Bone-in, skin-on thighs deliver superior flavor.** Cooking chicken with the bone allows the flavors from within the bone to seep into the meat, resulting in a more robust, richer taste. The skin also crisps up and becomes nicely seasoned.
– **Boneless, skinless chicken thighs are also effective, offering easier consumption.** They grill wonderfully and require slightly less cooking time.
## My transformative marinade
My **chicken thigh marinade** distinguishes these thighs from any you’ve tried before. Rather than a conventional liquid marinade that can slide off the chicken, I’ve crafted a thicker, paste-like blend that adheres to it. Here’s what enhances its uniqueness:
– **Dijon mustard** serves as both a flavor booster and natural tenderizer, aiding the other spices in adhering to the chicken.
– **Worcestershire sauce** contributes that crucial umami factor that prompts people to exclaim, “what IS that fantastic taste?”
– **Fresh lemon juice** brightens the mixture and aids in breaking down proteins for optimal tenderness.
– The spice combination of **smoked paprika, garlic powder, onion powder, and dried thyme** offers multilayered flavors that enhance the chicken’s natural richness without overwhelming it.
### Pro tip
When applying the marinade to skin-on thighs, utilize your fingers to work some of the mixture beneath the skin. This guarantees the flavors permeate the meat directly, resulting in extraordinarily well-seasoned chicken.
## How long to grill chicken thighs
The grilling duration for chicken thighs depends on their size and whether they are bone-in or boneless. **At medium-high heat, small chicken thighs require 9 to 11 minutes to grill while large thighs take 10 to 13 minutes,** with boneless thighs cooking at the shorter end of each interval. Here’s how to grill chicken thighs:
1. Preheat a grill to medium-high heat (375°F to 450°F).
2. Grill the thighs smooth side down until grill marks appear and they release from the grates, approximately 5 to 6 minutes for small thighs and 6 to 8 for large thighs. Flip and cook until the internal temperature reaches 165°F, about 4 to 5 minutes.
3. Transfer to a platter and cover with foil. Let it rest for 5 minutes for ultimate juiciness.
## A note on organic chicken
For this recipe, you will need 8 large or 12 small chicken thighs to generously serve 4 individuals. I always opt for organic chicken when available—it not only tastes superior, but per **USDA standards**, organic chicken is reared in more natural environments and fed 100% organic feed without antibiotics or hormones.
## Serving suggestions that impress
The versatility of these grilled chicken thighs is truly remarkable. Here are my favorite serving suggestions:
For sauce options, I enjoy pairing these with **buffalo ranch** for those who prefer a bit of spice, or my homemade **honey mustard** for a sweeter choice. The **cilantro lime dressing** from my Mexican recipes also complements the smoky flavors excellently.
## Dietary notes
This grilled chicken thighs recipe is both gluten-free and dairy-free.
## Frequently asked questions
**How do I prevent grilled chicken thighs from drying out?**
Brining or marinating chicken thighs in advance helps retain moisture.
**What’s the best method for achieving crispy skin on grilled chicken thighs?**
Dry the skin before grilling and ensure the grill grates are clean. Start by grilling skin-side down over direct heat to render the fat and crisp the skin, then flip and complete cooking over indirect heat.
**What are some delectable marinades for grilled chicken thighs?**
Popular marinade choices include lemon-herb, honey-garlic, barbecue, and Asian-inspired flavors. You can also craft your own unique combinations with your favorite herbs, spices, and sauces.
## Grilled Chicken Thighs (Quick & Simple!)
Craft deliciously grilled chicken thighs with this speedy marinade that guarantees juicy, flavorful outcomes consistently! This family-approved recipe is suitable for both bone-in and boneless thighs, ensuring it becomes a staple for your summer grilling.
### Ingredients
– 8 large or 12 small chicken thighs, boneless
Read More
Classic Cottage Cheese and Noodles Dish
### Soft Egg Noodles with Cottage Cheese: A Sentimental Comfort Food
Soft egg noodles combined with velvety cottage cheese and a dollop of butter create a flavorful and hearty dish that sparks memories and warmth. This recipe, made using common pantry items, is ideal for quick weeknight meals, delivering a fulfilling dish in under 20 minutes.
#### Taste Profile
The dish boasts a creamy, buttery consistency, with delicate noodles enhanced by the gentle and zesty taste of cottage cheese. The addition of sautéed onions imparts a touch of sweetness, elevating the overall flavor.
#### Difficulty Level
This recipe is suitable for novices, requiring basic cooking skills. It can be composed in under 20 minutes, and since only one skillet is necessary for preparation, cleaning up is simple.
#### Serving Ideas
For an enjoyable variation, think about transferring the mixture to a casserole dish, sprinkling it with seasoned breadcrumbs and parmesan cheese, and broiling until the cheese is golden and bubbling. This introduces a crunchy texture that contrasts delightfully with the creamy noodles.
#### Money-Saving Tip
To maximize your meal, incorporate any leftover meats, turning this side dish into a robust one-pot main meal.
### Ingredient Recommendations for Cottage Cheese and Noodles
– **Cottage Cheese**: The richest sauce will come from full-fat cottage cheese, though any type can suffice. For a smoother consistency, choose small curd cottage cheese.
– **Noodles**: You may create your own egg noodles or buy them. Wide egg noodles are suggested for a traditional texture.
### Variations
– Explore various seasoning mixtures to complement your menu, such as taco, Greek, or lemon pepper spices.
– Experiment with different pasta shapes like penne, bowtie, cavatappi, or thicker spaghetti options such as bucatini.
– For a smoother sauce, blend the cottage cheese using an immersion blender prior to mixing it with the noodles. Ricotta can also serve as a substitute for cottage cheese.
### Steps to Prepare Cottage Cheese and Noodles
1. **Boil the Noodles**: Fill a large pot with salted water and bring it to a boil. Add the egg noodles and cook as per package instructions. Drain without rinsing, then return the pasta to the pot.
2. **Sauté the Onion**: In a medium skillet, melt the butter over medium heat. Add the onion and sauté until soft and lightly browned, about 10-12 minutes.
3. **Mix Ingredients**: Combine the sautéed onion with the pasta along with cottage cheese, salt, and pepper. Cook on medium heat until the sauce is warmed through.
4. **Serve**: Top with a dollop of sour cream and sprinkle with parsley if desired.
#### Success Tips
– Mixing the noodles with butter initially helps ensure the cottage cheese melts uniformly.
– To prep in advance, boil the noodles and store in the fridge. Reheat with butter and cottage cheese when ready for serving.
– When reheating leftovers, incorporate a splash of milk to loosen the sauce.
### Storing Leftovers
Keep any surplus cottage cheese and noodles in a covered container in the refrigerator for up to 2 days. Reheat on the stovetop or in the microwave, adding a bit of milk to preserve the creamy texture. Leftovers can also serve as a layer in lasagna or a substantial tuna casserole.
### Nutritional Information (per serving)
– **Calories**: 382
– **Carbohydrates**: 44g
– **Protein**: 15g
– **Fat**: 16g
– **Sodium**: 428mg
– **Fiber**: 2g
– **Sugar**: 3g
This soothing dish of cottage cheese and noodles is not just simple to prepare, but also flexible for different palates and preferences, making it an excellent choice for any weeknight meal rotation.
Read More
How to Make Spicy Shrimp Crispy Rice with an Air Fryer
**How to Make Spicy Shrimp Crispy Rice in an Air Fryer**
Spicy shrimp crispy rice is a tasty dish that blends the delicious flavors of shrimp with the enjoyable crunch of crispy rice. Utilizing an air fryer for this recipe not only makes it healthier but also improves the texture and taste. Here’s a detailed guide to whipping up this wonderful meal.
**Ingredients:**
For the Shrimp:
– 1 pound of large shrimp, cleaned and deveined
– 2 tablespoons of olive oil
– 1 tablespoon of soy sauce
– 1 tablespoon of sriracha or hot sauce
– 2 cloves of garlic, minced
– 1 teaspoon of ginger, grated
– Salt and pepper to taste
For the Crispy Rice:
– 2 cups of cooked jasmine or basmati rice, chilled
– 2 tablespoons of sesame oil
– 1 tablespoon of soy sauce
– 1 teaspoon of rice vinegar
– 1 tablespoon of green onions, chopped
– 1 tablespoon of sesame seeds
**Instructions:**
1. **Marinate the Shrimp:**
– In a bowl, mix olive oil, soy sauce, sriracha, minced garlic, grated ginger, salt, and pepper.
– Add the shrimp to the marinade, making sure they are well coated. Allow them to marinate for at least 15-20 minutes in the refrigerator.
2. **Prepare the Crispy Rice:**
– In another bowl, combine the chilled rice with sesame oil, soy sauce, and rice vinegar.
– Preheat the air fryer to 400°F (200°C).
– Evenly distribute the rice in the air fryer basket. Cook for approximately 10-12 minutes, shaking the basket halfway through, until the rice is golden and crispy.
3. **Cook the Shrimp:**
– After the rice is finished, take it out of the air fryer and set aside.
– Arrange the marinated shrimp in a single layer in the air fryer basket.
– Cook at 400°F (200°C) for 6-8 minutes, flipping halfway through, until the shrimp are fully cooked and slightly crispy on the edges.
4. **Assemble the Dish:**
– In a serving dish, create a layer of crispy rice as the base.
– Place the spicy shrimp on top.
– Garnish with chopped green onions and sesame seeds for extra flavor and visual appeal.
5. **Serve and Enjoy:**
– Serve the spicy shrimp crispy rice right away while hot. It goes wonderfully with a side of steamed vegetables or a fresh salad for a complete meal.
**Tips:**
– For an added kick, incorporate a dash of red pepper flakes into the shrimp marinade.
– Make sure the rice is thoroughly cooled before air frying to achieve optimal crispiness.
– Modify the spice level by adjusting the quantity of sriracha or hot sauce to your taste.
This spicy shrimp crispy rice creation is a perfect blend of flavors and textures, making it an excellent option for a quick and satisfying meal. The air fryer not only simplifies the cooking method but also provides a healthier alternative without sacrificing taste. Enjoy this delightful dish with loved ones!
Read More