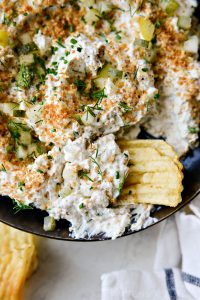
Four-Ingredient Dill Pickle Dip: An Easy and Fast Recipe
### About the Author: Holly Nilsson
Holly Nilsson is the visionary behind Spend With Pennies, a site committed to sharing simple and comforting recipes designed for real-world cooking. With a strong love for nostalgic tastes and easy cooking methods, Holly enables busy home cooks to whip up delicious meals that are both manageable and fulfilling.
Her cooking philosophy highlights the significance of crafting hearty, home-cooked meals that reflect the warmth of family traditions. Holly’s recipes are crafted to be uncomplicated, ensuring that even those with limited time or cooking skills can accomplish excellent results in the kitchen.
Alongside her efforts on Spend With Pennies, Holly is the author of the book “Everyday Comfort.” This compilation of recipes aims to motivate readers to delve into and embrace the pleasures of home cooking, showcasing a variety of dishes that evoke comfort and familiarity.
For those keen on following Holly’s culinary adventures and uncovering more of her delightful recipes, you can browse her posts on her website [here](https://www.spendwithpennies.com/author/holly/).
#### Follow Holly on Social Media:
– [Pinterest](https://www.pinterest.com/spendpennies/)
– [Facebook](https://www.facebook.com/ispendwithpennies/)
– [Twitter](http://spendpennies)
– [Instagram](https://www.instagram.com/spendpennies/)
Holly Nilsson continues to motivate home cooks everywhere with her commitment to creating meals that bring comfort and happiness to the dining experience.
Read More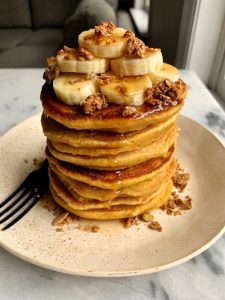
Pancakes Prepared Without Gluten
Pancake enthusiasts, this recipe is just for you, regardless of whether you’re gluten-free! This simple recipe utilizes one nutritious flour—oat flour—and essential ingredients such as Greek yogurt, maple syrup, butter, and eggs. (If oat flour isn’t available, you can easily create your own by blending old-fashioned or quick-cooking oats in a blender or food processor.)
These delicious golden pancakes are fluffy, featuring a gentle oatmeal taste. The yogurt adds a slight tang akin to buttermilk, along with added protein, while the maple syrup provides a richer flavor compared to plain sugar.
You could definitely argue that these pancakes are healthier than a typical stack, especially when topped with wholesome options. Above all, they make for an enjoyable treat to present on weekends, and they reheat wonderfully for speedy weekday breakfasts.
Oat Flour Pancake Tips
Crafting pancakes is a skill! These tips will assist you as you whip up your initial batch.
Allow the batter to rest for ten minutes. This gives the oat flour time to absorb moisture, resulting in pancakes that are wonderfully fluffy.
Ensure the batter has the appropriate consistency. It shouldn’t be too runny or overly thick to stir easily. It’s just right when you can pour it into the pan to create a nice round shape without needing to spread it. If needed, add up to 1/4 cup milk to help thin the batter.
Gently coat your griddle or skillet with oil or butter. I like to use avocado oil for cooking pancakes because it has a high smoke point and a neutral taste (butter can burn quickly). Regardless of what you opt for, wipe off the excess with a paper towel to prevent smoking.
Always begin by cooking just one pancake. Once you’ve gained confidence with one pancake and ensured proper preheating of your skillet, you can cook more at once. Leave a couple of inches between pancakes for easy flipping.
Pancakes are ready to flip when about 1/2-inch of the edge has changed from glossy to matte. Don’t expect to see bubbles forming around the edges for this recipe. The bottom should be a lovely golden color by this stage. If you’re unsure, it’s better to wait a bit longer than risk ending up with a doughy mess.
As you progress, reduce the heat. The skillet gradually gets hotter over time. If your pancakes are browning on the outside too quickly before they’re cooked through inside, your skillet is too hot. Lower the heat a bit after every few pancakes.
Pancake Serving Suggestions
These pancakes pair wonderfully with both classic pancake toppings as well as healthier alternatives. Here’s a selection of toppings or sides that you may enjoy with your pancakes.
More Gluten-Free Pancake Recipes
I love making pancakes with wholesome gluten-free flours like oat flour, almond flour, and buckwheat flour. Here are six additional pancake recipes for you to savor:
Please share how your pancakes turn out in the comments. I value your input and always enjoy hearing from you.
Gluten-Free Pancakes
This gluten-free pancake recipe uses oat flour, resulting in pancakes that are golden, fluffy, and delicious. They’re simple to prepare using basic ingredients. This recipe makes approximately 10 pancakes.
Instructions:
1. In a small mixing bowl, combine the yogurt, butter, and maple syrup. Crack the eggs into the bowl and whisk until blended well.
2. In a medium bowl, mix together the oat flour, baking soda, salt, and cinnamon. Use a large spoon to stir until everything is thoroughly combined.
3. Pour the wet ingredients into the dry ingredient bowl. Stir just until mixed (do not overmix, or you’ll lose the air bubbles that contribute to the fluffiness of these pancakes). If you’re incorporating any mix-ins, gently fold them in now.
4. Allow the batter to rest for 10 minutes to thicken. During the last minute or two, heat a large stainless steel or nonstick skillet on medium-low heat. (Alternatively, preheat an electric griddle to 325 degrees Fahrenheit).
5. When the pan is hot enough that a drop of water sizzles upon contact, lightly grease or butter the skillet, wiping off any excess with a paper towel. Pour ¼ cup of batter onto the pan. Cook the pancake for about 3 to 4 minutes until the edges appear more matte than shiny and the underside is golden. (If your batter is thick enough that you need to help spread the pancake, thin the mixture with milk as needed.)
6. Once the bottom side is sufficiently cooked, flip it using a spatula and cook for another 90 seconds or so, until golden brown on both sides. You may need to reduce the heat at this point. Repeat with remaining pancakes, greasing the
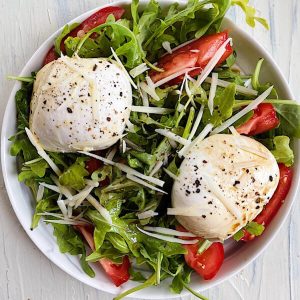
Tomato and Basil Salad featuring Burrata Cheese
Let’s give a round of applause for burrata cheese! I always choose burrata whenever I see it on restaurant menus, and we’ve enjoyed some fantastic pairings this summer. I can’t resist the unique textures of burrata—it feels like fresh mozzarella on the outside, but is decadently soft and creamy within.
For this recipe, I created a classic summer burrata salad featuring fresh tomatoes. Pair it with crostini or a rustic loaf of bread to transform it into an appetizer. This burrata dish comes together in just 15 minutes, believe it or not, and it’s truly impressive.
I aimed to keep it uncomplicated yet flavorful, drawing inspiration from my Easy Tomato Salad and Tomato Basil Bruschetta. I opted for a mix of cherry tomatoes and sun-dried tomatoes for richness, complemented by freshly toasted pine nuts for a savory kick. It’s not complete without a drizzle of rich olive oil, zesty balsamic vinegar, and a pinch of fresh basil. I hope it becomes one of your favorite recipes!
What is Burrata?
Burrata is a super-rich and creamy form of fresh mozzarella. It resembles a standard mozzarella ball on the outside, while the inside consists of stracciatella, a delightful blend of cream and mozzarella curds. It’s milky and scrumptious.
Burrata can be crafted from buffalo milk or cow milk. Buffalo milk is the traditional choice and offers a bolder, slightly tangy flavor, while cow’s milk is gentler and may taste more familiar. Either option works great for this recipe.
Look for burrata by the fresh mozzarella in well-stocked grocery stores like Whole Foods. Use it soon after purchasing, particularly once the package is opened—it’s kept in water and doesn’t store well like harder cheeses.
Serve burrata at room temperature for the best flavor, or at a time that’s slightly chilled to warm.
Burrata Serving Suggestions
Burrata pairs wonderfully with the Italian flavors present in this recipe: ripe tomatoes, basil (including pesto), balsamic vinegar, olive oil, and pine nuts or pistachios. If you’re not in the mood for tomatoes, swap them for fruits like sliced peaches, plums, cherries, or cantaloupe.
Present this burrata dish as a salad or appetizer. It complements a variety of summer meals, from casual barbecues to elegant dinner parties. Complete your meal with any of these summery choices:
More Burrata Recipes
Check out my Caprese Salad with Burrata, which highlights heirloom tomatoes. Burrata is a suitable alternative for fresh mozzarella balls, provided the recipe doesn’t require cooking the mozzarella. Experiment with my panzanella using torn pieces of burrata instead of mozzarella for a fun change!
You can include burrata on pizza, but wait to add the torn burrata until the pizza has finished baking, or toss it on in the last minute to warm it. If it melts completely, it loses the contrast of the creamy interior and becomes an unpredictable pool of mozzarella. Consider replacing the mozzarella on my Margherita Pizza or Arugula-Almond Pesto Pizza with torn burrata, or serve it on Grilled Pizza.
Please share how your burrata turns out in the comments! I love hearing from you.
Burrata with Tomatoes and Basil
This burrata salad recipe features tomatoes, basil, and pine nuts, drizzled with balsamic vinegar and olive oil. It’s irresistible and ready in just 15 minutes. Serve it as a salad or an appetizer alongside crostini or crusty bread. Recipe serves 4 to 6.
Instructions:
1. If you’re using pine nuts: In a small skillet over medium-low heat, warm the pine nuts until they become fragrant and lightly golden at the edges, about 3 to 5 minutes, stirring frequently (don’t let them burn!). Transfer them to a bowl to cool.
2. In a shallow serving bowl, mix the cherry tomatoes, sun-dried tomatoes, basil, and garlic. Add 1 tablespoon of the olive oil and 1 teaspoon of the vinegar, and stir to combine all the ingredients.
3. Gently tear each ball of burrata and place them into the center of the tomato mixture. Drizzle the burrata with the remaining 1 teaspoon olive oil and 1 teaspoon balsamic vinegar. Scatter the pine nuts over the entire dish, followed by some reserved basil leaves and a sprinkle of black pepper. Add a pinch of flaky salt over the cheese, if desired.
4. Serve with crostini or crusty bread on the side, if desired. This burrata is best enjoyed the day it’s prepared, but leftovers can be kept for several days in the refrigerator, covered.
Notes:
Mix it up: Substitute a large sliced peach for half of the tomatoes. Or for a fruitier twist, replace the tomatoes altogether with peaches, nectarines, or cherries (about…
Read More
This âSo Gorgeousâ Two-Tier Organizer Will Instantly Declutter Your Kitchen Counter â And Itâs on Sale

I totally get why Pinterest loves it.
READ MORE…

Zucchini-Enhanced Chocolate Loaf Bread
**Zucchini-Enhanced Chocolate Loaf Bread: A Delightfully Moist Treat**
Zucchini-enhanced chocolate loaf bread is a charming gastronomic invention that merges the understated flavor and moisture of zucchini with the luscious, indulgent taste of chocolate. This distinctive blend not only yields an appetizing delicacy but also presents a healthier alternative to conventional chocolate loaf bread through the inclusion of a nutrient-dense vegetable.
**The Enchantment of Zucchini in Baking**
Zucchini, a summer squash variety, is celebrated for its gentle flavor and substantial water content, rendering it an ideal component for baking. When shredded and included in batter, zucchini contributes moisture, leading to a soft and moist texture. This trait makes it a perfect enhancement to chocolate loaf bread, which can occasionally turn out dry if not made correctly.
**Health Benefits**
Integrating zucchini into chocolate loaf bread improves its nutritional value. Zucchini is low in calories and abundant in crucial nutrients like vitamin C, potassium, and dietary fiber. These nutrients aid in enhancing digestion, boosting heart health, and fortifying the immune system. By incorporating zucchini, one can relish a sweet indulgence with added health benefits.
**The Ideal Flavor Harmony**
The secret to achieving an excellent zucchini-enhanced chocolate loaf bread lies in finding the ideal flavor balance. The zucchini should be finely shredded to merge effortlessly into the batter, ensuring it enriches rather than overshadows the chocolate flavor. Utilizing high-quality cocoa powder or melted chocolate is vital for attaining a rich, chocolatey essence that harmonizes with the zucchini.
**Baking Suggestions**
1. **Select Fresh Zucchini**: Choose small to medium zucchinis, as they are generally more tender and contain fewer seeds. Fresh zucchini will yield the best taste and texture.
2. **Shred Finely**: Employ a fine grater to shred the zucchini. This guarantees that it mixes well into the batter and disperses uniformly throughout the loaf.
3. **Eliminate Extra Moisture**: After shredding, gently squeeze the zucchini to extract excess moisture. This measure prevents the loaf from becoming overly wet and assures a flawless texture.
4. **Enhance with Spices**: Think about adding a hint of cinnamon or nutmeg to the batter. These spices complement the chocolate and zucchini, enriching the flavor profile.
5. **Check for Doneness**: Use a toothpick to verify if the loaf is baked thoroughly. Insert it into the middle of the loaf; if it emerges clean or with a few crumbs, the bread is complete.
**Serving Ideas**
Zucchini-enhanced chocolate loaf bread can be savored in multiple ways. Present it warm with a dollop of whipped cream or a scoop of vanilla ice cream for a luxurious dessert. It also pairs wonderfully with a cup of coffee or tea for a delightful midday snack. For a more healthful choice, relish a slice with a smear of almond or peanut butter.
**Conclusion**
Zucchini-enhanced chocolate loaf bread exemplifies the adaptability of zucchini in baking. By fusing this unassuming vegetable with chocolate, one can craft a moist, flavorful, and slightly healthier take on a traditional delight. Whether aiming to incorporate more vegetables into your meals or simply wanting to experiment with something new, this loaf bread is sure to enchant with its delectable flavor and texture.
Read More
Everyone Demands the Recipe for “Key Lime Tiramisu” (It Tastes Like Summer!)

Sunshine in every bite.
READ MORE…

Iced Espresso Martini Beverage
**How to Create the Ideal Vanilla Cold Brew at Home**
Vanilla cold brew coffee is an invigorating and tasty drink that can be savored at any hour of the day. Whether you choose to buy bottled vanilla cold brew or craft it yourself, this guide will assist you in concocting the perfect beverage.
**Ingredients:**
1. **Cold Brew Coffee**: You may opt for store-bought vanilla cold brew or prepare your own. To create homemade cold brew, adhere to this [guide](https://www.acouplecooks.com/how-to-make-cold-brew-coffee/). Alternatively, brew coffee at double strength using your preferred technique.
2. **Sweetener**: To add a hint of sweetness, think about using 2 ½ tablespoons of [simple syrup](https://www.acouplecooks.com/how-to-make-simple-syrup/), maple syrup, or agave syrup. These natural sweeteners elevate the flavor without overshadowing the coffee.
**Preparation Tips:**
– **Blending**: For optimal texture, blend the ingredients just before serving. This guarantees a slushy quality that is both cool and enjoyable.
– **Make Ahead**: If you wish to get ready in advance, combine the liquids and chill them. When you are set to serve, blend with ice for the ultimate slushy texture. Alternatively, you can blend the mixture and put it in the freezer for up to an hour. Before serving, use a fork to stir in order to reach the desired consistency.
By adhering to these instructions, you can relish a delightful and refreshing vanilla cold brew coffee at home, customized to your taste preferences.
Read More
The Single Best Sausage You Can Buy If Youâre Shopping at Costco

They’re so flavorful.
READ MORE…

This Beloved Retailer Quietly Launched a Le Creuset Deal You Wonât Find Anywhere Else

If you aren’t shopping on QVC for exclusive savings on major kitchen brands, consider starting today. While browsing the site, I found a great deal on Le Creuset’s 3.75-Quart Enameled Cast Iron Cassadou that you can only find on QVC. Right now, you’ll save 24% on the cassadou, bringing the price down from $266 to $199.98, and if you use the code WELCOME20, you can score an additional $20 off as a new QVC shopper.
READ MORE…

25 Tasty and Reproducible Zucchini Dishes
When zucchini season arrives, I feel a surge of excitement. As someone who has experimented with countless zucchini recipes throughout the years, I can assure you that the secret lies in knowing how to utilize its distinct qualities. This adaptable vegetable can shine in hearty main courses, contribute to incredibly moist baked treats, or stand out as a straightforward side dish.
I have categorized these recipes to make it simple for you to locate exactly what you desire. From main courses like my family’s beloved stuffed zucchini boats to baked creations such as these outrageously chocolatey zucchini brownies, these are the recipes I frequently revisit—all tested by a real-life family (mine)!
## Zucchini main dish recipes
When I aim to make zucchini the highlight of the meal, I rely on these fulfilling dinner options. From comforting lasagna to exciting pizza toppings, there are countless ways to incorporate this vegetable.
– **Stuffed Zucchini Boats**: My stuffed zucchini boats are the most sought-after savory zucchini dish in my home. I scoop out zucchini halves and fill them with a flavorful blend of Italian sausage (we use plant-based), fire-roasted tomatoes, garlic, and herbs. Finished with melted mozzarella and crunchy panko breadcrumbs, these boats are substantial enough to satisfy even the heartiest appetites. The best part? They’re naturally gluten-free and can be easily adapted to vegetarian.
– **Creamy Zucchini Pasta**: When I crave something cozy yet not overly heavy, I whip up this creamy zucchini pasta. The sauce is decadently smooth thanks to Parmesan and Pecorino, while rounds of sautéed zucchini bring a gentle sweetness. A hint of lemon zest and fresh basil enliven the entire dish—it’s like summer captured in a bowl.
– **Zucchini Lasagna**: I’ve mastered the art of zucchini lasagna that avoids becoming a soggy disaster. The trick is to roast the zucchini slices first to eliminate extra moisture, then layer them with a rich, garlicky tomato sauce and three varieties of cheese. It’s my go-to recipe for entertaining because it appears impressive but is surprisingly simple to prepare. I might even choose this over traditional lasagna any day.
– **Zucchini Pizza**: I thoroughly enjoy experimenting with zucchini on pizza! This distinctive pie uses zesty salsa verde as the base instead of conventional tomato sauce. The blend of savory zucchini, sweet corn, spicy jalapeños, and gooey cheese creates a taste combination that’s utterly irresistible. It’s ideal for utilizing summer vegetables and consistently receives enthusiastic feedback.
– **Ratatouille**: This unpretentious French dish is one of my favorite methods to incorporate zucchini along with other late-summer vegetables. I simmer zucchini with eggplant, tomatoes, and herbs until everything becomes tender and flavorful. It’s not extravagant, but it’s tremendously satisfying, especially when garnished with pistou (the French equivalent of pesto).
## Zucchini side dish recipes
These are my go-to recipes when I want zucchini to accompany my main dish. This versatile vegetable complements everything from grilled meats to pasta.
– **Sautéed Zucchini**: This is the recipe that transformed me into a zucchini enthusiast. In just 10 minutes, I elevate bland zucchini into something truly delicious. The secret is oregano, garlic, and a generous sprinkle of Parmesan cheese. It’s the ideal side dish for grilled chicken or pan-seared salmon.
– **Baked Zucchini**: My baked zucchini achieves the perfect harmony between crispy and tender. I lightly coat zucchini rounds with seasoned breadcrumbs and Parmesan, then bake until golden. It’s much simpler than preparing zucchini fries but provides that same delightful crunch without the excess oil.
– **Zucchini Fritters**: These savory pancakes are among my favorite appetizers for summer gatherings. I grate the zucchini, combine it with herbs and Parmesan, then fry until golden brown. Served with tzatziki sauce or a simple garlic aioli, they vanish quicker than I can prepare them.
– **Grilled Zucchini**: I’ve discovered that zucchini truly shines on the grill. The intense heat creates beautiful char marks while keeping the interior tender. I season it with Italian herbs like basil, oregano, and garlic powder for a smoky taste. It pairs wonderfully with grilled vegetables for an effortless summer side dish.
– **Roasted Zucchini and Squash**: Zucchini and yellow squash bring me those nostalgic memories of summer dinners on the patio. I roast them with Italian-style herbs and finish with gooey Parmesan cheese for absolute perfection. This recipe is very easy to prepare, and you can prepare the rest of the meal while it bakes.
– **Squash and Zucchini Casserole**: This comforting casserole evokes the feeling of Sunday dinners and summer evenings. I layer tender zucchini and squash with a light Parmesan sauce and top it with crunchy breadcrumbs. It’s cozy comfort food that’s not overly rich and heavy—just right for family meals.
– **Pickled Zucchini**: When I have more
Read More