
30 Recipes You Should Know by the Age of 30

Watch this video and choose which recipe to make first!
READ MORE…

I Havenât Seen a Bug in My Kitchen in Years, Thanks to This Zero-Effort Trick

Itâs so much better than anything else Iâve tried.
READ MORE…

Shrimp Summer Rolls Accompanied by Peanut Hoisin Dipping Sauce
**Shrimp Summer Rolls Accompanied by Peanut Hoisin Dipping Sauce: A Refreshing Treat**
Summer rolls, often referred to as fresh spring rolls or Vietnamese spring rolls, are a beloved dish originating from Vietnam. These rolls present a refreshing, nutritious, and adaptable meal choice, ideal for warmer days. Shrimp summer rolls, specifically, are a delightful blend of fresh components encased in soft rice paper, served alongside a rich and tasty peanut hoisin dipping sauce.
**Ingredients and Method**
The secret to a remarkable shrimp summer roll is the freshness of the ingredients. Here’s an overview of what commonly fills these tasty rolls:
– **Rice Paper Wrappers:** These clear sheets are crafted from rice flour and serve as the crucial outer layer of the summer roll. They soften when quickly soaked in warm water.
– **Shrimp:** Fresh, cooked shrimp serve as the primary protein in these rolls. They are frequently sliced in half lengthwise for a neat fit within the roll.
– **Vegetables and Herbs:** Typical fillings include thinly sliced carrots, cucumbers, and bell peppers, complemented by fresh herbs such as mint, cilantro, and Thai basil. Additional fillings often include bean sprouts and lettuce.
– **Rice Vermicelli:** These slender rice noodles provide a pleasing texture and contribute volume to the rolls.
To put the rolls together, each ingredient is meticulously layered onto a softened rice paper wrapper. The wrapper is then folded over the filling and rolled tightly to create a compact, portable package.
**Peanut Hoisin Dipping Sauce**
The peanut hoisin dipping sauce is an essential accompaniment that enhances the flavor of shrimp summer rolls. This sauce is a delightful mix of sweet, salty, and nutty notes. Here’s a straightforward recipe for making it:
– **Ingredients:**
– 1/4 cup hoisin sauce
– 2 tablespoons smooth peanut butter
– 1 tablespoon soy sauce
– 1 tablespoon rice vinegar
– 1 teaspoon sesame oil
– 1-2 teaspoons sriracha or chili sauce (optional, for extra heat)
– 1/4 cup water (to modify consistency)
– Crushed peanuts and chopped cilantro for garnishing
– **Instructions:**
1. In a small bowl, mix hoisin sauce, peanut butter, soy sauce, rice vinegar, and sesame oil.
2. Whisk the mixture until smooth.
3. Gradually add water until the desired consistency is reached.
4. If you want a spicy touch, mix in sriracha.
5. Before serving, top with crushed peanuts and chopped cilantro.
**Serving and Enjoyment**
Shrimp summer rolls are most enjoyable when fresh. They serve as an excellent appetizer, light lunch, or dinner option. The rolls can be presented whole or cut in half for easier handling. The peanut hoisin dipping sauce should be provided on the side, allowing for each bite to be dipped and appreciated.
These rolls are not only delectable but also highly adaptable. Feel free to play around with various proteins such as chicken or tofu, or incorporate fruits like mango for a sweet twist. The mix of fresh ingredients and the savory dipping sauce makes shrimp summer rolls a hit and a fundamental part of Vietnamese cuisine. Whether you’re throwing a summer party or looking for a healthy meal, shrimp summer rolls with peanut hoisin dipping sauce are guaranteed to delight.
Read More
Weekly Meal Schedule for August 11, 2025
### About the Author: Holly Nilsson
Holly Nilsson is the imaginative mind behind Spend With Pennies, a culinary site focused on creating simple and comforting recipes tailored for daily life. With a profound enthusiasm for nostalgic tastes and streamlined cooking methods, Holly inspires busy home chefs to whip up delightful meals that are both easy to manage and fulfilling.
Her dedication to making cooking straightforward shines through in her recipes, which frequently take cues from timeless favorites while adding modern conveniences. Holly believes that everyone should have the opportunity to enjoy substantial, home-cooked dishes without the tension of complicated processes or hard-to-source ingredients.
Beyond her role at Spend With Pennies, Holly has written “Everyday Comfort,” a cookbook designed to motivate readers to produce even more wholesome meals that convey warmth and familiarity. This collection of recipes embodies her belief in cooking with care and simplicity, making it an essential reference for anyone aiming to improve their culinary abilities.
For those eager to dive deeper into Holly’s culinary inventions, her posts and recipes are available on her website. She is also actively involved with her followers on various social media channels, where she provides tips, inspiration, and updates about her newest ventures.
#### Follow Holly on Social Media:
– [Pinterest](https://www.pinterest.com/spendpennies/)
– [Facebook](https://www.facebook.com/ispendwithpennies/)
– [Twitter](http://spendpennies)
– [Instagram](https://www.instagram.com/spendpennies/)
Holly Nilsson continues to motivate home cooks all around the world with her commitment to transforming cooking into a delightful and rewarding journey.
Read More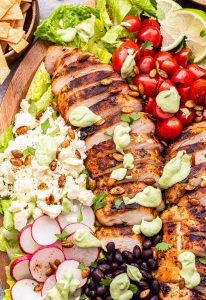
Grilled Chicken Salad with Cilantro-Lime Dressing
### Celebrating Summer Liberation: An Expedition of Self-Care and Gastronomic Pleasure
As summer arrives, numerous parents encounter a unique chance: a fortnight of undisturbed time while their children are away. Rather than the usual holiday or evening gatherings, this period can serve as a moment for personal growth and renewal. The journey can be unexpectedly rewarding, rich with simple pleasures and personal advancement.
During this time, one may prioritize health and wellness. For example, investing in orthotics can significantly enhance comfort and mobility. Catching up on missed appointments, delving into literature, and achieving hydration targets transform into minor triumphs. The absence of children enables uninterrupted chats with friends, relishing cool beverages like Hugo spritzes, and watching dogs play, all while reminiscing about the little ones.
This summer, one dish particularly shines: a Grilled Chicken Salad with Cilantro-Lime Dressing. This recipe encapsulates the spirit of summer meals, merging bright flavors and fresh ingredients. It’s a tribute to simplicity and flavor, ideal for those wishing to enjoy their time away from parental responsibilities.
#### The Highlight of Summer: Grilled Chicken Salad with Cilantro-Lime Dressing
**Ingredients:**
**Dressing:**
– 1 2-ounce bunch cilantro, leaves and stems
– 2 scallions, finely sliced
– 1 clove garlic, peeled
– 1 jalapeño, seeded and roughly chopped
– Finely grated zest and juice of 2 medium/large limes
– 1/2 cup olive oil
– 1 teaspoon kosher salt, plus additional to taste
**Salad:**
– Oil for brushing the grill
– 1 pound boneless, skinless chicken thighs
– 1 1/2 teaspoons chili powder
– 1 teaspoon kosher salt
– 2 ears corn on the cob, shucked
– 1 5-ounce package of leafy green lettuce
– 1 firm-ripe avocado, thinly sliced
– A bowl of Fritos (optional)
**Instructions:**
1. **Prepare the Dressing:**
– Roughly chop the cilantro and place it in a blender or food processor. Add scallions, garlic, jalapeño, and lime zest. Pulse to break down.
– With the machine running, gradually add olive oil, scraping the sides as necessary. Blend until completely pureed. Incorporate salt and lime juice, then blend again. Adjust seasoning as desired.
2. **Make the Salad:**
– Pat the chicken dry and season with chili powder and salt. Preheat the grill to medium-high and lightly grease the grates.
– Grill the chicken thighs for 4-5 minutes on one side and 3-4 minutes on the other. Grill the corn until charred, turning as needed.
– Slice the chicken into strips and remove the corn kernels from the cob.
3. **Combine and Serve:**
– Toss salad greens with some cilantro-lime dressing in a large bowl. Top with chicken, corn, and avocado. Drizzle with additional dressing and serve with Fritos on the side.
**Storage:** The dressing remains fresh in the refrigerator for 5-6 days without browning, while grilled chicken and corn can be stored for a few days.
This summer, as you appreciate the liberty of time away from parenting, let this colorful salad remind you of the pleasures of self-care and culinary adventure. Whether savored at home or in a vacation rental, it’s a dish that guarantees to enhance your summer dining moments.
Read More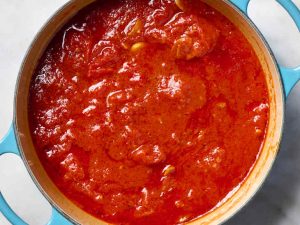
6 Substitutes for Tomato Sauce (and How to Use Them)

Youâve probably got something that can stand in.
READ MORE…


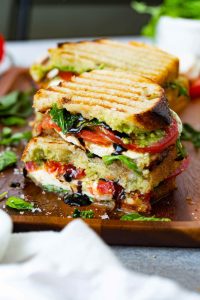
Steps to Craft the Perfect Tomato Sandwich
The traditional tomato sandwich is a tribute to succulent, ripe tomatoes, ideal for enjoying the spirit of summer. This guide will assist you in crafting the perfect blend of fresh tomatoes, crusty bread, and mayonnaise for a nostalgic and gratifying sandwich experience.
### Ingredients You Will Need
– **Sourdough Bread**: Opt for high-quality bread for optimal results. While classic white bread is common, sourdough or artisanal crusty varieties like no-knead or focaccia bring extra texture.
– **Tomatoes**: Choose only the best ripe tomatoes. Varieties of heirloom tomatoes with multiple colors can elevate the visual attractiveness.
– **Mayonnaise**: For a traditional taste, stick with plain mayonnaise, or enhance the flavor using herb aioli.
– **Salt and Pepper**: Crucial for seasoning the tomatoes before putting the sandwich together.
### Elevate with Basil or Tarragon Aioli
Upgrade your tomato sandwich with an herb aioli. This sauce, stemming from Southern France and Spain, is a seasoned mayonnaise. To create a simple herb aioli, mince garlic with basil or tarragon, then combine with mayonnaise, vinegar, and mustard. The tarragon variant is especially delightful, while basil aioli is also quite tasty.
### Suggestions for an Excellent Tomato Sandwich
1. **Toast the Bread**: Toasting in a skillet with olive oil adds flavor and a crisp texture, stopping the bread from getting too soft.
2. **Incorporate Herb Mayo (Aioli)**: Tarragon or basil aioli contributes a rich, aromatic flavor, although it’s not mandatory.
3. **Season the Tomatoes**: Always add salt and pepper to the tomatoes before putting the sandwich together.
### Variations and Additions
Play around with extra ingredients to enhance the texture and flavor of your tomato sandwich. Think about incorporating fresh greens, cheese, or other seasonal vegetables for a personalized touch.
### Storing Leftovers
Tomato sandwiches taste best when enjoyed right away to avoid sogginess. Tarragon aioli can be kept in the refrigerator for up to two weeks.
### Dietary Information
This recipe is both vegetarian and dairy-free. To make it vegan, substitute with vegan mayonnaise or cashew cream. For a gluten-free option, choose gluten-free bread.
### Common Questions
– **Which tomatoes are the best?** Heirloom, beefsteak, or any ripe, juicy variety. Look for fragrant, plump tomatoes that yield slightly under pressure.
– **Is toasting the bread necessary?** Toasting is optional but advisable for extra crunch and to avoid sogginess.
– **How can I store leftover tomato slices?** Place them in an airtight container in the refrigerator for up to two days.
### Recipe: The Ultimate Tomato Sandwich
#### Ingredients
– 4 slices of sourdough bread
– 2 large slicing tomatoes
– ½ cup mayonnaise (or herb aioli)
– Kosher salt
– Freshly ground black pepper
– Olive oil, for toasting
#### For the Basil or Tarragon Aioli (Optional)
– 2 tbsp finely chopped basil or 1 ½ tbsp finely chopped tarragon
– 1 small garlic clove
– ½ tsp white wine vinegar or lemon juice
– ½ tsp yellow mustard (optional)
– ½ cup high-quality mayonnaise (vegan if preferred)
#### Instructions
1. **Prepare the Aioli (Optional)**: Mince garlic into a paste. Whisk with herbs, vinegar, mustard, and mayonnaise. Keep refrigerated for up to two weeks.
2. **Toast the Bread**: Pour olive oil into a skillet over medium heat. Toast the bread slices until golden brown.
3. **Slice the Tomatoes**: Cut tomatoes into ¼-inch rounds. Season with salt and pepper.
4. **Build the Sandwich**: Spread mayonnaise on each toasted bread slice. Layer tomatoes on two slices, then cap with the remaining bread.
5. **Serve**: Slice sandwiches in half and serve immediately.
### Other Tomato Dishes to Explore
Discover more tomato recipes such as Caprese salad, Greek salad, tomato pie, or tomato galette to fully enjoy tomato season.
Read More
I Tried 21 New Trader Joeâs Groceries That Just Hit Stores â These Are the 5 You Donât Want to Miss (Plus, 2 to Skip)

According to a former employee.
READ MORE…

âThe Best Butter Dish Everâ Is Just $9 (Shoppers Bought More Than 5,000 in the Past Month)

Choose from three classic colors.
READ MORE…