
How to Create Homemade Pita Chips
Have you ever attempted to create your own pita chips? The trick is to peel your pita bread into layers so that the chips emerge wonderfully crisp and golden. They are genuinely addictive and can be kept in the pantry for as long as two weeks, making them perfect for a quick snack on the go.
Freshly-made pita chips are far superior to those found in stores, even when utilizing store-bought pita bread as I did. These homemade pita chips are also healthier than their commercially available counterparts since they are brushed with extra-virgin olive oil instead of being fried in canola oil.
I simplified the cooking process to ensure these pita chips are a swift and effortless task. They will be ready after a ten-minute bake in the oven. Elevate your favorite Mediterranean dip by pairing it with these homemade pita chips!
Pita Bread Choices
Purchase your pita bread from a Mediterranean market for the finest selections. You can also find respectable options at well-stocked grocery stores, including Whole Foods Market. Examine the ingredients list—minimally processed pita bread should contain a brief list of familiar ingredients such as flour, water, sugar, yeast, and salt.
Opt for pocket-style pita bread if possible, as it is simpler to separate the layers. I tried this recipe using Angel Bakeries and Toufayan brands. Toufayan was thinner and easier to split, but both produced delicious results. This recipe is crafted to suit various sizes of pita bread.
This recipe is compatible with either regular or whole wheat pita bread. I appreciate the extra nutty flavor and fiber from whole wheat pita bread, which is what I chose for these images.
Seasoning Suggestions
You can never go wrong with a dash of flaky sea salt or kosher salt. For a little extra savory kick, consider a sprinkling of:
Pita Chip Serving Ideas
Pita chips are an excellent accompaniment for Mediterranean and Middle Eastern dips. Here are a few of my favorites:
Utilize any leftover pita chips to whip up Fattoush Salad with Mint Dressing, or store them in a sealed bag for as long as two weeks.
Please share your experiences with the pita chips in the comments! They are so much more flavorful than store-bought options.
Homemade Pita Chips
Create the ultimate homemade pita chips with this straightforward recipe! These crunchy pita chips are baked, not fried. They’re golden and mouthwatering. The recipe yields 6 to 8 cups, depending on the dimensions of your pita bread.
Instructions:
1. Adjust two oven racks to the middle and upper third positions. Preheat the oven to 350 degrees Fahrenheit. Line two large, rimmed baking sheets with parchment paper for effortless cleanup.
2. With kitchen shears, cut around the perimeter of each pita and divide each pita into two thin rounds. (If the pita does not easily separate, gently use a serrated knife to slice between the layers.)
3. Working with one round at a time, lightly brush the smooth side with oil all over. Flip it over and generously brush the rough side with oil, then lightly sprinkle it with salt and optional seasonings. (If using flaky salt, crush it between your fingers while sprinkling to break apart any particularly large pieces.)
4. Continue with the remaining rounds, stacking them on top of one another as you go. Divide the stack into two for easier cutting. Use a chef’s knife to cut each pita stack into 8 wedges. Spread the wedges, rough side up, in a single layer across the two prepared baking sheets.
5. Bake until the wedges are golden brown and crisp, around 10 to 12 minutes, rotating and switching the sheets halfway through the baking time. The pan on the top rack will probably finish first; you might need to leave the pan on the middle rack in the oven for a few more minutes to achieve the same browning.
6. For optimal crispness and crunch, allow the pita to cool completely on the pans before serving. Pita chips can be stored in a sealed bag, with the excess air pressed out, at room temperature for up to 2 weeks.

Steps to Make a Crunchy Falafel Sandwich
**Discovering the Realm of Falafel Wraps: An Exquisite Culinary Adventure**
Falafel wraps are an adored culinary treasure that merges the rich tastes of Middle Eastern fare with the ease of a portable meal. While classic pita pockets frequently serve to hold these tasty chickpea cakes, numerous fans favor the adaptability of pocketless pita or even naan bread for an innovative take on the traditional wrap. This selection not only improves the texture but also provides a more substantial and fulfilling experience. Enveloping the falafel in foil is a handy suggestion to handle the delightful messiness that commonly comes with these tasty wraps.
For those looking for a quick and simple meal option, getting takeout falafel from a preferred Greek eatery can be transformative. Complementing these ready-made falafels with homemade tzatziki sauce and fresh toppings forms a blend of flavors that is both easy and delicious. This method allows for savoring authentic tastes without the time investment of making falafel from scratch.
Regarding storage, falafel sandwiches are best relished fresh to completely enjoy their flavor and texture. Nevertheless, if you end up with leftovers, it’s crucial to keep the falafel and sauce apart in the refrigerator. This technique maintains their unique characteristics for as long as three days. To regain the original crispiness and warmth, reheating the falafel in a toaster oven or air fryer is advisable before putting together the sandwiches.
In summary, whether you decide to prepare your falafel wraps from scratch or choose a speedy takeout option, the essence of a remarkable meal lies in the blend of fresh components and the appropriate bread selection. With a bit of planning and ingenuity, falafel wraps can be a delightful element of any meal strategy, providing a taste of the Middle East in each mouthful.
Read More
10 High-Protein Dinner Ideas for Simple Weeknight Meals
Use these high-protein dinner concepts to restore order to your busy weeknights! These meals are packed with protein, family-approved, and ready in approximately 30 minutes for hassle-free evening cooking. Options for vegetarians, vegans, gluten-free diets, and Mediterranean cuisine are included.
In just a few days, my two children will return to school. As a busy working parent, I feel a mix of anxiety and enthusiasm: eager for a fresh routine, yet apprehensive about taking charge and establishing a healthy dinner schedule! I’ve been caught off guard at dinnertime more often than I’d like to admit (confession: I’m not the natural meal planner one might imagine!).
Having spent over ten years crafting recipes for busy home cooks, I’ve compiled a list of my favorite high-protein dinner ideas for weeknights throughout the hectic school year. It’s challenging to locate recipes that fulfill all these criteria, but I’ve discovered my best dinner ideas that are nutritious, family-friendly, protein-rich, and can be prepared in 30 minutes!
Reasons these dinners are ideal for weeknights
When considering our family’s weekly dinners, I aim for recipes that contain around 20 grams of protein per serving. (This is relatively straightforward if you’re preparing chicken or seafood, but poses more difficulty with vegetarian options.)
I’ve also noticed that meals rich in good protein sources tend to be more satisfying for adults. After a long workday and juggling school pickup, Alex and I need dinners that truly sustain us through evening activities instead of leaving us snacking from the pantry shortly after.
The trick is selecting recipes that provide protein without demanding hours in the kitchen. Every recipe on this list can be made in 30 minutes or less! Some ideas may require more effort, but I’ve included a few of our “weeknight shortcuts” for super simple concepts.
Since Alex and I specialize in Mediterranean diet recipes, all of these suggestions are also friendly to the Mediterranean diet.
10 High-Protein Dinner Ideas for Busy Families
1. Chicken Meatballs (or Vegan Meatballs)
28g protein per serving (17g for vegan)
These flavorful chicken meatballs are a family favorite: everyone enjoys them! I often prepare them in a basic marinara sauce right in the oven.
Tip: To simplify and speed things up, you can bake them on a baking sheet at 400°F for 15 to 17 minutes (until they reach an internal temperature of 165°F).
For families on plant-based diets, I’ve developed a vegan version using the same cooking method, featuring protein-packed tempeh. It also takes about 30 minutes, which can be a challenge with vegan recipes (you’re welcome!).
2. Easy Baked Salmon
37g protein per serving
This recipe is remarkably easy to bake and full of smoky flavor! It only requires 20 minutes in the oven and pairs perfectly with quick sides like steamed broccoli or easy couscous. The high omega-3 content is an additional benefit!
3. Black Beans and Rice Bowl
20g protein per serving
This rice bowl has been a lifesaver when everyone craves something different for dinner. I lay out all the ingredients—seasoned black beans, rice, cheese, salsa—and let everyone assemble their own bowl. It’s like having a mini Chipotle at home, but with ingredients I trust.
Tip: Boost the protein and transform it into a shrimp bowl, or add strips of our simple air fryer chicken breast.
4. Shrimp and Orzo
37g protein per serving
One-pot meals are my go-to during the school year, and this shrimp and orzo dish meets all the requirements. The combination of tender pasta, succulent shrimp, and salty feta yields a dish that feels cohesive and enjoyable, and comes together in about 30 minutes.
5. Last-Minute Egg Tacos
15g protein per serving
If you haven’t planned for dinner at all, here’s your fix! This might be my favorite kitchen hack ever. These egg tacos taste as though they’re filled with seasoned taco meat, but they’re actually spiced scrambled eggs!
I created this dish on a dare from my sister to whip up dinner in just 5 minutes, and it has become one of our most relied-upon weeknight solutions. The secret lies in a generous amount of chili powder, garlic powder, and cumin.
Featured 5-Star Review ⭐⭐⭐⭐⭐ “These egg tacos are a game-changer for busy weeknights! I made them tonight after work and school pickup, and they came together so quickly. High in protein and so satisfying. My kids adored them!” — Tanvee
6. Soba Noodle Bowl
20g protein per serving
These Japanese buckwheat noodles cook quicker than regular pasta and have a taste that even picky eaters seem to appreciate. This recipe incorporates stir-fried veggies
Read More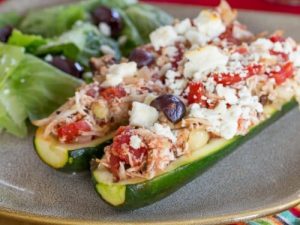
Zucchini Stuffed with BBQ Chicken
Zucchini Filled with BBQ Chicken
Preparation Time: 15 minutes Cooking Time: 50 minutes Total Duration: 1 hour 5 minutes Servings: 4
Zucchini ‘boats’ filled with BBQ chicken, onions, peppers, and corn, generously topped with melted cheese!
ingredients
- 4 medium zucchinis
- 1 tablespoon oil
- 1/2 pound chicken, diced
- 1/2 cup red onion, chopped
- 1/2 cup red bell pepper, chopped
- 1/2 cup corn (fresh or thawed)
- 1/4 cup hot peppers, sliced or chopped (optional)
- 1/4 cup BBQ sauce
- 1 cup cheese (cheddar and/or monterey jack), shredded
- 1 tablespoon cilantro, minced (optional)
directions
- Slice the zucchini in half lengthwise, and scoop out the insides (using a spoon or melon baller) until the zucchini walls are about 1/4 inch thick, saving and chopping the removed zucchini.
- In a large skillet, heat the oil over medium heat, add the chicken, and cook for about 6-8 minutes.
- Incorporate the chopped zucchini, onion, and pepper, cooking until softened, about 8-10 minutes.
- Stir in the corn, hot peppers, and BBQ sauce, mixing well before turning off the heat.
- Fill the hollowed zucchini halves with the chicken mixture, top with cheese, place them on a baking sheet, and bake in a preheated 350F/180C oven until the zucchini is tender, roughly 30-40 minutes.
Option: Toss in 1/2 cup diced pineapple!
Option: Include 1/4 cup cooked and crumbled bacon.
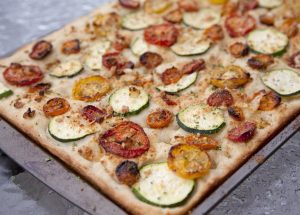
Focaccia Bread with Zucchini and Potato Toppings
### Focaccia with Zucchini and Potatoes: A Culinary Adventure
Focaccia, an adored Italian bread, has enchanted many with its light texture and enjoyable toppings. In recent months, I have delved into mastering focaccia, trying out a variety of techniques and ingredients. Here are five vital lessons I learned throughout this tasty adventure:
1. **Shallow Pans for Ideal Crispness**: For a beautifully caramelized and crunchy top, utilizing a shallow pan is crucial. While deeper pans can produce acceptable outcomes, they frequently do not match the crispness attained in rimmed baking sheets.
2. **Overbaking is Difficult to Achieve**: Interestingly, focaccia is rather forgiving regarding baking duration. Although it can be finished in 20 minutes, keeping it in the oven for 30 to 37 minutes results in the perfect texture—golden brown on the surface with a chewy center.
3. **No-Knead Technique Prevails**: Numerous focaccia recipes stress kneading or stretching the dough, but I discovered that the no-knead approach yielded equally gratifying results. This method streamlines the process without compromising quality, making it the favored option for many home bakers.
4. **Resist the Temptation to Manipulate**: Although it might be alluring to punch down the dough or over-dimple the focaccia, such actions can impede the desired airy texture. A gentle hand is essential for preserving the bread’s lightness.
5. **Ample Toppings are Crucial**: Toppings compress during baking, so it’s vital to be generous when adding ingredients. Whether you opt for a simple combination of salt and rosemary or pile on the zucchini and potatoes, more is certainly better in this instance.
### Recipe: Focaccia with Zucchini and Potatoes
#### Ingredients:
– 4 cups (540 grams) all-purpose flour
– 3 teaspoons (8 grams) kosher salt
– 2 1/4 teaspoons or 1 packet (7 grams) instant yeast
– 2 cups (475ml) lukewarm water (between 100 and 115°F)
– 6 tablespoons (90ml) olive oil, divided
– 8 ounces zucchini, cut into very thin slices
– 8 ounces Yukon Gold potatoes, cut into very thin slices
– 2 ounces salami, sliced into thin strips (optional)
– Fresh rosemary, for garnish
– Flaky sea salt, for garnish
#### Directions:
1. **Prepare the Dough**: In a large bowl, combine the flour, salt, and yeast. Pour in the lukewarm water along with 1 tablespoon of olive oil, stirring until there are no dry flour spots. Cover with plastic wrap and let it rise until it has doubled in size, roughly 1.5 hours. If necessary, refrigerate it before it fully rises.
2. **Make the Focaccia**: Line a 9×13-inch pan with parchment paper, drizzling 3 tablespoons of olive oil over it. Carefully scrape the risen dough onto the parchment, stretching it toward the edges without deflating the air. Place another pan on top and let it rise for an additional 1.5 hours.
3. **Prepare the Toppings**: Gently toss the zucchini and potatoes separately with kosher salt and allow them to soften.
4. **Assemble Focaccia**: Preheat the oven to 450°F. Drain and pat the vegetables dry. Remove the cover from the dough and layer the zucchini and potatoes on top, adding salami if you wish. Drizzle with the remaining olive oil, lightly dimple the dough, and sprinkle with flaky sea salt.
5. **Bake Focaccia**: Bake for 30 to 38 minutes until golden brown. Let it cool slightly before cutting.
6. **Enjoy**: Serve warm or at room temperature. Leftovers can be reheated in a 350°F oven to restore their crispiness.
This focaccia, featuring its delightful toppings and ideal texture, is perfect for any event—whether it’s a picnic, potluck, or a relaxed dinner at home. With this recipe, you’ll find yourself frequently making it, crafting delicious memories along the way.
Read More