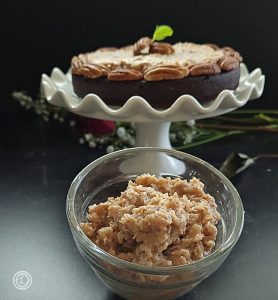
Coconut Pecan Icing Recipe
**The Wanderlust Kitchen: A Culinary Journey Across the Globe**
In a realm where culinary practices are as varied as the cultures they stem from, The Wanderlust Kitchen emerges as a lively center for food lovers and travel enthusiasts alike. Established by Linda, this platform is committed to sharing a rich array of recipes and travel experiences that motivate adventure and exploration through culinary delights.
### Honoring Genuine Culinary Traditions
At the core of The Wanderlust Kitchen lies a profound appreciation for genuine culinary traditions. Linda selects recipes that respect traditional cooking techniques and ingredients, enabling her audience to connect with the origins of diverse cuisines. From the fragrant spices of Indian curries to the subtle tastes of Japanese sushi, each recipe narrates a tale of its beginnings, inviting home cooks to discover the world from their own kitchens.
### Contemporary Techniques and Components
While authenticity remains vital, The Wanderlust Kitchen also welcomes contemporary culinary techniques and inventive ingredients. Linda motivates her readers to try modern cooking methods, making classic recipes easier and more enjoyable for today’s home cooks. This blend of the old and the new not only enhances the cooking journey but also opens avenues for creativity in the kitchen.
### An Invitation to Exploration
Linda’s mantra is clear: embrace adventure. The Wanderlust Kitchen transcends mere cooking; it’s about discovering new tastes and cultures. Each recipe acts as a ticket to a different corner of the globe, urging readers to venture beyond their culinary comfort zones. Whether it involves using a new ingredient or tackling a challenging dish, the kitchen transforms into a realm of discovery and thrill.
### Inspirational Travels
Beyond recipes, The Wanderlust Kitchen provides travel inspiration that complements the culinary adventure. Linda recounts her travel experiences, offering insights into the cultures and cuisines she encounters. This distinctive combination of food and travel encourages readers to not only cook but also explore the globe, nurturing a deeper respect for global cultures.
### Belonging and Interaction
The Wanderlust Kitchen is more than merely a recipe site; it’s a community of like-minded individuals who share a zeal for food and travel. Linda invites her readers to participate, share their culinary journeys, and connect through their passion for cooking. This sense of belonging enriches the experience, creating a welcoming environment for both novice cooks and experienced chefs.
### In Summary
The Wanderlust Kitchen is a tribute to food, culture, and adventure. With Linda leading the way, readers are inspired to explore the world through their taste experiences, embracing both traditional and contemporary culinary methods. So, whether you’re interested in trying a new recipe or setting off on a travel escapade, The Wanderlust Kitchen is your ultimate source of inspiration. Bon Appétit! Bon Voyage!
Read More
Ten Tasty Recipes Featuring Green Tomatoes
Alex & Sonja Overhiser: The Culinary Partners Behind A Couple Cooks
Introducing Alex and Sonja Overhiser, the energetic pair that has turned their love for cooking into a flourishing online community. As the creators of two renowned cookbooks and the originators of the well-liked website A Couple Cooks, Alex and Sonja have been motivating home chefs since 2010 with their easy, seasonal recipes and contagious zest for the culinary field.
Their adventure started over ten years ago when they chose to express their culinary passion with others. What began as a personal blog has evolved into a thorough resource for food lovers in search of delectable and simple recipes. A Couple Cooks is more than just a compilation of recipes; it’s a celebration of the joy of cooking together and the ability of food to unite people.
Alex and Sonja’s approach is grounded in simplicity and seasonality. They hold the belief that cooking should be available to anyone, regardless of their experience. Their recipes are thoughtfully created, highlighting fresh ingredients and uncomplicated methods that let the natural tastes shine through. From hearty breakfasts to fulfilling dinners, each creation honors wholesome, nourishing cuisine.
Alongside their broad recipe collection, Alex and Sonja provide priceless cooking tips and meal planning suggestions. Their knowledge is apparent in every article, as they lead readers through the details of meal preparation with clarity. Whether you’re a beginner or an experienced cook, there’s always something new to glean from their advice.
What distinguishes Alex and Sonja is their authentic partnership both in their culinary endeavors and their personal lives. As busy parents, they are well aware of the hurdles in balancing family and work, and their recipes mirror this reality. Each meal is tested not only by them but also by their children, ensuring that the dishes are family-friendly and enjoyable for all ages.
Their cookbooks have solidified their status as respected authorities in the culinary realm. Every book is a treasure chest of recipes that reflect their dedication to delightful, healthy eating. With breathtaking photography and captivating storytelling, Alex and Sonja welcome readers into their kitchen, sharing not just recipes but also the narratives and experiences that make each dish unique.
Through A Couple Cooks, Alex and Sonja Overhiser have established more than just a website; they’ve formed a community of like-minded individuals who share a fervor for food and cooking. Their efforts continue to motivate countless home cooks to relish the pleasures of preparing and sharing meals with their loved ones. As they keep innovating and creating, Alex and Sonja stay committed to their goal of making cooking a fun and fulfilling experience for everyone.
Read More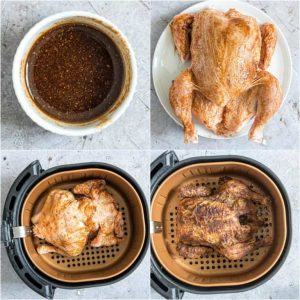
How to Prepare a Cornish Hen with an Air Fryer
**How to Prepare a Cornish Hen Using an Air Fryer**
Preparing a Cornish hen in an air fryer is an easy and effective method to enjoy a tasty, crispy-skinned bird without relying on a conventional oven. This technique is ideal for those seeking a quick dish with little cleanup required. Here’s a detailed guide to assist you in cooking a flawlessly prepared Cornish hen with an air fryer.
**Ingredients:**
– 1 Cornish hen (weighing about 1 to 1.5 pounds)
– 1 tablespoon olive oil or melted butter
– Salt and pepper as per taste
– 1 teaspoon garlic powder
– 1 teaspoon onion powder
– 1 teaspoon paprika
– Optional: fresh herbs (like rosemary or thyme) for garnish
**Instructions:**
1. **Preparation:**
– Start by preheating your air fryer to 375°F (190°C). This generally takes 3-5 minutes, based on your air fryer model.
– Use paper towels to pat the Cornish hen dry. This step is essential for obtaining crispy skin.
2. **Seasoning:**
– Coat the hen with olive oil or melted butter, making sure it’s evenly covered. This will aid in crisping the skin and enhancing the flavor.
– Generously season the hen with salt, pepper, garlic powder, onion powder, and paprika. Feel free to adjust the seasoning to match your taste.
– For extra flavor, you may insert fresh herbs into the cavity of the hen.
3. **Cooking:**
– Position the seasoned Cornish hen breast-side down in the air fryer basket. This orientation aids in even cooking and crisping.
– Cook the hen for 25 minutes. After this initial cooking time, gently flip the hen over using tongs.
– Continue cooking for an additional 15-20 minutes, or until the internal temperature hits 165°F (74°C) when checked with a meat thermometer inserted into the thickest part of the thigh.
4. **Resting:**
– After cooking, take the hen out of the air fryer and allow it to rest for about 5-10 minutes. Resting helps the juices redistribute, leading to a juicier bird.
5. **Serving:**
– Slice the Cornish hen and serve it alongside your preferred sides, such as roasted vegetables, mashed potatoes, or a fresh salad.
– Add fresh herbs for an extra touch of flavor and visual appeal.
**Tips:**
– If you are cooking multiple Cornish hens, ensure they fit comfortably in the air fryer basket without overcrowding. You may need to cook in batches.
– Try various seasonings and marinades to personalize the flavor of your Cornish hen.
– Always verify the internal temperature to confirm the hen is thoroughly cooked and safe to eat.
Cooking a Cornish hen in an air fryer is a practical way to relish a flavorful and tender meal with minimal effort. By following these straightforward steps, you’ll have a perfectly cooked bird ready to delight your family or guests.
Read More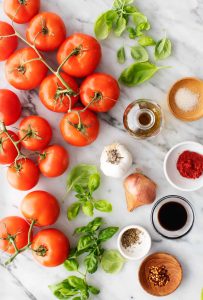
How to Prepare the Finest Fresh Tomato Sauce Using Garden Tomatoes
Title: Creating the Ultimate Fresh Tomato Sauce from Your Garden Bounty
Introduction:
There’s nothing comparable to the flavor of a homemade tomato sauce crafted from freshly picked garden tomatoes. Full of flavor, this sauce can enhance any pasta dish, pizza, or stew. With just a few basic ingredients and a bit of patience, you can produce a sauce that embodies the spirit of summer. Here’s a detailed guide to preparing the finest fresh tomato sauce from your garden tomatoes.
Ingredients:
– 5 pounds of fresh garden tomatoes (Roma or San Marzano types are perfect)
– 1/4 cup of extra virgin olive oil
– 1 medium onion, finely diced
– 4 cloves of garlic, minced
– 1 teaspoon of salt (adjust according to preference)
– 1/2 teaspoon of freshly ground black pepper
– 1 tablespoon of sugar (optional, to balance acidity)
– A handful of fresh basil leaves, torn
– 1 teaspoon of dried oregano
– 1 bay leaf
– Optional: A splash of red wine or balsamic vinegar for additional depth
Instructions:
1. **Prepare the Tomatoes:**
– Begin by thoroughly washing the tomatoes. To make peeling simpler, score a small “X” at the bottom of each tomato.
– Bring a large pot of water to a boil and prepare an ice bath in a separate bowl.
– Blanch the tomatoes in the boiling water for about 30 seconds, then place them in the ice bath. This will help loosen the skins.
– After they cool, remove the skins from the tomatoes and take out the cores. Chop the tomatoes into pieces and set aside.
2. **Cook the Aromatics:**
– In a large pot, heat the olive oil over medium heat.
– Add the chopped onion and sauté until it turns translucent, about 5 minutes.
– Stir in the minced garlic and cook for an additional minute until it becomes fragrant.
3. **Simmer the Sauce:**
– Introduce the chopped tomatoes to the pot, along with salt, pepper, and sugar if using.
– Mix in the fresh basil, dried oregano, and bay leaf.
– If you like, add a splash of red wine or balsamic vinegar for more flavor.
– Bring the mixture to a simmer, then reduce the heat to low. Let the sauce cook gently for 45 minutes to 1 hour, stirring occasionally. This allows the flavors to blend and the sauce to thicken.
4. **Blend and Adjust:**
– Once the sauce has thickened to your preference, remove the bay leaf.
– Use an immersion blender to puree the sauce to your desired consistency. Alternatively, you can transfer the sauce in batches to a blender.
– Taste and adjust the seasoning as necessary, adding more salt, pepper, or sugar to achieve the right balance of flavors.
5. **Finish and Store:**
– If you prefer a chunkier sauce, feel free to skip the blending step or only blend partially.
– Let the sauce cool before transferring it to airtight containers.
– Store it in the refrigerator for up to a week or freeze for extended storage.
Conclusion:
Making fresh tomato sauce from garden tomatoes is a satisfying endeavor that showcases the best of your homegrown produce. With its rich, vibrant flavors, this sauce is bound to become a staple in your kitchen. Whether you’re topping pasta, spreading it on pizza, or using it as a foundation for other meals, this homemade sauce will bring a refreshing and authentic touch to your dishes. Savor the essence of summer all year long with this delightful recipe!

Zucchini-Enhanced Southwest Turkey Burger Recipe
**Southwest Turkey Burgers with Zucchini**
Burgers epitomize summer enjoyment, and these Southwest turkey burgers stand out as a tasty favorite. Turkey makes for a superb burger option, although it can occasionally turn out dry. To remedy this, grated zucchini is incorporated into the patties, guaranteeing they stay moist and flavorful during cooking. The seasoning comprises a straightforward yet strong Southwest mix that includes chipotle chili powder, paprika, cumin, onion powder, garlic powder, Worcestershire sauce, salt, and pepper. Cheese is optional, but placing a slice of pepper jack or cheddar on top of the patties provides a delicious enhancement. Personalize your burger with toppings such as lettuce, tomato, guacamole, and chipotle mayo for added zest.
**Ingredients**
*For the turkey patties:*
– 1 pound ground turkey
– 1 cup zucchini, grated and pressed to remove excess moisture
– 1/4 cup breadcrumbs (gluten-free if necessary)
– 1 teaspoon chipotle chili powder
– 1 teaspoon (smoked) paprika
– 1 teaspoon ground cumin
– 1 teaspoon onion powder
– 1 teaspoon garlic powder
– 2 teaspoons Worcestershire sauce (optional)
– Salt and pepper to taste
*For the burgers:*
– 4 slices pepper-jack cheese
– 4 buns (gluten-free if necessary)
– 4 leaves of lettuce
– 1 large tomato, sliced
– 1/4 cup guacamole (or avocado slices)
– 1/4 cup mayonnaise
– 1 tablespoon chopped chipotle chilies in adobo
**Directions**
*For the turkey patties:*
1. Combine the turkey, zucchini, breadcrumbs, chipotle chili powder, paprika, cumin, onion powder, garlic powder, Worcestershire sauce, salt, and pepper. Split the mixture into 4 equal portions and shape into patties.
*For the burgers:*
1. Cook the patties by grilling, pan-frying over medium-high heat, or broiling, until fully cooked, roughly 3-5 minutes per side.
2. Add the cheese on top of the patties and allow it to melt prior to removing from heat.
3. Construct the burgers using the buns, lettuce, tomato slices, guacamole, and the blend of mayo and chipotle chilies in adobo. Enjoy!
**Nutrition Facts**: Calories 423, Fat 34g (Saturated 9g, Trans 0), Cholesterol 111mg, Sodium 722mg, Carbs 33g (Fiber 2g, Sugars 6g), Protein 35g.
Read More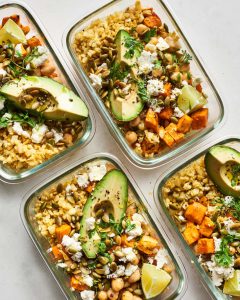
40 Make-Ahead Lunches You Can Prep and Pack Tonight

Your future self will thank you.
READ MORE…


Flying with Kids: What Snacks to Pack for the Plane

My child is two years old, and I’ve flown with her more than a dozen times. I’ve gone from declaring breast milk to bribing her with candy, and these are my tips for what to pack to keep young kids (babies to toddlers) happy.First, a few general guidelines:1. If you’re flying with a cranky, crying child or one who’s still sitting on your lap (i.e. taking up a lot of room and kicking the chair in front of her), offer to buy your seatmates a cocktail or a snack pack.
READ MORE…

What Foods Can You Carry on the Plane? The List Is Surprisingly Long.

Hummus and carrots will be your new go-to travel snack.
READ MORE…

