
My Plumber Just Showed Me the Easiest 2-Second Trick to Fix My Sinkâs Annoyingly Low Water Pressure

Read this before you call a plumber about your water pressure.
READ MORE…

How to Prepare Brown Sugar Syrup at Home
This brown sugar syrup can be prepared in just 5 minutes and is packed with a deep caramel taste. Ideal for sweetening coffee beverages, pancakes, and many other dishes!
Of course, you can enhance your lattes and iced espresso using traditional simple syrup. However, this homemade brown sugar syrup has become my latest go-to! It not only sweetens but infuses an even richer flavor: its deep caramel notes provide an intensely comforting experience, complemented by hints of toffee and vanilla. Additionally, it requires only 5 minutes to make and is great for coffee drinks, pancakes, and even cocktails and mocktails.
The first time I sampled a Starbucks Brown Sugar Oat Milk Shaken Espresso, I was captivated and felt compelled to create my own homemade version. Now, I always have a jar stored in my fridge!
Why You’ll Adore This Recipe
– **Fast and simple.** It comes together in less than 5 minutes using just brown sugar and water.
– **Rich, layered flavor.** The molasses content in brown sugar delivers a decadent caramel-toffee taste that’s more intriguing than simple syrup.
– **Flexible use.** Incorporate it into lattes and iced coffee, drizzle on pancakes and waffles, mix into oatmeal, or use it in cocktails.
– **Cost-effective.** Avoid costly trips to Starbucks or purchasing expensive syrups from Torani.
⭐⭐⭐⭐⭐”This is fantastic. Perfect for tea to create tea lattes. Delicious!” -Carilyn S.
Ingredients You’ll Require
– **Brown sugar:** You have the option to utilize either light or dark brown sugar: whatever is accessible! Naturally, dark brown sugar has a slightly richer caramel flavor. Coconut sugar or cane sugar could also be alternatives, though the taste may vary.
– **Water:** Standard tap or filtered water is suitable. The ratio is equal parts: 1 cup of water to 1 cup of brown sugar.
– **Optional extras:** Include a ½ teaspoon of vanilla extract for added warmth or 1 to 2 cinnamon sticks for a comforting spice essence.
How to Create Brown Sugar Syrup
Brown sugar syrup is simply a variation of simple syrup: it’s a liquid sweetener created with equal amounts of brown sugar and water. Due to the presence of molasses, it offers a profound flavor with caramel and toffee undertones. It has gained popularity from its use in Starbucks beverages, but it’s extremely easy to prepare at home. All you need is brown sugar! Here’s how:
1. **Mix sugar and water:** Combine ½ cup each of brown sugar and water in a small saucepan on the stove.
2. **Heat until it dissolves:** Warm over medium heat for 1 to 2 minutes, stirring until completely dissolved. Avoid simmering!
3. **Let it cool:** Take it off the heat and allow it to cool to room temperature.
Microwave option: Combine your brown sugar and water in a microwave-safe bowl or large mason jar. Heat on high for 30 seconds, then stir. Continue heating in 15-second increments until the sugar fully dissolves. This should take about 1 to 1.5 minutes total.
Storage Suggestions
Keep homemade syrup in the refrigerator for up to 1 month. A glass bottle facilitates easy pouring and is optimal for storage, or a glass mason jar can also work well. The flavor remains relatively stable over time, and it can last even longer.
Usage Suggestions
This brown sugar syrup is incredibly adaptable, suitable for everything from Starbucks beverages to breakfast! I designed it specifically for my Iced Brown Sugar Oat Milk Espresso recipe (which I strongly recommend). However, there are numerous ways to incorporate delightful cozy flavor notes.
Coffee and Tea Beverages
Several of my favorite coffee and tea beverages would be delightful with brown sugar syrup as the sweetener:
Baking and Sweets
Brown sugar syrup can serve as a versatile sweetening agent in baking and desserts as well:
– Brush it on cakes or muffins, such as Pumpkin Muffins
– Drizzle it over ice cream or frozen yogurt
– Replace other liquid sweeteners in recipes with it
Cocktails and Mocktails
Utilizing brown sugar syrup brings depth to both alcoholic and non-alcoholic drinks. The caramel undertones harmonize well with:
You can also gift homemade brown sugar syrup. Pour it into a small glass bottle or mason jar, add a label, and it becomes a wonderful gift for coffee enthusiasts. Pair it with a bag of quality coffee beans for a thoughtful host gift or holiday surprise!
Dietary Information
This brown sugar syrup recipe is vegetarian, vegan, plant-based, dairy-free, and gluten-free.
Common Inquiries
**How long does homemade brown sugar syrup remain good?** Homemade brown sugar syrup lasts up to 1 month when kept in an airtight container in the refrigerator. Always inspect for signs of spoilage like cloudiness, mold, or an odd smell before using.
**Is brown sugar syrup good for you?** Brown sugar syrup is fundamentally brown sugar dissolved in water, thus it contains the same carbohydrates, minimal saturated fat,
Read More
This “Very Tasty” Burrata Ravioli Is the Only Thing I Want For Dinner

A great dinner for two (or four!).
READ MORE…

25 Wholesome Thanksgiving Accompaniments That Dazzle the Turkey
**25 Wholesome Thanksgiving Sides That Outshine the Turkey**
Thanksgiving is an occasion to unite with family and friends and enjoy a banquet that honors appreciation and togetherness. While the turkey frequently takes the spotlight, the side dishes can significantly enhance the feast, providing a blend of tastes and nutrients. Here are 25 wholesome Thanksgiving side dishes that might just outshine the turkey:
1. **Balsamic Glazed Roasted Brussels Sprouts**: These small cabbages are loaded with vitamins C and K. Roasting enhances their inherent sweetness, and a balsamic glaze delivers a zesty finish.
2. **Cranberry and Quinoa Stuffed Acorn Squash**: This dish is not only a visual treat but also brimming with protein and fiber. The quinoa adds a nutty taste, while cranberries contribute a hint of tartness.
3. **Mashed Cauliflower with Garlic**: A low-carb substitute for mashed potatoes, mashed cauliflower is rich and tasty, particularly with roasted garlic mixed in.
4. **Black Bean and Sweet Potato Salad**: This colorful salad is packed with antioxidants and fiber. The sweet potatoes lend natural sweetness, enhanced by the earthy flavor of black beans.
5. **Pomegranate and Kale Salad**: Kale is a superfood abundant in vitamins A, C, and K. Paired with juicy pomegranate seeds, this salad is both invigorating and nutrient-rich.
6. **Mushroom and Pecan Wild Rice Pilaf**: Wild rice is a whole grain that offers a chewy consistency and nutty essence. Combined with earthy mushrooms and crunchy pecans, it creates a fulfilling side dish.
7. **Root Vegetables Roasted to Perfection**: A mix of carrots, parsnips, and beets, roasted to excellence, delivers a sweet and savory side abundant in vitamins and minerals.
8. **Sage and Parmesan Spaghetti Squash**: This low-calorie, nutrient-rich option serves as a fantastic pasta substitute. The sage offers an aromatic flair, while Parmesan adds a savory touch.
9. **Orange Cranberry Relish**: A refreshing twist on cranberry sauce, this relish blends cranberries with orange zest for a tangy, vitamin C-rich side.
10. **Almondine Green Beans**: Green beans are a timeless side; when sautéed with almonds, they provide a delightful crunch and a boost of vitamin E.
11. **Butternut Squash Soup**: Creamy and soothing, this soup is packed with beta-carotene and can be prepared with coconut milk to be dairy-free.
12. **Gratin Cauliflower**: A healthier version of classic gratin, this dish utilizes cauliflower and a light cheese sauce for a creamy and enjoyable side.
13. **Artichoke and Spinach Dip**: This beloved dip can be made healthier with Greek yogurt in place of cream cheese, offering protein and probiotics.
14. **Herb and Garlic Roasted Mushrooms**: Mushrooms are an excellent source of B vitamins, and roasting them with garlic and herbs enhances their savory taste.
15. **Apple and Caramelized Onion Tart**: This tart marries the sweetness of caramelized onions and apples within a flaky crust, providing a delightful balance of flavors and nutrients.
16. **Pesto Zucchini Noodles**: A low-carb replacement for pasta, zucchini noodles are light and refreshing, especially when mixed with a homemade basil pesto.
17. **Vegetable and Lentil Stew**: Lentils are a powerhouse of protein and fiber. This stew, packed with seasonal veggies, is both hearty and nutritious.
18. **Goat Cheese and Beet Salad**: Beets are high in folate and manganese. Paired with creamy goat cheese and walnuts, this salad adds flavor to the table.
19. **Bell Peppers Stuffed with Quinoa**: Stuffed with quinoa, black beans, and spices, these peppers are vibrant and nutrient-dense.
20. **Apple and Celeriac Slaw**: Celeriac, or celery root, is a low-calorie vegetable loaded with fiber. Mixed with apples, it results in a crunchy, refreshing slaw.
21. **Sweet Potato Baked Fries**: A healthier option compared to traditional fries, sweet potato fries are rich in beta-carotene and can be flavored with cinnamon or paprika.
22. **Fingerling Potatoes Roasted with Herbs**: These petite potatoes are roasted with rosemary and thyme, providing a crispy and delicious side.
23. **Spinach and Chickpea Sauté**: Chickpeas are rich in protein and fiber. When sautéed with spinach and garlic, they create a satisfying and nutritious side.
24. **Risotto with Pumpkin and Sage**: Creamy and comforting, this risotto incorporates pumpkin for a seasonal twist, offering a great source of vitamin A.
25. **Asparagus Grilled**
Read More


Bye-Bye, Blue Box: Kraftâs New Limited-Edition Mac & Cheese Flavor Is the Ultimate Thanksgiving Mashup

Itâs surprisingly good.
READ MORE…

Honey-Glazed Turkey Instructions
# Honey-Glazed Turkey Preparation
Savor the tastes of the festive season with this Honey-Glazed Turkey preparation. Succulent turkey adorned with a delightful honey glaze is ideal for any celebration!
## Contents
1. [Ingredients for the Recipe](#h-recipe-ingredients)
2. [Instructions for Making Honey-Glazed Turkey](#h-how-to-make-honey-glazed-turkey)
3. [Tips from Experts](#h-expert-tips)
4. [Common Questions](#h-faqs)
5. [Information on Storage](#h-storage-information)
6. [Additional Recipes to Explore](#h-more-recipes-to-try)
## Ingredients for the Recipe
– **Honey:** The foundation for the glaze that imparts sweetness to the turkey.
– **Paprika:** A subtle smokiness introduced to the turkey’s rub.
– **Boneless Turkey Breast:** Any size can be selected, adjusting the cooking duration as necessary.
Refer to the recipe card below for a complete list of ingredients and their quantities.
## Instructions for Making Honey-Glazed Turkey
**Step #1:** Use paper towels to dry the turkey.
**Step #2:** In a small bowl, mix together all spices designated for the turkey.
**Step #3:** Apply the seasoning blend thoroughly all over the turkey.
**Step #4:** Afterwards, encase the turkey in plastic wrap and refrigerate for 30 minutes to 24 hours.
**Step #5:** Set your oven to preheat at 325 degrees Fahrenheit.
**Step #6:** Position the turkey in a baking dish.
**Step #7:** Then, melt the butter and apply it evenly on the turkey.
**Step #8:** Roast the turkey in the oven for 30 minutes.
**Step #9:** While the turkey is roasting, prepare the glaze. In a saucepan set to medium-high heat, mix honey, butter, Dijon mustard, salt, and pepper. Let it bubble before reducing to a simmer for 3 minutes.
**Step #10:** After baking for 30 minutes, take the turkey out of the oven and coat it with ⅓ of the glaze.
**Step #11:** Roast for an additional 30 minutes, then remove from the oven and apply another ⅓ of the glaze.
**Step #12:** Continue baking for another 15 minutes or until the internal temperature of the turkey hits 165 degrees Fahrenheit, then take it out of the oven.
**Step #13:** Distribute the remaining glaze over the turkey.
**Step #14:** Permit the honey-roasted turkey to rest for 10-15 minutes before slicing. Serve and relish!
## Tips from Experts
– **Turkey Netting:** Using the turkey’s netting is optional, but cooking it with the netting on lends a classic appearance with indentations on the side.
– **Turkey Drippings:** If preparing this for a holiday, utilize the drippings from the turkey pan to create a flavorful gravy!
## Common Questions
**What is the cooking duration for a turkey larger than 3 pounds?**
As a general guideline, allocate 20-30 minutes per pound of turkey for cooking time. Larger turkey breasts might brown sooner; if the skin darkens excessively, loosely cover the top with foil. For turkey breasts over 4 pounds, postpone adding the glaze until the last 45–60 minutes of roasting to prevent excess caramelization.
**What side dishes go well with this Honey-Glazed Turkey recipe?**
I enjoy pairing mashed potatoes and roasted vegetables with this turkey. Additionally, I slice the turkey for sandwiches and serve it with a bowl of soup.
## Information on Storage
Any leftovers of this honey-baked turkey can be kept in an airtight container in the refrigerator for up to 4 days. To freeze the turkey, wrap it in plastic wrap and aluminum foil, then store it in an airtight container or freezer bag in the freezer for as long as 3 months.
For reheating, preheat your oven to 300 degrees Fahrenheit and warm for 20-30 minutes. Alternatively, you can reheat in the microwave until heated through.
## Additional Recipes to Explore
[Print the Honey-Glazed Turkey Preparation](https://thewanderlustkitchen.com/wprm_print/honey-glazed-turkey-recipe)
Read More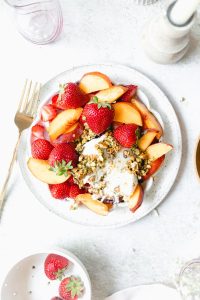
Burrata Cheese Accompanied by Mashed Cherries and Pistachios
### Burrata with Crushed Cherries and Pistachios
Last summer, an impromptu barbecue inspired the crafting of a charming dish that swiftly became a hit among pals. With time and resources being sparse, a friend combined burrata, ripe cherries, and crushed pistachios to assemble a lively platter that was not just visually striking but also extraordinarily tasty. This no-recipe recipe is ideal for those summer get-togethers when you desire something easy yet impressive.
#### Ingredients
– 1 pound (455 grams) burrata
– 1 pound (455 grams) fresh cherries
– Olive oil
– 1/3 cup (40 grams) salted, shelled pistachios
– A sprig or two of fresh mint
– Flaky sea salt
– Freshly ground black pepper
– Crostini for serving
#### Preparation Steps
1. **Prepare the Burrata**: Drain the burrata on a paper towel and let it sit at room temperature for optimum creaminess. Tear the burrata into pieces and place them on a serving platter.
2. **Prepare the Cherries**: Rather than using a cherry pitter, crush or slice the cherries open. To crush, press the cherry with the edge of a knife or the base of a sturdy glass until the pit is easily removable. Tear the cherries apart and scatter them over the burrata. If slicing, run a paring knife around the cherry, twist to split the halves, and take out the pit. Pour any collected cherry juices over the burrata.
3. **Add Olive Oil**: Generously drizzle olive oil over the cherries and burrata.
4. **Prepare the Pistachios**: Roughly chop the pistachios or crush them into uneven pieces using the back of a heavy pan. Sprinkle the pistachios over the cherries and burrata.
5. **Season**: Top with flaky sea salt, freshly ground black pepper, and fresh mint leaves.
6. **Serve**: Serve the dish alongside crostini and observe it vanish as guests savor this fresh and flavorful mix.
#### Tips for Success
– **Burrata**: For optimal flavor and texture, let burrata sit at room temperature before serving. Mini balls of burrata can be an excellent alternative if available.
– **Cherries**: This dish excels with fresh, ripe cherries. Be sure to pick cherries that are firm and sweet.
– **Variations**: If burrata is not available, high-quality fresh ricotta can be an appropriate substitute.
This dish is not only straightforward to prepare but also encourages creativity and customization. The blend of creamy burrata, sweet cherries, and crunchy pistachios offers a delightful contrast that is bound to impress at any gathering. Relish the simplicity and tastiness of this summer favorite!
Read More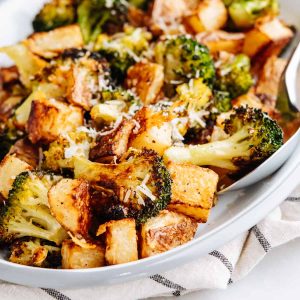
Oven-Roasted Potatoes Garnished with Crunchy Broccoli and Bacon
### Baked Potatoes with Crispy Broccoli and Bacon
Baked potatoes, commonly known as “jacket potatoes” in the UK, provide a soothing and straightforward meal choice that can be easily enhanced with suitable toppings. This article delves into the wonderful pairing of baked potatoes with crispy broccoli and bacon, offering a comforting dinner option that is both hearty and wholesome.
#### The Allure of Baked Potatoes
Baked potatoes are not just tasty but also adaptable. They act as a blank slate for an array of toppings, making them ideal for various palates and dietary needs. Classic toppings such as butter, cheddar cheese, sour cream, and bacon bits are always popular, but including vegetables can boost the meal’s nutritional profile.
#### Roasting Broccoli and Bacon
A highlight of this recipe is the use of roasted broccoli and bacon. Roasting enhances the natural sweetness of the broccoli while providing a crunchy texture to the bacon. This combination results in a savory topping that complements the fluffy inside of the baked potato perfectly.
#### Ingredients
– **4 russet potatoes** (approximately 8 ounces or 225 grams each), cleaned
– **Olive oil**
– **Kosher salt and freshly ground black pepper**
– **1 pound fresh broccoli**, chopped into 1-inch pieces
– **4 ounces bacon** (around 4 slices), diced
– **Butter** (for serving)
– **Sharp orange cheddar**, coarsely grated (for serving)
– **Sour cream** (for serving)
– **Minced fresh chives** (for garnish)
#### Instructions
**1. Bake the Potatoes:**
– Preheat your oven to 450°F (230°C).
– Puncture each potato several times with a fork to allow steam to escape.
– Lightly coat each potato in olive oil and sprinkle with kosher salt and black pepper.
– Place the potatoes directly on the oven rack and bake for 45 minutes to 1 hour, until tender.
**2. Roast the Broccoli and Bacon:**
– Toss the broccoli with olive oil, salt, and pepper on a baking sheet.
– Add the diced bacon and mix thoroughly.
– After 15 minutes of baking the potatoes, place the broccoli and bacon in the oven.
– Roast for another 25 to 30 minutes, turning occasionally, until the bacon is crisp and the broccoli is lightly charred.
**3. Serve:**
– Once the potatoes are fully baked, use a fork to split them down the center.
– Carefully squeeze the ends to open them up, creating room for toppings.
– Fill each potato with butter, salt, pepper, cheddar cheese, and a generous portion of the roasted broccoli and bacon mix.
– Top with sour cream, minced chives, and any additional seasoning as desired.
#### The Ideal Potato Loading Sequence
To create the ultimate baked potato experience, adhere to this loading sequence:
1. Open the baked potato and add butter.
2. Season with salt and pepper.
3. Add cheddar cheese.
4. Top with crispy broccoli and bacon.
5. Conclude with sour cream and chives.
This approach ensures every bite is packed with flavor and satisfaction.
### Conclusion
Baked potatoes with crispy broccoli and bacon present a delightful way to savor a traditional dish while integrating vegetables. This recipe is not only easy to make but also allows for creativity in toppings, making it an excellent option for family dinners or laid-back gatherings. Relish the warmth and comfort of this fulfilling meal, and remember to commend yourself for a job well done!
Read More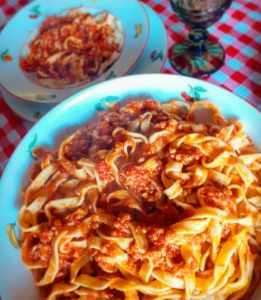
Tagliatelle con Salsa Bolognese di Zucca
**Pumpkin Bolognese Tagliatelle: A Delight Inspired by Fall**
As the foliage changes and the temperatures dip, there’s no better way to celebrate the tastes of autumn than with a robust meal that merges the comforting flavor of bolognese with the seasonal allure of pumpkin. Presenting Pumpkin Bolognese Tagliatelle—a charming variation on a traditional Italian classic that infuses the warmth of the season into your meal.
**Preparation and Cooking Time:**
– **Prep Time:** 15 minutes
– **Cook Time:** 35 minutes
– **Total Time:** 50 minutes
– **Servings:** 8
**A Flavor of Autumn:**
This distinctive bolognese sauce features pumpkin puree and bits of pumpkin, delivering a hearty and flavorful dish ideal for brisk nights. Incorporating pumpkin not only imparts a gentle sweetness but also boosts the meal’s nutritional value, creating a healthy option for family gatherings.
**Ingredients:**
– 1 tablespoon oil
– 1 pound ground turkey (or substitute with chicken, beef, pork, or Italian sausage)
– 1 cup onion, diced
– 1 cup carrot, diced
– 1 cup celery, diced
– 1 cup bell pepper, diced
– 8 ounces mushrooms, chopped
– 2 tablespoons tomato paste
– 4 cloves garlic, minced
– 1 tablespoon sage, minced
– 1/2 teaspoon red pepper flakes (to taste)
– 1 cup chicken broth
– 1 (15 ounce) can crushed tomatoes (or marinara sauce)
– 1 cup pumpkin puree
– 2 cups diced pumpkin or butternut squash (optional)
– 1/4 teaspoon cinnamon
– 1 tablespoon balsamic vinegar
– 1 tablespoon Italian seasoning (or oregano)
– 1/4 cup Parmigiano Reggiano, grated
– Salt and pepper to taste
– 1 pound pasta (use gluten-free pasta if required)
**Directions:**
1. Heat the oil in a large saucepan. Add the ground turkey, onion, carrot, celery, and mushrooms. Cook for about 15 minutes, breaking the turkey apart as it cooks.
2. Stir in the tomato paste, garlic, sage, and red pepper flakes. Cook until aromatic, about a minute.
3. Add the chicken broth, crushed tomatoes, pumpkin puree, diced pumpkin, cinnamon, balsamic vinegar, and Italian seasoning. Mix thoroughly, bring to a boil, then lower the heat and simmer until the pumpkin is tender, about 15-20 minutes.
4. Turn off the heat, incorporate the grated Parmesan, and stir until it melts into the sauce.
5. Adjust seasoning with salt and pepper to your liking.
6. While the sauce simmers, cook the pasta according to package directions. Drain and combine with the sauce before serving.
**Optional Enhancements:**
– Cook and mix in 1/4 pound pancetta or bacon for added flavor.
– Include 1 teaspoon of smoked paprika with the garlic for a smoky depth.
– Add 1/4 cup chopped sun-dried tomatoes for a zesty twist.
– Stir in 1 tablespoon of fish sauce at the end for umami richness.
– Incorporate 1/4 cup of heavy cream, milk, or ricotta with the Parmesan for a creamy consistency.
**Nutritional Information:**
– **Calories:** 428
– **Fat:** 9g (Saturated 2g)
– **Cholesterol:** 44mg
– **Sodium:** 487mg
– **Carbohydrates:** 61g (Fiber 6g, Sugars 11g)
– **Protein:** 24g
This Pumpkin Bolognese Tagliatelle not only delights your palate but also adds a festive flair to your dining experience. Relish the cozy tastes of autumn with every bite!
Read More