
Crispy Toast Recipe with Garlic Infusion
Alex & Sonja: The Culinary Pair Behind A Couple Cooks
Introducing Alex and Sonja Overhiser, the energetic pair who transformed their love for cooking into a flourishing online community. As the writers of two celebrated cookbooks and the creators of the well-known website A Couple Cooks, they have committed themselves to spreading the pleasure of cooking with others. Their adventure started in 2010 when they chose to develop a platform for sharing straightforward, seasonal recipes suitable for everyone.
What distinguishes Alex and Sonja is their dedication to crafting original recipes that are equally tasty and approachable. Each recipe is carefully developed and tested in their kitchen at home, frequently with the participation of their children. This hands-on method guarantees that every dish is not only suitable for families but also a genuine representation of their culinary skills.
Throughout the years, A Couple Cooks has expanded into a thorough resource for home chefs of diverse expertise. The site features thousands of recipes, spanning from quick weekday meals to intricate holiday banquets. Besides recipes, Alex and Sonja offer useful cooking tips and meal planning suggestions, simplifying the process for busy families to relish home-cooked dishes together.
Outside of the kitchen, Alex and Sonja are enthusiastic about nurturing a passion for cooking in others. They uphold the belief that preparing meals together can strengthen bonds and forge enduring memories. Through their captivating writing and beautiful photography, they welcome readers into their realm, motivating them to embrace the craft of cooking.
No matter if you’re an experienced chef or an emerging cook, Alex and Sonja’s friendly approach and authentic passion for food make A Couple Cooks an essential destination for anyone aiming to improve their culinary abilities. With their support, you’ll uncover the joy of cooking and the fulfillment of sharing exquisite meals with those you care about.
Read More
Easy Cannellini Bean Dish
Alex & Sonja: The Culinary Team Behind A Couple Cooks
Introducing Alex and Sonja Overhiser, the energetic pair who have transformed their love for cooking into a flourishing online community. As the creators of two celebrated cookbooks and the imaginative forces behind the well-known website, A Couple Cooks, Alex and Sonja have been motivating home chefs since 2010 with their straightforward, seasonal recipes and their contagious passion for the culinary world.
What initially started as a personal endeavor to chronicle their cooking experiences has evolved into a thorough resource for food enthusiasts globally. A Couple Cooks serves not merely as a collection of recipes; it is a tribute to the happiness that cooking brings into daily life. With thousands of unique recipes, valuable cooking advice, and actionable meal planning suggestions, Alex and Sonja have developed a platform that appeals to both beginner cooks and experienced chefs.
A distinctive feature of A Couple Cooks is the personal touch that Alex and Sonja infuse into their content. Each recipe is not only crafted and captured by the couple but also tested by their family, including their kids. This hands-on method guarantees that every dish is both family-friendly and attainable for home cooks at any level of experience.
Besides their digital footprint, Alex and Sonja have penned two cookbooks that further highlight their culinary knowledge and imagination. These books are packed with recipes that focus on fresh, healthy ingredients and straightforward methods, making them approachable for anyone eager to improve their cooking skills.
As active parents, Alex and Sonja recognize the difficulties of juggling family responsibilities with a passion for cooking. Their knack for preparing tasty, nutritious meals that accommodate a busy routine is a reflection of their commitment and talent. Through A Couple Cooks, they keep encouraging others to find pleasure in the kitchen and to appreciate cooking as a way to connect people.
Whether you’re in search of a quick weekday meal, an impressive dish for a festive gathering, or just some motivation to reignite your cooking enthusiasm, Alex and Sonja’s A Couple Cooks is an essential resource that guarantees satisfaction. Join the Overhisers in their culinary adventure and experience the transformative essence of cooking with care and purpose.
Read More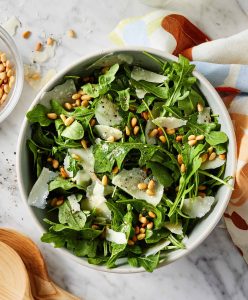
Parmesan-Seasoned Butter Lettuce Salad Recipe
Alex & Sonja: The Culinary Partnership Behind A Couple Cooks
Introducing Alex and Sonja Overhiser, the energetic pair behind the well-known culinary platform, A Couple Cooks. As creators of two acclaimed cookbooks and active parents, Alex and Sonja have perfected the skill of juggling family duties alongside their culinary enthusiasm. Their adventure commenced in 2010 when they established A Couple Cooks to express their passion for uncomplicated, seasonal dishes and the happiness that cooking can bring to daily life.
Throughout the years, Alex and Sonja have curated an extensive array of thousands of unique recipes, each designed with attention and innovation. Their website is a goldmine of culinary motivation, showcasing everything from fast weeknight meals to intricate recipes for special events. What distinguishes their recipes is their focus on simplicity and seasonality, guaranteeing that every dish is not only flavorful but also approachable for home cooks at any experience level.
Alongside recipes, A Couple Cooks serves as an invaluable resource for cooking advice and meal planning suggestions. Alex and Sonja recognize the difficulties of providing for a family and are committed to empowering others to navigate the kitchen with assurance. Their straightforward tips and well-thought-out meal plans make it simpler for busy families to savor nutritious, home-cooked dishes together.
Each recipe featured on A Couple Cooks is carefully crafted and photographed by Alex and Sonja themselves, providing a personal touch that connects with their audience. They also engage their children in the cooking experience, trying out recipes and nurturing a passion for food and cooking in the younger generation.
Through their website, cookbooks, and compelling content, Alex and Sonja Overhiser have fostered a lively community of food lovers who share their enthusiasm for cooking. Whether you’re an experienced chef or a kitchen beginner, A Couple Cooks presents something for everyone, welcoming you to dive into the pleasures of cooking and the delightful opportunities that await in your own kitchen.
Read More
One-Pan Sesame Beef Stir-Fry Recipe
# Ground Beef Stir Fry: A Fast and Tasty Dinner
This ground beef stir fry delivers a pleasing takeout-inspired flavor, showcasing crisp vegetables and a flavorful hoisin-ginger sauce, all prepared in roughly 30 minutes. It’s an energetic and rapid dinner choice that complements rice or noodles wonderfully.
## Reasons to Make It
– **Quick Cooking:** Ground beef cooks swiftly, making this dish perfect for hectic weeknights.
– **Easy Sauce:** The sauce can be prepared in a single bowl, streamlining the cooking steps.
– **Single-Pan Meal:** This recipe simplifies cleanup and is an excellent way to utilize leftover vegetables.
## Time-Saving Tip
Employ a bag of coleslaw mix or pre-cut stir-fry vegetables to reduce preparation time.
## Required Tools
A large skillet or wok is crucial for tossing the beef and vegetables without crowding the pan.
## Serving Ideas
Present the stir fry on top of rice or noodles, or choose cauliflower rice or lettuce cups for a lighter alternative.
## Ingredient Tips
– **Beef:** Opt for lean ground beef to prevent greasiness. If using a higher-fat variety, drain excess fat to maintain a smooth sauce.
– **Vegetables:** Cut vegetables thinly and evenly for uniform cooking.
– **Sauce:** The sauce is a mix of savory and sweet. Use low-sodium soy sauce to control salt intake, and ensure the cornstarch is whisked well for proper thickening.
## Preferred Variations
– Swap ground beef for ground turkey or chicken.
– Add vegetables such as broccoli stems, snap peas, or additional bell peppers.
– Toss in water chestnuts for added crunch.
– For heat, include red pepper flakes or chili garlic sauce.
## Steps to Create Ground Beef Stir Fry
1. **Make the Sauce:** In a small bowl, blend beef broth, hoisin sauce, soy sauce, sesame oil, and cornstarch. Set aside.
2. **Brown the Beef:** In a large skillet, cook the ground beef with garlic and ginger over medium-high heat until no longer pink. Drain excess fat and transfer to a bowl.
3. **Sauté Vegetables:** In the same skillet, warm oil and sauté vegetables, starting with those that take longer to cook like celery and carrots, then adding quicker-cooking options like bell peppers.
4. **Mix and Simmer:** Return the beef to the skillet, add the sauce, and stir to combine. Let the mixture simmer until the sauce thickens.
5. **Serve:** Serve over rice or noodles, garnished with sesame seeds and green onions if desired.
## Storage and Reheating
Store any cooled leftovers in an airtight container in the fridge for up to 4 days, or freeze for up to 3 months (avoid freezing rice or noodles). Reheat in a skillet over medium heat with a splash of water or broth to loosen the sauce, or microwave, stirring halfway through.
## Nutritional Information (per serving)
– **Calories:** 471
– **Carbohydrates:** 60g
– **Protein:** 17g
– **Fat:** 18g
– **Sodium:** 744mg
– **Fiber:** 3g
– **Sugar:** 6g
This ground beef stir fry is not only quick and simple to make but also adaptable to your taste preferences. Savor a colorful and delicious meal that brings takeout flavors right to your home!
Read More
Best Recipes for Blood Orange Cocktails
Alex & Sonja: The Culinary Pair Behind A Couple Cooks
Introducing Alex and Sonja Overhiser, the extraordinary pair who have turned their love for cooking into a flourishing online community. As the creators of two celebrated cookbooks and the visionaries behind the well-known site A Couple Cooks, Alex and Sonja have been motivating home chefs since 2010 with their straightforward, seasonal recipes and contagious passion for the culinary world.
What commenced as a personal quest to discover the pleasures of cooking has transformed into an extensive resource for food enthusiasts globally. A Couple Cooks presents thousands of original recipes, each thoughtfully crafted with meticulous attention. The recipes not only showcase Alex and Sonja’s culinary skills but also embody their dedication to making cooking accessible and delightful for everyone.
As busy parents, Alex and Sonja recognize the difficulties of juggling family life alongside a passion for cooking. Their website is brimming with practical cooking advice and meal planning suggestions tailored to family needs, ensuring that appetizing, homemade meals can be integrated into everyday living. Each recipe is tested in their own kitchen and frequently earns the thumbs-up from their children, adding an extra layer of authenticity to their creations.
Imagery is a vital aspect of the A Couple Cooks experience. Every recipe is stunningly photographed by Alex and Sonja, showcasing the vivid colors and tempting textures of their dishes. This visual narrative not only enhances the allure of their recipes but also provides a source of inspiration for their audience.
Beyond recipes, Alex and Sonja are committed to nurturing a sense of community among their readers. They connect with their audience through social media, newsletters, and interactive content, cultivating a platform where food lovers can engage, share, and learn from each other.
In an era where fast food and convenience frequently eclipse the craft of cooking, Alex and Sonja Overhiser emerge as champions for the simple joys of preparing and enjoying meals. Their efforts on A Couple Cooks continue to motivate countless individuals to embrace the delight of cooking, one recipe at a time.
Read More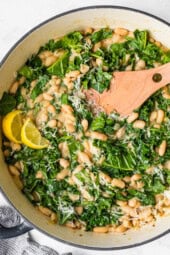
High-Fiber Legumes and Leafy Greens Recipe for Fast Weeknight Meals
**Quick Weeknight Dinners with High-Fiber Beans and Greens Recipe**
In the hectic pace of contemporary life, it can be tough to find time to whip up a healthy meal. Nevertheless, adding high-fiber foods to your diet doesn’t need to be labor-intensive. A simple and tasty option is a beans and greens recipe, ideal for quick weeknight dinners. This meal is not only straightforward to make but also loaded with nutrients that promote digestive health and overall wellness.
**Advantages of High-Fiber Foods**
Fiber plays a crucial role in a healthy diet, supporting digestion, regulating blood sugar levels, and enhancing heart health. High-fiber foods can keep you feeling satisfied longer, making them a smart choice for managing weight. Beans and leafy greens stand out as two of the finest sources of dietary fiber, and when combined, they yield a nutritious meal.
**Essential Ingredients**
1. **Beans**: Beans serve as a flexible and budget-friendly source of fiber and protein. Choices like black beans, chickpeas, or cannellini beans are great for this recipe. They provide a creamy texture and a nutty flavor to the dish.
2. **Greens**: Leafy greens like kale, spinach, or Swiss chard are abundant in vitamins A, C, and K, along with minerals such as iron and calcium. They contribute a vibrant hue and a mildly bitter flavor that beautifully contrasts with the beans.
3. **Aromatics**: Onions and garlic offer a tasty foundation for the dish. They enhance the flavor and provide additional health perks, including boosting the immune system.
4. **Herbs and Spices**: Fresh herbs like parsley or cilantro, mixed with spices such as cumin or red pepper flakes, can enrich the flavor depth of the dish.
5. **Broth or Stock**: Incorporating vegetable or chicken broth brings richness to the dish and helps fuse the flavors.
**Simple Recipe**
**Ingredients**:
– 1 can (15 oz) of beans (black, chickpeas, or cannellini), drained and rinsed
– 1 bunch of leafy greens (kale, spinach, or Swiss chard), cleaned and chopped
– 2 tablespoons olive oil
– 1 onion, finely diced
– 3 cloves garlic, chopped
– 1 teaspoon ground cumin
– 1/4 teaspoon red pepper flakes (optional)
– 2 cups vegetable or chicken broth
– Salt and pepper to taste
– Fresh parsley or cilantro for garnishing
**Instructions**:
1. **Sauté Aromatics**: In a sizable skillet, warm olive oil over medium heat. Add the diced onion and sauté until it becomes translucent, around 5 minutes. Mix in the chopped garlic, cumin, and red pepper flakes, cooking for another minute until aromatic.
2. **Add Beans and Broth**: Incorporate the drained beans into the skillet, mixing with the aromatics. Add in the broth and allow the mixture to reach a simmer.
3. **Integrate Greens**: Slowly add the chopped greens to the skillet, stirring until they wilt and become tender, about 5-7 minutes.
4. **Season and Serve**: Adjust the dish with salt and pepper according to your taste. Garnish with fresh parsley or cilantro before serving.
**Serving Ideas**
This beans and greens meal can be enjoyed on its own or accompanied by whole grains like quinoa or brown rice for a heartier option. For more protein, think about adding a poached egg or grilled chicken on top. A dash of lemon juice or a sprinkle of Parmesan cheese can also uplift the flavors.
**Final Thoughts**
A high-fiber beans and greens recipe is a fantastic option for a speedy and nutritious weeknight dinner. It’s a versatile meal that can be tailored to your flavor preferences and dietary requirements. By including this recipe in your weekly menu, you can reap the rewards of a fiber-rich diet without dedicating hours to cooking.
Read More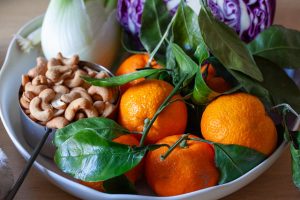
Winter Cabbage Salad With Mandarins and Cashews
### Winter Cabbage Salad with Mandarins and Cashews
As the festive season draws near, many of us are busy baking cookies and preparing celebratory dishes. Yet, our bodies sometimes seek something light and invigorating amidst the richness. This winter cabbage salad, with its crisp red cabbage, zesty mandarin oranges, and spiced cashews, provides the ideal counterbalance to the heavy fare of the season.
#### Ingredients
**Spiced Cashews:**
– 1 cup (115 grams) cashews
– 2 tablespoons (25 grams) dark brown sugar
– 1/2 teaspoon kosher salt
– 1/4 teaspoon ground cayenne
– 1/2 teaspoon smoked paprika
**Salad Assembly:**
– 1 pound (455 grams) red cabbage, sliced thin or shredded (approximately 4 cups)
– 1 small or half a large fennel bulb, halved and sliced thin (around 1 cup)
– 3 regular or 4 thin scallions, sliced thin (green and white parts)
– A small handful of fresh mint leaves, chopped finely
– 3 mandarins (clementines or similar small oranges), divided
– 2 tablespoons (30 ml) white wine vinegar
– 3 tablespoons (45 ml) olive oil
– 1 teaspoon kosher salt
– Freshly ground black pepper
– 1 teaspoon sumac, plus additional for finishing
– Spiced cashews (from above)
#### Instructions
**Make the Spiced Cashews:**
1. Preheat your oven to 400°F (200°C).
2. Rinse the cashews in a colander with water, keeping them slightly moist for the spices to stick.
3. In a bowl, mix the rinsed cashews with dark brown sugar, kosher salt, cayenne, and smoked paprika. Stir until well coated. If the mixture seems dry, add another teaspoon of water.
4. Spread the cashews on a parchment-lined baking sheet and roast for 8 to 10 minutes, or until they are darker and a bit charred. Let them cool completely.
**Assemble the Salad:**
1. In a large bowl, combine the sliced red cabbage, fennel, scallions, and mint.
2. Juice one of the mandarins and place 2 tablespoons of the juice in a small bowl. Add the white wine vinegar, olive oil, kosher salt, black pepper, and sumac. Whisk together.
3. Pour the dressing over the cabbage mixture and toss to combine. Adjust seasoning if necessary. If preparing ahead, this mixture can marinate for several hours without getting mushy.
4. Peel the other two mandarins and separate them into segments.
5. Serve the salad by layering half of the dressed mixture on a plate, topped with half of the mandarin segments and half of the spiced cashews. Repeat with the remaining ingredients.
This salad is not only a pleasant addition to your holiday spread, perfectly complementing latkes or hearty braises, but it also makes for a refreshing brunch choice. Savor the lively flavors and textures, and enjoy the moment spent in your kitchen, relishing a bowl of this crunchy treat.
Read More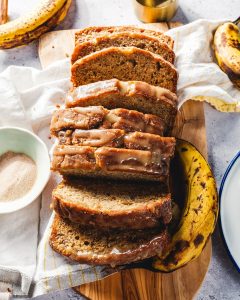
Banana Bread with Nutty Butter
Alex & Sonja: The Culinary Pair Behind A Couple Cooks
Introducing Alex and Sonja Overhiser, the energetic pair who have been motivating home cooks since 2010 via their well-known platform, A Couple Cooks. As the authors of two acclaimed cookbooks, committed parents, and a genuine couple, Alex and Sonja have transformed their love for cooking into a flourishing online community. Their adventure commenced with a straightforward goal: to spread the joy of cooking with simple, seasonal dishes.
Throughout the years, A Couple Cooks has expanded into an extensive resource for food lovers, providing thousands of original recipes that accommodate various tastes and dietary requirements. From nutritious breakfasts to filling dinners, their recipes highlight fresh, seasonal ingredients and uncomplicated preparation techniques, making them approachable for cooks of every skill level.
What distinguishes Alex and Sonja is their team-based approach to cooking. Every recipe is a collaborative endeavor, with Alex and Sonja joining forces to create, test, and refine each dish. Their commitment to excellence shines through in the careful attention to detail found in both their writing and photography, ensuring that every recipe is not only tasty but also visually captivating.
In addition to recipes, A Couple Cooks provides useful cooking tips and meal planning suggestions, equipping readers to make educated decisions in the kitchen. Whether you are a busy parent in search of quick weeknight dinners or a food enthusiast excited to explore new tastes, Alex and Sonja offer the support and motivation necessary to craft unforgettable meals.
As parents, Alex and Sonja are aware of the difficulties of cooking for a family, and they frequently trial their recipes on their children. This real-life testing guarantees that their dishes are not only healthy but also kid-approved, making them perfect for family meals.
Through their website, cookbooks, and vibrant social media presence, Alex and Sonja Overhiser continue to ignite a passion for cooking and a greater appreciation for the craft of preparing and sharing food. Their commitment to nurturing a community of home cooks is evident in every recipe they develop, making A Couple Cooks a cherished resource for anyone wanting to infuse more joy into their kitchen.
Read More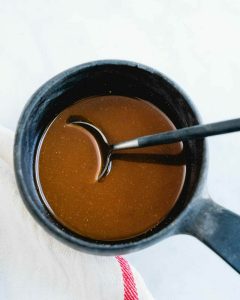
New Mediterranean Vegetable Salad
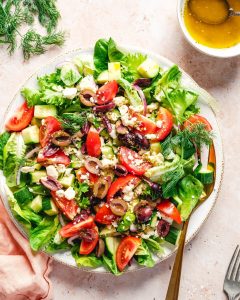
**Crafting a Versatile Salad: Suggestions and Replacements**
When preparing a tasty and healthy salad, adaptability is essential. Here are some inventive replacements and additions to elevate your salad experience:
**Replacements:**
– For an extra boost of protein, add drained, rinsed chickpeas or white beans.
– Boost flavor and texture with diced bell peppers, roasted red peppers, or artichoke hearts.
– For a grain-infused variation, mix in cooked quinoa.
– Replace the lemon vinaigrette with Tahini Sauce or Italian dressing for a different taste.
**Protein Enhancements:**
Elevate your salad to a full meal by garnishing it with:
– Grilled chicken
– Baked salmon
– Sautéed shrimp
– Crispy tofu
**Preparation Tips:**
– Keep chopped vegetables and dressing stored separately in airtight containers for up to 5 days.
– To ensure optimal texture, chop tomatoes and add dressing just before serving to avoid sogginess.
**Plant-Based Option:**
– Exclude feta cheese or opt for a vegan feta substitute to keep the salad plant-based.
By applying these suggestions, you can create a salad that is not only delightful but also suitable for various dietary needs and events.
Read More