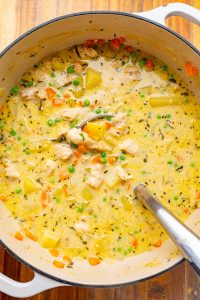
Robust and Tasty Chicken Stew Recipe
Chicken Stew
Prep Time: 15 minutes Cook Time: 45 minutes Total Time: 1 hour Servings: 6
A delicious chicken stew brimming with an abundance of vegetables and herbs!
ingredients
- 2 tablespoons oil
- 2 tablespoons butter
- 1 pound boneless, skinless chicken breasts or thighs, chopped into bite-sized pieces
- 2 tablespoon flour (gluten-free for gluten-free)
- 1 cup onion, chopped
- 1 cup carrot, chopped
- 1 cup celery, chopped
- 2 tablespoons garlic, minced
- 2 teaspoons sage, minced (or 1 teaspoon dried)
- 2 teaspoons rosemary, minced (or 1 teaspoon dried)
- 2 teaspoons thyme, minced (or 1 teaspoon dried)
- 2 tablespoon flour (gluten-free for gluten-free)
- 6 cups chicken stock (link)
- 2 cups potatoes, chopped
- 2 bay leaves (optional)
- 1/2 cup heavy/whipping cream
- 1/4 cup grated parmigiano reggiano (parmesan cheese)
- 1 cup peas (optional)
- 1 tablespoon parsley, minced (optional)
- salt and pepper to taste
directions
- In a large saucepan over medium heat, heat the oil and melt the butter, then add the chicken mixed with the flour, cooking for about 8-10 minutes before removing it from the pan.
- Introduce the onion, carrot, and celery into the pan, cooking until soft, roughly 10-15 minutes.
- Incorporate the garlic, sage, rosemary, and thyme, then sprinkle in the flour, stirring well and cooking for an additional minute.
- Pour in 1/2 cup of broth to deglaze the pan, scraping up the browned bits on the bottom as the broth simmers.
- Add the remaining broth, along with the chicken, potatoes, and bay leaves, bringing the mixture to a boil, then reduce the temperature to simmer until the potatoes are tender, approximately 20 minutes.
- Discard the bay leaves, then mix in the cream and parmesan, allowing the cheese to melt into the broth.
- Stir in the peas and parsley, seasoning with salt and pepper to taste, and enjoy!
Option: Skip the flour! It is used to thicken the broth.
Option: Include 8 ounces of sliced mushrooms together with the onions.
Option: Add 1 diced bell pepper along with the onions.
Option: Incorporate 1 tablespoon of tomato paste when adding the garlic.
Option: Utilize 1/4 teaspoon of turmeric,

Creamy Chicken Noodle Soup Instructions
# Creamy Chicken Noodle Soup
This luscious chicken noodle soup is an enjoyable dish that blends thick noodles, juicy pieces of chicken, and a savory mix of flavors from creamy thyme, garlic, and veggies. It’s a soothing meal ideal for any event, particularly on cold days.
## Why I Adore This Soup
Not long ago, after a hectic evening, I came home with my family, all of us feeling ravenous. I had made this soup in advance, and it was ready for us in the Dutch oven. As we served ourselves, the atmosphere buzzed with excitement, and we eagerly plunged into the deliciousness without uttering a word. The mix of thick noodles, tender chicken, and the creamy touch of thyme and garlic really elevates this soup.
At first, I intended for a thicker consistency like chicken wild rice soup but found myself captivated by this lighter, brothier variation. It delivers the indulgent flavor of cream and herbs while maintaining a delightful slurpability that feels just perfect for chicken noodle soup. The leftovers were something I looked forward to throughout the week.
## How To Prepare Creamy Chicken Noodle Soup
### Ingredients
– Olive oil
– Onions
– Carrots
– Celery
– Garlic
– Fresh thyme
– Chicken broth
– Egg noodles
– Cooked chicken
– Fresh spinach (optional)
– Heavy cream
– Parmesan cheese (for serving)
### Instructions
1. **Cook Vegetables**: Warm olive oil in a large Dutch oven over medium heat. Add onions, carrots, and celery; sauté for 7-10 minutes until tender and beginning to caramelize.
2. **Add Seasoning and Herbs**: Mix in garlic, salt, and thyme sprigs; sauté for a minute until aromatic.
3. **Broth and Noodles**: Incorporate chicken broth and noodles. Bring to a gentle simmer and cook for about 10 minutes, or until the noodles are soft.
4. **Finish**: Take off heat and remove thyme sprigs. Mix in spinach, chicken, and cream until heated through and spinach is wilted. If oil separates on top, let it sit for 10-20 minutes to reabsorb or stir before serving.
5. **Serve**: Delight in with warm crusty bread and a dusting of freshly grated Parmesan cheese.
## FAQ About Creamy Chicken Noodle Soup
– **How can you make this dairy-free?**
You can use a dairy-free heavy cream or gradually whisk in eggs for a creamy texture.
– **How can you make this vegetarian?**
Replace the chicken with a can of chickpeas.
– **What do you pair with this soup?**
Oyster crackers complement it well, along with a green salad and crusty bread.
– **What noodles are best to use?**
While I favor Mrs. Miller’s egg noodles, any egg noodle works nicely. Wheat-based noodles like orzo, ditalini, or rotini are also fantastic choices.
## Conclusion
This creamy chicken noodle soup is not only scrumptious but also simple to make, making it an excellent option for family dinners or cozy evenings in. With its rich flavors and comforting texture, it’s bound to become a beloved dish in your home. Enjoy!
Read More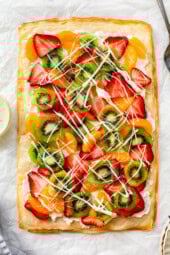
Fruit Tart with Filo Pastry
**Title: Crafting an Exquisite Fruit Tart with Phyllo Dough**
Fruit tarts are a cherished dessert that blends the innate sweetness of fresh fruits with a rich filling and a flaky, buttery crust. When prepared with phyllo dough, these tarts gain an extra dimension of texture and elegance, providing a pleasurable crunch that contrasts wonderfully with the tender fruits and creamy filling. Here’s a guide on how to create a fruit tart using phyllo dough, as well as a few suggestions to ensure your dessert is both tasty and visually appealing.
**Ingredients:**
– **For the Phyllo Dough Crust:**
– 8 sheets of phyllo dough
– 1/2 cup unsalted butter, melted
– 2 tablespoons granulated sugar
– **For the Filling:**
– 1 cup mascarpone cheese
– 1/2 cup heavy cream
– 1/4 cup powdered sugar
– 1 teaspoon vanilla extract
– **For the Topping:**
– 2 cups mixed fresh fruits (like strawberries, blueberries, kiwi, and raspberries)
– 1/4 cup apricot jam (optional, for glazing)
**Instructions:**
1. **Prepare the Phyllo Dough Crust:**
– Preheat the oven to 350°F (175°C).
– Place one sheet of phyllo dough on a clean, dry surface. Lightly brush it with melted butter and sprinkle a bit of granulated sugar over it.
– Add another sheet on top and repeat until all eight sheets are stacked.
– Gently fit the layered phyllo into a tart pan, trimming any excess edges.
– Bake in the preheated oven for 10-12 minutes, or until golden and crispy. Allow it to cool completely.
2. **Make the Filling:**
– In a mixing bowl, blend together mascarpone cheese, heavy cream, powdered sugar, and vanilla extract.
– Whip the mixture until smooth and creamy. Adjust sweetness to your preference if needed.
3. **Assemble the Tart:**
– After the phyllo crust has cooled, spread the mascarpone filling evenly over the base.
– Arrange the fresh fruits on top of the filling in a decorative manner. Feel free to get creative with the layout for an appealing presentation.
4. **Optional Glaze:**
– For a shiny finish, warm the apricot jam in a small saucepan over low heat until it liquefies.
– Use a pastry brush to gently coat the fruits with the warm jam.
5. **Serve:**
– Chill the tart in the refrigerator for no less than an hour before serving to let the filling set.
– Slice and serve cold, savoring the delightful fusion of creamy filling, crunchy phyllo, and fresh fruit.
**Tips for Success:**
– **Handling Phyllo Dough:** Phyllo dough can be fragile and dries out fast. Keep unused sheets covered with a damp towel while working to avoid them becoming brittle.
– **Fruit Selection:** Opt for fruits that are in season for optimal flavor. Ensure they are ripe yet firm to preserve their shape and texture.
– **Customization:** Try different fillings such as pastry cream or lemon curd, and experiment with various fruit combinations to match your taste.
A fruit tart with phyllo dough is not just a treat for the palate but also a visual spectacle. Its sophisticated look and refreshing tastes make it an ideal dessert for special occasions or a delightful indulgence to enjoy with loved ones.
Read More
The Most Liked Potluck Pasta Salad That Everyone Relishes First
### Creamy Macaroni Salad: A Timeless Favorite
This macaroni salad is a rich, zesty staple filled with fresh vegetables and coated in an easy homemade dressing. It’s a straightforward make-ahead side that’s ideal for potlucks, cookouts, or whenever you need a quick and tasty favorite.
#### Reasons to Prepare It
– The dressing combines right in the serving bowl, resulting in fewer dishes to clean and quick flavor blending.
– Delight in a creamy, tangy-sweet dressing with relish and mustard for traditional deli-style flavors.
– Employ a vegetable chopper to expedite preparation.
#### Serving Ideas
This macaroni salad pairs perfectly with grilled BBQ chicken and classic hamburgers.
—
### Ingredients for Macaroni Salad
– **Pasta**: Elbow macaroni is the traditional choice, but any short pasta such as ditalini, small shells, or mini farfalle will do well.
– **Vegetables**: Celery, shredded carrots, and red bell pepper bring crunch, vibrancy, and sweetness. Red onion adds bite, or opt for green onions for a gentler taste.
– **Dressing**: For added tang, replace some mayo with sour cream or Greek yogurt, and modify vinegar, relish, or mustard according to your preference.
—
### Best Additions and Variants
– **Dressing**: Substitute the homemade dressing with store-bought coleslaw dressing.
– **Additions**: Think about adding cheese, bacon bits, diced ham, hard-boiled eggs, or sweet peas.
—
### Steps to Prepare Macaroni Salad
1. Cook the pasta. Make sure to drain thoroughly.
2. Combine the dressing ingredients.
3. Incorporate the drained macaroni and chopped vegetables into the dressing.
4. Chill for at least one hour before serving.
—
### Make-Ahead and Chilling Recommendations
This macaroni salad tastes best when chilled for an hour or two prior to serving, allowing flavors to meld and the dressing to penetrate the pasta. It can be prepared up to 24 hours ahead.
—
### How to Maintain Creaminess in Macaroni Salad
– Cook pasta just until tender and rinse immediately with cold water to prevent softness.
– Ensure the pasta is well-drained to keep the dressing from becoming watery.
– If the salad appears dry after chilling, mix in 1 to 2 tablespoons of mayo or a dash of vinegar.
– For less sweetness, utilize apple cider vinegar and limit sugar, tasting after chilling.
– For larger gatherings, double the recipe and mix in a spacious bowl for even distribution.
—
### Storage and Leftover Guidelines
Store leftovers in an airtight container in the refrigerator for up to 4 days. Do not freeze. For outdoor events, place the bowl over ice and avoid leaving it out too long in warm temperatures.
—
### Common Inquiries
**Can you freeze macaroni salad?**
No, it does not freeze well.
**How long does macaroni salad last?**
It’s best prepared in advance and will last in the refrigerator for up to 4 days.
**What pairs well with macaroni salad?**
It complements grilled dishes like BBQ chicken, hot dogs, or hamburgers, and is also delicious with pulled pork.
—
Did you like this macaroni salad? Leave a comment and a rating below!
Read More
Barbecue-Style Chicken Noodle Soup Recipe
**BBQ Chicken Noodle Soup**
**Prep Time**: 10 minutes
**Cook Time**: 40 minutes
**Total Time**: 50 minutes
**Servings**: 6
**Summary**: A chicken noodle soup that draws inspiration from BBQ chicken pizza!
**Ingredients**:
– 1 tablespoon oil
– 1 cup onion, chopped
– 1 cup carrot, chopped
– 1 cup bell pepper, chopped
– 2 cloves garlic, minced
– 6 cups chicken stock
– 1 pound boneless skinless chicken breasts or thighs
– 1 (15 ounce) can diced tomatoes
– 2 (15 ounce) cans beans, rinsed and drained
– 1/2 cup BBQ Sauce
– 1 teaspoon oregano
– 8 ounces pasta (gluten-free for gluten-free)
– 2 cups corn (fresh, frozen, or canned)
– 2 green onions, chopped (optional)
– 2 tablespoons cilantro, minced (optional)
– Salt and pepper to taste
**Directions**:
1. In a large saucepan, heat the oil over medium-high heat, then add the onion, carrot, and bell pepper, cooking until softened, approximately 8-10 minutes.
2. Stir in the garlic and cook until aromatic, about a minute.
3. Incorporate the broth, chicken, diced tomatoes, beans, BBQ sauce, and oregano, bringing the mixture to a boil, then lowering the heat to simmer until the chicken is cooked through, roughly 20 minutes, before taking out the chicken to shred or slice.
4. Stir in the pasta and prepared chicken, bringing to a boil again, then reduce the heat and simmer until the pasta is soft, about 10 minutes.
5. Mix in the corn, green onions, and cilantro, seasoning with salt and pepper to taste before enjoying!
**Options**:
– Utilize cooked chicken (like rotisserie chicken)! (Omit the simmer time in step 3.)
– Cut the chicken, fry it in oil, and set it aside prior to beginning step 1. (Omit the simmer time in step 3.)
– Incorporate 4 slices of bacon, cooked and crumbled.
– Incorporate 4 ounces of cream cheese at the end, allowing it to melt into the broth.
– Incorporate 1/2 cup of heavy/whipping cream at the end.
– Incorporate 1/2 cup of sour cream at the end.
– Incorporate sliced pickled banana peppers at the end.
– Incorporate diced pineapple at the end.
– Incorporate 1/4 cup of fresh diced red onion at the end.
– Serve topped with shredded cheddar cheese.
**Nutrition Facts**: Calories 621, Fat 9g (Saturated 1g, Trans 0), Cholesterol 62mg, Sodium 1132mg, Carbs 94g (Fiber 12g, Sugars 21g), Protein 41g
Read More
How to Create Pesto Pizza: A Step-by-Step Guide
Alex & Sonja: The Culinary Pair Behind A Couple Cooks
Alex and Sonja Overhiser are the vibrant couple behind the renowned culinary platform, A Couple Cooks. As writers of two acclaimed cookbooks, they have made a notable mark in the realm of home cooking by sharing their enthusiasm for straightforward, seasonal dishes. The duo, who also juggle parenting, have been motivating home cooks since they launched their website in 2010.
Their adventure commenced with a mutual passion for cooking and a wish to spread the joy of creating and relishing meals in households across the globe. Throughout the years, Alex and Sonja have crafted thousands of unique recipes, each made with meticulous care and precision. Their emphasis on seasonal produce guarantees that their dishes are not only flavorful but also sustainable and health-conscious.
A Couple Cooks is not just a recipe platform; it’s a thorough resource for anyone seeking to enhance their culinary abilities. Alex and Sonja provide an abundance of cooking tips and meal planning strategies, all aimed at transforming cooking into an enjoyable and stress-free endeavor. Their friendly approach and focus on simplicity render their recipes approachable for cooks at all levels of experience.
Beyond their online platform, Alex and Sonja have penned two cookbooks that further highlight their know-how and creativity in the kitchen. These books boast stunning visuals and straightforward instructions, making them an essential addition to any home cook’s collection.
What distinguishes Alex and Sonja is their authentic passion for cooking together as a couple. Their teamwork in the kitchen exemplifies their solid partnership and shared aspirations. By trying out their recipes on their own family, they guarantee that each dish is not only delicious but also suitable for families.
Through A Couple Cooks, Alex and Sonja Overhiser have nurtured a community of food lovers who value the craft of cooking and the joy it offers. Their commitment to sharing their expertise and passion continues to motivate numerous individuals to embrace the culinary arts and create unforgettable meals with their loved ones.
Read More
Traditional Italian Anchovy Pizza Recipe
Alex & Sonja: The Culinary Pair Behind A Couple Cooks
Introducing Alex and Sonja Overhiser, the energetic pair who have fused their enthusiasm for cooking with their affection for each other to establish a flourishing culinary platform. As the writers of two successful cookbooks and the creators of the well-known website A Couple Cooks, Alex and Sonja have been motivating home cooks since 2010 with their uncomplicated, seasonal recipes and pragmatic cooking advice.
The adventure of A Couple Cooks commenced more than ten years ago when Alex and Sonja chose to record their culinary escapades and express their passion for nutritious, home-cooked dishes. Their website swiftly garnered attention for its accessible recipes that highlight fresh, seasonal produce and easy cooking methods. Nowadays, A Couple Cooks serves as a primary resource for thousands of unique recipes, meal planning suggestions, and expert culinary guidance—all developed and photographed by Alex and Sonja themselves.
What distinguishes Alex and Sonja is their authentic approach to cooking and their knack for relating to their audience. As busy parents, they comprehend the hurdles of crafting healthy meals within a packed timetable. This direct experience enables them to provide practical solutions and time-efficient tips that resonate with fellow parents and busy individuals alike. Their recipes are not only tried in their home kitchen but also by their children, guaranteeing that each dish is family-friendly and kid-approved.
Alongside their website, Alex and Sonja have penned two cookbooks that further highlight their culinary skills and inventiveness. These volumes are filled with delectable recipes that embody their dedication to simplicity and taste, making them a staple in kitchens globally.
Beyond the recipes, Alex and Sonja’s narrative is one of teamwork and collaboration. As a real-life couple who cooks together, they illustrate the joy and bond that can be found in the kitchen. Their mutual passion for food and cooking has not only fortified their relationship but also inspired numerous others to relish the joy of cooking together.
Whether you’re an experienced cook or just embarking on your culinary path, Alex and Sonja Overhiser provide a trove of knowledge and inspiration through A Couple Cooks. Their commitment to crafting delicious, accessible recipes and their genuine passion for cooking render them a cherished presence in the culinary landscape.
Read More
Quinoa Salad Featuring Mediterranean Components
Alex & Sonja: Culinary Innovators and Cookbook Writers
Introducing Alex and Sonja Overhiser, the creative pair behind the well-known culinary blog, A Couple Cooks. As the authors of two highly regarded cookbooks, they have significantly influenced the realm of home cooking. Their adventure started in 2010 when they debuted their website aiming to share easy, seasonal recipes that spread happiness in the kitchen. Throughout the years, they have developed an extensive assortment of original recipes, cooking hacks, and meal planning suggestions, all made with thoughtfulness and accuracy.
Not only are Alex and Sonja collaborators in the kitchen, but they are also partners in life. As active parents, they recognize the hurdles of making healthy and tasty meals within a busy timetable. This firsthand experience shapes their culinary approach, making their recipes practical and reachable for families everywhere. Their dishes are not only tried by them but also by their children, guaranteeing that each recipe is family-approved and delightful.
Their blog, A Couple Cooks, has turned into a preferred destination for food lovers in search of inspiration and direction. With stunningly captured dishes and comprehensive instructions, Alex and Sonja transform cooking into a pleasurable and fulfilling endeavor. Their focus on seasonal produce and uncomplicated methods resonates with readers who cherish the craft of home cooking.
Through their cookbooks and online activities, Alex and Sonja persist in motivating others to embrace the joy of cooking together. Their enthusiasm for food and family is evident in every recipe, making them cherished figures in the culinary world.
Read More
How to Create an Ideal Chocolate Dip
Alex & Sonja Overhiser: The Culinary Team Behind A Couple Cooks
Introducing Alex and Sonja Overhiser, the energetic husband-and-wife duo who have transformed their love for cooking into a flourishing online culinary platform. As the founders of the beloved website A Couple Cooks, they have been motivating home cooks since 2010 with their easy, seasonal recipes and a mutual appreciation for the art of cooking.
Having authored two successful cookbooks, Alex and Sonja have positioned themselves as reliable voices in the realm of home cooking. Their adventure started with the desire to share the joy and creativity they experienced in the kitchen, and throughout the years, they have nurtured a community of food lovers who value their friendly and delectable recipes.
What distinguishes Alex and Sonja is not only their culinary talent but also their authentic partnership. As busy parents, they comprehend the difficulties of preparing nutritious meals amid a chaotic schedule. Their recipes are crafted to be tantalizing and practical, simplifying the process for families to savor home-cooked meals together.
The A Couple Cooks website is a treasure chest of thousands of unique recipes, each one carefully created and photographed by Alex and Sonja themselves. Ranging from hearty breakfasts to fulfilling dinners and everything in between, their collection appeals to a broad array of tastes and dietary needs. Whether you are an experienced cook or a beginner in the kitchen, their straightforward instructions and helpful tips ensure that cooking is a pleasurable experience.
Alongside recipes, Alex and Sonja provide useful cooking tips and meal planning suggestions to help streamline the effort of getting food on the table. Their philosophy revolves around the belief that cooking should be enjoyable, accessible, and a means to connect with loved ones.
Outside their online presence, Alex and Sonja’s cookbooks have received acclaim for their creative yet approachable recipes. Each book mirrors their culinary journey, filled with personal stories and insights that make cooking feel like a collective adventure.
As Alex and Sonja persist in inspiring others with their fervor for cooking, they remain dedicated to their mission of uniting people through food. Their narrative exemplifies the strength of collaboration, creativity, and the simple pleasure of sharing a meal with those you cherish.
Read More
Ideal Caramelized Sweet and Sticky Ham Glaze Recipe
# Copycat Honey Baked Ham: A Show-Stopping Centerpiece for Special Events
This imitation honey baked ham is a simple, eye-catching main course that’s ideal for holidays or special gatherings. A spiral-cut ham is coated with a delectable honey glaze and baked to perfection for a tender, syrupy finish.
### Flavor Profile
The taste of this dish is luxurious and savory, showcasing a sweet, sticky honey glaze paired with a bit of warmth from spices and a touch of tang to bring balance.
### Recommended Tools
To create this scrumptious dish, you will need:
– A roasting pan
– Aluminum foil
– A pastry brush for applying the glaze
– An instant-read thermometer to ensure optimal cooking
### Cherish Your Leftovers
Having additional slices of honey baked ham available is a delight. Use them in simple sandwiches or comforting soups throughout the week, making every leftover taste as wonderful as the initial meal.
## Ingredients for Honey Baked Ham
– **Ham**: Opt for a fully cooked, bone-in spiral ham for the best flavor and juiciness.
– **Honey Glaze**: The glaze is made with honey for sweetness, butter for richness, brown sugar for caramel flavors, and a dash of Dijon mustard for tang.
– **Variations**: Think about adding a citrus element with orange zest, replacing cloves with cinnamon, or mixing in a pinch of cayenne for a sweet heat boost.
## How Much Spiral Ham Per Person?
When buying bone-in spiral ham, estimate about ½ lb per person (or ¾ lb for generous leftovers). A larger ham is perfect for leftover dishes and for using the bone in soups.
## How to Cook a Honey Baked Ham
1. Preheat the oven to 325°F.
2. Position the ham, cut-side down, in the roasting pan, cover with foil, and bake.
3. Apply the glaze on the ham, raise the oven temperature, and bake until the ham attains 140°F.
4. Take it out of the oven and let it rest for at least 15 minutes before slicing and serving.
### Cooking Tips
– Bake the ham cut-side down to retain moisture.
– Cover the ham with foil while warming to avoid drying.
– Utilize a thermometer to prevent overcooking; remove the ham at 135°F before glazing.
– Add glaze towards the end of cooking to avoid charring.
## Storage, Freezing, and Reheating
– **Refrigerate**: Keep honey baked ham in an airtight container for up to 4 days.
– **Freeze**: Sliced ham can be frozen for up to 2 months. Include a spoonful of pan juices before freezing to retain moisture.
– **Reheat**: Thaw overnight in the refrigerator and warm covered at 300°F with a splash of broth or water.
### Leftover Ideas
Incorporate leftover ham into sandwiches, breakfast scrambles, fried rice, soups, sliders, or scalloped potatoes. Reserve the ham bone for soups like ham and bean soup.
## What to Serve with Honey Baked Ham
Complement this delectable ham with sides such as roasted vegetables, mashed potatoes, or a fresh salad to create a complete meal.
### Conclusion
This Copycat Honey Baked Ham is a delightful feature for any holiday or special occasion, delivering a perfect mix of flavors and textures that will impress your guests. Savor the leftovers in various recipes, maximizing the versatility of this main dish.