
Weekly Meal Schedule for March 9, 2026
### Receive Tasty New Recipes Every Day
In today’s fast-paced environment, carving out time to cook can prove difficult. Nevertheless, having access to fresh and thrilling recipes can turn meal preparation into a fun and less intimidating task. Joining a daily recipe service can equip you with an abundance of culinary ideas, allowing you to dive into various cuisines and cooking methods right from your own kitchen.
#### Advantages of Daily Recipe Subscriptions
1. **Diversity and Creativity**: Daily recipe subscriptions present you with a broad assortment of meals, from expedited weeknight dinners to intricate weekend banquets. This diversity can assist you in moving away from the routine of cooking the same dishes time after time.
2. **Skill Enhancement**: With fresh recipes landing in your inbox, you can discover new cooking methods and ingredients that you might not have explored otherwise. This can elevate your culinary expertise and increase your confidence in the kitchen.
3. **Time Efficiency**: Meal planning can consume a lot of time. A daily recipe subscription removes the uncertainty from meal planning, giving you a systematic approach to your weekly meals.
4. **Healthier Choices**: Numerous recipe services concentrate on well-balanced meals that include fresh ingredients. This can aid you in sustaining a healthier eating pattern while still relishing tasty food.
5. **Community and Assistance**: Many recipe platforms provide a community element, where subscribers can exchange their experiences, advice, and even adjustments to recipes. This can foster a sense of community and support among fellow cooking fans.
#### How to Enroll
Enrolling in a daily recipe service is generally uncomplicated. You might be required to submit your email address and consent to receive updates. For instance, a basic form could prompt you to input your email and confirm your desire to receive recipes.
Here’s a brief rundown of what to anticipate during the enrollment procedure:
– **Email Submission**: You will be asked to provide your email address for daily recipe updates.
– **GDPR Compliance**: Confirm that you accept the terms concerning data privacy, which is frequently a prerequisite for email subscriptions.
– **Verification**: After entering your details, you might receive an email for verification to confirm your subscription.
#### Opting Out
If the service does not align with your expectations, most platforms make it easy for you to unsubscribe. Generally, you can locate an “unsubscribe” link at the bottom of the emails you get.
#### Connect with Us on Social Media
Stay engaged and uncover additional recipe inspirations by following your preferred recipe platforms on social media. Platforms such as Facebook, Instagram, Pinterest, and TikTok are excellent for finding new dishes, cooking advice, and interacting with a community of food enthusiasts.
In summary, enrolling in a daily recipe service can revolutionize your cooking journey, making it more delightful and less overwhelming. With a multitude of recipes at your disposal, you can explore new tastes and techniques, ultimately enriching your culinary skill set.
Read More
My Reliable Classic Deviled Eggs Formula
Title: My Reliable and Timeless Classic Deviled Eggs Recipe
Deviled eggs have been a beloved choice at family get-togethers, potlucks, and festive occasions for ages. Their rich texture and zesty taste appeal to many, and they are remarkably simple to make. Throughout the years, I have fine-tuned my traditional deviled eggs recipe, and I am thrilled to share it with you. Whether you’re an experienced chef or a kitchen newcomer, this recipe is likely to become a favorite.
Ingredients:
– 6 large eggs
– 1/4 cup mayonnaise
– 1 teaspoon Dijon mustard
– 1 teaspoon white vinegar
– Salt and pepper to taste
– Paprika for garnish
– Fresh chives or parsley for garnish (optional)
Instructions:
1. **Boil the Eggs:**
Start by placing the eggs in a single layer in a saucepan. Cover them with cold water, ensuring it’s about an inch above the eggs. Bring the water to a vigorous boil over medium-high heat. Once it reaches a boil, take the saucepan off the heat, cover it with a lid, and let the eggs rest for approximately 10-12 minutes.
2. **Cool and Peel:**
Once the eggs are cooked, move them to a bowl of ice water to cool for at least 5 minutes. This will simplify peeling and avoid overcooking. Gently tap each egg on a solid surface and peel off the shell.
3. **Prepare the Filling:**
Cut each egg in half lengthwise and delicately remove the yolks, placing them in a medium bowl. Set the egg whites aside on a serving dish. Using a fork, crumble the yolks until they are finely mashed.
4. **Mix the Filling:**
Incorporate mayonnaise, Dijon mustard, white vinegar, salt, and pepper into the mashed yolks. Mix until the blend is smooth and creamy. Taste and modify seasoning as needed.
5. **Fill the Egg Whites:**
Spoon or pipe the yolk mixture back into the halves of the egg whites. For a decorative flair, utilize a piping bag fitted with a star tip.
6. **Garnish:**
Lightly dust paprika over the filled eggs for a vibrant touch and flavor. If you wish, add a small sprig of fresh chives or parsley for an elegant finishing touch.
7. **Serve and Enjoy:**
Chill the deviled eggs in the refrigerator for a minimum of 20 minutes before serving. This allows the flavors to blend and enhances the overall taste.
Tips for Perfect Deviled Eggs:
– For easier peeling, choose eggs that are a few days old instead of fresh ones.
– Try different mustards or add a dash of hot sauce for an extra kick.
– For a lighter filling, replace some mayonnaise with Greek yogurt.
Deviled eggs are adaptable and can be modified to match your taste preferences. This classic recipe offers a great base, but feel free to get inventive with extra ingredients like bacon bits, pickles, or smoked salmon. Regardless of how you decide to enjoy them, deviled eggs remain a classic appetizer that never loses its charm.
Read More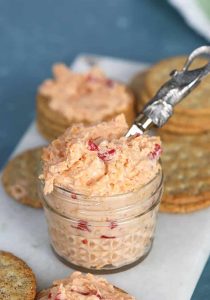
Fast and Simple 10-Minute Pepper Jelly Cheese Dip Formula
### Pepper Jelly Cheese Dip: The Ultimate Appetizer
Pepper jelly cheese dip is a delightful mix of sweet, spicy, and creamy flavors, making it an ideal appetizer for any occasion. Ready in just 10 minutes, this simple-to-prepare dip is guaranteed to impress your visitors and become a favorite at your celebrations.
#### Flavor Profile
– **Smooth and Rich**: The dip boasts a creamy base that is superbly complemented by the zing from the pepper jelly. This delightful mixture makes it irresistible, encouraging guests to return for seconds (or thirds).
– **Light and Fluffy**: Beating the cream cheese until airy ensures a lighter, scoopable consistency that enhances the overall enjoyment.
#### Recommended Tools
To make this dip, you will need:
– A [hand mixer](https://www.amazon.com/s?k=hand+mixer&language=en_US) for effortless mixing.
– A rubber spatula for scraping the sides of the bowl.
– A shallow serving dish to elegantly showcase the dip.
#### Serving Suggestions
This dip pairs beautifully with:
– Buttery crackers
– Pretzels
– Crostini
– Fresh vegetable sticks
It’s sure to be the first item to vanish from your holiday snack board or game-day spread.
### The Flavor Lineup
1. **Cream Cheese**: Full-fat cream cheese delivers richness. Neufchâtel can be utilized for a slightly softer feel.
2. **Pepper Jelly**: Keep a jar of your preferred pepper jelly handy. Any flavor or heat level works brilliantly.
3. **Cheese**: Sharp cheddar provides the best contrast. Alternatives like pepper jack or smoked cheddar can introduce variety.
4. **Variations**: For additional heat, choose hot pepper jelly or incorporate crushed red pepper. Fresh chives or chopped pecans can offer a delightful twist.
### How to Make Pepper Jelly Cheese Dip
1. **Mix Ingredients**: In a medium bowl, blend cream cheese, garlic powder, and onion powder. Beat with a hand mixer until airy and fluffy. Incorporate grated cheese and mix until fully combined.
2. **Spread**: Transfer the cream cheese mixture into a shallow dish, spreading it out evenly.
3. **Top with Jelly**: Drizzle pepper jelly over the cream cheese layer and garnish with green onions if desired.
#### Tips for Success
– Soften cream cheese at room temperature for effortless mixing.
– Finely shred cheddar cheese to ensure it blends seamlessly.
– If the pepper jelly is too firm, warm it slightly for easier spreading.
– Use a shallow dish for even layering, ensuring every scoop contains jelly.
– Add pepper jelly just before serving for the best visual appeal.
### Fridge-Friendly Party Prep
You can prepare the cheese base up to two days ahead. Just add the jelly and any garnishes prior to serving. For larger gatherings, double the recipe and present on a large platter with a variety of crackers and pretzels. Allow it to rest at room temperature for 10–15 minutes for optimal scooping.
**Storage**: The cream cheese layer can be frozen for up to 2 months. Thaw in the refrigerator and whip again before topping with jelly.
### Nutrition Information (Per Serving)
– **Calories**: 194
– **Carbohydrates**: 4g
– **Protein**: 5g
– **Fat**: 18g
– **Sodium**: 192mg
This pepper jelly cheese dip is not only flavorful but also quick and simple to make, establishing it as the ultimate appetizer for any event. Relish the sweet and spicy flavors that will leave your guests raving!
Read More

Whipped Avocado Cottage Cheese Spread Loaded with Protein and Fiber
**Whipped Avocado Cottage Cheese Dip: A Nutrient and Fiber Dynamo**
In the world of nutritious snacking, discovering a dip that meets both flavor and dietary requirements can be difficult. Introducing the whipped avocado cottage cheese dip—a smooth, savory mixture that not only pleases the taste buds but also delivers with its impressive protein and fiber levels. This dip makes for an exceptional option for individuals aiming to uphold a balanced eating plan without compromising on taste.
**Nutritional Advantages**
1. **Rich in Protein:** Cottage cheese is famous for its substantial protein content, making it popular among fitness lovers and those aiming to enhance muscle mass. With roughly 11 grams of protein in every 100 grams, it offers a significant quantity of this vital macronutrient. When paired with avocado, which also boasts a modest amount of protein, this dip transforms into a strong ally for muscle recovery and development.
2. **High in Fiber:** Avocados are an excellent source of dietary fiber, providing approximately 7 grams per half fruit. Fiber is essential for digestive health, assisting in maintaining consistent bowel movements and avoiding constipation. It also plays a part in managing blood sugar levels and can help create a sensation of fullness, contributing to weight control.
3. **Nourishing Fats:** Avocados are packed with monounsaturated fats, which are beneficial for heart health and can help lower bad cholesterol levels. These fats are crucial for the absorption of fat-soluble vitamins and offering sustained energy.
4. **Vitamins and Minerals:** This dip is a valuable source of vitamins and minerals, such as vitamin K, vitamin E, vitamin C, and B-vitamins from avocados, along with calcium and phosphorus from cottage cheese. These nutrients are essential for bone strength, immune health, and overall wellness.
**Crafting the Ideal Dip**
Making this dip is straightforward and requires just a handful of ingredients:
– 1 ripe avocado
– 1 cup of cottage cheese
– 1 tablespoon of lime juice
– Salt and pepper to taste
– Optional: garlic powder, chopped cilantro, or jalapeño for enhanced flavor
**Instructions:**
1. Halve the avocado, discard the pit, and scoop the flesh into a blender or food processor.
2. Incorporate the cottage cheese and lime juice.
3. Blend until the mixture is smooth and creamy. If you like a chunkier texture, pulse it to your preferred consistency.
4. Season with salt and pepper as desired. Include optional ingredients if you wish.
5. Serve right away with fresh veggies, whole-grain crackers, or use as a spread on sandwiches and wraps.
**Flexibility and Serving Ideas**
This dip is remarkably adaptable. It can function as a spread on toast, a topping for baked potatoes, or a filling for wraps and sandwiches. Serve it with a variety of dips like carrot sticks, cucumber slices, bell pepper strips, or whole-grain pita chips for a healthy and fulfilling snack.
**Final Thoughts**
The whipped avocado cottage cheese dip is not just a delicious indulgence; it’s a nutritional dynamo that fosters a healthy way of life. Packed with protein and fiber, it delivers necessary nutrients that encourage muscle health, digestive regularity, and heart wellness. Whether you seek a post-exercise snack or a party starter, this dip is guaranteed to delight your taste buds and nourish your body.
Read More