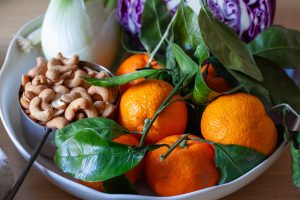
Winter Cabbage Salad with Mandarins and Cashews
### Winter Cabbage Salad with Mandarins and Cashews
As the festive period draws near, many of us are enveloped by rich, decadent dishes. Nonetheless, at times our bodies yearn for something crisp and lively. This Winter Cabbage Salad with Mandarins and Cashews serves as the ideal remedy for the weightiness of holiday cuisine. With its crunchy consistency, vibrant flavors, and a charming mix of ingredients, this salad is bound to please.
#### Ingredients
**For the Spiced Cashews:**
– 1 cup (115 grams) cashews
– 2 tablespoons (25 grams) dark brown sugar
– 1/2 teaspoon kosher salt
– 1/4 teaspoon cayenne pepper
– 1/2 teaspoon smoked paprika
**For the Salad:**
– 1 pound (455 grams) red cabbage, finely sliced or shredded (approximately 4 cups)
– 1 small or half a large fennel bulb, halved and sliced thinly (around 1 cup)
– 3 regular or 4 slender scallions, finely sliced (green and white portions)
– A small handful of fresh mint leaves, finely sliced
– 3 mandarins (clementines and other small oranges are suitable), divided
– 2 tablespoons (30 ml) white wine vinegar
– 3 tablespoons (45 ml) olive oil
– 1 teaspoon kosher salt
– Freshly cracked black pepper
– 1 teaspoon sumac, plus extra for garnish
– Spiced cashews (from above)
#### Instructions
**Prepare the Spiced Cashews:**
1. Preheat the oven to 400°F (200°C).
2. Rinse the cashews in a colander under water, ensuring they are slightly moist.
3. In a bowl, mix the cashews with dark brown sugar, kosher salt, cayenne, and smoked paprika. Stir until well-coated. If the mixture seems dry, add an additional teaspoon of water.
4. Spread the cashews on a baking sheet lined with parchment and roast for 8 to 10 minutes, or until they are darker with some black spots. Monitor them closely to avoid burning. Let them cool completely.
**Create the Salad:**
1. In a large bowl, mix the red cabbage, fennel, scallions, and mint.
2. Juice one mandarin and pour 2 tablespoons of juice into a small bowl. (Any leftover juice can be enjoyed as a refreshing beverage.)
3. To the bowl with mandarin juice, add white wine vinegar, olive oil, kosher salt, black pepper, and sumac. Whisk together.
4. Drizzle the dressing over the cabbage mixture and toss to combine. Taste and adjust seasoning if necessary. If made in advance, the salad can marinate for a few hours without getting soggy.
5. Peel the remaining mandarins and separate them into segments. Layer half of the dressed salad on a serving dish, topping it with half of the mandarin segments and spiced cashews. Repeat with the rest of the salad, mandarins, and cashews.
#### Serving Suggestions
This salad complements various holiday dishes wonderfully, from crispy latkes to hearty stews. It can also function as a refreshing brunch option or a light meal by itself. Relish the pleasure of being in your kitchen, enjoying this lively salad while the hustle of the season swirls around you.
#### Conclusion
The Winter Cabbage Salad with Mandarins and Cashews is more than just a recipe; it exemplifies a celebration of fresh flavors and textures that can illuminate any holiday spread. With its blend of crunchy cabbage, sweet mandarins, and spiced cashews, it provides a delightful counterpoint to the richer fare customary of the season. Enjoy this salad as a reminder that even amidst the indulgent holiday festivities, fresh, wholesome choices can be equally fulfilling.
Read More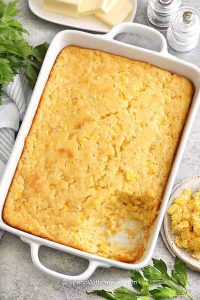
Six-Component Creamy Corn Casserole Recipe
# Jiffy Mix Corn Casserole: A Delightful Holiday Accompaniment
This Jiffy mix corn casserole emerges golden in less than an hour and is a cherished side dish that everyone rushes to sample first! With just six ingredients, it’s a delightful holiday accompaniment that keeps people returning for seconds.
## Ingredients for Jiffy Corn Casserole
– **Cornbread Mix:** A box of [Jiffy Corn Muffin Mix](https://amzlink.to/az02tMg7GqCu1) acts as the foundation. If Jiffy Mix isn’t available, you can [create your own homemade alternative](https://ourzestylife.com/copycat-jiffy-corn-muffin-mix/).
– **Corn:** Opt for either canned or frozen corn kernels. Make sure to thaw and drain (pat dry if moist) before mixing into the batter.
– **Creamed Corn:** Do not drain this ingredient, as it provides moisture and enhances the creamy texture of the casserole.
– **Butter:** It’s best to use salted butter; if you choose unsalted, add a pinch of extra salt to the mix.
– **Sour Cream:** Using full-fat sour cream will yield the creamiest texture. Plain Greek yogurt can serve as a substitute, offering a firmer and tangier result.
## Variations
– **Optional Ingredients:** Think about incorporating finely chopped green onion, diced jalapeño, or crumbled bacon for added flavor.
– **Cheesy Enhancements:** For a cheesy corn casserole, mix in cheddar cheese, parmesan, or pepper jack, or sprinkle cheese on top for a golden, crispy finish.
## Steps to Prepare Corn Casserole
1. Preheat the oven to 350°F. Grease a 2-quart baking dish and set it aside.
2. In a medium mixing bowl, blend melted butter, eggs, corn muffin mix, corn kernels, creamed corn, and sour cream. Mix until combined.
3. Pour the mixture into the prepared baking dish.
4. Bake for 45-55 minutes or until the top is golden brown.
### Tips for Optimal Results
– **To Achieve a Firm Casserole:** Ensure the canned corn is well-drained and fully thaw the frozen corn before adding.
– **For a Smooth Mixture:** Allow the melted butter to cool for a few minutes before blending.
– **Avoid Overmixing:** Stir just until mixed to keep a tender consistency.
– **Prevent Excess Browning:** If the top browns too swiftly, loosely cover with foil for the last 10 to 15 minutes of baking.
– **Rest Before Serving:** Let the casserole sit for approximately 10 minutes post-baking for neater portions.
## Storing Leftovers
Keep cooled leftovers in an airtight container in the refrigerator for up to 4 days. For extended storage, wrap tightly and freeze for up to 3 months. Thaw in the refrigerator before reheating.
To reheat, let sit at room temperature for 60 minutes, then bake covered at 350°F for 15 to 20 minutes or until warmed through. Individual portions can also be warmed in the microwave.
### Frequently Asked Questions
**Can corn casserole be prepared in advance?**
Yes, it can be made up to 2 days beforehand. Cool completely and refrigerate. Reheat by baking at 350°F for 15 to 20 minutes.
**Is it possible to freeze corn casserole?**
Yes, cool thoroughly, wrap well in plastic wrap, and freeze for up to 3 months. Thaw in the refrigerator overnight prior to reheating.
**Can this dish be made in a Crock Pot?**
Indeed, prepare the ingredients and cook on high for 2 to 3 hours, or on low for 4 to 5 hours, until set.
## Final Thoughts
This corn casserole transcends mere dish status; it’s a comforting staple for any holiday gathering, sure to delight family and friends alike. Enjoy this simple recipe that infuses warmth and joy into your celebrations!
Read More
Informative Recipe for Morning Glory Muffins that are Vegan and Gluten-Free
# Morning Glory Muffins: A Vegan and Gluten-Free Delight
Introducing morning glory muffins, made **vegan + gluten-free**! A traditional favorite first crafted by Pam McKinstry in 1978 at her Nantucket eatery, Morning Glory Cafe, these muffins are **lightly sweet, subtly spiced**, and loaded with fruits, vegetables, AND nuts.
Our gluten-free take incorporates oat flour and potato starch (no almond flour!) to produce a tender muffin that’s **wholesome** and **satisfying**. Brew your favorite coffee or tea, and let’s get baking muffins!
## What is in Morning Glory Muffins?
The [original morning glory muffins](https://www.earthboundfarm.com/recipes/the-original-morning-glory-muffins/) by Chef Pam McKinstry are **filled with nutritious ingredients** that elevate them above typical muffins: shredded coconut, raisins, grated apple and carrots, pineapple chunks, pecans or walnuts, and cinnamon. For the **traditional muffin components**, she includes flour, sugar, baking soda, salt, eggs, vegetable oil, and vanilla extract.
Our contemporary adaptation retains most of the nutritious ingredients but substitutes some of the traditional components to ensure they are vegan, gluten-free, naturally sweetened, and *even* more wholesome.
## How to Make Vegan Gluten-Free Morning Glory Muffins
Our take on these **1-bowl**, fruit- & veggie-packed muffins is made with the following components:
– **Flaxseed meal + orange juice** – this blend forms the “flax egg” that keeps these vegan/egg-free and introduces natural sweetness and a light orange essence!
– **Coconut sugar** – a sweetener with a lower glycemic index that has a hint of caramel flavor. Brown sugar or cane sugar would likely be suitable as well!
– **Avocado oil + dairy-free milk** – our version uses less oil than the classic, utilizing dairy-free milk to thin out the batter. Avocado oil is our preferred neutral option, but feel free to use another oil or melted vegan butter.
– **Oat flour + potato starch** – this gluten-free blend offers the right balance of being wholesome while maintaining lightness to avoid the muffins from becoming *too* dense and moist.
– **Morning glory essentials** – grated apple and carrot, shredded coconut, raisins, walnuts, cinnamon, vanilla extract, salt, and baking soda.
– **Baking powder** – gluten-free baked items tend to be denser and gummier than those made with all-purpose flour, so we add baking powder for a little extra uplift!
To create your muffins, mix the orange juice and flaxseed meal and allow the mixture to sit for a few minutes to thicken. While that thickens, you can grate the carrot and apple using the large side of a box grater.
Next, incorporate the remaining ingredients, starting with the wet, followed by the dry, and finally all those delightful extras! Divide the batter among your muffin cups, and let’s bake!
Allow to cool slightly, and then those treats are ready for you!
We believe you’ll ADORE these muffins! They’re:
– Wholesome
– Satisfying
– Moist
– Tender
– Naturally sweet
– Subtly spiced
– Loaded with fruits, nuts & veggies
– & SO tasty!
These muffins are perfect for snacking on the go or as a sweet breakfast treat! They pair exceptionally well with a glass of dairy-free milk or a warm cup of coffee or tea.
## More Vegan Gluten-Free Muffin Recipes
If you give this recipe a try, tell us! Leave a comment, rate it, and don’t forget to tag a photo on Instagram. Cheers, friends!
### Recipe Overview
– **Prep Time**: 15 minutes
– **Cook Time**: 20 minutes
– **Total Time**: 35 minutes
– **Servings**: 12 muffins
– **Course**: Breakfast, Snack
– **Cuisine**: Dairy-Free, Gluten-Free, Vegan
– **Freezer Friendly**: 1 month
– **Does it keep?**: 2-3 Days
### Ingredients
– 1 ½ Tbsp flaxseed meal*
– 1/2 cup freshly squeezed orange juice, with pulp
– 2/3 cup coconut sugar
– 1/3 cup dairy-free milk (plain, unsweetened)
– 1/4 cup avocado oil (or another neutral oil or melted vegan butter)
– 1 ½ tsp vanilla extract
– 1 cup oat flour* (certified gluten-free as required)
– 1 cup potato starch* (NOT potato flour)
– 1 ½ tsp ground cinnamon
– 1/2 tsp ground ginger
– 1 tsp baking soda
– 1 tsp baking powder
– 1/2 tsp sea salt
– 1
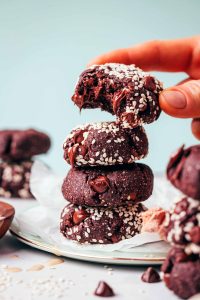
One-Bowl Chewy Chocolate Tahini Cookies Recipe
# Fudgy Chocolate Tahini Cookies: A Delectable Vegan Delight
While preparing our tahini cookies yet again, we thought, *What if we tossed some chocolate into the mix?* The outcome surpassed our expectations. Presenting: fudgy chocolate tahini cookies sprinkled with chocolate chips! They’re **vegan**, **gluten-free**, and utterly delightful — like a brownie and cookie fused into one!
## Reasons to Adore These Cookies
What do you need for these? **1 bowl**, **8 ingredients**, and about **20 minutes**. What more could we add? Let’s get baking!
## Chocolate Tahini Cookie Components
– **Tahini** – This luscious seed butter, crafted from ground sesame seeds, has become a staple in our sweet recipes thanks to its deep, nutty, slightly bitter taste. It also provides moisture, substituting for the butter or oil you’d typically find in cookies, ensuring these treats remain oil-free and nutrient-rich!
– **Maple syrup** – The sweet, robust profile of maple syrup pairs beautifully with tahini, adds moisture, and keeps these cookies naturally sweetened. If you need another alternative, honey or agave might be worth considering!
– **Almond flour & tapioca flour** – This gluten-free, grain-free flour mix ensures the cookies are light, fluffy, and fudgy. If almonds aren’t an option for you, cashew flour could be a great substitute! For a nut-free version, you may try a seed-based flour or a reduced amount of all-purpose or oat flour, though the texture and taste will vary.
– **Cocoa powder** – Yum, chocolate! No further comments needed.
– **Baking soda & sea salt** – Classic additions that enhance lift and flavor.
– **Chocolate chips** – More chocolate = more fabulousness! When enjoyed warm, the chocolate chips become gooey and especially delightful.
## Steps to Create Chocolate Tahini Cookies
We’re familiar with the wonders of **tahini + maple syrup**, which is precisely where we commence with these cookies! When whisked together, they form a luscious, caramel-colored concoction with a perfect bittersweet harmony.
Next, we incorporate the dry ingredients (almond flour, tapioca starch, cocoa powder, baking soda, and salt) and stir until the cookie dough takes shape. There’s hardly an easier way to make cookies!
The last touch before scooping and baking: chocolate chips! Who could resist gooey chocolate morsels in their cookies?!
A brief bake in the oven (~10 minutes) followed by a few minutes to cool (~5 minutes), and the cookies are ready for you!
These might just become your favorite cookies! They are:
– Rich
– Fudgy
– Crispy on the exterior
– Soft on the inside
– Perfectly sweet
– Chocolaty
– Quick & easy
– Irresistibly scrumptious!
These satisfying cookies (5 g protein per serving!) make for an ideal sweet + energizing afternoon snack, Valentine’s Day festivities, holiday cookie baking, and beyond. They also freeze well (either as dough or baked cookies), making them fantastic for quick chocolate cravings!
## Additional Tahini Treats
If you try out this recipe, please share your thoughts with us! Leave a comment, rate it, and don’t forget to tag a photo on Instagram. Cheers!
## Recipe Snapshot
### Ingredients
– 1/2 cup tahini, unsalted and creamy/drippy
– 1/2 cup maple syrup
– 1 cup almond flour
– 1/2 cup tapioca starch
– 1/2 cup cocoa powder
– 1/2 tsp baking soda
– 1/2 tsp sea salt
– 1/2 cup semisweet chocolate chips or chunks
### Instructions
1. Preheat the oven to 350°F (176°C) and prepare a baking sheet with parchment paper.
2. In a medium mixing bowl, combine tahini and maple syrup and whisk together. Add almond flour, tapioca starch, cocoa powder, baking soda, and salt. Mix thoroughly. Fold in chocolate chips.
3. Use a cookie scoop or tablespoon to portion out ~1 1/2 tablespoon balls of dough, roll them into balls, and arrange them 2 inches apart on the baking sheet. Slightly flatten.
4. Bake for 9-12 minutes until the edges are just firm. Allow to cool for 5 minutes before indulging.
5. Store any leftovers covered at room temperature for up to 3-4 days or in the freezer for up to 1 month.
### Nutritional Information (per cookie)
– Calories: 202
– Carbohydrates: 20.9 g
– Protein: 5.2 g
– Fat: 12.9 g

Crunchy Beef Tacos Recipe
**The Wanderlust Kitchen: A Culinary Expedition Across the Globe**
In a realm where gastronomic discovery merges with the excitement of travel, The Wanderlust Kitchen emerges as a lively center for culinary aficionados and adventurers alike. Established by Linda, this platform is committed to sharing not just exquisite recipes but also the narratives and cultures that accompany them. With an emphasis on authenticity and contemporary flair, The Wanderlust Kitchen invites you to set off on a flavorful voyage that knows no boundaries.
### Honoring Authentic Culinary Heritage
At the core of The Wanderlust Kitchen lies a profound appreciation for culinary heritage. Linda selects recipes that pay tribute to traditional cooking practices and ingredients from diverse cultures. Each dish narrates a tale, embodying the history and traditions of its roots. By delving into these recipes, home chefs can engage with the rich fabric of global gastronomy, gaining understanding of the lives of those who have honed these dishes across generations.
### Adopting Modern Techniques
While respecting tradition, The Wanderlust Kitchen also adopts contemporary culinary techniques and ingredients. Linda effortlessly merges timeless recipes with modern twists, making them approachable for today’s home cooks. This method not only preserves the spirit of the original dishes but also fosters experimentation and innovation in the kitchen. Whether it’s infusing new flavors or applying cutting-edge cooking techniques, The Wanderlust Kitchen motivates cooks to push their creative boundaries.
### An Invitation to Adventure
A distinctive feature of The Wanderlust Kitchen is its call to adventure. Linda inspires her readers to venture beyond their comfort zones, both in cooking and while traveling. Each recipe acts as a portal to a new locale, enabling cooks to experience the globe through their palates. From the zesty streets of Bangkok to the charming kitchens of Tuscany, every dish presents an opportunity to discover new cultures and tastes.
### Recipes to Discover
The Wanderlust Kitchen showcases a varied range of recipes, accommodating different flavors and dietary needs. Here are some standout selections:
– **Thai Green Curry**: A aromatic and spicy creation that encapsulates the essence of Thai dining, perfect for those eager to add some heat to their meals.
– **Italian Risotto**: Rich and soothing, this iconic Italian fare highlights the elegance of simplicity and high-quality ingredients.
– **Mexican Street Tacos**: Colorful and savory, these tacos celebrate fresh produce and robust flavors, ideal for a casual gathering or lively celebration.
### Conclusion
The Wanderlust Kitchen is more than merely a recipe site; it’s a tribute to food, culture, and adventure. Linda’s enthusiasm for genuine cooking and her adventurous spirit radiate through every entry. Whether you’re an experienced chef or a beginner in the kitchen, The Wanderlust Kitchen invites you to explore, create, and relish the tastes of the world. So, roll up your sleeves, collect your ingredients, and prepare to embark on a culinary adventure that will tantalize your taste buds and spark your wanderlust. Bon Appétit! Bon Voyage!
Read More
Heart-Shaped Cookies Instructions
# Liven Up Your Valentine’s Day with Colorful and Fun Heart Cookies
These Heart Cookies are tender, rich sugar cookies inspired by the traditional Conversation Hearts that appear every Valentine’s Day. The cookie dough is prepared, chilled, and shaped into hearts before being baked just right. They are adorned with vibrant royal icing and personalized messages for your special someone. You’ll adore how chewy and soft these cookies are, topped with a lively and sweet royal icing to brighten anyone’s day.
## Recipe Ingredients
– **Food Coloring** – To mimic the classic hues of the conversation heart candies.
– **Almond Extract** – Imparts a subtle almond taste that makes these cookies delightful.
– **Confectioner’s Sugar** – The foundation for the smooth and sweet royal icing.
For a comprehensive list of ingredients and their quantities, refer to the recipe card below.
## How to Prepare Heart Cookies
### Step #1:
In a medium bowl, combine the flour and baking powder and whisk until blended.
### Step #2:
In a large bowl, cream together the butter and sugar at high speed for 3 minutes.
### Step #3:
Then, add the egg, vanilla, and almond extract, beating at high speed for 1 minute. Scrape down the edges as necessary.
### Step #4:
Incorporate the dry ingredients into the wet mixture and stir until a dough forms.
### Step #5:
Divide the dough into two parts and, using a rolling pin, roll out each half on lightly floured parchment paper to about ¼ inch thickness.
### Step #6:
Transfer the dough onto a baking sheet and chill in the refrigerator for 1 hour.
### Step #7:
After chilling, preheat your oven to 350 degrees Fahrenheit and prepare your baking sheets with parchment paper or silicone mats.
### Step #8:
Take the chilled dough from the fridge, and with a 3.5-inch heart cookie cutter, shape the dough into hearts. Reroll the scraps and continue to cut until no dough is left. Note: If the dough becomes too sticky while rerolling, you may want to chill it for a little while.
### Step #9:
Arrange the cut cookies on your prepared baking sheets and bake in the oven for 10-12 minutes or until the edges are lightly golden. Allow the cookies to cool completely before decorating.
### Step #10:
While the cookies cool, prepare the royal icing. In a large bowl, use a hand mixer to whip together the confectioner’s sugar, meringue powder, and water until fully blended.
### Step #11:
Then, divide the icing into 6 bowls, with 5 larger for the heart colors and one small for writing. Tint each icing bowl to your desired color, then transfer each into a piping bag. For the heart colors, a piping tip #4 is recommended. Outline each cookie and flood the center until smooth. Use a cookie scribe or a toothpick to eliminate any bubbles in the icing if necessary.
### Step #12:
Allow the cookies to set for 1-2 hours before you write on them.
### Step #13:
Fill a piping bag with red icing using a round piping tip #2 and inscribe your chosen words onto the cookies. The writing will take 1-2 hours to set.
### Step #14:
Finally, serve and enjoy!
## Expert Tips
– **Cookie Dough Consistency** – If the cookie dough is too sticky, incorporate an additional tablespoon of flour until you achieve your desired texture.
– **Chilling the Dough** – I suggest chilling the dough after each reroll until all heart cookies are cut out. This will make it less sticky and easier to manage.
– **Royal Icing** – If your royal icing appears too runny, mix in more powdered sugar until you achieve a thicker consistency. You might also want the red icing for writing to be thicker than the icing for the cookies to help the letters maintain their shape better.
## FAQs
**Can I prepare these heart cookies in advance?**
Definitely! These heart cookies can be made a week ahead and will still taste fresh!
**Do I need to cut these cookies into heart shapes?**
Not at all. If you have other shapes you’d prefer to use for your cookies, feel free! Note this recipe uses a 3.5-inch heart cookie cutter; if you choose a smaller size, reduce the baking time by a few minutes.
**Can I stack these heart cookies on top of each other after decorating?**
Yes. Wait for them to dry completely and place parchment paper in between each layer to stack neatly.
## Storage Information
You can **store** any remaining conversation heart cookies in an airtight container on your countertop at room temperature for up to a week. Avoid refrigerating them.
Read More
Taco Tuesday Culinary Inspirations for a Tasty Feast
**Discovering Culinary Journeys with The Wanderlust Kitchen**
In an increasingly interconnected world, food serves as a universal dialect that surpasses borders and cultures. Linda, the imaginative mind behind The Wanderlust Kitchen, invites you to embark on a culinary voyage that honors both timeless recipes and modern cooking methods. This platform goes beyond mere cooking; it’s about immersing yourself in the rich fabric of global cuisines and the narratives that come with them.
### An Honor of Genuine Culinary Traditions
At The Wanderlust Kitchen, the focus is on genuineness. Linda selects recipes that pay tribute to the culinary heritages of diverse cultures, ensuring that each dish embodies its roots. Whether it’s a timeless Italian pasta, a fiery Thai curry, or a soothing Moroccan tagine, the recipes are crafted to whisk you away to the essence of each culture. By utilizing traditional ingredients and techniques, Linda aids in preserving the core of these cherished dishes, enabling home cooks to replicate them confidently.
### Contemporary Techniques and Ingredients
While authenticity remains paramount, The Wanderlust Kitchen also embraces modernity. Linda integrates contemporary cooking techniques and inventive ingredients that can enhance traditional recipes. This blend of the classic and the contemporary not only makes cooking more approachable but also inspires creativity in the kitchen. Home cooks are invited to experiment and modify recipes to match their preferences, transforming each dish into a personal manifestation of culinary expression.
### Motivation to Discover
A fundamental principle of The Wanderlust Kitchen is the motivation to be bold. Linda believes that trying new recipes is akin to journeying to fresh places. Each recipe provides a window into a different culture, letting you explore new tastes and cooking styles from the comfort of your home. By venturing beyond your culinary comfort zone, you can uncover new delights and broaden your palate.
### Community and Connection
The Wanderlust Kitchen transcends being just a recipe blog; it’s a hub for food aficionados and travel lovers. Linda nurtures a sense of togetherness among her readers, motivating them to share their own culinary explorations and experiences. This communal dimension enhances the excitement of cooking and traveling, as individuals unite to celebrate their collective love for food.
### Conclusion
In a realm abundant with culinary opportunities, The Wanderlust Kitchen shines as a guide for those looking to delve into global cuisines. With Linda as your mentor, you can set off on a flavorful adventure that honors both the legacy of traditional recipes and the thrill of modern cooking. So, whether you’re aiming to recreate a cherished dish from your travels or experiment with something entirely different, The Wanderlust Kitchen is your ultimate destination for delectable recipes and inspiring journeys. Bon Appétit! Bon Voyage!
Read More
Authentic Italian Easter Cookies: Recipes and Adaptations
### The Wanderlust Kitchen: A Gastronomic Adventure Across Continents
#### Introduction
Welcome to The Wanderlust Kitchen, a lively platform where food exploration intertwines with travel escapades. Founded by Linda, this site is committed to offering a wide range of recipes that not only honor genuine culinary traditions but also incorporate contemporary cooking techniques and ingredients. Whether you’re a seasoned chef or a beginner, The Wanderlust Kitchen invites you to set forth on a delectable journey that knows no boundaries.
#### Celebrating Authentic Food Heritage
At the core of The Wanderlust Kitchen lies a profound respect for genuine food customs. Linda curates recipes that embody the rich gastronomic legacies of different cultures. Each meal narrates a tale, linking you to the individuals and locations from which it springs. From classic Italian pasta recipes to flavorful Indian curries, these dishes pay tribute to the cherished practices that have been transmitted through ages.
#### Embracing Modern Techniques
While authenticity holds utmost importance, The Wanderlust Kitchen also acknowledges the significance of modern cooking methods and ingredients. Linda artfully fuses traditional recipes with innovative approaches, rendering them approachable and enjoyable for today’s home chefs. Whether employing sous-vide techniques for exquisitely tender meats or integrating trendy superfoods, the recipes presented here aim to spark creativity in the kitchen.
#### A World of Recipes
The Wanderlust Kitchen boasts an extensive compilation of recipes from around the world. Here are just a few highlights:
– **Mediterranean Delights**: Discover the tastes of the Mediterranean with dishes like Greek moussaka, Moroccan tagine, and Italian risotto. Each recipe is crafted to capture the essence of the region on your table.
– **Asian Inspirations**: Immerse yourself in the rich culinary landscape of Asia with dishes such as Thai green curry, Japanese ramen, and Korean bibimbap. These recipes highlight the distinct spices and cooking styles that characterize Asian cuisine.
– **Latin American Flavors**: Savor the vibrant flavors of Latin America with recipes such as Mexican enchiladas, Brazilian feijoada, and Peruvian ceviche. Each dish is a tribute to the bold tastes and colorful ingredients that define this area.
#### Travel Through Food
The Wanderlust Kitchen transcends mere cooking; it’s about journeying through food. Every recipe is intertwined with anecdotes and insights from Linda’s personal travel adventures, motivating readers to discover new places. As you prepare a meal, you can also delve into its cultural significance and the ideal spots to experience it while traveling.
#### Encouragement to Be Adventurous
Linda’s philosophy is straightforward: embrace adventure in the kitchen and during your travels. The Wanderlust Kitchen motivates you to venture beyond your comfort zone, sample new ingredients, and experiment with unfamiliar cuisines. Each recipe serves as a portal to a fresh experience, inviting you to savor the world from the comfort of your home.
#### Conclusion
The Wanderlust Kitchen is more than merely a recipe site; it’s a tribute to global gastronomy and a call to explore. With a dedication to authenticity and a love for contemporary cooking, Linda invites you to navigate the world through cuisine. So, whether you’re organizing your next travel journey or simply seeking to enhance your dinner repertoire, The Wanderlust Kitchen is your ultimate source for culinary inspiration. Bon Appétit! Bon Voyage!

Raspberry Martini: A Revitalizing Drink Recipe Showcasing Fresh Raspberries and Vodka
### Indulge in a Lively Raspberry Martini
This simple Raspberry Martini recipe is a cheerful and sophisticated cocktail that everyone will love. Juicy raspberries are blended with sugar and water to create a deliciously sweet simple syrup. After cooling, this syrup is combined with bold vodka and zesty lemon juice, creating a fruity drink that is ideal for any event.
#### Reasons We Adore This Raspberry Martini
– **Minimal Ingredients**: You only need a handful of ingredients that you probably have in your pantry!
– **Rapid Preparation**: This martini can be ready in just 15 minutes!
– **Cheerful Hue**: Its vibrant color makes it a great choice for Valentine’s Day, Galentine’s, Christmas, or any festive gathering.
#### Recipe Components
– **Vodka**: The foundation for this fruity martini.
– **Lemon Juice**: Contributes a mild tang to offset the sweetness.
– **Raspberry Simple Syrup**: A sweet syrup crafted from fresh raspberries, sugar, and water, delivering that classic raspberry taste.
#### Steps to Create A Raspberry Martini
1. **Make the Syrup**: In a pot over medium-high heat, add the raspberries, sugar, and water.
2. **Boil and Reduce Heat**: Allow the pot to boil, then lower the heat and let it simmer for 10 minutes.
3. **Strain the Syrup**: Pass the raspberry syrup through a fine mesh sieve (avoid pressing down on the raspberries to keep the syrup clear). Set aside to cool.
4. **Combine Ingredients**: Once cooled, in a cocktail shaker filled with ice, add vodka, raspberry simple syrup, and lemon juice.
5. **Shake**: Shake vigorously for 30 seconds.
6. **Present**: Pour into your preferred martini glass and relish!
#### Common Questions
– **Is vodka essential for this raspberry martini?**
No. If you’d rather use a different spirit like gin, you can easily replace the vodka.
– **What can I use to garnish this raspberry martini?**
I suggest using a toothpick or wooden skewer to arrange fresh raspberries, either placed inside or on top of a martini glass.
#### Storage Guidelines
You can keep any remaining raspberry martini in an airtight container in your refrigerator for 2-3 days. Unused raspberry syrup can be kept in an airtight container in your fridge for up to 2 weeks.
#### More Exciting Cocktails to Explore
For additional delightful cocktails, you might want to try a Lavender Martini, Passion Fruit Martini, or Espresso Martini.
Savor your lively Raspberry Martini, a sweet and vibrant cocktail for anytime enjoyment!
Read More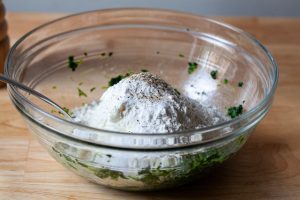
Spinach and Ricotta Gnocchi
### Spinach and Ricotta Gnudi: A Warm Autumn Treat
As temperatures drop and daylight diminishes, the allure of hearty, soothing meals becomes clear. One dish that truly captures the spirit of autumn is spinach gnudi — fluffy, tender cheese dumplings that provide a charming variation on classic pasta. Although gnudi are typically linked to spring and summer, their deep flavors and inviting warmth render them perfect for the cooler days.
#### What Are Gnudi?
The word “gnudi” means “naked” in Italian, highlighting that these dumplings consist of the filling of spinach and ricotta ravioli, minus the pasta shell. This distinctive method results in a more concentrated taste sensation, allowing you to savor the creamy, cheesy interior without the weight of pasta. Traditionally, gnudi incorporate fresh greens, but frozen spinach serves as a dependable and budget-friendly substitute, making this treat feasible throughout the year.
#### Ingredients
To create these scrumptious dumplings, gather the following ingredients:
– 1 package (10-ounce or 283-gram) frozen chopped spinach, defrosted
– 1 cup (215 grams) whole-milk ricotta
– 1 large egg
– 1/2 cup (50 grams) grated parmesan cheese, plus extra for serving
– A pinch of freshly grated nutmeg (optional)
– 1 teaspoon kosher salt
– Freshly ground black pepper
– 1/3 cup (45 grams) all-purpose flour
– A few fresh sage leaves
– 4 tablespoons (55 grams) salted butter, plus additional if necessary
#### Preparation Steps
1. **Prepare the Spinach**: Squeeze the defrosted spinach to eliminate excess moisture, then finely chop it on a cutting board. Move to a bowl.
2. **Mix the Ingredients**: In the bowl with the spinach, combine ricotta, egg, parmesan, nutmeg (if included), salt, pepper, and flour. Mix thoroughly until combined. The mixture should be thick.
3. **Form the Gnudi**: Scoop the mixture into 1.5-tablespoon-sized balls and place them on a plate or tray.
4. **Boil the Gnudi**: Bring a medium pot of salted water to a gentle boil. Add the gnudi in batches, cooking until they float to the top, about 3 minutes. Use a slotted spoon to return them to the plate.
5. **Brown in Butter**: In a large skillet, melt butter over medium heat. Add sage leaves and the gnudi, browning carefully on both sides. Move to a serving plate and continue with the remaining dumplings.
6. **Serve**: Drizzle any remaining butter over the gnudi, finishing with freshly cracked black pepper and a sprinkle of parmesan. Serve hot.
#### Tips for Success
– **Ricotta Selection**: Opt for a thick, high-quality ricotta for the best consistency. If using a wetter ricotta, drain before measuring.
– **Chop Spinach Well**: Ensure the spinach is minced finely for consistent mixing.
– **Chilling the Gnudi**: Chill the shaped gnudi on a parchment-lined tray for 30 minutes to several hours to assist with setting.
– **Flouring the Balls**: Some recipes recommend rolling the gnudi in flour prior to boiling for enhanced texture.
#### Pairing Suggestions
To complete the meal, think about serving the gnudi with hearty bread, a light soup, or a roasted autumn vegetable salad. These combinations elevate the comforting, cozy experience of the dish.
In summary, spinach and ricotta gnudi provide a delightful opportunity to enjoy the tastes of autumn. Their creamy texture, paired with the nutty scent of browned butter and sage, creates a meal that is both fulfilling and heartwarming. Whether served as a main dish or a side, these gnudi are sure to bring warmth on cool evenings.
Read More