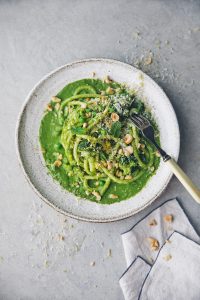
Creamy Green One-Pot Pasta Dish
### The Emergence of TikTok Pasta: An Irresistible Trend in Swift Cooking
Recently, a culinary craze has swept through social media: the “TikTok pasta.” This trending recipe generally includes baked feta cheese and cherry tomatoes, mashed into a creamy sauce that is then mixed with pasta. The ease and tastiness of this dish have made it a top choice for home chefs, including families like Elsa’s, who recently made it with fantastic results. This experience showcases not only the impact of platforms like TikTok on cooking abilities but also the pleasure of cooking together as a family.
#### The Charm of Quick and Simple Pasta Dishes
The appeal of quick and simple pasta dishes is clear in how they connect with busy families. These recipes provide a solution for those wanting to create a satisfying meal without spending extensive time in the kitchen. The TikTok pasta exemplifies this, illustrating how a few basic ingredients can unite to create something remarkable.
#### A Creamy Kale Pasta Dish
For those eager to diversify their quick pasta options, a creamy kale pasta recipe is a fantastic choice. This dish is especially suited for lunch, perfect for kids who might not appreciate greens. It can be made in under 15 minutes using just a handful of ingredients and one pot, making it a practical selection for hectic days.
**Ingredients:**
– Bucatini pasta (or any preferred pasta)
– Fresh kale
– Olive oil
– Garlic
– Parmesan cheese
– Salt and pepper
– Optional: nuts or seeds for extra texture
**Method:**
1. **Cook the Pasta:** Begin by boiling water in a pot and adding the bucatini pasta.
2. **Incorporate the Kale:** After a minute, add the kale to soften it in the boiling water.
3. **Mix the Sauce:** Once the pasta and kale are cooked, save some pasta water and drain the excess. Move the kale and pasta to a blender, adding olive oil, garlic, Parmesan cheese, salt, and pepper. Blend until smooth, adding reserved pasta water as necessary to achieve the preferred consistency.
4. **Combine:** Mix the pasta with half of the sauce, ensuring it is thoroughly coated. Present the remaining sauce at the bottom of the plates for an impressive appearance and added creaminess.
This technique, influenced by Jamie Oliver’s 5-ingredient cookbook, has been modified to create a more substantial meal. The choice of bucatini, a thicker pasta with a hollow center, allows it to absorb the sauce wonderfully, enhancing the flavor and texture of the dish.
#### Join the Cooking Session
To try this delightful recipe firsthand, participate in the Lunch Therapy cookalong on Instagram Stories. On Wednesday, March 3, at noon CET, you can join in and prepare this creamy kale pasta in real-time. Ensure you gather the ingredients in advance and take part in the fun!
If you choose to post your version of the dish on Instagram, make sure to tag @gkstories. Reader photos will be collected and showcased in a subsequent post, fostering a community of pasta enthusiasts inspired by this quick and tasty recipe.
In conclusion, the ascent of TikTok pasta and similar speedy recipes underscores the changing dynamics of home cooking. With the right components and a touch of creativity, anyone can create a meal that is both fulfilling and visually stunning. Whether cooking with family or experimenting alone, these recipes are bound to bring happiness to your kitchen.
Read More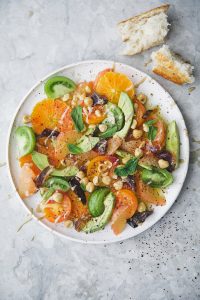
Orange, Date, and Avocado Salad Recipe for the Month of April
### Embracing Spring with a Citrus Salad Recipe
With Easter nearing, many of us are inclined to look for fresh and lively recipes to share with family and friends. One such delightful creation is a citrus salad, which not only honors the tastes of the season but also highlights the remaining citrus fruits before they vanish until next winter. This article will direct you through a straightforward yet impressive citrus salad recipe, while also offering some intriguing links and projects that inspire us.
#### The Citrus Salad Recipe
**Ingredients:**
– Variety of citrus fruits (oranges, grapefruits, mandarins)
– Assorted bitter greens (arugula, radicchio, or frisée)
– 1 ripe avocado
– A handful of toasted and chopped hazelnuts
– Sweet dates, pitted and chopped
– Extra virgin olive oil
– Salt and pepper to taste
– Crusty bread for serving
**Instructions:**
1. **Prepare the Citrus:** Peel and segment the citrus fruits, discarding any seeds. Arrange the segments on a large platter.
2. **Prepare the Greens:** Wash and dry the mixed greens. Distribute them over the citrus segments.
3. **Add Avocado:** Halve the avocado, take out the pit, and slice it into wedges. Position the avocado on top of the salad.
4. **Add Hazelnuts and Dates:** Sprinkle the chopped hazelnuts and dates over the salad for additional crunch and sweetness.
5. **Dress the Salad:** Drizzle with extra virgin olive oil and season with salt and pepper to taste.
6. **Serve with Bread:** Provide slices of crusty bread on the side to soak up the flavorful juices.
This salad is not just visually appealing but also filled with flavors and textures that harmonize beautifully. The bitterness of the greens counterbalances the sweetness of the citrus and dates, while the creaminess of the avocado contributes richness.
#### Inspiration and Recommendations
While savoring this refreshing salad, here are some links to projects and books that have piqued our interest recently:
– **Popl Burger:** Following Noma’s closure due to Covid, the team launched an outdoor burger spot. Their vegetarian burger crafted with fermented quinoa is a must-try.
– **To Asia With Love:** Hetty McKinnon’s new cookbook showcases simple and delicious noodle dishes ideal for any home cook.
– **Coming Clean Project Podcast:** An episode featuring discussions on shifting to a plant-based diet and the presence of toxins in food.
– **David Chang’s Microwave Salmon:** A humorous perspective on cooking salmon in a microwave that has ignited lively online discussions.
– **Link in Bio Newsletter:** A useful resource for anyone interested in social media, providing insights and job opportunities in the sector.
– **Super Natural Simple:** Heidi Swanson’s latest book promises to present stunning recipes with a California vibe.
– **Vegetable Tattoos:** An exciting new edition of this project is on the way, featuring beautiful illustrations.
– **Simply Julia:** Julia Turshen’s new book offers a harmonious approach to health and creativity in cooking.
#### Easter Cooking Tips
If you’re in search of more recipes to experiment with over the Easter holiday, consider these options:
– **Soups:** Asparagus & Spinach Soup or Carrot, Tomato & Coconut Soup.
– **Salads:** Grilled Asparagus and Creamy Lemon Quinoa or Spring Celebration Salad.
– **Pies:** Perfect Picnic Pie or Beet & Greens Tart.
– **Chocolate Treats:** Chocolate Tahini Cups or Banana, Almond & Chocolate Cake.
As you prepare to celebrate Easter, we hope this citrus salad recipe and the accompanying recommendations inspire you to whip up delightful meals and relish the vibrant flavors of spring. Happy cooking!
Read More
Lemon, Polenta, and Ricotta Cake Instructions
### Thrilling Developments and a Yummy Cake Recipe
As life progresses, it frequently ushers in major changes, and for our family, this marks a period of transition and fresh starts. We are excited to share that we are relocating to Denmark! This choice is inspired by Luise’s enduring aspiration to become a midwife, as she begins her education at a midwifery school in Copenhagen. Our family will be moving to a snug house located just outside the city, signifying a new chapter in our journey.
#### The Relocation Adventure
The debate over where to establish our home has always been a compelling topic in our bi-national family. After 12 fantastic years in Sweden, we feel prepared to embrace life in Denmark. Our children are thrilled about the prospect of moving into a home with a trampoline and being nearer to their grandmother. However, they are also grappling with the adjustments that a new school and surroundings bring. If you have experience relocating to a new country with kids, we would be grateful for any advice you could offer.
Despite the hurdles, we are eager to continue our collaboration with Green Kitchen Stories (GKS). Luise will be juggling her studies alongside her input to GKS, and we have numerous exciting projects on the horizon. We are currently focused on a new collection of tattoos, while I am concentrating on Green Kitchen Studios, our production enterprise. Additionally, we are thrilled to reveal that we are in the midst of creating a new book set to launch next Spring, although we are keeping the title a secret for now.
#### Broadening Our Vegan Supplement Range
Last year, we introduced our vegan supplement range in partnership with Puori, and we are actively working to enhance these products while seeking ways to broaden our offerings. Our protein powder, which was previously sold out, is now back in stock. To celebrate this, we are providing a 20% discount code throughout May. You can purchase through [this link](https://puori.eu/pages/vegan-launch) and apply the code GKS_MAY21 to enjoy the discount. My personal favorite is the [B12 Berry Booster](https://puori.eu/products/b12-berry-booster-20-sticks), and now is an excellent time to give it a shot.
#### The Highlight of the Day: Upside-Down Lemon Polenta Cake
Now, onto the centerpiece of this post: the cake! This scrumptious recipe is inspired by a polenta cake from our book, [Green Kitchen Travels](https://www.amazon.co.uk/Green-Kitchen-Travels-vegetarian-adventures/dp/1742707688), but we’ve made some modifications to enhance its moisture and transform it into an upside-down cake embellished with lovely lemon slices and a lemon honey syrup.
This cake is a delightful fusion of an Italian cheesecake and a soft crumb cake, showcasing the distinctive flavors and textures of polenta and poppy seeds. Remarkably moist yet airy, it is naturally gluten-free and sweetened only with honey, delivering enchanting floral notes. The addition of ricotta cheese boosts the flavor, making it even more delectable after a day in the refrigerator.
To celebrate the introduction of this cake and our imminent move, we have filmed a new YouTube video. We hope it gives you a glimpse into our journey and the cake-making experience.
We look forward to sharing more updates as we settle into our new residence and continue our culinary and family adventures!
Read More
Summer Romance Letter and Zucchini Bisque Recipe
# Zucchini Soup: A Creamy Treat
Zucchini soup is an adaptable and healthy dish that highlights the subtle taste of zucchini, making it an ideal option for a light snack or appetizer. This rich soup is not only simple to make but also filled with fresh components that enhance its lively flavor and health advantages.
## Ingredients
To create a tasty zucchini soup, you will require the following ingredients:
– **2 tbsp olive oil**: This nutritious fat brings flavor and helps in nutrient absorption.
– **1 yellow onion**: Delivers a sweet and savory foundation for the soup.
– **1 celery stalk**: Contributes crunch and layers of flavor.
– **1-2 cloves garlic**: Boosts the fragrance and flavor of the soup.
– **1 large or 2 smaller zucchini (courgette)**: The main ingredient, providing a gentle taste and creamy consistence when cooked.
– **A generous handful of fresh spinach**: Adds color, vitamins, and a hint of earthiness.
– **120 ml / 1/2 cup white wine**: Imparts acidity and depth to the flavor profile.
– **500 ml / 2 cups vegetable stock**: Acts as the soup’s foundation, enhancing the overall flavor.
– **120 ml / 1/2 cup cream or coconut cream**: Introduces creaminess and luxury to the soup.
– **A handful of fresh herbs (dill and mint suggested, though basil is also a great choice)**: Enriches the soup with freshness and fragrant notes.
– **1 lemon**: The juice brightens the flavors and adds a zesty twist.
– **Salt & black pepper**: Key seasonings to elevate the overall flavor.
### Toppings
To enhance your zucchini soup, think about adding some toppings:
– **1 cup cooked quinoa**: Provides protein and a nutty flavor.
– **Sour cream or smetana**: Delivers a creamy, tangy contrast.
– **Dill**: Complements the soup’s tastes and adds a fresh element.
– **Red onion or chives, finely chopped**: Introduces a bit of crunch and a mild onion flavor.
## Preparation
1. **Sauté the Aromatics**: In a big pot, warm the olive oil over medium heat. Add the chopped onion and celery, sautéing until soft. Stir in the minced garlic and continue cooking for another minute until aromatic.
2. **Cook the Zucchini**: Include the diced zucchini in the pot and cook for roughly 5 minutes, allowing it to tenderize.
3. **Deglaze with Wine**: Add the white wine, scraping the pot’s bottom to free any tasty bits. Allow it to simmer for a few minutes until the wine reduces a bit.
4. **Add Stock and Spinach**: Pour in the vegetable stock and bring the blend to a boil. Mix in the fresh spinach and cook until wilted.
5. **Blend the Soup**: Take the pot off the heat and use an immersion blender to puree the soup until smooth. Alternatively, pour the mixture into a blender in batches.
6. **Stir in Cream and Herbs**: Put the blended soup back in the pot, mix in the cream or coconut cream, and incorporate the fresh herbs. Squeeze in the lemon juice and season with salt and black pepper to taste.
7. **Serve**: Spoon the soup into bowls and top with cooked quinoa, a dollop of sour cream, dill, and chopped red onion or chives.
## Conclusion
Zucchini soup is a wonderful dish that is both satisfying and nutritious. Its creamy consistency, combined with the freshness of herbs and the zest of lemon, makes it an excellent choice for any time of the year. Whether served as an appetizer or a main meal, this soup is bound to delight the taste buds and nourish the body. Savor the simplicity and flavor of this zucchini soup, and feel free to personalize it with your preferred toppings!
Read More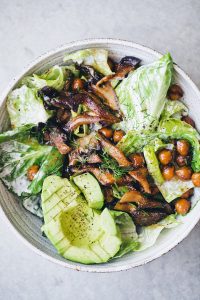
Vegan Caesar Salad featuring Oyster Mushrooms
### Vegan Caesar Salad with Crispy Sear-Cooked Mushrooms
As summer ends, many seek fresh and intriguing methods to relish seasonal vegetables. This vegan version of the classic Caesar salad centers around the main ingredient: mushrooms. This recipe not only emphasizes the mushrooms but also provides a tasty and creative way to present them.
#### The Motivation Behind the Recipe
Following a short break from sharing recipes due to a recent relocation to Denmark, we are thrilled to introduce this distinct dish. The move has been a whirlwind, filled with new experiences and settling into a different home. Nevertheless, amid the excitement, the kids have adjusted well to their new schools, and we are beginning new journeys, including the creation of a Green Kitchen Studio in Copenhagen.
#### The Mushroom Method
The essence of this recipe is a unique technique for preparing the mushrooms. Inspired by various online resources, this approach involves pressing the mushrooms between two pans over medium-high heat. This technique enables the mushrooms to release their moisture while obtaining a crispy outer layer. Credited to Derek Sarno, this method yields mushrooms that are both crunchy and juicy, resembling chicken in texture.
To boost the flavor, the mushrooms are marinated, allowing them to absorb the delightful seasoning. This preparation not only enhances the dish but also positions the mushrooms as the ideal focal point for the salad.
#### The Vegan Caesar Dressing
Classic Caesar salads typically depend on anchovies and croutons for flavor and texture. In this vegan adaptation, we replace these elements with a straightforward dressing crafted from vegan mayonnaise, a dash of vinegar, and capers. The capers introduce a salty kick that resembles the umami essence of anchovies, while warm chickpeas serve as a substitute for croutons, contributing protein and substance to the dish.
#### Ingredients
– **For the Mushrooms:**
– Fresh mushrooms (such as cremini or portobello)
– Olive oil
– Salt and pepper
– Marinade of choice (soy sauce, balsamic vinegar, or herbs)
– **For the Vegan Caesar Dressing:**
– Vegan mayonnaise
– Vinegar (apple cider or white wine)
– Capers
– Garlic powder (optional)
– **For the Salad:**
– Romaine lettuce
– Warm chickpeas
– Additional toppings (such as nutritional yeast or vegan parmesan)
#### Instructions
1. **Prepare the Mushrooms:**
– Clean and slice the mushrooms.
– Heat a pan over medium-high heat and drizzle with olive oil.
– Position the mushrooms between two pans and press down firmly. Cook until they are crispy and golden, approximately 5-7 minutes.
– Remove from heat and toss in your preferred marinade.
2. **Craft the Dressing:**
– In a bowl, combine vegan mayonnaise, a splash of vinegar, and capers. Adjust seasoning as desired.
3. **Assemble the Salad:**
– In a large bowl, mix romaine lettuce with the dressing until thoroughly coated.
– Incorporate warm chickpeas and top with the seared mushrooms.
– Serve right away and savor!
#### Conclusion
This vegan Caesar salad with crispy sear-cooked mushrooms is a delightful and tasty dish that highlights the adaptability of mushrooms. Whether you’re in search of a light lunch or a side for dinner, this recipe will surely impress. We encourage you to give it a try and share your feedback!
Read More
Sweet Potato Shakshuka: A Wholesome Take on the Traditional Recipe
### Crispy Sweet Potato Hash with Eggs and Sriracha Butter
This scrumptious recipe, drawing inspiration from the Ottolenghi Test Kitchen’s “Shelf Love,” melds the inherent sweetness of baked sweet potatoes with the creaminess of eggs and a zesty sriracha butter sauce. Ideal for breakfast or brunch, this dish is both satisfying and full of taste.
#### Ingredients
– 2 large sweet potatoes
– 3 tablespoons olive oil
– 1 teaspoon salt, divided
– Freshly ground black pepper
– 100g cheddar cheese, grated
– 2 cloves garlic, minced
– 1 teaspoon ground cumin
– 4 large eggs
– 30g butter
– 2 tablespoons sriracha sauce
– 1 small onion, finely sliced
– 2 tablespoons lemon juice
– Fresh coriander leaves, for garnish
#### Instructions
1. **Bake the Sweet Potatoes**: Preheat your oven to 200°C (400°F fan). Puncture the sweet potatoes all over with a fork (approximately 8–10 times) and arrange them on a medium, parchment-lined baking sheet. Bake for 45–50 minutes, or until they are tender and cooked through. Once finished, let them cool and decrease the oven temperature to 180°C (375°F).
2. **Pickle the Onions**: In a small bowl, combine the sliced onion, 1 tablespoon of lemon juice, and a pinch of salt. Allow it to pickle while you prepare the other components of the dish.
3. **Prepare the Sweet Potatoes**: Once the sweet potatoes have cooled enough to handle, peel off the skins and break them into approximately 4 cm pieces. Transfer the potato flesh to a large bowl and set it aside. Return the skins to the baking tray, drizzling them with 1 tablespoon of oil, 1/4 teaspoon of salt, and a generous amount of pepper. Bake for 8 minutes, or until they are nicely browned and beginning to crisp. Set aside to cool and become crispier.
4. **Mash the Potato Flesh**: Use a fork to mash the potato flesh until smooth. Incorporate the grated cheddar, minced garlic, cumin, another tablespoon of oil, the remaining tablespoon of lemon juice, 1 teaspoon of salt, and plenty of pepper. Stir until everything is well blended.
5. **Cook the Potato Mixture**: Heat the remaining tablespoon of oil in a large frying pan with a lid over medium-high heat. Spoon the mashed potato mixture into the pan, spreading it out evenly. Cook for about 7 minutes, allowing the bottom to start browning. Lower the heat to medium and create eight wells in the potato mixture using a spoon. Crack an egg into each well. Lightly season with salt and pepper, cover with the lid, and cook for 4–5 minutes, occasionally rotating the pan, until the egg whites are set and the yolks remain runny.
6. **Make the Sriracha Butter**: While the eggs are cooking, combine the butter and sriracha in a small saucepan over medium heat. Cook until the butter melts, whisking continuously to emulsify. Remove from heat before it bubbles to avoid splitting.
7. **Serve**: Once the eggs are cooked, drizzle the sriracha butter over them. Top with a generous amount of crispy potato skins, half of the pickled onion, and all the coriander leaves. Serve right away, with the leftover potato skins and pickled onion on the side.
This recipe not only highlights the adaptability of sweet potatoes but also presents a fulfilling dish that is bound to impress. Savor the medley of textures and flavors, from the creamy eggs to the crispy skins, all elevated by the zest of sriracha butter.
Read More
Double Chocolate and Buckwheat Cookies Formula by Aran
### Vegan Chocolate Fennel Cookies
This article introduces a charming vegan variation of a traditional chocolate cookie recipe originally developed by Aran Goyoaga. By replacing eggs with aquafaba and butter with coconut oil, we have created a scrumptious treat that accommodates vegan diets while preserving rich flavors and textures.
#### Ingredients
– 6 tablespoons aquafaba (whipped)
– 7 ounces (200 g) dark chocolate, separated
– 1/4 cup almond butter
– 3/4 cup brown sugar
– 1 teaspoon vanilla extract
– 1 cup buckwheat flour
– 1/4 cup cocoa powder
– 1/2 teaspoon baking soda
– 1/4 teaspoon salt
– 1 teaspoon crushed fennel seeds
– 1/4 cup coconut oil
#### Instructions
1. **Preheat the Oven**: Start by preheating your oven to 375 degrees F. Line two baking sheets with parchment paper to avoid sticking.
2. **Prepare Fennel**: Crush the fennel seeds into a fine powder using a mortar and pestle or a clean coffee grinder. This will enhance the flavor of the cookies.
3. **Melt Chocolate Mixture**: Fill a medium saucepan one-quarter full with water and bring it to a simmer over medium-high heat. In a large heatproof bowl, mix the crushed fennel, 7 ounces of chocolate, almond butter, and coconut oil. Place this bowl over the simmering water, stirring until the chocolate is almost melted. Remove from heat, letting the residual warmth complete the melting process.
4. **Mix Aquafaba and Sugar**: In the bowl of a stand mixer fitted with the whisk attachment, mix the whipped aquafaba, brown sugar, and vanilla extract. Beat on high speed until the mixture becomes pale and thick, around 5 minutes. Then, incorporate the melted chocolate mixture and beat on medium speed until fully combined and thickened, about 1 minute.
5. **Combine Dry Ingredients**: In a separate small bowl, mix together the buckwheat flour, cocoa powder, baking soda, salt, and crushed fennel seeds. Gently fold this dry mixture into the chocolate batter using a spatula until just blended.
6. **Shape Cookies**: Use a tablespoon to scoop 1½-tablespoon mounds of dough onto each prepared baking sheet, ensuring to leave 2 inches of space between each mound. Press small pieces of the remaining chocolate into the top of every cookie for added richness.
7. **Bake**: Place the baking sheets in the preheated oven and bake for 8 to 9 minutes. The edges should be crisp while the centers remain soft. Avoid overbaking; the cookies may seem slightly underdone but will firm up as they cool.
8. **Cool and Store**: Let the cookies cool on the baking sheet for about 10 minutes, or until they can be picked up without crumbling. Store the cookies in an airtight container, where they will stay fresh for up to 3 days.
#### Conclusion
These Vegan Chocolate Fennel Cookies are a delightful combination of rich chocolate flavor and fragrant fennel, making them a thrilling addition to any dessert spread. Savor the delectable taste while maintaining a vegan lifestyle!
Read More
Saffron and Millet Salad for Winter Festivities
### Roasted Root Vegetable and Millet Salad with Pomegranate
This colorful and wholesome vegan recipe merges the rustic tastes of roasted root vegetables with the crunchy texture of millet, garnished with fresh herbs and pomegranate seeds for an exciting flavor explosion. Ideal as a main course or a side, it can also be enriched with crumbled feta cheese for those who prefer a creamy touch.
#### Ingredients:
– A variety of root vegetables (carrots, parsnips, sweet potatoes, etc.)
– Olive oil
– Ground cinnamon
– Salt
– Pecan nuts
– Millet
– Water
– Vegetable stock
– Saffron
– Pink Castel Franco lettuce
– Fresh dill
– Fresh mint
– Pomegranate seeds
#### Instructions:
1. **Preheat the Oven**: Start by preheating your oven to 400°F (200°C).
2. **Prepare the Root Vegetables**: Peel your selected root vegetables and chop them into bite-sized pieces.
3. **Season the Vegetables**: Arrange the chopped vegetables on a baking tray lined with parchment paper. Drizzle with olive oil, sprinkle with ground cinnamon and salt, and toss to coat evenly.
4. **Roast the Vegetables**: Bake in the preheated oven for 15 to 20 minutes, or until the vegetables are tender, golden, and slightly crispy on the edges.
5. **Add Pecans**: In the final minutes of roasting, incorporate pecan nuts to the tray to allow them to roast with the vegetables.
6. **Cook the Millet**: While the vegetables are roasting, combine millet, water, vegetable stock, and saffron in a pot. Bring to a boil, then reduce the heat and let it simmer for 8 minutes. After that, turn off the heat, cover the pot, and let it rest for about 10 minutes to finish cooking.
7. **Assemble the Salad**: Once the millet is ready, move it to a serving dish and let it cool slightly. Take the roasted vegetables out of the oven and allow them to cool for a few minutes.
8. **Prepare the Dressing**: In a small bowl, combine your preferred dressing ingredients (such as olive oil, lemon juice, and herbs) and drizzle it over the roasted root vegetables.
9. **Incorporate the Lettuce**: Slice the pink Castel Franco lettuce in half and gently mix it into the cooled millet.
10. **Combine Ingredients**: Blend the roasted root vegetables and toasted pecans into the millet and lettuce mixture.
11. **Garnish**: Sprinkle freshly chopped dill and mint over the salad, followed by a generous handful of pomegranate seeds for added color and flavor.
12. **Serve**: Savor this delightful and nutritious roasted root vegetable and millet salad warm or at room temperature. For an added flourish, crumble feta cheese on top if you wish.
This dish not only highlights the inherent sweetness of the roasted vegetables but also offers a delightful crunch from the pecans and a refreshing contrast from the herbs and pomegranate. It’s an ideal complement to any meal or a standalone dish that celebrates seasonal ingredients.
Read More
Soba Salad with Miso and Ginger-Enhanced Eggplant and Broccoli
### Tasty Soba Noodle Stir-Fry with Eggplant
This soba noodle stir-fry recipe featuring eggplant (aubergine) is not only delicious but also flexible for various dietary needs. With a handful of easy ingredients and steps, you can whip up a healthy meal that is both fulfilling and straightforward to make.
#### Ingredients:
– Eggplant (or swap with mushrooms or tofu)
– Soba noodles (ensure gluten-free varieties if needed)
– Broccoli
– Green onions
– Garlic
– Chili
– Spinach
– Sesame seeds
– Fresh cilantro
– Miso paste (for marinading)
– Oil (for sautéing)
– Optional: Rice vinegar or lemon juice
#### Cooking Instructions:
1. **Prepare the Eggplant**: Dice the eggplant into small pieces. Heat a well-oiled skillet over medium heat and add the diced eggplant along with a bit of salt. Cook for around 6-8 minutes, stirring occasionally, until the eggplant shrinks and turns a lovely color. Add more oil as needed to prevent sticking.
2. **Create the Marinade**: In a small bowl, mix the ingredients for the marinade. Miso can be difficult to dissolve, so use the back of a teaspoon to break it up before whisking it until smooth.
3. **Cook the Soba Noodles**: Cook the soba noodles as directed on the package. After cooking, rinse them under cold water to eliminate excess starch, which helps prevent them from getting sticky.
4. **Prepare the Vegetables**: Slice the broccoli into thin stalks and roughly chop the green onions.
5. **Char the Broccoli**: Once the eggplant is done, transfer it to a bowl. In the same skillet, add the broccoli, green onions, half a garlic clove, and half of the chili. Char the broccoli for 1-2 minutes on each side.
6. **Mix Ingredients**: Add the cooked eggplant back to the skillet and pour in half of the marinade. Stir to mix everything well.
7. **Add Noodles and Spinach**: Stir in the soba noodles (begin with about 2/3 of the noodles for a higher filling-to-noodle ratio) and a handful of spinach. Take the pan off the heat and toss all components together.
8. **Serve**: Distribute the stir-fry into two bowls. Garnish with sesame seeds, fresh cilantro, the remaining chili, and a drizzle of the leftover marinade.
#### Tips:
– If you’re not keen on eggplant, feel free to swap it out for mushrooms or tofu for a different taste and texture.
– Always verify the soba noodle packaging if you have gluten sensitivity, as some brands may contain wheat alongside buckwheat.
– For an added zesty kick, think about including a splash of rice vinegar or lemon juice in the marinade.
Savor this colorful and nutritious soba noodle stir-fry that’s ideal for a quick weeknight meal or as a meal prep choice!
Read More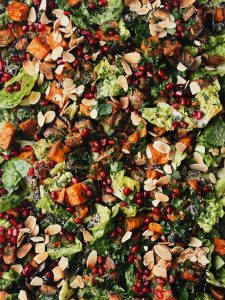
Salad featuring Sweet Potato, Eggplant, and Tahini Dressing
### Roasted Vegetable Quinoa Salad with Tahini Dressing
This colorful and wholesome roasted vegetable quinoa salad is a scrumptious dish that merges the deep flavors of eggplant and sweet potato with a tangy tahini dressing. Ideal as a standalone meal or as a side, this salad is not just visually striking but is also loaded with vital nutrients. Here’s how to make it.
#### Ingredients
– **For the Roasted Vegetables:**
– 1 eggplant (aubergine), diced
– 1 sweet potato, diced
– Olive oil
– Salt
– **For the Marinade:**
– Olive oil
– Apple cider vinegar
– Ground paprika
– Ground cumin
– Ground coriander
– Chili powder
– Salt
– **For the Tahini Dressing:**
– Tahini
– Olive oil
– Maple syrup
– Lemon juice
– **For the Salad:**
– Cooked quinoa
– Romaine lettuce, roughly chopped
– Cucumber, roughly chopped
– Chopped fresh parsley (for garnish)
– Pomegranate seeds (for garnish)
– Flaked almonds (toasted, for garnish)
#### Instructions
1. **Roasting the Vegetables:**
Start by preheating your oven to 200°C (around 400°F). Dice the eggplant and sweet potatoes into small cubes and spread them on a baking tray. Drizzle with olive oil and sprinkle with salt. Roast in the oven for about 30 minutes, or until the vegetables become tender and slightly caramelized.
2. **Preparing the Marinade:**
While the vegetables roast, create the marinade. In a jar, mix together olive oil and apple cider vinegar with ground paprika, cumin, coriander, chili powder, and a generous pinch of salt. Seal the lid and shake vigorously to combine all the ingredients well.
3. **Combining the Roasted Vegetables and Marinade:**
Once the vegetables are roasted, take them out of the oven and let them cool a bit. Drizzle the marinade over the roasted vegetables and toss to ensure they are fully coated. Let the mixture cool down further.
4. **Making the Tahini Dressing:**
In a large bowl, whip up the tahini dressing by mixing tahini, olive oil, maple syrup, and lemon juice until smooth and well-blended.
5. **Assembling the Salad:**
Incorporate the cooked quinoa into the bowl with the tahini dressing. Next, add the roughly chopped romaine and cucumber. Toss everything together until all ingredients are mixed well and coated in the dressing.
6. **Plating the Salad:**
To serve, begin by layering the quinoa, romaine, and cucumber mix on a plate. Top it with the roasted vegetables. Lastly, garnish with fresh parsley, pomegranate seeds, and toasted almond flakes for extra texture and flavor.
#### Enjoy!
This roasted vegetable quinoa salad not only tastes great but also serves as a nutritious meal that can be savored warm or cold. It’s perfect for meal preparation, gatherings, or as a healthy lunch choice. Relish the explosion of flavors and the nutritional advantages of this exquisite dish!