A Comprehensive Guide to Making the Popular TikTok Cucumber Salad
# The Viral TikTok Cucumber Salad: A Refreshing Trend
As the heat intensifies, the desire for light and refreshing dishes becomes increasingly common. Enter the sensational TikTok cucumber salad, a creation that has captivated social media audiences, largely due to Logan Moffitt, popularly referred to as the “TikTok cucumber guy.” This salad not only fulfills the craving for a cool dish but has also inspired a lively community of cucumber lovers online.
## Who is the TikTok Cucumber Guy?
Logan Moffitt, a Canadian content creator on TikTok, has risen to fame for his passion for cucumbers and Korean dishes, especially kimchi and cold noodles. His captivating videos, often showcasing him making and savoring a variety of cucumber-based meals, have attracted millions of views. His memorable phrase, “Sometimes you just NEED to eat a whole cucumber,” resonates with his followers, making his content both engaging and fun.
## What is the Viral Cucumber Guy Recipe?
The initial recipe that shot Logan to stardom is a straightforward yet delectable garlicky soy-sesame cucumber salad. This dish is savory, mildly sweet, and exceedingly refreshing, making it ideal for warm days. The blend of flavors and textures has enchanted viewers, resulting in a spike in the dish’s popularity.
## How to Make the TikTok Cucumber Guy Salad
### Ingredients:
– 1 whole seedless English cucumber
– 1.5 tablespoons soy sauce
– 1 tablespoon toasted sesame oil
– 1 teaspoon fish sauce
– 1 teaspoon sugar
– A pinch of MSG (optional)
– 1 clove garlic, grated
– 2 green onions, chopped
– 1 tablespoon toasted sesame seeds
### Instructions:
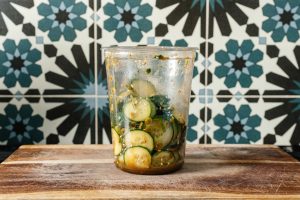
1. **Slice**: Thinly slice the cucumber with a mandolin or knife, putting the slices directly into a deli quart container.
2. **Add**: To the cucumber pieces, mix in soy sauce, toasted sesame oil, fish sauce, sugar, MSG, grated garlic, chopped green onions, and toasted sesame seeds.
3. **Toss**: Close the lid on the container and shake until all components are thoroughly combined.
4. **Enjoy**: Serve right away using chopsticks for an authentic experience, or chill for a couple of hours for a quick pickled taste.
## Equipment Needed
While you can prepare this salad without any specialized tools, using the following can enhance your experience:
– **Deli quart containers with lids**: Perfect for mixing and storing the salad.
– **Mandolin**: For uniformly sliced cucumbers.
– **Microplane**: For finely grating garlic.
## Cucumber Salad Variations
Logan’s rise to fame has resulted in a myriad of cucumber recipes, with fresh variations appearing every day. Each recipe generally begins with an entire cucumber, highlighting the adaptability of this refreshing vegetable. From spicy to sweet, the options are limitless, making it a must-have for summer dishes.
## Conclusion
The TikTok cucumber salad is more than just a fad; it’s a tasty and simple way to enjoy a nutritious meal during the warmer seasons. With its crunchy texture and zesty dressing, it’s no surprise this salad has become a hit among TikTok users. So grab a cucumber, follow the easy recipe, and become part of the cucumber community that is taking social media by storm!
Read More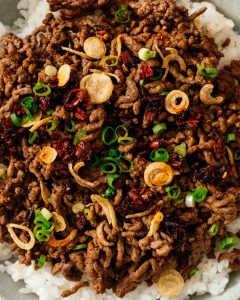
Enhanced Boy Kibble: An Improved Option
# What Exactly is Boy Kibble and Why Has it Become So Popular?
Boy kibble has recently caught a lot of attention across social media channels, igniting curiosity among numerous individuals, particularly those who aren’t acquainted with the term. This piece explores what boy kibble is, its components, cooking methods, nutritional values, and the factors contributing to its rising trend.
## What is Boy Kibble?
Boy kibble is fundamentally a straightforward dish created from ground beef and rice, frequently served with a variety of sauces or toppings. It is notable for its high protein levels and simple preparation, which makes it a favored selection among college students and young adults. The meal is not only quick to prepare but also fulfills the cravings of those in search of a substantial dish without advanced culinary skills.
## How to Prepare Boy Kibble
Preparing boy kibble is uncomplicated and demands minimal cooking expertise. Here’s an easy recipe:
1. **Prepare Some Rice**: Cook your rice using your chosen method, whether it’s on the stovetop or in a rice cooker.
2. **Brown the Ground Beef**: In a non-stick frying pan, brown the ground beef, seasoning it well with salt and pepper. Break it into smaller pieces while it cooks. After it’s browned, incorporate any spices or sauces you prefer.
3. **Plate It Up**: Place rice on a dish, layer it with the seasoned beef, and add any toppings if you like.
## Ingredients for Boy Kibble
The fundamental ingredients for boy kibble consist of:
– **Ground Beef**: The main source of protein, typically around one pound of lean or standard ground beef.
– **Rice**: Any type of rice you prefer, with brown rice being a more nutritious choice.
– **Spices/Seasonings**: Crucial for flavor, options include hot sauces, seasoning blends from instant noodles, or various spice mixtures.
– **Toppings**: Optional items such as herbs, vegetables, or crispy onions can improve the dish.
## How to Flavor Boy Kibble
To enhance the taste of boy kibble, think about using these seasonings:
– **Chicken Salt**: A combination of chicken bouillon, garlic powder, onion powder, and salt.
– **Taiwanese Spice Combination**: A mix of five spice, white pepper, black pepper, garlic powder, and salt.
– **Soy Sauce**: A naturally fermented soy sauce brings richness to the dish.
– **Chili Crisp**: For added crunch and flavor.
## The Craze for High Protein
In recent times, there has been an increasing inclination towards high-protein diets. Protein is vital for muscle development, tissue recovery, and overall fullness. Boy kibble, with its substantial protein content from ground beef, fits seamlessly into this dietary trend.
## Is Boy Kibble Nutritious?
Although boy kibble is rich in protein, it might lack nutritional balance, particularly if prepared with white rice. To enhance its health benefits, consider swapping white rice for brown rice or incorporating leafy greens for additional vitamins and fiber.
## Why is Boy Kibble Gaining Traction?
The charm of this dish lies in its cost-effectiveness, straightforwardness, and the catchy name that appeals to a younger demographic. Boy kibble is perceived as a low-effort yet rewarding meal that aligns perfectly with the hectic schedules of many.
## What’s Behind the Name Boy Kibble?
The term “boy kibble” serves as a whimsical rebranding of classic ground beef rice bowls. It encapsulates the spirit of a quick, fulfilling meal that is often linked to young men, similar to the notion of “girl dinner.”
In summary, boy kibble has surfaced as a trending food phenomenon thanks to its simplicity, high protein content, and cultural relevance. Whether you’re an experienced cook or a novice, boy kibble is a convenient and delightful meal option to consider.
Read More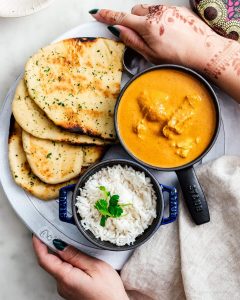
Butter Chicken Recipe for Instant Pot
# Instant Pot Butter Chicken: A Tasty and Saucy Treat
Instant Pot butter chicken is a cherished dish that brings together savory tastes and a creamy consistency, making it an ideal companion with rice and naan to soak up its delightful tomatoey buttery sauce. Known as murgh makhani in India, this dish has become a favorite in numerous households thanks to its rich flavor and straightforward preparation.
## A Personal Link
Butter chicken occupies a special spot in many people’s hearts, often tied to fond memories. For instance, it was a favorite for a couple who loved to cook together when they first settled in. Initially depending on store-bought sauces, they ultimately evolved to create the dish from scratch, demonstrating their developing cooking abilities and passion for Indian cuisine.
## The Charm of Instant Pot Butter Chicken
In today’s fast-paced world, the Instant Pot has transformed home cooking, enabling quick and flavorful meals with minimal effort. Instant Pot butter chicken is especially tempting for those occasions when you desire something comforting yet simple to make.
### How to Prepare Instant Pot Butter Chicken
#### Ingredients
– **Diced Tomatoes**: 14 oz can (undrained)
– **Garlic**: 6 cloves, minced
– **Ginger**: 1 tbsp, minced
– **Spices**:
– 1 tsp ground turmeric
– 1 tsp ground cayenne pepper
– 1 tsp smoked paprika
– 2 tsp garam masala
– 1 tsp ground cumin
– 1 tsp salt
– **Chicken**: 1 lb boneless skinless chicken thighs or breasts
– **Butter**: ½ cup, cubed (unsalted)
– **Heavy Cream**: ½ cup
– **Fresh Cilantro**: ½ cup, chopped (for garnish)
#### Instructions
1. **Combine Ingredients**: In the Instant Pot, mix the diced tomatoes, garlic, ginger, turmeric, cayenne, paprika, 1 tsp garam masala, cumin, and salt. Stir thoroughly and nestle the chicken pieces into the blend.
2. **Cook Under Pressure**: Lock the lid and set the Instant Pot to high pressure for 10 minutes. Allow the pressure to release naturally for 10 minutes before manually releasing any remaining pressure.
3. **Puree Sauce**: Carefully take out the chicken and set it aside. Use an immersion blender to puree the sauce until smooth, or transfer to a blender. Let it cool briefly before mixing in the butter, cream, and the remaining teaspoon of garam masala.
4. **Heat Through**: Dice the chicken into bite-sized chunks and return it to the sauce. Set the Instant Pot to sauté on low to warm the chicken and let the sauce simmer.
5. **Garnish and Enjoy**: Top with freshly chopped cilantro and savor!
## What If You Don’t Own an Instant Pot?
If you don’t have an Instant Pot, you can still relish butter chicken by simmering the chicken uncovered in a pot for 25-30 minutes, adding water as needed to keep the liquid level consistent.
## The Essence of Butter Chicken
Butter chicken is a relatively contemporary dish, crafted by the Moti Mahal restaurant group in India. It features a mild, creamy sauce made from tomatoes, spices, butter, and cream, making it a comforting favorite for many.
## Recipe Authenticity
This recipe is grounded in traditional methods of preparing butter chicken, ensuring that it stays true to its Indian heritage while being approachable for home cooks.
## Flavor Characteristics
The mix of cream and tomatoes offers a lovely balance of umami and acidity, with the cream softening the spices’ heat. This makes butter chicken a comforting dish that appeals to a broad spectrum of tastes.
## Butter Chicken vs. Chicken Tikka Masala
Though both dishes share similarities, butter chicken is creamier and milder, while chicken tikka masala tends to be more tomato-centric and spicier. Each dish possesses its distinct allure and flavor profile.
## Helpful Tips
– **No Need for Extra Water**: The chicken will produce enough moisture, so refrain from adding excess water to avoid a watery sauce.
– **Cool the Sauce First**: Allow the sauce to cool a bit before incorporating the butter and cream for optimal texture.
– **Finish with Garam Masala**: Adding garam masala at the end enriches the flavor profile.
– **Prevent Burn Alerts**: Ensure you use a 14 oz can of diced tomatoes with all the liquid to avert burn warnings in the Instant Pot.
## Ideal Pairings for Butter Chicken
Butter chicken goes beautifully with basmati rice and naan, creating a complete and fulfilling meal.
### Nutritional Information (Per Serving)
– **Calories**: 419
– **Fat**: 31.7g (Saturated Fat: 18.1g)
– **Cholesterol**: 154mg
Taiwanese Popcorn Chicken Dish: Options for Air Frying or Baking
# Taiwanese Popcorn Chicken Nuggets: A Culinary Treasure
Taiwanese popcorn chicken nuggets are a cherished snack that has won the affection of food lovers worldwide. Renowned for their exceptionally crunchy texture and intensely savory taste, these nuggets represent not just a delicacy but also a cultural icon emerging from Taiwan’s lively night markets.
## What is Taiwanese Popcorn Chicken?
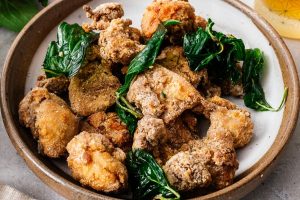
Taiwanese popcorn chicken is an irresistible street food that has established itself as a fundamental part of Taiwanese cuisine. Typically made from boneless, skinless chicken thighs, marinated in a blend of spices, coated in starch, and then deep-fried to perfection, it boasts an addictive quality. The double-frying method—first at a lower heat to cook the chicken thoroughly, followed by a high-heat fry for added crunch—ensures that every bite is succulent on the inside and crispy on the outside. Often, these nuggets are flavored with a combination of salt and pepper and adorned with deep-fried basil leaves, contributing an aromatic flair to the dish.
## Ingredients for Taiwanese Fried Chicken
The essential components for crafting Taiwanese popcorn chicken include:
– **Chicken**: Boneless skinless chicken thighs are favored for their moisture.
– **Light Soy Sauce**: Imparts umami taste without overly darkening the chicken.
– **Starch**: A blend of cornstarch and potato starch provides a delicate, crispy coating.
– **Five Spice Powder**: This spice mix imparts the chicken with its unique flavor.
– **White Pepper**: Introduces a sharp, floral essence.
– **Thai Basil**: Frequently used as a garnish, contributing an earthy freshness.
## How to Make Taiwanese Fried Chicken
### Step-by-Step Instructions
1. **Cut the Chicken**: Slice the chicken into bite-sized pieces, ensuring uniformity for even cooking.
2. **Marinate**: Mix the chicken with soy sauce, garlic, five spice powder, white pepper, and salt. Let it marinate for a minimum of 30 minutes.
3. **Coat the Chicken**: Dredge the marinated chicken in a blend of cornstarch and potato starch until evenly coated.
4. **Fry**: Deep-fry the chicken in hot oil, beginning at a lower temperature, followed by a higher temperature for extra crispness.
5. **Toss with Seasoning**: After frying, mix the chicken with a seasoning blend of salt, white pepper, and five spice powder.
### Cooking Methods
– **Deep-Frying**: The classic approach, delivering the crispiest outcomes.
– **Air-Frying**: A healthier option that still provides a satisfying crunch.
– **Oven-Baking**: A method that uses less oil, although it may not achieve the same crispiness.
## The Best Coating for Taiwanese Popcorn Chicken
The distinctive texture of Taiwanese popcorn chicken comes from its coating, generally made from a mix of cornstarch and sweet potato starch. This combination results in a light, crispy shell that differs from traditional flour coatings. Sweet potato starch, in particular, is preferred for its high amylose content, which enhances crunchiness.
## What to Serve with Taiwanese Fried Chicken
Taiwanese popcorn chicken can be savored alone as a snack or paired with fluffy white rice, fried noodles, or even green onion pancake beef rolls for a complete dining experience.
## Conclusion
Taiwanese popcorn chicken nuggets represent more than just a snack; they are a representation of Taiwanese street food culture. Their irresistible crunch and savory flavor render them a must-try for anyone eager to dive into the rich culinary heritage of Taiwan. Whether you opt to deep-fry, air-fry, or bake, this dish is guaranteed to delight your taste buds and evoke cherished memories of late-night hangouts and joyful times with friends.
Read More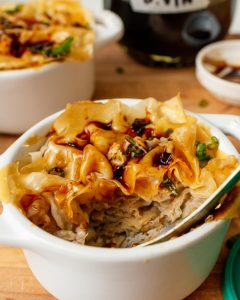
Pork Dumpling Lasagna: An Illustrated Guide to the Recipe
# These Viral Dumpling Lasagna Creators Are Here to Stay
Dumplings are cherished comfort food for many, delivering a delightful blend of succulent meat and vegetables encased in tender dough. Among the diverse kinds of dumplings, *xiao long bao* (Shanghai soup dumplings) emerges as a standout, recognized for its flavorful filling and delicate casing. However, crafting these dumplings from scratch can be intimidating, which is why the inventive idea of dumpling lasagna has captivated the culinary scene.
## What is Dumpling Lasagna?
Dumpling lasagna represents a whimsical take on classic dumplings, presenting them in a layered format akin to lasagna. This dish showcases layers of thin wonton wrappers filled with a savory combination of pork and cabbage, all steamed to perfection. Instead of baking, the layers are steamed, yielding a tender, spoonable dumpling experience. Finished with chili crisp and a dash of soy sauce and black vinegar, dumpling lasagna guarantees a rush of flavor in every mouthful.
## Who Invented Dumpling Lasagna?
The dumpling lasagna trend surged in popularity through social media, particularly TikTok, where user april_eatz demonstrated a straightforward method to create this dish. By stacking a pork filling with cabbage and wonton wrappers instead of folding individual dumplings, she made the endeavor accessible and enjoyable, contributing to its viral acclaim.
## TikTok Soup Dumpling Ingredients
To whip up this delicious dish, you’ll need the following ingredients:
– **Ground Pork**: The centerpiece of the filling, delivering flavor and moisture.
– **Wonton Wrappers**: These act as the noodle layers and are readily available at grocery stores.
– **Vegetables and Aromatics**: Finely chopped cabbage, fresh ginger, and green onions impart depth and flavor.
– **Seasoning**: A blend of soy sauce, Shaoxing wine, toasted sesame oil, salt, and white pepper elevates the overall taste.
– **Chicken Stock**: Introduces moisture during the steaming process.
– **Toppings**: Personalize with chili crisp, soy sauce, black vinegar, and sesame seeds for enhanced flavor.
## How to Make TikTok Soup Dumplings
Follow these instructions to create your own dumpling lasagna:
1. **Prep**: Slice the cabbage, green onions, and mince the ginger. Set a steamer in a large pot.
2. **Mix**: In a bowl, combine ground pork, soy sauce, Shaoxing wine, sesame oil, salt, and pepper.
3. **Layer**: In ramekins, alternate layers of wonton wrappers and pork filling. Pour chicken stock before adding the final layer of wrappers.
4. **Steam**: Cook in the steamer for approximately 20 minutes or until the pork is completely cooked.
5. **Enjoy**: Take out from the steamer, allow it to cool slightly, and serve with your preferred toppings.
## Big Soup Dumpling Lasagna
For those interested in creating a grander version, you can build a large dumpling lasagna in a casserole dish. Layer the ingredients in a similar manner, but cover with chicken stock and bake at 350°F for around 30 minutes, checking for doneness.
## Dipping Sauce
While dipping an entire dumpling lasagna isn’t feasible, traditional *xiao long bao* is commonly enjoyed with black vinegar and ginger. If black vinegar isn’t accessible, a combination of balsamic and rice vinegar can act as a substitute.
In conclusion, dumpling lasagna is a delightful blend of flavors and textures that brings the joy of dumplings into a new format. Whether you’re an experienced cook or a novice, this dish is sure to impress and satisfy. Relish the warmth and comfort it provides, especially on a chilly day!
Read More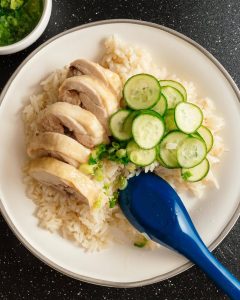
Genuine One-Pot Hainanese Chicken Rice Recipe
# If You’re Searching for Your Next Effortless, Tasty One Pot Meal, This is It: Hainanese Chicken Rice
Have you ever experienced Hainanese chicken rice? Are you as enamored with it as I am? I’m thinking the answer is no, as I have a lifelong, profound obsession with chicken rice. It’s my top comfort food, my all-time favorite meal, my equivalent to Anton Ego’s mom’s ratatouille. You know, the scene in the Pixar film where Anton is transported back to his mother’s kitchen, and she serves him ratatouille, creating a moment of bliss. That’s Hainanese chicken rice for me.
Jump to the recipe using the button at the top of the page or continue reading for some serious Hainanese chicken rice enthusiasm.
## What is Hainanese Chicken Rice?
Hainanese chicken appears simple yet is quite intricate. It originated in Hainan, located in Southern China, but its true heart lies in Singapore, where you’ll discover versions of the beloved dish everywhere, from street vendors to upscale hotels.
I would fiercely argue that Hainanese chicken rice is the finest version of chicken and rice available. It’s so modest, so delicious, and so genuine. At its core, Hainanese chicken rice is merely chicken and rice.
The chicken is poached in a straightforward yet tasty broth infused with ginger, garlic, and scallions, resulting in a silky, firm texture that tastes like the best chicken you’ll ever encounter. The accompanying rice should be able to shine on its own: bursting with chicken flavor, glossy with fat, savory, and aromatic.
## What’s So Unique About the Rice?
You need to taste it to grasp it, but I believe the rice is the secret behind why Hainanese chicken rice is extraordinary. The key to the rice is chicken fat. Any proficient cook recognizes that when you prepare rice in broth, the broth seeps into the grains, enhancing their flavor. Many cultures employ this technique, similar to how Mexican rice is cooked with tomatoes and onions. Chicken rice takes it a step further by sautéing uncooked rice in chicken fat with garlic, shallots, and ginger before cooking it in chicken broth, adding a layer of toasty, fragrant lusciousness. The rice ought to be shiny, rich, and flavorful.
## The Best Chicken Rice is the One You Enjoy Making
Many Hainanese chicken rice recipes feature 24-hour (or longer) cures and various intricate steps. It doesn’t have to be complicated, particularly if you’re just seeking delicious chicken rice and you’re not vying with numerous other chicken rice vendors at a market. It’s the rice that requires careful attention, and that’s a straightforward task that doesn’t demand significant extra time.
For me, preparing chicken rice is a pleasure; I find it oddly soothing. However, at times I crave chicken and rice without the hassle of cooking a whole chicken. **This straightforward recipe is designed for those occasions: skin-on boneless chicken thighs and rice are cooked in one pot for convenience and fewer dishes to clean.** A win-win!
## The Secret to Excellent Hainanese Chicken Rice
This is a fundamental one pot Hainanese chicken rice with all the taste and none of the hassle. The recipe begins with chicken fat. If you’re like me and adore chicken rice, making it regularly, you’ll want to keep a jar of rendered chicken fat in your refrigerator. Even if you’re not like me and don’t want to prepare chicken rice every day, having a jar of chicken fat in the fridge is essential. Chicken fat is PURE FLAVOR.
Chicken fat is what enhances the rice portion of chicken rice, making it so delectable. But, if you don’t possess chicken fat, don’t fret; toasting your rice in any fat will provide it with a glossy, tasty flavor layer. The secret is to cook the ginger, garlic, and shallots in fat so that the aromatics release their delightful essence into the rice.
## How to Render Chicken Fat
Chicken fat is vital for a good Hainanese chicken rice. The addition of chicken fat brings tremendous flavor to the rice, and you’ll be amazed.
1. **Collect.** Trim excess skin from the chicken thighs. Whenever you come across a recipe requiring boneless skinless chicken thighs, opt for skin-on, bone-in chicken. Debone and save the bones for stock and the skin for rendering. I like to freeze a large quantity, then create a big batch of chicken fat and crispy chicken skin.
2. **Chop.** Use a sharp knife to cut the chicken skin into small 1/2 inch pieces. Scissors can work well for this too.
3. **Slowly render.

Discovering Tokyo in the Height of Sakura Season: An Essential Addition to Your Bucket List
# Experiencing Sakura Season in Tokyo: A Dream Fulfilled
Visiting Japan, particularly Tokyo, during sakura or cherry blossom season has long been a dream of mine. It took Mike and me nine years of trips to Japan before we finally experienced sakura. This wait wasn’t due to missed chances or a lack of interest; it stemmed from a blend of concerns about the crowds and our preference for other seasons in Japan.
In 2019, we decided it was time to change our routine. Despite my early doubts, Mike urged us to organize our trip around the peak of cherry blossom season. This turned out to be one of our smartest decisions.
## When is Sakura Season in Tokyo?
The cherry blossom season changes from year to year based on climatic factors, but it usually takes place in early April. Various websites and calendars offer updates on blooming forecasts, with full bloom being the prime moment to observe the gorgeous display of delicate pink and white blossoms. The transient beauty of sakura is a much-anticipated event in Japan, symbolizing the arrival of spring and providing a wonderful reason for gatherings and celebrations.
## Best Places to View Sakura in Tokyo
Mike and I successfully booked our flight right at the beginning of the peak season. Our intention was to spend a day in Tokyo enjoying the blossoms before embarking on a short train journey to explore other areas of Japan. After a lengthy flight, we dropped off our luggage and made our way to one of Tokyo’s prime cherry blossom locations: Nakameguro.
### Nakameguro
Nakameguro is a bustling neighborhood brimming with delightful eateries, trendy cafes, and boutiques. The Meguro River, adorned with sakura trees and glowing with pink lanterns, is a favored Instagram location. Although it can get crowded, especially during busy hours, we arrived in the afternoon when the crowds were more manageable. The atmosphere was lively, and the sakura were stunning.
Street food vendors enhanced the experience, offering sakura-themed delicacies and traditional Japanese festival foods. I savored grilled mochi with a sweet, garlicky sauce and we sampled yakisoba along with other tasty options. The variety of street food was impressive, featuring choices like strawberry drinks, takoyaki, and miso dango.
### Chidorigafuchi Park
Following our time in Nakameguro, we headed to Chidorigafuchi Park close to the Emperor’s Palace. Arriving at sunset, we admired the sakura glowing against the evening sky. While beautiful, the park was considerably busier than Nakameguro, filled with both tourists and locals. We took a brief walk and snapped countless photos before deciding to return the next day for a more peaceful experience.
The next morning, we went back to Chidorigafuchi Park, where daylight showcased the breathtaking canopy of cherry blossoms. The contrast between the moat’s color and the pink blossoms was stunning, and we enjoyed observing people paddle boats while claiming spots for hanami.
## What is Hanami?
Hanami is the traditional custom of picnicking beneath cherry blossom trees. Groups come together with food, drinks, and friends to appreciate the beauty of sakura. Although we didn’t get to partake in hanami ourselves, we watched numerous groups savoring their time collected under the trees with blue tarps laid out beneath them.
## Tips for Enjoying Sakura Season in Tokyo
If you find yourself in Tokyo during sakura season, here are five suggestions for a successful hanami experience:
1. **Bring a tarp**: Many individuals spread blue tarps to secure a prime hanami spot. Inexpensive tarps can be found at 100 yen stores.
2. **Grab some drinks**: Alcohol is a key component of hanami. Visit a convenience store like 7-11 or Lawson’s to stock up on beverages.
3. **Food is crucial**: Snacks are a must. If food stalls are around, treat yourself to local specialties. Otherwise, convenience store fare or Uber Eats can be good alternatives.
4. **Don’t let crowds deter you**: Securing a seating spot can be competitive, but you can still soak in the atmosphere while hovering near food stalls.
5. **Bring napkins or wet wipes**: Many vendors don’t supply them, so it’s smart to come prepared.
Our experience in Tokyo during sakura season was unforgettable, filled with beautiful sights, delicious food, and the joy of embracing a cherished cultural event. As we boarded the shinkansen for our next adventure, we reflected on the enchantment of cherry blossoms and the memories we forged.
Read More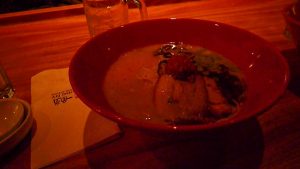
The 10 Essential Ramen Eateries in Tokyo to Experience in Spring 2026
# If You’re Heading to Tokyo, Ramen is Essential
A piping hot bowl of noodles in flavorful, umami-filled broth, garnished with succulent chashu and a rich yolked egg is definitely an essential experience. With countless ramen establishments in Tokyo, the variety can create decision fatigue for many tourists.
## My Enduring Affection for Tokyo Ramen
Mike and I have been delving into Tokyo’s ramen landscape since the early 2000s when a simple bowl was just 500 yen. Over the years, we’ve frequented more than 300 ramen venues, nurturing a profound affection for noodles. Our adventure commenced at David Chang’s Momofuku Bar in New York, which ignited our passion. After thorough research and efforts to replicate our favorite bowls at home, our inaugural bowl in Tokyo left us astonished and reaffirmed our enthusiasm.
We became enthusiastic followers of ramen accolades, including the TRY Magazine (Tokyo Ramen of the Year), and committed ourselves to sample every winner. Despite the overwhelming array of choices, we persist in hunting for the finest ramen establishments annually.
## My Top 10 Ramen Spots in Tokyo
Here are my top ten ramen spots in Tokyo, selected for their approachable, refined tastes. These choices may not all be in vogue, but each provides a memorable experience.
### 1. Ginza Hachigo
– **Broth:** A clear consommé crafted from duck, free-range chicken, scallops, dried tomatoes, and more.
– **Noodles:** Thin, bouncy, and springy durum wheat noodles.
– **Toppings:** Kujo negi, bamboo shoots, thick-cut chashu, and ajitama.
– **Vibe:** Sophisticated with a wooden counter and open kitchen.
**Location:** 3 Chome−14−2 Ginza, Chuo City, Tokyo
**Hours:** Tuesday-Sunday, 11am until the soup is exhausted
### 2. Motenashi Kuroki
– **Broth:** Shio broth featuring chicken, duck, pork, and a mix of five salts.
– **Noodles:** Choice of thin straight or hand-scrunched thick curly noodles.
– **Toppings:** Chicken chashu, menma, and seasonal variations.
– **Vibe:** Contemporary and spacious with an attractive display.
**Location:** 1 Chome-28-9 Asakusabashi, Taito City, Tokyo
**Hours:** M-S 11am-3pm, 6pm-8pm
### 3. Konjiki Hototogisu
– **Broth:** Dashi, clam, fish, and chicken broth finished with a truffle sauce.
– **Noodles:** Chewy, medium-thin noodles made from Hokkaido wheat.
– **Toppings:** Roast pork shoulder chashu and signature black truffle sauce.
– **Vibe:** Inviting ramen counter with warm wooden accents.
**Location:** 2 Chome−4−1 Shinjuku City, Shinjuku, Tokyo
**Hours:** M-F 11am-2:30pm, 6:30-8:30pm
### 4. Jun Teuchi Men to Mirai
– **Broth:** Light and clean chicken broth with a touch of yuzu.
– **Noodles:** Extra thick, handmade noodles.
– **Toppings:** Shrimp wonton, pork belly chashu, and cilantro.
– **Vibe:** Traditional ramen setting with an open kitchen.
**Location:** 3 Chome-25-1 Kitazawa, Setagaya City, Tokyo
**Hours:** M-F 11:30am – 2:30pm, 5:30-9pm; Sat-Sun 11:30am-5pm
### 5. Kagari
– **Broth:** Creamy toripaitan made from Japanese chickens.
– **Noodles:** Thin, straight noodles that pair well with the broth.
– **Toppings:** Tender sous vide chicken breast and seasonal vegetables.
– **Vibe:** Elegant and cozy within a tucked-away Ginza alley.
**Location:** 6 Chome-4-12 Ginza, Chuo City, Tokyo
**Hours:** 11am-9:30pm
### 6. Yamaguchi
– **Broth:** 100% chicken stock with a subtle umami essence.
– **Noodles:** Chewy, medium-thin noodles.
– **Toppings:** Salt-brined chicken breast, braised pork shoulder chashu, and chicken wonton.
– **Vibe:** Modern ramen counter with a pristine kitchen.
**Location:** 3 Chome-13-4 Nishiwaseda, Shinjuku City, Tokyo
**Hours:** Daily, 11am – 9:30pm, or until sold out
### 7. Mensho Gotokuji
Read More
Genuine Lamb Shepherd’s Pie Recipe
# The Delight of Shepherd’s Pie
Shepherd’s pie is an adored dish that merges the robustness of meat and vegetables with the soothing creaminess of mashed potatoes. This timeless comfort food stirs emotions of coziness and nostalgia, making it a preferred choice for many, particularly during chilly winter months.
## The Ultimate Shepherd’s Pie
Not long ago, I had the joy of trying two distinct British recipes for shepherd’s pie, thanks to my friend Mike. He made both Jamie Oliver’s and Gordon Ramsay’s variations, and to our astonishment, Oliver’s recipe stood out as the clear winner. The taste was so delightful that I found myself preparing it over and over, and it has now become my favorite recipe for this dish.
## The Core of Shepherd’s Pie
Conventionally, shepherd’s pie is crafted with lamb, whereas cottage pie is created with beef. In the United States, these terms are frequently used interchangeably, but true purists contend that lamb is the ideal option. The rationale is straightforward: shepherds tend to sheep, making lamb the genuine selection for shepherd’s pie. Although I was raised enjoying cottage pie, I must confess that lamb shepherd’s pie delivers a more opulent and flavorful experience.
## Potatoes: The Ideal Topping
As an aficionado of potatoes, I love how the creamy mashed potatoes envelop the savory lamb filling. For my rendition, I use bone-in roasted lamb, which boosts the flavor. To enhance the mashed potatoes, I pass them through a sieve for added smoothness and incorporate sour cream for a zesty touch. This recipe, while a bit time-consuming, is perfect for special occasions like Easter, providing a touch of sophistication without compromising comfort.
## Steps to Prepare Lamb Shepherd’s Pie
One of the reasons shepherd’s pie enjoys such popularity is its ease of preparation. It serves as a fantastic weeknight dinner, is excellent for meal prepping, and can even be frozen for later use. Here’s a simple guide to crafting your own lamb shepherd’s pie:
1. **Roast the Lamb**: Coat lamb chops with oil and season generously. Roast for approximately 2 hours until tender. Remove the meat from the bones and chop, saving the bones and juices.
2. **Prepare the Lamb Stew**: Use the roasting fat to sauté diced vegetables. Stir in flour, the lamb, roasting juices, and water, then simmer until it reduces into a stew.
3. **Create the Mash**: Boil potatoes until soft, then mash and combine with butter, milk, sour cream, and cheddar cheese for richness.
4. **Construct the Pie**: Spread a thin layer of mashed potatoes in a baking dish, add the lamb mixture, and top with the remaining mashed potatoes.
5. **Bake and Savor**: Bake in the oven for about an hour until the top is golden and crunchy.
## Serving Ideas
As spring draws near, think about pairing your shepherd’s pie with fresh spring peas and perhaps some corn that you froze from last summer. This combination not only enhances the pie but also brings a pop of color and freshness to your meal.
In summary, shepherd’s pie transcends being just a meal; it’s a comforting experience that unites people. Whether you favor the classic lamb variety or a substantial beef cottage pie, this recipe is guaranteed to warm your heart and please your palate. Happy cooking!
Read More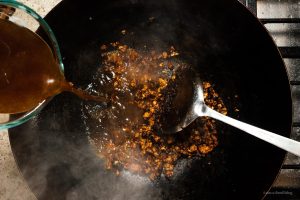
Simple and Genuine Mapo Tofu Recipe
# I’m hooked on the enchanting blend of silky smooth tofu and zesty spicy pork. If you’re in the loop, you understand: mapo tofu.
## What is mapo tofu?
Mapo tofu is a renowned Sichuan dish featuring a generous amount of *mala*, the distinctive numbing spiciness characteristic of exceptional Sichuan cuisine. If you’re unacquainted with Sichuan fare, the vibrant red color may intimidate you, but once you overcome that heat, you’ll crave it again!
If you’re fond of tofu and enjoy spice, mapo tofu is sure to delight you as well. And if extreme spice isn’t your thing, the beauty of this dish is that you can tweak the spiciness by adjusting the amount of Sichuan pepper you use as a finishing touch.
For those unfamiliar, here’s a brief overview: mapo tofu is a widely loved Chinese dish originating from the Sichuan province. It features soft tofu immersed in a spicy, bright red sauce accompanied by ground pork. The dish’s name roughly means “pockmarked grandma’s tofu,” akin to your grandmother’s special tofu. Numerous variations exist, but this is a classic, authentic mapo tofu recipe.
## How to prepare authentic mapo tofu
With your ingredients ready, the recipe is quite straightforward. Begin by blanching your tofu in salted water. Next, it’s simply a matter of frying the pork and [doubanjiang](https://iamafoodblog.com/doubanjiang-sichuan-spicy-bean-paste/), incorporating chicken stock, and thickening it. Sautéing the doubanjiang to release its oils enhances the flavor and aroma. The sauce thickens with cornstarch, resulting in a glossy, golden mixture that clings flawlessly to your tofu cubes. It pairs beautifully with rice.
1. **Blanch the tofu.** Lightly simmer the tofu in salted water over low heat, then take the pot off the heat and let it sit in its salty water.
2. **Fry.** Cook the pork until crispy, then mix in the doubanjiang and fry it to release its spicy red oils. Add the garlic and ginger.
3. **Sauce.** Combine the chicken stock and soy sauce, bringing the mixture to a simmer. Incorporate the drained tofu cubes and stir in a cornstarch slurry. Simmer until the sauce is thick and glossy, and you’re all set!
## Key Ingredients
This dish centers around two essential ingredients: chili bean paste (doubanjiang) and Sichuan peppercorns. Both can be found at your local Asian grocery store. The rest of the ingredients are fairly common.
– **Doubanjiang.** Doubanjiang is one of the trickiest (or second trickiest) ingredients to source for authentic mapo tofu, but it’s definitely worth it. If your local Asian market doesn’t carry it, [you can find it online.](https://amzn.to/3N9NVFf) Read more about [doubanjiang here](https://iamafoodblog.com/doubanjiang-sichuan-spicy-bean-paste/) or below.
– **Sichuan peppercorns.** As for Sichuan peppercorns, you can purchase pre-ground powder, but if possible, opt for whole Sichuan peppercorns and toast and grind them on your own. The flavor will be much fresher and more pronounced.
– **Soft tofu.** Soft tofu is crucial for authentic mapo tofu. It should be smooth, rich, and soft.
– **Ground pork.** This dish includes a small amount of ground pork, just enough to enhance the tofu.
– **Ginger and garlic.** Ginger and garlic contribute a burst of aroma.
– **Chicken stock.** Chicken stock forms the bulk of the sauce.
– **Cornstarch.** Cornstarch is used as a thickener to ensure the sauce is silky and smooth.
– **Soy sauce.** Just a hint of soy adds extra umami.
## Doubanjiang
With certain authentic recipes, there’s usually that one ingredient you need to hunt down extensively. You might be wandering the aisles questioning if it’s really worth the effort. Allow me to assure you, it absolutely is! Doubanjiang is a spicy fermented blend of soy and broad beans. It’s referred to as the heart of Sichuan cuisine and is responsible for giving your mapo tofu that beautiful red color. When shopping, aim for the Pixian variety if available.
Read More