
Recipe for Cane’s Dressing
# Just Like Everyone Else, Cane’s Sauce with Its Creamy, Tangy, Zesty, Irresistible Pink Sauce Has Me in a Grip
If you’re not particularly keen on the fast food realm, you might not be familiar with Raising Cane’s. Here’s the rundown: they offer chicken fingers and *only* chicken fingers. Well, that’s a slight exaggeration. They also serve the finest crinkle cut fries, Texas toast, and coleslaw. Not to come off like a paid advertisement (this isn’t one), but I can’t get enough of Raising Cane’s.
As a devotee of chicken fingers, I relish their 24-hour marinated, made-to-order crispy chicken fingers. Don’t even get me started on the sauce. It’s prepared daily at each location, and the formula is a closely guarded secret. They don’t sell it, they haven’t shared the recipe, and that just intensifies the craving.
## What is Cane’s Sauce?
Cane’s sauce is Raising Cane’s incredibly secretive sauce served alongside their chicken fingers. It’s a charming pink salmon-colored sauce reminiscent of Thousand Island or Russian dressing. What ingredients are in it? No one knows. It’s a genuine trade secret. Even the general managers (the only individuals authorized to prepare it) are unaware of the components. They don’t follow a recipe; they simply combine unmarked ingredients. Even combining these unmarked mixtures necessitates signing strict non-disclosure agreements. The seasoning blend is the most confidential part of all.
## What is Cane’s Sauce Composed Of?
There’s a lot of conjecture regarding the composition of Cane’s sauce. Generally, it appears that people agree on a combination of mayo, ketchup, and Worcestershire sauce. There are also spices involved, but no one is entirely certain what is included in that mixture. Common hypotheses mention salt, pepper, garlic powder, and paprika. Lemon pepper is also often brought up.
## Our Sauce Methodology
I scoured the web for various Cane’s sauce recipes and conducted blind taste tests with Mike, playing with ratios and ingredients. I can’t guarantee that our recipe is an exact replica, but I can say it possesses that characteristic bite with the creamy, irresistible flavor of Cane’s.
## How to Create Cane’s Sauce
1. **Combine.** Measure out all of the components and blend until smooth.
2. **Chill.** Cover the sauce and allow it to chill in the refrigerator for 24 hours.
3. **Savor.** Give the sauce a stir and dip everything in it.
## Cane’s Sauce Essential Ingredients
– **Mayo** – The heavy-duty variety is liked best.
– **Ketchup** – The rosy salmon pink tone likely originates from ketchup, which imparts sweetness and tang.
– **Worcestershire Sauce** – Contributes umami and complexity.
– **Soy Sauce** – Believed to be included due to allergen disclosure.
– **Freshly Ground Coarse Black Pepper** – Delivers the sauce’s zing.
– **Garlic Powder** – Adds depth and sweetness.
### Heavy Duty Mayo
Almost everyone concurs that mayo serves as the base for Cane’s sauce. The trick is that it’s classified as extra heavy-duty mayo, commonly found in the restaurant sector. It’s essentially mayo with additional egg yolks, rendering it thicker and richer. Kewpie mayo, which is made solely with egg yolks, is an excellent alternative for home cooks.
### Fresh Black Pepper
While some argue that the heat comes from cayenne or a Cajun spice blend, it is suspected that Raising Cane’s employs high-quality black pepper, ground fresh each day. Tellicherry black pepper is especially recommended for its robust flavor.
## Cane’s Sauce Tips and Tricks
– **Allow to Rest** – For optimal flavor, let the sauce rest for at least 24 hours.
– **Kewpie Mayo** – If you can’t find heavy-duty mayo, Kewpie mayo is a fantastic replacement.
– **Coarse Ground Black Pepper** – Utilize high-quality, coarsely ground black pepper for the finest outcomes.
That concludes my thoughts on Cane’s sauce. Enjoy sauce crafting, and please let me know if you try this recipe and if you think it comes close to the original.
Read More
Crispy Shanghai Butter Mochi Recipe
# Shanghai Butter Mochi: The Crispy, Chewy Wonder
If you love soft, chewy desserts, Shanghai butter mochi is one you won’t want to overlook. Renowned for its pleasing texture, this dessert features a soft and chewy center encased in a crispy, golden-brown shell. With its subtly sweet flavor, it shines among numerous Asian desserts and is remarkably simple to prepare, even for those with limited baking skills. Additionally, it is inherently gluten-free!
## What is Shanghai Butter Mochi?
Shanghai butter mochi, also known as butter tteok, is a trendy baked delicacy that hails from Korea. It has surged in popularity across social media platforms, particularly in early 2026. The main ingredients consist of glutinous rice flour, butter, milk, and eggs, which are mixed and baked in individual containers. This dessert closely resembles Hawaiian butter mochi but offers a notably crispier texture. It also bears some resemblance to French canelé, characterized by a crunchy outer layer and a soft interior.
## How to Prepare Shanghai Butter Mochi
### Ingredients
– **Butter**: Key for creating that crispy, golden crust.
– **Sugar**: Regular granulated sugar contributes sweetness and supports caramelization.
– **Egg**: Adds richness and helps the mochi rise.
– **Vanilla**: Infuses a warm, rounded flavor.
– **Milk**: Whole milk is preferred due to its higher fat content, but any variety or substitute will work.
– **Glutinous Rice Flour (Mochiko Flour)**: This essential ingredient provides the mochi with its chewy consistency. It is naturally gluten-free.
### Instructions
1. **Prepare the Pan**: Generously grease a muffin pan or another pan with small cavities. Optionally, add a touch of sugar to the pan to create a crunchy surface.
2. **Melt Butter and Milk**: In a small saucepan, heat the milk and butter over low heat, stirring until the butter is completely melted. Do not bring it to a boil.
3. **Mix Eggs and Sugar**: In a separate bowl, beat together the egg, sugar, and vanilla until light and airy.
4. **Combine Mixtures**: Slowly whisk in the melted milk and butter mixture.
5. **Add Flours**: Incorporate the glutinous rice flour and tapioca flour, ensuring there are no lumps.
6. **Strain the Batter**: For a silkier texture, strain the batter through a fine mesh sieve (optional).
7. **Pour and Bake**: Distribute the batter evenly into the prepared molds and bake until golden and crispy.
8. **Cool**: Remove from the oven, allow to cool in the pan for a few minutes, then transfer to a wire rack. The mochi will become crispier as it cools.
## Storing and Recrisping Butter Mochi
If you have leftovers, let the mochi cool completely before storing them in an airtight container. They can be stored for a few days but will lose their crispiness over time. To recrisp, lightly toast them in a toaster oven at 350°F for 4-5 minutes or air-fry for 1-3 minutes, keeping a close watch to avoid burning.
## Nutrition Facts
Each serving (1 mochi) contains approximately:
– **Calories**: 90
– **Fat**: 2.2g (3% Daily Value)
– **Saturated Fat**: 1.1g (7% Daily Value)
– **Cholesterol**: 28mg (9% Daily Value)
– **Sodium**: 27mg (1% Daily Value)
– **Carbohydrates**: 12.6g (4% Daily Value)
– **Protein**: 1.7g (3% Daily Value)
*Percent Daily Values are based on a 2000 calorie diet.*
## Conclusion
Shanghai butter mochi is a delightful dessert that merges crispy edges with a chewy center, making it an ideal snack for any occasion. Whether you are an experienced baker or a beginner in the kitchen, this recipe is straightforward and gratifying. Enjoy crafting these delicious butter rice cakes and relish the scrumptious results!
Read More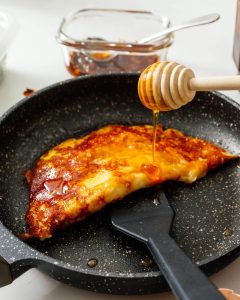
Zesty Honey-Infused Cheese and Egg Recipe
### These Spicy Honey Cheese Eggs Are Absolutely Delicious, You’ll Want to Make Them Again and Again
If you haven’t tried mozzarella that’s been melted in a skillet, you need to do so right away. It becomes wonderfully melty and stretchy, caramelizing in a way that perfectly envelops your sunny side up eggs in a cheesy layer. The mild spiciness of hot honey elevates it to another level. It’s everything I crave for breakfast.

I ended up preparing this in two different styles. The internet’s method: honey, then cheese, then egg. Then I tried it my way: cheese, followed by honey, then egg. They ultimately taste quite similar, but since I’m all about the #vibe aesthetics, I preferred how the hot honey eggs appeared with the cheese melted first. As Gen Alpha might say, cheese first dominates over honey first. Cheese first or honey first, the choice is yours.

#### Crunchy Cheese Eggs
I have adored crispy cheese eggs since 2015. Mike and I have been blogging for so long that retro trends are resurfacing. Who would have guessed that plaid shirts would be back in style? Not me. Anyway, cheese eggs are incredible: a crunchy, caramelized cheese crust over a flawlessly cooked egg? Protein on protein? Tell me more 😍
I love eggs, and discovering new ways to prepare them always makes me egg-cited. (Sorry, I had to) Puns aside, eggs are a fantastic source of protein, and when paired with stretchy, melty mozzarella and sweet yet spicy honey, these three components transform into something that far exceeds the sum of its parts.

#### What Exactly Are Spicy Honey Cheese Eggs?
Spicy honey cheese eggs resemble an over-easy egg resting on a bed of hot honey and crispy cheese. More specifically, hot honey is drizzled into a skillet, then shredded mozzarella is sprinkled in, followed by sunny side up eggs. Cover and cook, fold in half, and finish with additional hot honey or even a dash of chili crisp.

#### How to Prepare Spicy Honey Cheese Eggs
1. **Honey.** Take a non-stick skillet. Over medium heat, drizzle in some hot honey.
2. **Cheese.** Add a generous portion of shredded mozzarella cheese.
3. **Eggs.** Place two eggs directly on the cheese and season with salt and pepper to taste.
4. **Cover.** Put a lid on the skillet and cook the eggs until the whites firm up and the cheese starts to brown and caramelize.
5. **Fold.** Use a spatula to detach the cheesy base and fold the eggs in half. If preferred, let it cook a little longer to achieve the yolk’s desired consistency.
6. **Enjoy.** Transfer from the skillet and savor your cheesy, sweet-and-spicy eggs right away.

#### Ingredients for Spicy Honey Cheese Eggs
– **Hot Honey:** Hot honey is currently trending, and I personally am enjoying the sweet-heat combination everywhere. Mike’s Hot Honey is the most recognized hot honey brand, but like all beloved items, there’s an extensive variety available.
– **Cheese:** Shredded mozzarella cheese works best here. Its mild flavor and melting ability allows the hot honey to stand out while caramelizing to a delightful crisp.
– **Eggs:** Yes, please, eggs. If your budget permits, opt for local free-range or organic eggs; the difference in taste can be quite significant.

#### Sweet and Salty Eggs
There’s a reason why many addictive foods combine sweet and salty flavors. It stimulates two of our taste senses, and the interplay between the two makes them even more appealing to our palates. The sweetness from the honey blended with the savoriness of the cheese and eggs is harmonious in
Read More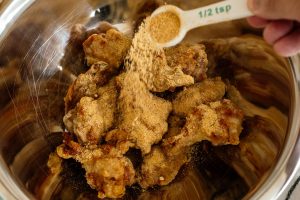
Chicken Salt: An Aromatic Seasoning Mix for Chicken Recipes
# If You Adore Seasoned Fries, You’re Going to Adore Chicken Salt
For those unfamiliar, you might be asking yourself what chicken salt actually is. Is it chicken? Is it salt? The response is both. And it’s spectacular on pretty much everything. Particularly chicken wings.
## What is Chicken Salt?
Australia conceals a secret umami treasure you might not have encountered. Essentially, it’s a seasoning mix brimming with bold, appetizing, umami-laden flavors. It is the standard seasoning mix liberally applied to fast-food fries down under. It’s cherished and esteemed, generously added to nearly anything for a sprinkle of flavor.

## The Finest Chicken Wings I’ve Ever Tasted
Aussies use it for fries, but I’ve discovered that it’s even more delightful on [air fryer chicken wings](https://iamafoodblog.com/air-fryer-chicken-wings/). Simply prepare the wings however you like (I utilize a wet/dry cornstarch combination in the air fryer) and then mix with chicken salt for the most effortless, delectable wings you’ve ever tasted.

## How to Prepare Chicken Salt
It’s as easy as combining all the ingredients listed below and blending them thoroughly. Once done, keep it in an airtight container.
### Chicken Salt Ingredients
– **Chicken bouillon powder:** This will provide the chicken flavor. Check the ingredients of the chicken powder and ensure that chicken is included. It’s what will impart the enormous umami taste you’re after.
– **Garlic powder:** Garlic powder is simply garlic that has been dried and ground into a fine powder. Make sure to select garlic powder, rather than garlic salt.
– **Onion powder:** The same applies to onion powder. It should solely consist of dehydrated onion ground into a fine powder for authentic onion flavor.
– **Sweet paprika:** A dash of sweet paprika contributes a touch of smokiness, a splash of red, and a hint of sweetness.
– **Salt:** Salt is essential for this; the best part about making your own is that you can adjust the quantity of salt.

## What is Chicken Salt Composed Of?
Gourmet versions begin with roasted, braised, dried, salted chicken, which is then dehydrated and mixed with salt and various spices. The standard seasoning ingredients include salt, garlic powder, onion powder, and white pepper. In contrast, commercial versions utilize chicken bouillon.

## Why is it Named Chicken Salt?
Interestingly, chicken salt is named such because it indeed contains chicken. While some commercial variants may not, the original recipe certainly includes chicken bouillon.
## Who Created Chicken Salt?
Chicken salt originates from Australia, introduced by Peter Brinkworth, a chicken shop owner in the 1970s. Initially, this spice mix was meant for his roast chicken, but after the shop sold in the late 70s, the new owners (the Mitani’s) reformulated it and marketed it as a seasoning. The rest is history.

## Quick Chicken Salt
If you desire all the flavors of chicken salt but don’t want to roast, dehydrate, and grind a chicken, this shortcut is for you. The key ingredient is chicken bouillon powder.
## What is Chicken Bouillon?
Bouillon is French for “broth,” so chicken bouillon essentially refers to chicken broth. It’s a term for condensed broth/stock that comes in cubes, granules, powder, paste, or liquid. Chicken bouillon is a fantastic shortcut for introducing chicken flavor to nearly everything.

## Vegan Chicken Salt
If you follow a vegan or vegetarian diet, you can still relish chicken salt – simply opt for a [vegan chicken-flavored powder such as Orrington Farm’s](https://amzn.to/45bkrQi).
## Why Create it at Home?
– It tastes incredible.
– Many commercial

Creamy Lays Chips: The Beloved Peri Peri Taste
# Viral Creamy Peri Peri Lays Chips: The Ultimate Snack Revolution
Chips have always been a favorite treat, but the arrival of viral creamy peri peri Lays chips has raised the snacking experience to unprecedented heights. These chips merge the iconic crunch of ripple chips with a luxurious, creamy sauce that transforms them from a basic snack into a delightful gastronomic adventure.
## Chips and Dip: A Cherished Combination
Chips and dip have consistently held a unique spot in our memories. The thrill of dipping a chip into a zesty sauce creates a mini celebration that enhances an ordinary snack into something unforgettable. The viral creamy peri peri Lays chips embody this spirit, providing a contemporary twist that makes them feel even more extraordinary.
## What Are Viral Creamy Peri Peri Lays Chips?
These chips essentially consist of ripple chips coated in a creamy, sour cream-based sauce, seasoned with a mixture of butter, garlic, chili flakes, oregano, chili powder, and fresh cilantro. The outcome is a visually enticing dish that has captivated social media, frequently presented in vibrant pink sauces that stimulate the taste buds.
## How to Create Creamy Peri Peri Lays Chips
Making these tasty chips at home is surprisingly easy. Here’s a straightforward guide:
1. **Prepare the Spiced Butter**: Melt butter over medium heat, add minced garlic, and cook until golden. Stir in red pepper flakes, oregano, and chili powder, then remove from heat and allow to cool.
2. **Make the Creamy Sauce**: In a mixing bowl, whisk together sour cream and milk, then blend in freshly chopped cilantro and the cooled spiced butter.
3. **Mix with Chips**: Add the Wavy Lays to the bowl and gently toss until evenly coated.
4. **Serve Right Away**: Savor the chips while they are still crunchy for the optimal experience.
## Ingredients for Creamy Peri Peri Chips
To recreate this snack, you will need:
– Butter
– Garlic
– Chili flakes
– Oregano
– Chili powder (optional)
– Sour cream or yogurt
– Milk
– Fresh cilantro
– Ripple chips (Wavy Lays or any preferred brand)
## Do I Really Need to Use Lays?
Although the internet frequently recommends using Wavy Lays, any ripple chip will work fine. The ridges help capture the sauce, ensuring every bite is delicious. Trying out different brands and flavors can lead to delightful surprises, like incorporating BBQ or ketchup-flavored chips.
## What Do the Viral Creamy Chips Taste Like?
If you’re a fan of peri peri sauce, these chips will be a favorite. They are garlicky, tangy, and savory, with a whisper of spice and herbs. The creamy sauce envelops each chip, yielding a delightful contrast of crunchy and slightly softened textures.
## Are the Chips Soggy?
The secret to relishing these chips lies in timing. While the ripple chips withstand the creamy sauce very well, they can turn soggy if left too long. For the finest experience, consume them right after preparation.
## Tips and Tricks for the Best Creamy Chips
1. **Use Ripple Chips**: Their robustness is crucial for supporting the sauce.
2. **Consume Immediately**: Enjoy the chips right after mixing them in the sauce.
3. **Adjust Sauce to Taste**: Modify the amount of sauce according to your liking.
4. **Prepare Ahead of Time**: You can make the creamy sauce in advance for quick snacking.
## Conclusion
Viral creamy peri peri Lays chips are more than just a passing fancy; they signify a fresh approach to enjoying chips that merges flavor, texture, and a dash of fun. Whether you’re throwing a party or simply treating yourself to a snack at home, these chips are bound to impress. Happy chipping!
Read More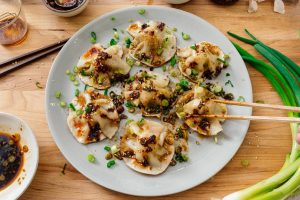
Blanket Dumplings: An Overview of Creating and Savoring This Cozy Dish
# These Trendy No-Fold Blanket Dumplings Have Hit the Scene
If you adore siu mai or any Chinese dumplings, you must try your hand at making these tasty and simple blanket dumplings. It’s an adorable new viral method of preparing dumplings. It’s quicker than the traditional folding method and tastes equally delicious. Honestly, who ever turns down dumplings?
Like any popular trend, there are numerous variations. I enjoy dumplings and keeping up with trends. Most importantly, I relish head-to-head contests, so naturally, I held a blanket dumpling competition.
## What Are Blanket Dumplings?
In simple terms, blanket dumplings are unassembled dumplings. The stuffing is formed into meatballs, and then dumpling wrappers are gently placed on top, resembling tiny blankets, hence the name.
## How to Create No-Fold Blanket Dumplings (Two Techniques)
Blanket dumplings are incredibly simple to prepare. Essentially, you’re scooping the filling and wrapping the dumpling wrapper around it. You can position the blanket/dumpling wrapper either on the top or the bottom (more details on that below).
### Blankets on Top
1. Prepare the dumpling filling by combining ground pork, finely chopped cabbage, aromatics, and spices.
2. Warm a little oil in a pan over medium heat, and when heated, spoon the filling directly into the pan in 1.5 tbsp portions.
3. Cover the portions with dumpling wrappers, creating a blanket effect.
4. Pour a small amount of water into the pan, cover it, and steam until the dumplings are fully cooked.
5. Lift the lid, allow the meat of the dumplings to become hot and crisp, then savor!
### Blankets Underneath
1. Prepare the dumpling filling by combining ground pork, finely chopped cabbage, aromatics, and spices.
2. Warm a small amount of oil in a pan over medium heat. Take a spoon and place about 1.5 tbsp of filling in the center of a dumpling wrapper.
3. Gather the dumpling wrapper up the sides and put it in the pan. Continue until all the dumpling filling is used. The dumplings can be positioned close and squished together without issue.
4. Add a little water to the pan, cover, and steam until the dumplings are fully cooked.
5. Remove the lid, allow the dumpling wrappers to become hot and crisp, then relish!
## No-Fold Blanket Dumpling Ingredients
– **Dumpling wrappers** – These can be found in the grocery store, generally in the refrigerated section, near the tofu. If unavailable, you can make your own. Ensure to select dumpling/gyoza wrappers instead of wonton wrappers, as they are thicker.
– **Ground pork** – Ground pork is the preferred option for dumplings, but you can utilize any ground meat you prefer.
– **Cabbage** – Cabbage contributes moisture. You can choose any type of cabbage; just chop it finely and salt it before preparing the filling to prevent excess moisture.
– **Ginger and garlic** – Fresh ginger and garlic bring a wealth of flavor to dumplings.
– **Green onions** – Finely sliced green onions add a refreshing brightness.
– **Soy sauce, oyster sauce, and toasted sesame oil** – These provide the primary flavors, along with a bit of salt and white pepper. If you lack oyster sauce, you can replace it with additional soy sauce.
– **Cornstarch** – A small amount of cornstarch assists in binding the dumpling filling and gives it a silky texture.
## Blanket Dumplings vs. Upside-Down Blanket Dumplings
You may have observed that I presented two different techniques for making blanket dumplings above. After the introduction of blanket dumplings, some wondered why one would prepare dumplings upside down. They weren’t mistaken. The original blanket dumplings are indeed upside down since Asian dumplings typically keep the filling inside.
The upside-down blanket dumpling method involves laying out the dumpling wrappers first, then placing the meatballs on top and pressing the wrappers around the meatballs. Upside-down blanket dumplings resemble siu mai, those delightful steamed pork and shrimp dumplings served at dim sum.
## Which Is Superior?
Both techniques yield different results. The original approach produces crispy browned meatballs, while the upside-down technique results in a crispy dumpling skin. After trying both, I concluded that the original method is superior, as it provides a crunch from the seared meatballs and the crispy bottom portions of the dumpling wrapper, while the top stays juicy.
### Blanket Dumpling Sauce
Everyone has their personal favorite dumpling sauce. Personally, I prefer a dipping sauce that is tangy, salty,
Read More
One-Pan Oven-Cooked Dumplings Recipe for TikTok
# The Ultimate One Pan Dinner: TikTok’s One Pan Dumpling Bake
The one pan dumpling bake has gone viral, captivating food enthusiasts with its ease and flavor. This dish showcases tender dumplings immersed in a rich, sweet-and-spicy sauce, making it ideal for serving over rice.
## What Makes Recipes Go Viral?
Viral recipes often allure us with their stunning presentations and claims of simple cooking. The one pan dumpling bake fits this mold. At first, I doubted this trend, believing that classic dumpling cooking methods were more than adequate. Nevertheless, the blend of coconut milk and red curry paste in this recipe was too irresistible to ignore.
## How to Create the Viral One Pan Dumpling Bake
### Ingredients
– **Frozen Dumplings**: 1 bag (about 1 lb) of gyoza or potstickers.
– **Coconut Milk**: 1 can (approximately 14 oz).
– **Red Curry Paste**: 2 tbsp.
– **Garlic**: 3 cloves, minced.
– **Ginger**: 2 tsp, grated.
– **Leafy Greens**: 3 cups of spinach or another green.
– **Toppings**: Sliced green onions, cilantro, toasted sesame oil, and optional chili crisp.
### Instructions
1. **Prep**: Preheat the oven to 375°F. Mince the garlic and grate the ginger.
2. **Assemble**: In a baking dish, combine coconut milk, red curry paste, garlic, and ginger. Stir in leafy greens until coated. Arrange frozen dumplings in the dish, pouring sauce over them.
3. **Bake**: Cover the dish and bake for approximately 20 minutes, or until the dumplings are fully cooked and the sauce thickens. Optionally, uncover for the last 5 minutes for added browning.
4. **Top**: Garnish with cilantro, green onions, sesame oil, and chili crisp.
5. **Enjoy**: Serve hot, either by itself or over rice or noodles.
## What is the One Pan Dumpling Bake?
This dish merges baked dumplings, usually gyoza or potstickers, with a savory sauce crafted from coconut milk and red curry paste. The outcome is a creamy, spicy sauce that thickens as it bakes, while the dumplings become juicy and plump.
## Trend Origins
The popular dumpling bake trend was initiated by Danielle Brown of Healthy Girl Kitchen on TikTok. As with many viral dishes, pinpointing an exact source can be challenging, but this recipe has garnered tremendous acclaim for its simplicity and taste.
## Selecting the Correct Pan
For the one pan dumpling bake, choose a dish where the dumplings can be partially submerged in the sauce. A 9×9 inch square casserole dish or an 11×7 inch rectangle is perfect.
## Best Frozen Dumplings
When choosing frozen dumplings, gyoza or potstickers are the best choices due to their thinner skins and scrumptious fillings. Local Asian grocery stores typically present a vast selection, but well-known brands like MìLà and Lao Ban can also be found in larger grocery stores.
## Serving Ideas
This dish complements simple steamed rice wonderfully, creating a warm meal. For a more refined touch, consider pairing it with a crisp cucumber salad or other light side dishes.
## Closing Thoughts
The viral one pan dumpling bake is a fantastic addition to any table. Its blend of flavors and ease of cooking make it a favored recipe for hectic weeknights. Whether you’re drawn to viral trends or just in search of a comforting meal, this dish is sure to please.
Read More
A Manual for Preparing Tomahawk Steak
# Occasionally I Envision Savoring a Tomahawk Steak Just for Myself
Tomahawk steaks are a gastronomic pleasure that many meat enthusiasts fantasize about experiencing. While they can be a luxury for regular meals, they make for an excellent choice during special events. Not only are they frequently more budget-friendly than prime rib, but they also serve as a breathtaking focal point for any gathering. The great news is that you can cook a flawless tomahawk steak at home, often exceeding the quality of what you would find in restaurants, all while saving some dollars. Here’s everything you should know about purchasing, preparing, and serving a tomahawk steak.
## What Exactly is a Tomahawk Steak?
A tomahawk steak is fundamentally a bone-in ribeye, specifically sliced from ribs 6-12, featuring a long bone left intact and the meat frenched for an elegant appearance. The visual allure of a 24-inch steak is irrefutable, ensuring it’s a treat for both the eyes and the taste buds.
## How to Prepare Tomahawk Steak
Cooking a tomahawk steak resembles preparing any other steak, but there are several pivotal aspects to ensure success. The most vital step is to temper the steak by allowing it to rest at room temperature before cooking. This aids the inside in reaching the preferred temperature quickly, preventing the exterior from burning.
Since a tomahawk steak is generally 2 inches thick or more, it’s vital to cook it to medium rare (135°F) to ensure the fat renders properly, enhancing the flavor.
### Cooking Techniques
1. **In the Oven**: Preheat your oven to its lowest temperature, about 250°F. Place the steak in the oven for 45 to 90 minutes, based on its thickness. Utilize a meat thermometer to track the temperature, removing it when it hits 10 degrees below your desired level.
2. **Sous Vide**: This approach is uncomplicated. Submerge the steak in a water bath set to 10 degrees lower than your targeted final temperature. It can remain in the bath for up to 8 hours, although 1-2 hours typically suffices.
3. **On the Grill**: For maximum flavor, especially when using charcoal, set up your grill for indirect heat. Position the steak away from the coals or burner and close the lid, flipping occasionally for even cooking.
### Searing Your Tomahawk Steak
Once it achieves the desired internal temperature, it’s time to sear the steak. This can be accomplished on the grill or in a hot skillet. If using a grill, increase the heat and sear for about 30 seconds on each side. If you prepared it in the oven or sous vide, sear it in a hot skillet or pizza oven for a similar time.
### Searing on the Stovetop
Searing a tomahawk steak on the stovetop can be challenging due to its size. A large cast iron skillet or a low-sided pan like a plancha can be effective. Alternatively, a wok can provide adequate surface area and heat for efficient searing.
### Fire Safety
When searing, exercise caution with high flames, particularly when using oil. To prevent flare-ups, avoid overheating the oil and turn off the gas prior to adding the steak. If a fire arises, cover it with a non-flammable object to extinguish the flames.
## The Significance of a Meat Thermometer
A meat thermometer is crucial when cooking a tomahawk steak, especially considering its price. It helps you avoid overcooking and ensures perfect doneness every single time. A probe thermometer that beeps upon reaching the target temperature is especially handy.
## Steak Cooking Temperatures
For your reference, here are the optimal temperatures for steak doneness:
– Rare: 125°F
– Medium-rare: 135°F
– Medium: 145°F
– Medium-well: 155°F
– Well done: Best to avoid this.
## Resting Your Tomahawk Steak
After cooking, let the steak rest for 5-15 minutes. This resting phase allows the muscle fibers to relax and reabsorb moisture, resulting in a juicier and more tender steak.
## Where to Purchase a Tomahawk Steak
Costco is a favored location for buying tomahawk steaks, often offering good quality at fair prices. Local butchers are also a superb choice, as they may provide fresher cuts and personalized service. Online premium butcher shops can also deliver high-quality steaks, including varieties like wagyu.
## Best Sauces for Steak
While some prefer the straightforwardness of salt and pepper, others enjoy enriching the flavor with an assortment of sauces. Starting with basic seasoning and providing a range of sauces allows guests to personalize their experience.
## Are Thick-Cut Bone-In Steaks Superior?
Thick bone-in steaks, such as the tomahawk, tend to possess greater flavor due to the meat’s closeness to the bone. Their thickness enables for a
Read More
Cottage Cheese-Centered Ice Cream Recipe
# If You Adore Cottage Cheese and Ice Cream, This TikTok Cottage Cheese Ice Cream Will Be Perfect for You
Who can resist ice cream, especially as temperatures rise? A scoop of silky, creamy, chilled ice cream is a timeless delight that satisfies cravings. However, if you aim to indulge without feeling guilty and want to integrate more protein into your eating habits, this simple homemade cottage cheese ice cream is the ideal answer.
## What is Cottage Cheese Ice Cream?
Cottage cheese ice cream is just as it sounds: ice cream crafted with cottage cheese. Unlike conventional ice cream, which generally uses heavy cream, sugar, and flavoring, this creative recipe swaps the cream for cottage cheese. The outcome is a creamy, cold, and delightful dessert that closely resembles the texture and taste of classic ice cream.
## Cottage Cheese Ice Cream Ingredients
– **Cottage Cheese**: Opt for whole-fat cottage cheese for the finest flavor and texture.
– **Sweetener**: Honey is a traditional option, but you can also utilize maple syrup, agave syrup, sugar, brown sugar, dates, or sweetened condensed milk for a fuller taste.
– **Banana**: This is optional, but including a frozen banana improves the texture and makes the ice cream easier to scoop.
– **Add-ins/Flavors**: Get inventive! Use extracts for flavoring, seasonal fruits, or nuts for an extra crunch.
## How to Create Cottage Cheese Ice Cream
1. **Blend**: Combine the cottage cheese and sweetener in a blender or food processor and blend until smooth.
2. **Mix**: Transfer the blend to a bowl and incorporate any add-ins (optional).
3. **Freeze**: Place the mixture into a freezer-safe container and freeze until solid, around 4 hours.
4. **Enjoy**: Scoop out and relish your homemade ice cream!
## Tips and Tricks
– **Quality Cottage Cheese**: Select a high-quality brand for the best outcome. Good Culture is a favored option for its creamy consistency.
– **Stir Occasionally**: Occasionally stir the mixture while it freezes to create a smoother texture and avoid crystallization.
– **Add-ins**: If using mix-ins, freeze the ice cream in intervals of 30 minutes, mixing in the add-ins at intervals to keep them from sinking or floating.
– **Let Temper**: Allow the ice cream to rest at room temperature for a few minutes prior to scooping for easier serving.
## Tools Required
– **Blender or Food Processor**: To achieve a smooth and creamy texture.
– **Container**: Any lidded container will work, such as a loaf pan or the original cottage cheese container.
## Flavor Suggestions
– **Extracts and Spices**: Incorporate vanilla, lemon, almond, or spices like cinnamon for enhanced flavor.
– **Chocolate and Nuts**: Mix in chopped chocolate or nuts for added texture.
– **Fruit**: Blend in or add chunks of your preferred fruits.
– **Swirls**: Swirl in jam, nutella, or caramel for extra flavor and visual appeal.
– **Baked Goods**: Chopped cookies, brownies, or cake can create a delightful mix-in.
## Who Created Cottage Cheese Ice Cream?
The viral sensation of cottage cheese ice cream on TikTok can be traced back to Paige Lingren, who made the recipe famous.
## Why Cottage Cheese Ice Cream is Effective
Cottage cheese has a lower fat content than heavy cream, yet both are dairy products that complement each other well. Blending cottage cheese results in a creamy texture that freezes beautifully, and its mild taste allows it to absorb sweetness and other flavors effectively.
## What is the Taste of Cottage Cheese Ice Cream?
The flavor is a creamy, sweet frozen dessert that may remind some of frozen yogurt rather than traditional ice cream. The flavor of cottage cheese is understated, particularly when paired with sweeteners and add-ins.
For a fun twist, consider adding vibrant mix-ins like marshmallows and sprinkles, which can enhance the treat’s visual appeal and taste.
Enjoy making cottage cheese ice cream! What flavors will you experiment with this summer?
Read More
Sunshine Mountain Lodge: An Exquisite Place to Stay in Banff Sunshine Resort
**Next Year May Be a Disappointing Ski Season: A Summer Skiing Adventure at Sunshine Mountain Lodge**
As winter draws near, numerous ski fanatics are preparing for what might be a lackluster ski season next year. Given this uncertainty, we chose to take advantage of the opportunity and experience summer skiing at Sunshine Mountain Lodge in Banff, which remains open for summer skiing until July 5th. This exceptional chance enabled us to have a once-in-a-lifetime skiing experience during the summer.
### My Initial Trip to Banff Sunshine
Looking back on my initial trip to Banff Sunshine, I remember the thrill of driving up to the alpine meadows, only to discover the gondola was not in operation. That early summer excursion left me longing to return to soak in the beauty and excitement of Sunshine Village. Over the years, my partner Mike and I have made several return trips to relish the outstanding skiing for which Sunshine is renowned, especially its superior, dry, and fluffy snow.
This year, Sunshine Village declared a unique two-week summer skiing event from June 20th to July 5th, prompting us to prioritize hitting the slopes. Such summer skiing opportunities are rare, with the last one in 2022 only lasting six days, so we were keen to embrace this extraordinary chance.
### Summer Skiing at Banff Sunshine
At first, my expectations for summer skiing were modest, especially following a few rainy days leading up to our visit. However, the experience surpassed my expectations. The atmosphere was amazing, and despite the limited terrain available with only the Standish and Strawberry lifts in operation, the snow quality was unexpectedly good. The conditions felt more akin to early-season skiing rather than the slushy end-of-season type. Skiing in June was an exhilarating adventure, and we thoroughly enjoyed our time on the slopes.
### Why Choose Sunshine Mountain Lodge?
After evaluating various lodging options in Canmore and Banff, we decided to indulge in Sunshine Mountain Lodge for two primary reasons. First, its ski-in, ski-out accessibility allowed us to maximize our skiing experience without the inconvenience of daily drives to the base. Second, we found out that the cost of our stay included lift tickets for the entirety of our visit, making it an appealing choice.
### Where to Stay in Sunshine Village
Sunshine Mountain Lodge is the sole accommodation situated atop the mountain, nestled among three peaks: Standish, Lookout, and Goat’s Eye. The lodge offers stays year-round, granting unparalleled access to the slopes and breathtaking alpine views.
### Essential Information Before Arriving at Sunshine Mountain Lodge
Conveniently located at the base of the Standish Express chair lift, the lodge provides easy access to the slopes. Checking in is hassle-free, and the staff helps with luggage transport via the gondola, ensuring a smooth arrival process.
### The Gondola Experience at Banff Sunshine
Upon checking in, we rode the gondola up to the lodge. The journey offers stunning views and is efficiently managed, with staff assisting with ski gear. It’s important to be mindful of the gondola hours to prevent getting stranded, as return options to the lodge are limited.
### The Prime Rooms in Sunshine Mountain Lodge
We stayed in the recently refurbished West Wing, which included a balcony that overlooked the Standish Express lift, a king-size bed, and a snug fireplace. The room was bright and spacious, ideal for taking in the magnificent mountain scenery.
### Amenities Available at Sunshine Mountain Lodge
The lodge features a variety of amenities, such as slippers, bath salts, and eco-friendly toiletries. A delightful surprise was the inclusion of a fridge in our room, enabling us to keep drinks and snacks fresh. Although there is no microwave, the fridge is a welcome benefit for those wishing to enjoy refreshments in their accommodation.
### The Hot Tub at Sunshine Mountain Lodge
The lodge is home to Banff’s largest outdoor hot tub, offering a serene place to relax after a day on the slopes. Though we opted for a bath in our room, the hot tub is a favored option for those wanting to socialize.
### Evening Activities in Banff Sunshine
Staying on the mountain means fewer nightlife options, but the lodge provides a warm atmosphere with a bar and several dining choices. One highlight was the nightly s’mores by the outdoor fire pit, which added a delightful element to our evenings.
### Dining Opportunities in Banff Sunshine Village
Dining venues at Sunshine Village include Mad Trapper’s, The Coco Lab, Nikko Ramen, and Chimney Corner. While the food can vary in quality, we found the selections to be adequate for a ski resort.
### Tips for a Stay at Sunshine Mountain Lodge
1. **Bring Your Own Snacks**: As there are no grocery stores in the village, stock up on snacks before your arrival.
2. **Pack Water/Drinks**: Although the tap water is excellent, consider bringing your own beverages to enjoy on the balcony.
3. **Plan for