
The Most Liked Potluck Pasta Salad That Everyone Relishes First
### Creamy Macaroni Salad: A Timeless Favorite
This macaroni salad is a rich, zesty staple filled with fresh vegetables and coated in an easy homemade dressing. It’s a straightforward make-ahead side that’s ideal for potlucks, cookouts, or whenever you need a quick and tasty favorite.
#### Reasons to Prepare It
– The dressing combines right in the serving bowl, resulting in fewer dishes to clean and quick flavor blending.
– Delight in a creamy, tangy-sweet dressing with relish and mustard for traditional deli-style flavors.
– Employ a vegetable chopper to expedite preparation.
#### Serving Ideas
This macaroni salad pairs perfectly with grilled BBQ chicken and classic hamburgers.
—
### Ingredients for Macaroni Salad
– **Pasta**: Elbow macaroni is the traditional choice, but any short pasta such as ditalini, small shells, or mini farfalle will do well.
– **Vegetables**: Celery, shredded carrots, and red bell pepper bring crunch, vibrancy, and sweetness. Red onion adds bite, or opt for green onions for a gentler taste.
– **Dressing**: For added tang, replace some mayo with sour cream or Greek yogurt, and modify vinegar, relish, or mustard according to your preference.
—
### Best Additions and Variants
– **Dressing**: Substitute the homemade dressing with store-bought coleslaw dressing.
– **Additions**: Think about adding cheese, bacon bits, diced ham, hard-boiled eggs, or sweet peas.
—
### Steps to Prepare Macaroni Salad
1. Cook the pasta. Make sure to drain thoroughly.
2. Combine the dressing ingredients.
3. Incorporate the drained macaroni and chopped vegetables into the dressing.
4. Chill for at least one hour before serving.
—
### Make-Ahead and Chilling Recommendations
This macaroni salad tastes best when chilled for an hour or two prior to serving, allowing flavors to meld and the dressing to penetrate the pasta. It can be prepared up to 24 hours ahead.
—
### How to Maintain Creaminess in Macaroni Salad
– Cook pasta just until tender and rinse immediately with cold water to prevent softness.
– Ensure the pasta is well-drained to keep the dressing from becoming watery.
– If the salad appears dry after chilling, mix in 1 to 2 tablespoons of mayo or a dash of vinegar.
– For less sweetness, utilize apple cider vinegar and limit sugar, tasting after chilling.
– For larger gatherings, double the recipe and mix in a spacious bowl for even distribution.
—
### Storage and Leftover Guidelines
Store leftovers in an airtight container in the refrigerator for up to 4 days. Do not freeze. For outdoor events, place the bowl over ice and avoid leaving it out too long in warm temperatures.
—
### Common Inquiries
**Can you freeze macaroni salad?**
No, it does not freeze well.
**How long does macaroni salad last?**
It’s best prepared in advance and will last in the refrigerator for up to 4 days.
**What pairs well with macaroni salad?**
It complements grilled dishes like BBQ chicken, hot dogs, or hamburgers, and is also delicious with pulled pork.
—
Did you like this macaroni salad? Leave a comment and a rating below!
Read More
Ideal Caramelized Sweet and Sticky Ham Glaze Recipe
# Copycat Honey Baked Ham: A Show-Stopping Centerpiece for Special Events
This imitation honey baked ham is a simple, eye-catching main course that’s ideal for holidays or special gatherings. A spiral-cut ham is coated with a delectable honey glaze and baked to perfection for a tender, syrupy finish.
### Flavor Profile
The taste of this dish is luxurious and savory, showcasing a sweet, sticky honey glaze paired with a bit of warmth from spices and a touch of tang to bring balance.
### Recommended Tools
To create this scrumptious dish, you will need:
– A roasting pan
– Aluminum foil
– A pastry brush for applying the glaze
– An instant-read thermometer to ensure optimal cooking
### Cherish Your Leftovers
Having additional slices of honey baked ham available is a delight. Use them in simple sandwiches or comforting soups throughout the week, making every leftover taste as wonderful as the initial meal.
## Ingredients for Honey Baked Ham
– **Ham**: Opt for a fully cooked, bone-in spiral ham for the best flavor and juiciness.
– **Honey Glaze**: The glaze is made with honey for sweetness, butter for richness, brown sugar for caramel flavors, and a dash of Dijon mustard for tang.
– **Variations**: Think about adding a citrus element with orange zest, replacing cloves with cinnamon, or mixing in a pinch of cayenne for a sweet heat boost.
## How Much Spiral Ham Per Person?
When buying bone-in spiral ham, estimate about ½ lb per person (or ¾ lb for generous leftovers). A larger ham is perfect for leftover dishes and for using the bone in soups.
## How to Cook a Honey Baked Ham
1. Preheat the oven to 325°F.
2. Position the ham, cut-side down, in the roasting pan, cover with foil, and bake.
3. Apply the glaze on the ham, raise the oven temperature, and bake until the ham attains 140°F.
4. Take it out of the oven and let it rest for at least 15 minutes before slicing and serving.
### Cooking Tips
– Bake the ham cut-side down to retain moisture.
– Cover the ham with foil while warming to avoid drying.
– Utilize a thermometer to prevent overcooking; remove the ham at 135°F before glazing.
– Add glaze towards the end of cooking to avoid charring.
## Storage, Freezing, and Reheating
– **Refrigerate**: Keep honey baked ham in an airtight container for up to 4 days.
– **Freeze**: Sliced ham can be frozen for up to 2 months. Include a spoonful of pan juices before freezing to retain moisture.
– **Reheat**: Thaw overnight in the refrigerator and warm covered at 300°F with a splash of broth or water.
### Leftover Ideas
Incorporate leftover ham into sandwiches, breakfast scrambles, fried rice, soups, sliders, or scalloped potatoes. Reserve the ham bone for soups like ham and bean soup.
## What to Serve with Honey Baked Ham
Complement this delectable ham with sides such as roasted vegetables, mashed potatoes, or a fresh salad to create a complete meal.
### Conclusion
This Copycat Honey Baked Ham is a delightful feature for any holiday or special occasion, delivering a perfect mix of flavors and textures that will impress your guests. Savor the leftovers in various recipes, maximizing the versatility of this main dish.

A Luscious and Savory Festive Accompaniment: Creamy Cheesy Indulgence
### Potatoes au Gratin: The Ultimate Comforting Side Dish
Potatoes au gratin is an iconic recipe that enhances any meal, making it a perfect accompaniment for Sunday dinners or a convenient option for holiday celebrations. This dish showcases soft layers of potatoes and onions, all coated in a luxurious, creamy, and cheesy sauce, baked until it’s hot, bubbly, and beautifully golden.
#### Flavor Profile
The flavor of potatoes au gratin is rich, cheesy, and comforting, featuring a golden, slightly crispy top that elevates each bite. This dish pairs wonderfully with baked ham, roast beef tenderloin, or pork tenderloin, making it a flexible choice for any dinner setting.
#### Key Features
– **Creamy Texture**: The dish resembles scalloped potatoes but is infused with a delightful cheesy flavor.
– **Thick Sauce**: A prepared roux thickens the sauce, guaranteeing it coats the potatoes uniformly instead of settling at the base.
– **Preparation Tools**: For uniform and thin slicing of potatoes and onions, a mandoline or box grater is advisable.
– **Make-Ahead Convenience**: For holiday meals, prepping the dish ahead and baking it fresh just prior to serving streamlines the cooking process.
#### Understanding the Difference: Au Gratin vs. Scalloped Potatoes
While both dishes are made with potatoes (and often onions) baked in a creamy sauce, the key difference is in the topping. “Au gratin” refers to a dish topped with breadcrumbs or cheese, whereas “scalloped” pertains to a dish baked with milk or sauce. In this recipe, the inclusion of cheese classifies it as au gratin, although the term scalloped potatoes is frequently used interchangeably.
### Best Potatoes for Potatoes au Gratin
For optimal results, select red-skinned or Yukon Gold potatoes. These varieties maintain their shape well and don’t require peeling. Starchy russets, in contrast, may turn mushy and are more suitable for mashing.
#### Additional Ingredients
– **Onions**: Slice them very thin to guarantee they soften fully while baking.
– **Mustard Powder**: A dash enhances the cheese flavor; Dijon can be an alternative.
– **Cheese**: Strong, sharp cheeses like Gruyère or cheddar are ideal, with provolone or Swiss as suitable substitutes.
– **Variations**: Consider incorporating minced garlic, garlic powder, or fresh herbs like thyme or rosemary for extra flavor. Cooked ham or bacon can also be added for a heartier dish.
### How to Make Potatoes Au Gratin
1. **Prep**: Slice the potatoes and onions thinly.
2. **Assemble**: Layer the potato slices and onions in a greased casserole dish.
3. **Make the Sauce**: Prepare the cheese sauce in a saucepan, then pour it over the arranged potatoes and onions.
4. **Bake**: Bake until the potatoes are tender and the sauce is bubbling.
**Pro Tip**: For a quicker variation, layer the potatoes and onions, cover, and microwave for 10 minutes before adding the cheese sauce and baking.
### Make-Ahead, Storing, and Reheating
You can prepare potatoes au gratin up to 24 hours ahead of time. Keep the potatoes submerged in sauce, tightly wrapped, and refrigerated. Allow them to reach room temperature prior to baking, adding an additional 10-20 minutes to the baking duration.
Leftovers can be kept in the refrigerator for up to 4 days. To freeze, let the dish cool completely, wrap it well in plastic wrap and aluminum foil, or portion it into freezer-safe containers. It will last for up to 2 months. Defrost overnight in the refrigerator before reheating in the oven at 350°F until thoroughly hot.
### Conclusion
Potatoes au gratin is a cherished side dish that merges simplicity with decadent flavors, making it a must-have for family meals and special occasions. With its creamy consistency and cheesy delight, it’s bound to be a favorite at your next gathering.
Read More
A Complete Manual for Creating Ideal Baked Macaroni and Cheese
# Baked Mac and Cheese: The Ultimate Comfort Dish
Baked mac and cheese is a cherished meal that stirs up feelings of coziness and nostalgia. Renowned for its velvety consistency and deep cheesy taste, this recipe elevates the classic comfort dish with an extra saucy mix of cheeses and a crunchy topping that provides the ideal finishing detail.
## A Personal Favorite
Mac and cheese has been a fundamental part of numerous homes, including my own. It occupies a special spot in my heart, to the extent that I asked for a side of it on my wedding day! This recipe ranks among my all-time favorites, and I believe that once you savor it, it will become a favorite in your household too.
### Key Features of This Recipe
– **Flavor**: The blend of two cheese types and a substantial amount of sauce guarantees a creamy, indulgent dish bursting with cheesy delight.
– **Skill Level**: This recipe is simple and can be prepared ahead of time, making it ideal for hectic weeknights or gatherings.
– **Cheese Variations**: Feel free to try out different cheese combinations such as mozzarella, Monterey Jack, Havarti, Provolone, Gruyere, or Gouda for a distinctive twist.
– **Make-Ahead Option**: You can put together the dish up to two days prior; just keep the topping separate for optimal crispiness.
– **Time-Saving Tip**: If you’re short on time, you can omit the baking step and serve the mac and cheese straight from the stovetop.
## Ingredients You’ll Need
– **Pasta**: Elbow pasta is classic, but other small shapes like shells or cavatappi also work nicely.
– **Cheese**: Opt for freshly shredded sharp cheddar for the best melting ability. You can swap out some of the cheddar with Swiss, Havarti, or Gruyere.
– **Dairy**: A combination of milk and cream produces a luxurious, creamy sauce. Heavy cream contributes additional richness.
– **Topping**: Panko breadcrumbs add a pleasurable crunch, but regular breadcrumbs or crushed crackers can also be utilized.
– **Variations**: Incorporate veggies like diced roasted broccoli or peas, or add cooked bacon or ham for a more substantial meal.
## How to Make Baked Mac and Cheese
1. **Cook Pasta**: Boil the pasta until al dente, then drain and set it aside.
2. **Make Sauce**: In a saucepan, melt butter, whisk in flour and spices, then slowly add milk and cream. Stir in the cheese until it melts.
3. **Combine**: Mix the cheese sauce with the cooked pasta until thoroughly coated.
4. **Bake**: Pour into a casserole dish, sprinkle with breadcrumbs, and bake until bubbly and golden.
## Tips for the Best Baked Mac and Cheese
– **Cook Pasta Al Dente**: This helps prevent overcooking during baking.
– **Shred Your Cheese**: Freshly shredded cheese melts better than pre-packaged varieties.
– **Perfect Sauce**: Remove the sauce from heat before incorporating cheese to prevent graininess.
– **Avoid Overbaking**: Bake just until hot and bubbly to retain creaminess.
– **Rest Before Serving**: Allow the dish to sit for about 10 minutes before serving for easier scooping.
## Storage, Freezing, and Reheating
– **Leftovers**: Store in a sealed container in the refrigerator for up to 5 days. Reheat with a splash of milk to reclaim creaminess.
– **Make Ahead**: Assemble without the topping and refrigerate for up to 2 days. Add the topping just prior to baking.
– **Freezing**: You can freeze unbaked mac and cheese. Thaw overnight in the refrigerator before baking.
## Conclusion
Baked mac and cheese is more than merely a dish; it’s a comforting experience that unites people. Whether savored as a side or a main dish, this recipe is guaranteed to delight at any table. Give it a try, and don’t forget to leave a rating and a comment about your experience!
Read More
An Adaptable One-Pan Meatball Dish for Frequent Indulgence
### Simple Swedish Meatballs: A Warm Family Favorite
Simple Swedish meatballs are one of those dishes I prepare when I crave something comforting that everyone will enjoy. Succulent meatballs, whether homemade or store-bought, are cooked in a luscious gravy in a single pan. A nod to the classic Ikea delight, we find this homemade version even more satisfying. It pairs wonderfully with egg noodles or mashed potatoes for an ideal family meal.
#### Why These Swedish Meatballs Are Great
These Swedish meatballs are a go-to recipe for nights when I want to simplify dinner!
– **Utilizes common ingredients**: You can tweak the spices or salt amounts.
– **Utilize frozen or homemade meatballs**: Searing homemade meatballs helps them stay intact and enhances flavor.
– **A rich, savory sauce**: It’s simple to prepare.
– **One pan dinner**: Eases the cleanup process.
#### Ingredient Tips For Swedish Meatballs
– **Meat**: Opt for a mix of ground beef and pork or just ground beef. Lean beef guarantees the meatballs remain tender without excessive grease.
– **Binders**: Breadcrumbs and egg keep the meatballs together and ensure they stay soft. Any kind of breadcrumbs will do.
– **Spices**: Warm spices like nutmeg and allspice impart a classic taste to the meatballs.
– **Beef stock**: Beef stock provides a deeper flavor than broth. If broth is used, include a beef bouillon cube for more richness.
– **Soy sauce**: While it may appear unusual, it’s frequently included in authentic Swedish meatball recipes. It contributes both saltiness and richness to the sauce.
#### Preparation Tips
– **Opt for Frozen**: Replace homemade meatballs with 24 ounces of frozen, pre-cooked meatballs.
– **Enhance flavor**: Sauté diced onion or mushrooms in a bit of butter before browning the meatballs.
– **Prepare in advance**: Create a large batch or two of homemade meatballs. They can be cooked before or after freezing. Simply simmer them in the Swedish meatball sauce for a quick weeknight meal.
– **Make it slightly lighter**: Substitute heavy cream with ½ cup of evaporated milk whisked with 1 ½ teaspoons of cornstarch.
#### Serving Ideas
In Sweden, these meatballs are frequently accompanied by lingonberry jam, reminiscent of cranberry sauce. You can serve them with:
– Egg noodles
– Mashed potatoes
– A side of vegetables
### Recipe for Simple Swedish Meatballs
**Servings**: 6
**Prep Time**: 20 minutes
**Cook Time**: 20 minutes
**Total Time**: 35 minutes
#### Ingredients
– 1 pound ground beef
– 1 pound ground pork
– 1 cup breadcrumbs
– 1 egg
– ½ cup milk
– 1 teaspoon salt
– ½ teaspoon pepper
– ½ teaspoon allspice
– ½ teaspoon nutmeg
– ¼ teaspoon cloves
– 2 tablespoons butter
– ¼ cup flour
– 2 cups beef stock
– ½ cup heavy cream
– 2 tablespoons soy sauce
#### Instructions
1. In a large bowl, combine the ground beef, pork, breadcrumbs, egg, milk, salt, pepper, allspice, nutmeg, and cloves. Mix until well incorporated and form into 45–48 small meatballs, around 1-inch in size.
2. Heat a large nonstick skillet over medium-high heat. Add half of the meatballs and sear on all sides; they don’t need to be fully cooked. Remove to a plate and repeat with the remaining meatballs.
3. In the same skillet, add the butter to the meat drippings. Whisk in the flour and pepper and cook for 1 minute.
4. Gradually whisk in the broth, cream, and soy sauce, stirring until the mixture is smooth.
5. Once smooth, incorporate the meatballs and bring to a gentle simmer over medium-low heat. Cover and cook for 10 minutes, stirring occasionally. Uncover and cook for an additional 5-10 minutes or until the sauce thickens and the meatballs are fully cooked. Taste and adjust with more salt and pepper if necessary.
6. Serve over egg noodles or mashed potatoes. Garnish with parsley if desired.
#### Notes
– If using beef broth instead of stock, add a little extra seasoning or bouillon for enhanced flavor.
– Fully cooked frozen meatballs can be added directly to the sauce. Make sure to thaw homemade frozen meatballs first and ensure they reach 160°F.
– Store in the refrigerator for up to 4 days or freeze for up to 3 months.
### Nutrition Information
– **Calories**: 397
– **Carbohydrates**: 12g
– **Protein**: 28g
– **Fat**: 26g
– **Sodium**:

Easy Sweet Potato Accompaniment: Sugary or Savory Choices
# Roasted Sweet Potatoes: An Easy and Tasty Side Dish
If you appreciate straightforward sides that deliver on flavor, these roasted sweet potatoes are destined to be a staple on your dining table! Soft within and with caramelized edges, these sweet potatoes are coated in olive oil and simple spices, then roasted to a golden perfection.
## Flavor Profile
These potatoes are inherently sweet, complemented by a savory touch of garlic. The blend of flavors creates a versatile side dish that pairs beautifully with a range of main courses.
### Time-Saving Tip
To expedite your meal prep, consider peeling and dicing the sweet potatoes the evening prior, or simply opt for store-bought pre-peeled and pre-cut sweet potatoes.
### Serving Suggestions
Roasted sweet potatoes are ideal when served with chicken, pork, or salmon. They also enhance grain bowls, salads, or simple meal prep lunches throughout the week.
## Ingredients
– **Sweet Potatoes**: Select firm, smooth potatoes. Cut into uniform 1-inch cubes for even cooking. Larger pieces or wedges will need more time.
– **Seasonings**: You can easily modify the flavor by exchanging garlic powder for onion powder or smoked paprika. For a sweeter alternative, consider adding cinnamon (occasionally with a hint of nutmeg or pumpkin pie spice), and remember to adjust the salt after roasting.
– **More Variations**: For a maple-cinnamon flair, drizzle a bit of maple syrup over the potatoes during the final 5 minutes to create a light glaze without burning. You can also spice them up with chili powder or cayenne, or garnish with fresh parsley or rosemary.
## How to Roast Sweet Potatoes
1. Preheat the oven to 400°F.
2. Dice sweet potatoes into cubes and combine with olive oil and seasonings.
3. Roast until tender (approximately 35-40 minutes), stirring once after the first 20 minutes for even cooking.
### Tips for Perfect Roasting
– Utilize a large pan and spread the potatoes out. Overcrowding retains steam and softens the edges.
– For optimal browning, roast directly on the sheet pan rather than using parchment paper.
– Stir after about 20 minutes to encourage even caramelization and prevent burning.
– For extra crispy edges, preheat the sheet pan as the oven warms up, then carefully add the oiled potatoes.
## Storage and Leftovers
Keep leftovers in an airtight container in the refrigerator for up to 4 days. You can freeze them for up to 6 months. Reheat on a sheet pan at 400°F in the oven until hot, or utilize an air fryer to restore the crispiness of the edges.
## Conclusion
Roasted sweet potatoes are a tasty, adaptable side dish that can enhance a variety of meals. With their natural sweetness and uncomplicated preparation, they are sure to become a favorite in your kitchen. Enjoy trying out different seasonings and serving suggestions to make them unique!
Read More
DIY Bread Dip Recipe in a Jar
# Olive Oil Bread Dip: An Easy and Delicious Appetizer
For those who appreciate uncomplicated and tasty appetizers, this olive oil bread dip is whipped up in no time and delivers a restaurant-quality bread basket experience right at home. Allow it to rest while you heat the bread, then just pour and dip.
## Flavor Profile
This dip offers a savory and garlicky essence with a vibrant balsamic tang, hints of Italian herbs, and a delicate nuttiness, particularly enhanced by Parmesan on top.
### Optional Add-Ins
– **Balsamic Glaze**: A drizzle in winter adds a sweet touch.
– **Fresh Lemon Zest**: A sprinkle in summer delivers a bright, refreshing twist.
### Serving Suggestions
Accompany with a warm baguette, focaccia, or crostini for that classic restaurant-style bread basket experience.
## Gather Your Ingredients
– **Olive Oil**: Select a flavorful, everyday extra virgin olive oil. If it has a strong peppery taste, blend it with a dash of milder olive oil.
– **Balsamic Vinegar**: Keeps the dip light and tangy; a balsamic glaze contributes sweetness.
– **Italian Seasoning**: A convenient way to achieve that “restaurant-style” flavor; substitute with a mix of oregano and basil if needed.
– **Garlic**: Fresh minced garlic provides the most intense flavor; for a smoother consistency, opt for garlic powder.
– **Parsley**: Fresh offers a vibrant look; dried is suitable year-round.
## Variations
– **Spicy Kick**: Incorporate a pinch of red pepper flakes for some heat.
– **Mediterranean Twist**: Mix in chopped sun-dried tomatoes or olives for added texture.
– **Citrus Bright**: Finish with a dash of lemon zest for freshness.
## How to Prepare Olive Oil Bread Dip
1. In a jar, combine all the ingredients (complete recipe below).
2. Shake and let it rest at room temperature for up to 2 hours.
3. Shake once more right before serving and pour into a shallow bowl, accompanied by warm bread.
### Tips for the Ideal Dish
– Utilize a shallow dish to ensure that the bread captures all the herbs and garlic with each dip.
– Slightly warm the bread to help it absorb the oil without feeling overly heavy.
– For a smoother texture, use dried parsley and garlic powder instead of fresh garlic.
– Top with flaky salt and extra black pepper for more “restaurant” appeal.
– Store leftovers promptly in the refrigerator; do not let garlic-in-oil mixtures sit at room temperature too long.
– Double the amounts for gatherings, maintaining the same wide dish presentation.
## How to Keep Leftovers
Store any leftovers in an airtight container in the refrigerator for up to 4 days. The oil may solidify when chilled, so allow it to rest at room temperature for a few minutes, then shake well before serving. Freeze in small portions for longer storage. Keep the bread separate and toast it for rejuvenation.
### Nutritional Information (Per Serving)
– **Calories**: 331
– **Carbohydrates**: 2g
– **Protein**: 1g
– **Fat**: 36g
– **Sodium**: 170mg
– **Cholesterol**: 1mg
### Recipe Overview
– **Servings**: 4
– **Prep Time**: 5 minutes
– **Total Time**: 35 minutes
### Ingredients
– Olive oil
– Balsamic vinegar
– Garlic
– Parsley
– Italian seasoning
– Salt and pepper
### Instructions
1. In a jar with a lid, combine oil, balsamic, garlic, parsley, Italian seasoning, salt, and pepper.
2. Shake well to mix and allow to sit at room temperature for 30 minutes or up to 2 hours.
3. When ready to serve, shake well and pour into a shallow bowl or dish.
4. Optionally garnish with grated Parmesan cheese.
5. Serve with a fresh loaf of bread, like a baguette or focaccia, for dipping.
Savor this delightful olive oil bread dip as an appetizer or a crowd-pleaser at your next gathering!
Read More
Homemade Pierogi Garnished with Buttery Onions
### Homemade Pierogi: A Family Treasure from Grandma Mary’s Kitchen
These homemade pierogi are a treasured recipe handed down from my Grandma Mary. The delicate dough is stuffed with a savory blend of creamy mashed potatoes and cheese, boiled to perfection, and then pan-fried until golden and crispy. Serve them alongside caramelized onions and a spoonful of sour cream for a delightful side or main dish that captures the spirit of comfort food.
#### What Are Pierogi?
Pronounced ‘puh-row-gee’, pierogi (also spelled pierogie, perogie, or perogy) are a cornerstone of Polish cuisine and a cherished dish throughout Eastern Europe. These dumplings start with a simple flour dough and can be filled with an array of ingredients, from sweet options like blueberries to savory ones such as sauerkraut. The traditional cooking method involves boiling the pierogi until they float, followed by a quick pan-fry to create a crisp outer layer.
This recipe highlights the classic potato and cheese filling, known as pierogi ruskie, which my grandma frequently prepared for our family celebrations. They are best enjoyed with sour cream and caramelized onions.
#### Ingredient Notes
– **Dough**: For the ideal texture, stick to the original ingredients in the dough. This recipe, used by my Polish grandma, does not call for sour cream, ensuring a classic consistency.
– **Filling**: The filling comprises smooth mashed potatoes, cheddar cheese, and finely diced sautéed onions.
– **Potatoes**: Choose starchy types like russet or baking potatoes for a creamy texture.
– **Cheese**: Go for finely shredded cheddar, preferably freshly shredded from a block for enhanced flavor.
– **Seasonings**: Finely dice the white onion and cook it in butter until soft, without letting it brown. My grandma preferred white pepper for a delicate taste, but black pepper is also suitable.
#### How to Make Pierogi
Crafting pierogi is a cherished tradition that can be an enjoyable family activity. Here’s how to do it:
1. **Make the Dough**: Mix flour, eggs, oil, salt, and water in a bowl, stirring until a dough forms. Knead gently until it’s smooth, then let it rest.
2. **Prepare the Filling**: Boil the potatoes until they are tender, sauté the onions in butter, then mash the potatoes and combine them with the onions and cheese. Let the filling cool.
3. **Roll the Dough**: Roll the dough out to 1/8-inch thickness and cut into 3-inch circles.
4. **Fill and Seal**: Spoon a portion of the filling onto each circle, fold it over, and pinch the edges to seal.
#### Cooking and Freezing Pierogi
– **Cooking**: Boil the pierogi in salted water until they float, then pan-fry in butter until golden brown. Serve with sautéed onions and sour cream.
– **Freezing**: Prepare the pierogi and freeze them on a parchment-lined baking sheet. Once they are frozen, transfer them to a zippered bag. They can be cooked straight from frozen.
#### Tips for the Best Pierogi
– Make sure the potatoes are mashed until smooth for a creamy filling.
– Shred your own cheese to maximize flavor.
– Sauté the onions gently to prevent browning.
– Avoid overworking the dough; knead just until it’s smooth.
– Let the dough rest if it springs back while rolling.
#### Conclusion
These homemade pierogi are not merely a dish; they represent a link to family traditions and cherished memories. Whether enjoyed as a side dish or a main meal, they are bound to be a favorite at your table. Relish the experience of making them with your loved ones, just as my grandma did with me.
Read More
Weekly Meal Schedule for March 30, 2026
### Receive Tasty New Recipes Every Day
In the hectic pace of modern life, carving out time to create nutritious and appetizing meals can be challenging. Yet, with the proper tools, you can effortlessly uncover new recipes that not only save time but also excite your palate. Enrolling in a daily recipe service can be transformative for home chefs of all experience levels.
#### Reasons to Enroll in a Recipe Service
1. **Diversity**: A daily recipe subscription introduces you to a broad spectrum of cuisines and cooking methods. This diversity keeps your meals thrilling and avoids the dullness of consuming the same dishes continually.
2. **Ease of Use**: With recipes sent directly to your inbox, you can conveniently organize your meals for the week. This ease of use frees up time for meal planning and grocery shopping.
3. **Skill Enhancement**: Experimenting with new recipes can improve your culinary abilities. You’ll discover fresh techniques and ingredients that can broaden your cooking repertoire.
4. **Healthier Choices**: Many recipe services emphasize healthy eating, offering nutritious selections that can assist you in sustaining a balanced diet.
5. **Connection and Inspiration**: Joining a recipe subscription frequently links you with a community of other cooking fans. Exchanging experiences and tips can motivate you to experiment with new ideas in the kitchen.
#### Steps to Begin
To start receiving tasty new recipes daily, simply sign up for a recipe service. Most services will ask for your email address and may inquire about your preferences regarding dietary needs or preferred cuisines.
For example, you can register for a service that provides a weekly meal plan, ensuring you receive a tailored selection of recipes that match your tastes. Seek out services that allow you to unsubscribe at any moment, offering you the flexibility to opt-out should your needs evolve.
#### Interacting with the Community
After subscribing, feel free to interact with the community. Numerous recipe services maintain social media accounts where you can share your cooking triumphs, seek advice, and gather inspiration from other members. Following these platforms can also keep you informed about new recipes and cooking insights.
#### Final Thoughts
Subscribing to a daily recipe service is a fantastic way to enhance your culinary experience. With an abundance of recipes at your disposal, you can relish the art of cooking while discovering new flavors and techniques. Embark on your culinary adventure today and elevate your meals into delightful experiences!
Read More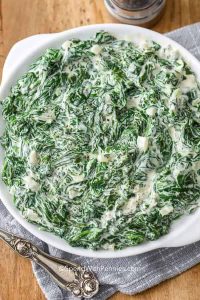
Fast and Simple Steakhouse-Style Creamed Spinach Recipe in 25 Minutes
# Steakhouse-Style Creamed Spinach Recipe
This creamed spinach recipe, reminiscent of steakhouse flavors, is indulgent, velvety, and quick to prepare, making it an ideal accompaniment for any dinner. Cooked in a single skillet and ready in just 25 minutes, the dish achieves its creamy consistency from cream cheese, doing away with the necessity for flour.
## Flavor Profile
– **Rich and Creamy**: This creamed spinach features a luxurious, creamy consistency with notes of sweet onion and flavorful garlic, expertly seasoned for a comforting taste sensation.
– **Convenience**: Skipping the roux and flour means fewer pans to clean, and the cream cheese thickens the mixture swiftly and dependably.
## Serving Suggestions
This adaptable side dish complements an assortment of main courses, including:
– Steak
– Tender chicken
– Pork chops
– Salmon
## Ingredients Overview
– **Spinach**: Fresh spinach is optimal, though frozen spinach can serve as a fast substitute. If using frozen, be sure it’s thawed and excess moisture is removed.
– **Sauce Base**: The sauce centers around cream cheese and heavy whipping cream. For optimal results, use softened full-fat cream cheese.
– **Seasonings**: Basic seasonings like garlic powder and homemade seasoned salt elevate the flavors. Fresh minced garlic can be included when sautéing the onions for added richness.
– **Variations**: For a richer flavor, mix in Parmesan or Romano cheese. A touch of nutmeg or crushed red pepper can introduce warmth.
## How to Make Creamed Spinach
1. **Wilt the Spinach**: Sauté the spinach in a skillet until wilted, then drain thoroughly.
2. **Cook Onions**: In the same pan, cook onions in butter until soft, then incorporate the cream cheese.
3. **Add Ingredients**: Blend in heavy cream, garlic powder, and salt, allowing to simmer until it thickens.
4. **Combine**: Mix the drained spinach into the cream sauce and taste for seasoning before serving.
### Tips for Success
– **For a Thick Sauce**: Make sure the spinach is very dry before incorporating it into the sauce. Use a strainer to eliminate any excess liquid.
– **For a Smooth Sauce**: Cut the cream cheese into cubes to facilitate quicker melting and mix in any cheese off the heat.
– **Prevent Graininess**: Maintain a medium-low temperature after adding the dairy to prevent curdling.
– **Season Later**: Taste after adding the spinach, as it may mute the salt and seasonings.
## Storing, Reheating, and Freezing
– **Storage**: Store any leftovers in an airtight container in the refrigerator for up to 4 days.
– **Freezing**: Can be frozen for as long as 2 months, although the dairy sauce might slightly separate when thawed.
– **Reheating**: Thaw in the refrigerator, then gently reheat on low, whisking to blend. Add a splash of cream or milk if needed.
## Nutritional Information (per serving)
– **Calories**: 121
– **Carbohydrates**: 4g
– **Protein**: 3g
– **Fat**: 10g
– **Saturated Fat**: 6g
– **Cholesterol**: 33mg
– **Sodium**: 160mg
– **Potassium**: 454mg
– **Fiber**: 1g
– **Vitamin A**: 7470 IU
– **Vitamin C**: 21.7mg
– **Calcium**: 93mg
– **Iron**: 2.1mg
This creamed spinach dish delivers steakhouse-quality taste right in your kitchen, making it a wonderful addition to any meal. Relish the decadent, creamy flavor that enhances a variety of main courses!
Read More