
Commemorating 18 Years of Closet Cooking: An Important Anniversary
🎉 Closet Cooking Commemorates 18 Thrilling Years of Culinary Imagination! 🎉
Closet Cooking, the cherished food blog renowned for its inventive and flavor-rich recipes, is marking a significant achievement—18 years of delivering delightful food and culinary motivation! What commenced as a personal quest to cook more inventively in a compact kitchen has evolved into a go-to resource for home chefs globally.
A Year of Flavorful Expeditions
As Closet Cooking celebrates its 18th anniversary, the last year has proven to be one brimming with culinary discovery and ingenuity. From hearty main courses and comforting soups to indulgent desserts and colorful breakfasts, the blog has persisted in providing a wide range of recipes that suit every taste and occasion.
This year’s recipe collection reflected a global touch, with meals inspired by cultures from around the globe. Whether it was zesty Thai curries, savory Italian pastas, or iconic American comfort food, Closet Cooking demonstrated once more that great flavor transcends borders.
Adjusting to Escalating Food Prices
One of the primary hurdles encountered this year was the soaring cost of groceries—an issue for many households. In response, Closet Cooking concentrated on crafting recipes that utilize pantry staples and ingredients frequently available at a discount. Despite this budget-friendly approach, the blog retained its signature taste and creativity, showing that delicious meals can be affordable.
Beloved Recipes from the Past Year
Among the plethora of recipes shared, a select few emerged as favorites for both the blog’s creator and its dedicated readers. These dishes not only showcase the adaptability of everyday ingredients but also embody the fun and enthusiasm that have defined Closet Cooking for nearly twenty years. Some standout favorites include:
– Creamy Tuscan Chicken: A rich and fulfilling dish that merges tender chicken with sun-dried tomatoes, spinach, and a velvety garlic cream sauce.
– Korean BBQ Beef Bowls: A swift and flavorful entrée featuring marinated beef, rice, and an assortment of fresh toppings.
– Lemon Blueberry Ricotta Pancakes: A lively and airy breakfast delight that’s ideal for weekend brunches.
– Cheesy Jalapeño Cornbread: A spicy, cheesy variation on a classic side that pairs well with chili or barbecue.
– Chocolate Chip Cookie Dough Cheesecake Bars: An indulgent dessert that fuses two adored treats into one irresistible bite.
Looking Forward to More Delicious Journeys
As Closet Cooking embarks on its 19th year, the anticipation for what lies ahead is tangible. With a dedication to flavor, accessibility, and culinary curiosity, the blog continues to motivate home cooks to explore new ideas and delight in the art of cooking.
Whether you’re a longtime supporter or a fresh visitor, Closet Cooking presents an abundance of recipes to discover. Here’s to another year of delectable revelations, inventive cooking, and sharing the joy of food with a worldwide community.
Happy 18th Anniversary, Closet Cooking—may the upcoming year be even more delicious than the previous! 🍽️🎂
Visit www.closetcooking.com to uncover the latest recipes and partake in the celebration.
Read More
A Comprehensive Guide to Preparing Sunny Side Up Eggs
Introducing Alex & Sonja Overhiser: The Minds Behind A Couple Cooks
Alex and Sonja Overhiser form the energetic pair behind the beloved culinary blog A Couple Cooks, a reliable online source for nutritious, accessible, and mouthwatering recipes. Since the inception of their blog in 2010, the Overhisers have emerged as key figures in the home cooking realm, motivating millions with their enthusiasm for seasonal produce, healthy living, and the pleasure of cooking together.
The Journey Behind A Couple Cooks
What began as a personal exploration into healthier eating soon transformed into a full-fledged culinary odyssey. Alex, previously a graphic designer, and Sonja, an ex-communications specialist, started experimenting in the kitchen after their marriage. As they uncovered the benefits of cooking from scratch and the advantages of a whole-foods approach, they took the leap to share their recipes and journeys online. Hence, A Couple Cooks came to life.
Throughout the years, their blog has matured into an extensive resource for home chefs of every experience level. With over 3,000 thoroughly tested recipes, the site showcases a diverse array of dishes catering to different dietary needs, such as:
- Mediterranean diet
- Vegan and vegetarian
- Pescatarian
- Whole food and plant-focused meals
- Smoothies and wholesome beverages
- Craft cocktails and non-alcoholic drinks
Books That Motivate
Besides their online activities, Alex and Sonja have penned two celebrated cookbooks: A Couple Cooks: Pretty Simple Cooking and Pretty Simple Cooking. These publications embody their belief that cooking should be enjoyable, nourishing, and within reach. With an emphasis on whole ingredients and straightforward methods, their recipes aim to empower readers to cook more at home and relish the experience.
Pretty Simple Cooking has been recognized as one of the top vegetarian cookbooks by Epicurious and MindBodyGreen, garnering acclaim for its accessible recipes and meaningful narratives. This book is not merely a recipe collection—it’s a pathway to cultivating a lifelong passion for cooking.
Core Beliefs and Influence
Central to Alex and Sonja’s mission is a conviction in the capacity of food to unite people. Whether it’s a weekday meal or a leisurely weekend brunch, their recipes are crafted to be enjoyed and shared. They highlight the importance of cooking with seasonal ingredients, minimizing food waste, and making healthful eating a pleasurable experience rather than a restrictive one.
The couple is also a strong advocate for sustainable living and thoughtful eating. Through their blog, cookbooks, and social media, they inspire their audience to implement small, impactful changes in their kitchens that contribute to a healthier lifestyle and a more sustainable planet.
Become Part of the Community
With a dedicated fan base and an expanding collection of recipes, Alex and Sonja have fostered a thriving community of home cooks who seek their guidance, insights, and motivation. Whether you’re an experienced cook or a novice, A Couple Cooks provides something valuable for everyone.
From substantial plant-based meals to invigorating smoothies and sophisticated cocktails, Alex and Sonja’s recipes celebrate quality food and delightful companionship. Their journey demonstrates that home cooking can be both straightforward and immensely fulfilling—and that sharing the experience enhances it all.
To delve into their recipes and find out more, visit A Couple Cooks.
Read More
Nutritious Ground Turkey Burrito Bowls Recipe
### About the Author: Holly Nilsson
Holly Nilsson is a culinary innovator and the driving spirit behind the acclaimed food blog, Spend With Pennies. Her goal is to make cooking enjoyable and easy for everyone, specializing in the creation of simple, comforting recipes that resonate with the average home cook. Holly’s enthusiasm for nostalgic tastes and streamlined cooking methods is evident in her work, earning her a cherished place among those who love hearty, home-cooked meals.
#### A Culinary Journey
Holly’s adventure in the culinary realm started with her passion for cooking and sharing dishes with family and friends. She recognizes the hurdles faced by busy home cooks, which is why her recipes are crafted to be uncomplicated and attainable without compromising on flavor or satisfaction. Every recipe embodies her belief that cooking should bring joy, not be a burden.
#### Everyday Comfort: A Cookbook for All
Beyond her blog, Holly has authored the cookbook “Everyday Comfort.” This compilation of recipes showcases her philosophy of crafting meals that offer warmth and joy at the dining table. The book includes a range of dishes that are not just tasty but also simple to prepare, making it a vital resource for anyone looking to improve their cooking skills while relishing the experience.
#### Connecting with the Community
Holly’s impact goes beyond her blog and cookbook. She actively interacts with her audience across multiple social media platforms, where she shares tips, tricks, and motivation for home cooking. Her engagement on Pinterest, Facebook, Twitter, and Instagram allows her to reach a broader community of food lovers, offering them daily inspiration and support to try new recipes.
– **Pinterest**: [Follow Holly on Pinterest](https://www.pinterest.com/spendpennies/)
– **Facebook**: [Connect with Holly on Facebook](https://www.facebook.com/ispendwithpennies/)
– **Twitter**: [Join Holly on Twitter](http://spendpennies)
– **Instagram**: [Follow Holly on Instagram](https://www.instagram.com/spendpennies/)
#### Conclusion
Holly Nilsson’s commitment to making cooking fun and accessible has established her as a reliable source for home cooks everywhere. Through her blog, cookbook, and social media presence, she continues to motivate others to prepare delicious meals that unite people. Whether you’re a beginner in the kitchen or an experienced chef, Holly’s recipes and insights are bound to enrich your culinary journey. For more ideas and tasty recipes, don’t forget to explore her work at Spend With Pennies.
Read More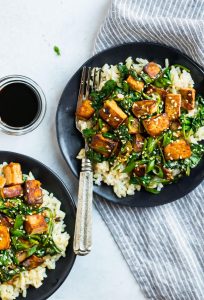
Simple and Tasty Pan-Seared Tofu Recipe
Introducing Alex & Sonja Overhiser: The Creators of A Couple Cooks
Alex and Sonja Overhiser form an energetic husband-and-wife duo behind A Couple Cooks, a well-known food blog aimed at motivating home chefs with easy, wholesome recipes. Since the inception of their site in 2010, they have established themselves as reliable figures in the cooking community, recognized for their colorful, seasonal dishes and their focus on the delight of cooking together.
The Tale Behind A Couple Cooks
Alex and Sonja’s entry into the culinary scene was far from conventional. Neither has formal training in cooking; instead, their love for food grew naturally after their marriage. They found that cooking together served not just as a means to nourish their bodies but also as a way to enhance their bond and creativity. Inspired to share this journey with others, they created A Couple Cooks as a venue to chronicle their kitchen escapades and inspire others to embrace the pleasure of home cooking.
Cookbooks and Culinary Beliefs
The Overhisers have penned two highly regarded cookbooks: A Couple Cooks: Pretty Simple Cooking and Pretty Simple Cooking. Their works embody their culinary beliefs: that home cooking can be uncomplicated, gratifying, and accessible for all. They emphasize whole foods, plant-centric meals, and recipes that are nourishing as well as delicious. Their inviting approach and focus on seasonal produce have struck a chord with readers worldwide.
What Awaits You on A Couple Cooks
Currently, A Couple Cooks boasts over 3,000 carefully tested recipes catering to a range of dietary needs and lifestyles. Key features include:
- Mediterranean Diet Recipes: With an emphasis on fresh produce, whole grains, and healthy fats, their Mediterranean recipes are both delicious and heart-friendly.
- Vegan and Vegetarian Options: From hearty vegan stews to inventive vegetarian pasta dishes, Alex and Sonja provide a plethora of meatless choices that do not compromise on flavor.
- Pescatarian Recipes: For those who enjoy seafood, the blog includes a variety of light and gratifying fish and seafood recipes.
- Smoothies: Their smoothie recipe collection offers everything from classic green smoothies to creative blends filled with superfoods.
- Cocktails: Alex and Sonja also indulge in mixology with a thoughtfully selected range of cocktail recipes, spanning from traditional drinks to innovative new creations.
More Than Just Recipes: A Joyful Cooking Lifestyle
Beyond being merely a recipe hub, A Couple Cooks celebrates the lifestyle accompanying home cooking. Alex and Sonja stress the significance of slowing down, enjoying the cooking process, and making mealtime a significant aspect of everyday life. Their efforts inspire readers to perceive cooking not as a duty, but as a joyful, creative practice that unites people.
Connect with Alex & Sonja
Through their website, cookbooks, podcast appearances, and social media platforms, Alex and Sonja continue to motivate a worldwide community of home cooks. Whether you are an experienced chef or a beginner in the kitchen, their easy-to-follow recipes and optimistic approach make it effortless to fall in love with the culinary arts.
Discover more and dive into their extensive recipe collection at A Couple Cooks.
Read More
Moist Banana Bread Brownies Featuring a Dense, Cake-Like Consistency
Alex & Sonja: Inspiring Home Chefs Across the Globe
Introducing Alex and Sonja Overhiser, the incredible pair behind the well-known food blog A Couple Cooks and authors of two esteemed cookbooks, A Couple Cooks: Pretty Simple Cooking and Pretty Simple Cooking. As a real-life couple passionate about crafting wholesome and accessible meals, Alex and Sonja have cultivated a vibrant online community dedicated to the joys of home cooking.
The Origins of A Couple Cooks
In 2010, Alex and Sonja established A Couple Cooks to chronicle their foray into home cooking. Lacking formal culinary education, they were motivated by a mutual commitment to healthier eating and mindful living. What began as a personal endeavor swiftly evolved into a recognized source for home cooks at every level of experience.
Cookbooks That Motivate
Building upon the achievements of their blog, Alex and Sonja released Pretty Simple Cooking in 2018, a cookbook celebrated for its user-friendly recipes and heartfelt narratives. The book received accolades as one of the top vegetarian cookbooks from Epicurious and Food & Wine, encapsulating the couple’s belief that cooking should be straightforward, nourishing, and enjoyable. Their subsequent cookbook, A Couple Cooks, extends this vision, providing readers with a delightful array of seasonal, flavorful recipes that make home cooking both thrilling and attainable.
An Abundance of Recipes for Every Lifestyle
Currently, A Couple Cooks offers over 3,000 carefully crafted recipes, addressing a diverse array of dietary preferences and lifestyles. Whether you seek Mediterranean diet staples, vegan and vegetarian fare, pescatarian selections, invigorating smoothies, or inventive cocktails, Alex and Sonja have options for everyone. Their recipes highlight fresh, seasonal produce and are crafted to be both delectable and approachable, empowering anyone to cook at home with assurance.
More Than Just Recipes: A Joyful Cooking Lifestyle
For Alex and Sonja, cooking transcends merely feeding oneself—it’s a journey of connection, creativity, and community. Through their blog, cookbooks, and social media engagement, they inspire individuals to slow down, enjoy the process, and find pleasure in the kitchen. Their relatable approach and sincere passion resonate with audiences worldwide, motivating many individuals and families to incorporate home cooking as a vital part of their lives.
Become Part of the A Couple Cooks Community
Whether you are an experienced home chef or just beginning your culinary adventure, Alex and Sonja welcome you to dive into their extensive range of recipes and resources. With their support, you’ll realize that cooking at home can be simple, rewarding, and—most importantly—enjoyable. Visit A Couple Cooks to embark on your culinary journey today!
Read More
Lentil Tacos: A Plant-Powered Variation of a Timeless Favorite
Sure! Here’s a revised version of the article:
—
# Lentil Tacos: A Plant-Based Take on a Timeless Favorite
Tacos have been a cherished element in numerous culinary traditions, renowned for their adaptability, taste, and quick preparation. While often associated with seasoned beef, chicken, or pork, tacos have transformed to meet diverse dietary needs. Among the tasty and healthy alternatives gaining traction is the lentil taco—offering a plant-based rendition of the classic favorite that delivers on flavor and satisfaction.
## Why Choose Lentils?
Lentils are tiny, lens-shaped legumes that offer remarkable nutritional benefits. They are a fantastic source of plant-derived protein, fiber, iron, and vital minerals such as folate and potassium. Their robust texture and capacity to absorb flavors make them a perfect replacement for ground meat in various dishes, including tacos.
Besides their health advantages, lentils are cost-effective, readily accessible, and environmentally sustainable. Cultivating lentils demands less water and generates fewer greenhouse emissions than livestock farming, making them a wise choice for environmentally conscious diners.
## Assembling the Ideal Lentil Taco
Making lentil tacos is straightforward and allows for personal tweaks. Here’s a basic framework to kick things off:
### Ingredients:
– 1 cup dried brown or green lentils, rinsed
– 2 ½ cups vegetable broth or water
– 1 small onion, finely diced
– 2 cloves garlic, minced
– 1 tablespoon olive oil
– 1 tablespoon tomato paste
– 1 teaspoon ground cumin
– 1 teaspoon chili powder
– ½ teaspoon smoked paprika
– ½ teaspoon oregano
– Salt and pepper to taste
– Taco shells or tortillas
– Toppings: shredded lettuce, chopped tomatoes, avocado slices, salsa, vegan cheese, cilantro, lime wedges
### Instructions:
1. In a saucepan, combine lentils and vegetable broth. Bring to a boil, then lower the heat and let simmer uncovered for around 20-25 minutes, or until lentils are soft yet firm. Drain any excess liquid.
2. In a large skillet, warm olive oil over medium heat. Add the diced onion and cook until translucent, about 5 minutes. Then add garlic and sauté for another minute.
3. Mix in tomato paste, cumin, chili powder, smoked paprika, and oregano. Cook for 1-2 minutes to toast the spices.
4. Incorporate the cooked lentils into the skillet and mix thoroughly with the spice blend. Cook for an additional 5 minutes to let the flavors combine. Season with salt and pepper as desired.
5. Place the lentil mixture into taco shells or tortillas and top with your chosen garnishes.
## Customizations and Additions
Lentil tacos are incredibly flexible. Here are some ideas to modify your tacos:
– **Spicy Twist**: Incorporate diced jalapeños or a dash of hot sauce into the lentil mixture.
– **Smoky Essence**: Add chipotle peppers in adobo sauce for a rich, smoky flavor.
– **Vegetable Enhancement**: Fold in sautéed bell peppers, corn, or zucchini for more texture and nutrition.
– **Creamy Accents**: Drizzle with vegan sour cream or a cashew-based queso for a touch of indulgence.
## Nutritional Perks
A serving of lentil tacos offers a well-rounded meal full of protein, fiber, and complex carbohydrates. Lentils contribute to heart health, stabilize blood sugar levels, and promote digestive health. Additionally, opting for plant-based components supports a more sustainable food ecosystem.
## Suitable for All
Whether you’re a dedicated vegan, aiming to increase your plant-based meals, or simply seeking a fresh take on taco night, lentil tacos provide a delightful and tasty choice. They are also a fantastic way to incorporate more legumes into your diet without compromising on the fulfilling, savory experience of classic tacos.
## Conclusion
Lentil tacos demonstrate that eating plant-based can be just as appetizing and satisfying as traditional meat-centered meals. With their bold flavor, pleasing texture, and remarkable nutritional benefits, lentil tacos are bound to become a staple in your dining repertoire. Give them a shot—you might discover that this plant-driven version becomes your preferred taco recipe!
—
Would you also be interested in a printable recipe card or some innovative serving ideas? 🌮
Read More
“How to Prepare Crunchy Air Fryer Home Fries: A Detailed Guide”
# Crisp and Tasty Air Fryer Home Fries: A Restaurant-Quality Treat at Home
Crispy, golden home fries are a cherished favorite in numerous households, frequently served with breakfast or as a side for lunch and dinner. Thanks to air fryers, whipping up restaurant-style home fries at home is now simpler and healthier than ever. This article will walk you through making scrumptious air fryer home fries using potatoes, peppers, onions, and basic seasonings.
## Why Opt for Air Fryer Home Fries?
Air fryers have transformed cooking methods, enabling us to achieve that delightful crispy texture we adore with significantly less oil. Here are some reasons why air fryer home fries are an excellent choice:
– **Healthier Choice**: An air fryer allows you to enjoy crispy fries with minimal oil, making them a healthier option compared to conventional frying techniques.
– **Fast and Convenient**: These home fries can be prepared swiftly in just a few minutes, ideal for busy mornings or impromptu meal preparations.
– **Flexible Ingredients**: You can utilize fresh or frozen potatoes, adjusting cooking times as needed, making this recipe adaptable to your available ingredients.
## Ingredient Suggestions
To prepare the finest air fryer home fries, consider the following ingredient suggestions:
– **Potatoes**: Russet potatoes are favored for their starchy content, yielding a fluffy interior. However, Yukon Gold and red potatoes also perform well.
– **Peppers and Onions**: Incorporating onions and bell peppers boosts the flavor. Feel free to choose any color of bell pepper you like.
– **Seasoning**: Keep it straightforward with garlic powder and seasoned salt, or personalize with your favorite herbs and spices.
### Variations
Feel free to try out different ingredients to design your unique take on home fries. Think about including:
– **Baby Potatoes**: For a bite-sized variation.
– **Sweet Potatoes**: For a sweeter taste profile.
– **Mushrooms**: For an earthy touch.
– **Bacon Bits**: For a savory crunch.
## Serving Ideas
Air fryer home fries are extraordinarily versatile and can enhance various meals. Serve them alongside:
– **Breakfast Plates**: Combine with eggs, bacon, or sausage for a substantial breakfast.
– **Lunch**: Relish as a side with sandwiches or salads.
– **Dinner**: Accompany grilled meats or include in a veggie platter.
## Recipe: Air Fryer Home Fries
### Ingredients
– 4 medium russet potatoes, peeled and diced into ½” chunks
– 1 bell pepper, chopped (any color)
– 1 onion, chopped
– 2 tablespoons olive oil
– 1 teaspoon garlic powder
– 1 teaspoon seasoned salt
– 1 tablespoon butter (optional)
### Instructions
1. **Prepare the Potatoes**: If you prefer, peel the potatoes and chop them into ½” chunks.
2. **Season the Potatoes**: In a bowl, mix the potato chunks with olive oil, seasoned salt, and garlic powder until well-coated.
3. **Air Fry the Potatoes**: Place the seasoned potatoes into the air fryer basket and cook at 380°F for 15 minutes.
4. **Add Vegetables**: In a separate bowl, mix the chopped onion, bell pepper, and butter. After the first 15 minutes, add this mixture to the air fryer, lower the temperature to 340°F, and cook for another 15 minutes, or until the potatoes and vegetables are tender.
5. **Serve Right Away**: Savor your crispy air fryer home fries fresh from the fryer!
### Storage and Reheating
Store any extra home fries in an airtight container in the refrigerator for up to 4 days. To reheat, simply pop them in the microwave for a minute or two, or place them back in the air fryer for about 5 minutes until heated through.
## Conclusion
Air fryer home fries present a delightful and effortless way to indulge in a classic dish with a healthier spin. With just a handful of ingredients and minimal effort, you can create a side dish that rivals the offerings of your favorite restaurant. Whether for breakfast, lunch, or dinner, these crispy home fries are bound to become a family favorite. Give them a try and relish the delightful crunch and flavor they add to your table!
Did you enjoy these Air Fryer Home Fries? Leave a rating and a comment below!
Read More
Robust Ground Beef Birria-Inspired Chili
# Ground Beef Birria Chili: A Delicious Spin on a Timeless Classic
If you’re a fan of the deep, hearty flavors found in traditional birria but need a faster, simpler way to indulge, Ground Beef Birria Chili is the ideal choice. This satisfying dish embodies the spirit of long-simmered birria stew but can be prepared in less than an hour, making it perfect for hectic weeknights or relaxed get-togethers.
—
## Quick Summary
– **Prep Time**: 10 minutes
– **Cook Time**: 45 minutes
– **Total Time**: 55 minutes
– **Servings**: 8
—
## What Exactly is Ground Beef Birria Chili?
Birria is a cherished Mexican delicacy typically created with slow-cooked goat or beef, infused with dried chilies and spices. Ground Beef Birria Chili reinterprets those rich, smoky, and flavorful elements into a quicker, ground beef chili. The result is a warm, robust, and slightly spicy dish that’s delightful on its own or as a stuffing for tacos, burritos, or nachos.
—
## Ingredients You Will Need
To whip up this delectable chili, gather the following:
– **Chilies**: 4 dried guajillo chilies and 2 dried ancho chilies for a smoky, subtly sweet base.
– **Ground Beef**: 2 pounds of ground beef to create a hearty texture.
– **Aromatics**: 1 cup diced onion and 4 cloves minced garlic for added flavor.
– **Tomatoes**: Optional tomato paste and a can of crushed tomatoes for richness.
– **Broth**: 1 cup beef broth (or chicken broth or water) for a luscious sauce.
– **Spices**: Ground cumin, coriander, black pepper, cinnamon, cloves, allspice, oregano, and smoked paprika to create a layered flavor experience.
– **Acid**: Apple cider vinegar to enhance brightness.
– **Bay Leaves**: Optional, for an extra touch of aroma.
– **Salt**: To taste.
Optional extras include Worcestershire sauce, soy sauce, and various toppings such as fresh onions, cilantro, sour cream, and lime wedges.
—
## Steps to Prepare Ground Beef Birria Chili
Follow these easy instructions to make this dish come alive:
1. **Prepare the Chilies**: Lightly toast the guajillo and ancho chilies in a heavy skillet for around 30 seconds on each side. Then, soak them in rapidly boiled water for about 20 minutes until soft. Blend the chilies with the soaking water until smooth.
2. **Cook the Beef**: In a large skillet over medium-high heat, brown the ground beef, breaking it apart as it cooks, for about 8-10 minutes. Drain any excess fat.
3. **Sauté Aromatics**: Mix in the diced onion and cook until soft, approximately 5-7 minutes. Stir in the garlic and optional tomato paste, cooking until aromatic, about 1 minute.
4. **Combine and Simmer**: Incorporate the pureed chilies, crushed tomatoes, broth, spices, vinegar, and bay leaves. Bring to a boil, then lower the heat and simmer for 15-20 minutes to allow the flavors to combine.
5. **Taste and Serve**: Sample and adjust seasoning with salt, honey, and vinegar to balance the spicy, salty, sweet, and sour elements. Skim off any excess fat if preferred.
—
## Serving Ideas
Ground Beef Birria Chili is highly adaptable. Here are several suggestions:
– **Classic Bowl**: Serve it in a bowl garnished with diced onions, pickled red onions, sour cream, sliced radishes, cilantro, shredded cheese, and lime wedges.
– **Tacos**: Fill warm tortillas with the chili for an enjoyable birria taco experience.
– **Nachos**: Pour it over tortilla chips topped with melted cheese and your preferred toppings.
– **Dipping Broth**: For a soupier style perfect for dipping tacos, simply add more broth during cooking.
—
## Nutritional Facts (Per Serving)
– **Calories**: 342
– **Fat**: 23g (Saturated 8g, Trans 1g)
– **Cholesterol**: 80mg
– **Sodium**: 268mg
– **Carbohydrates**: 11g (Fiber 3g, Sugars 3g)
– **Protein**: 22g
—
## Recommendations and Variations
– **Broth Thickness**: Modify the quantity of broth based on whether you desire a thicker chili or a more dilute consistency for dipping.
– **Flavor Enhancements**: Incorporate Worcestershire or soy sauce for an extra touch of umami.
– **Make it Gluten-Free**: Opt for gluten-free soy sauce.

Hearty Pork Stew Recipe: A Cozy Meal for Every Event
# About Holly Nilsson: A Culinary Muse
Holly Nilsson represents the essence of comfort food and straightforward cooking. As the founder of the beloved food blog Spend With Pennies, Holly has devoted her culinary journey to creating recipes that resonate with busy home chefs in search of both ease and flavor in their dishes. Her enthusiasm for nostalgic tastes and simple techniques has made her a reliable source for many who want to whip up delightful meals without unnecessary complications.
## The Story of Spend With Pennies
Established on the belief that cooking should be within everyone’s reach, Spend With Pennies offers a diverse selection of recipes that meet a wide range of preferences and dietary needs. From filling casseroles to refreshing salads, Holly’s dishes aim to unite families around the dinner table. Her recipes are often influenced by classic comfort foods, reinterpreted with a contemporary flair that aligns with the fast-paced lifestyle of today.
Holly’s cooking philosophy highlights the value of using genuine ingredients and uncomplicated approaches. She is convinced that anyone can create a delicious dish, no matter their cooking background. This belief shines through in her user-friendly recipes, which frequently contain advice and tips to streamline the cooking experience.
## Author of “Everyday Comfort”
Alongside her thriving blog, Holly is the writer of the cookbook “Everyday Comfort.” This compilation of recipes stands as proof of her dedication to equipping home cooks with the essential tools to prepare hearty, fulfilling meals. The book features a range of dishes that are not only comforting but also practical for daily cooking. With “Everyday Comfort,” Holly hopes to encourage readers to celebrate home-cooked meals and the joy of sharing culinary experiences with loved ones.
## Connecting with the Community
Holly’s impact goes beyond her blog and cookbook. She actively interacts with her audience through social media channels, where she shares cooking insights, behind-the-scenes peeks into her culinary exploits, and delectable food photography. Her presence on sites like Pinterest, Facebook, Twitter, and Instagram enables her to connect with a community of food enthusiasts who share her love for cooking.
– **Pinterest**: [Discover Holly on Pinterest](https://www.pinterest.com/spendpennies/) for a wealth of recipe ideas and inspiration.
– **Facebook**: Become part of Holly’s circle on [Facebook](https://www.facebook.com/ispendwithpennies/) to keep up with her latest updates and join discussions with fellow cooking fans.
– **Twitter**: Stay tuned on [Twitter](http://spendpennies) for brief updates and culinary insights.
– **Instagram**: For a visual delight, explore Holly’s [Instagram](https://www.instagram.com/spendpennies/) where she showcases stunning images of her dishes and cooking journey.
## Conclusion
Holly Nilsson transcends the role of a mere food blogger; she is a culinary mentor for anyone aiming to infuse joy and comfort into their kitchen. Through her blog, cookbook, and social media activities, she continually motivates home cooks to prepare meals that not only satisfy hunger but also strengthen bonds with family and friends. Whether you are an experienced chef or a beginner in the kitchen, Holly’s recipes and advice are guaranteed to enhance your cooking adventures and make them enjoyable.
For more delectable recipes and insights, don’t forget to check out her work at [Spend With Pennies](https://www.spendwithpennies.com/author/holly/).
Read More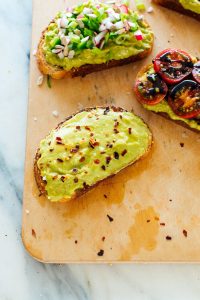
A Complete Manual for Making Avocado Toast
### About Holly Nilsson: A Culinary Inspiration
In the dynamic realm of food blogging, few personalities shine as brightly and genuinely as Holly Nilsson. As the founder of **Spend With Pennies**, Holly has established a unique space that highlights effortless, comforting recipes tailored for everyday life. Her enthusiasm for cooking is apparent in each recipe she presents, earning her a cherished spot among home cooks who seek both ease and taste.
#### A Journey into Comfort Food
Holly’s culinary path is grounded in her appreciation for nostalgic tastes and the comforting dishes that unite families. By emphasizing readily available ingredients and uncomplicated methods, she enables busy individuals and families to whip up delightful meals devoid of the typical stress linked to cooking. Her recipes are more than mere sustenance; they aim to nourish the spirit, bringing back memories of home-cooked dishes enjoyed at the family table.
#### Author of “Everyday Comfort”
Alongside her thriving blog, Holly is the proud author of **“Everyday Comfort,”** a cookbook that delves deeper into her ethos of wholesome, home-style meals. This assortment of recipes is crafted to motivate cooks of varied skill levels, presenting a range of dishes that are both fulfilling and simple to make. Whether you are an experienced culinary artist or a beginner in the kitchen, Holly’s friendly approach makes cooking feel within reach and pleasurable.
#### Engaging with the Community
Holly’s impact goes beyond her culinary creations. She actively connects with her audience via numerous social media channels, where she shares not just her recipes but also helpful hints, techniques, and personal stories that resonate with her fans. By nurturing a community spirit, Holly inspires her followers to share their own cooking journeys, creating an inclusive space for all food lovers.
You can follow Holly and delve into her culinary explorations through her social media accounts:
– **[Pinterest](https://www.pinterest.com/spendpennies/)**: Unearth a wealth of recipes and cooking ideas.
– **[Facebook](https://www.facebook.com/ispendwithpennies/)**: Become part of a community of fellow cooking enthusiasts and stay informed on Holly’s latest updates.
– **[Twitter](http://spendpennies)**: Interact with Holly in real-time and express your opinions on her recipes.
– **[Instagram](https://www.instagram.com/spendpennies/)**: Enjoy a visual display of Holly’s delectable dishes and get behind-the-scenes insights into her culinary process.
#### Conclusion
Holly Nilsson emerges as a guiding light in the culinary landscape. Through her blog, **Spend With Pennies**, and her cookbook, **“Everyday Comfort,”** she consistently makes cooking approachable and fun for all. Her commitment to crafting comforting, easy-to-prepare recipes not only feeds the body but also cultivates a sense of belonging among home cooks. Whether you’re in search of a quick weeknight meal or a robust dish to share with friends and family, Holly’s recipes are guaranteed to provide warmth and pleasure.
For further delightful recipes and culinary motivation, be sure to explore Holly’s work and connect with her on social media!
Read More