7-Day Menu for a Protein-Rich Diet
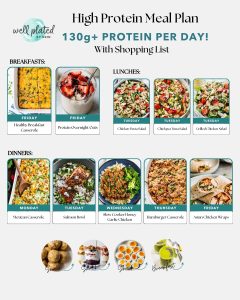
**7-Day Meal Plan for a High-Protein Diet**
A high-protein eating plan is a powerful method to enhance muscle growth, facilitate weight reduction, and boost overall health. Consuming protein keeps you satiated for extended periods, accelerates metabolism, and aids in tissue repair and immune health. Whether you’re an athlete, aiming to shed pounds, or just wish to improve your diet, a well-organized high-protein meal schedule can support your goals.
Below is a week-long high-protein meal plan tailored to deliver balanced nutrition emphasizing lean proteins, healthy fats, and complex carbohydrates.
—
### **Daily Protein Target**
Although individual requirements differ, most individuals pursuing a high-protein diet should aim for anywhere from 1.2 to 2.0 grams of protein for every kilogram of body weight daily. For instance, a person weighing 70 kg (154 lb) could target 84–140 grams of protein each day.
—
## **Day 1**
**Breakfast:**
– Scrambled eggs (3 eggs) paired with spinach and feta
– 1 slice of whole-grain toast
– 1/2 avocado
**Snack:**
– Greek yogurt (plain, 1 cup) mixed with chia seeds and berries
**Lunch:**
– Grilled chicken breast (150g)
– Quinoa salad featuring cucumber, tomato, and olive oil
– Steamed broccoli
**Snack:**
– Hard-boiled eggs (2)
**Dinner:**
– Baked salmon (180g)
– Roasted sweet potatoes
– Asparagus
—
## **Day 2**
**Breakfast:**
– Protein smoothie incorporating whey protein, banana, spinach, almond milk, and peanut butter
**Snack:**
– Cottage cheese (1/2 cup) with sliced peaches
**Lunch:**
– Turkey lettuce wraps accompanied by hummus and shredded carrots
– Serving of lentil soup
**Snack:**
– Handful of almonds (28g)
**Dinner:**
– Grilled lean steak (150g)
– Brown rice
– Mixed greens topped with balsamic vinaigrette
—
## **Day 3**
**Breakfast:**
– Oatmeal enriched with protein powder, almond butter, and blueberries
**Snack:**
– Edamame (1 cup, shelled)
**Lunch:**
– Tuna salad (canned tuna in water, Greek yogurt, celery, mustard) on whole-grain bread
– Side salad
**Snack:**
– Protein bar (ensure it has low sugar and high protein)
**Dinner:**
– Baked chicken thighs (skinless, 150g)
– Mashed cauliflower
– Green beans
—
## **Day 4**
**Breakfast:**
– Egg white omelet filled with mushrooms, tomatoes, and low-fat cheese
– 1 slice of Ezekiel bread
**Snack:**
– Protein shake made with almond milk
**Lunch:**
– Grilled shrimp (150g)
– Couscous mixed with herbs and lemon
– Steamed zucchini
**Snack:**
– Celery sticks spread with peanut butter
**Dinner:**
– Turkey meatballs served with marinara sauce
– Whole-wheat spaghetti
– Side of roasted Brussels sprouts
—
## **Day 5**
**Breakfast:**
– Greek yogurt parfait layered with granola and raspberries
**Snack:**
– Boiled egg alongside a small apple
**Lunch:**
– Grilled chicken Caesar salad (utilize a Greek yogurt-based dressing)
– Whole-grain roll
**Snack:**
– Roasted chickpeas
**Dinner:**
– Baked cod (150g)
– Wild rice
– Steamed carrots and peas
—
## **Day 6**
**Breakfast:**
– Protein pancakes topped with almond butter and banana slices
**Snack:**
– Low-fat string cheese alongside a handful of grapes
**Lunch:**
– Turkey and avocado wrapped in a whole-wheat tortilla
– Side of mixed greens
**Snack:**
– Smoothie made with protein powder, mixed berries, and spinach
**Dinner:**
– Grilled tofu or tempeh (for a plant-based option) or grilled chicken
– Stir-fried vegetables
– Brown rice or quinoa
—
## **Day 7**
**Breakfast:**
– Cottage cheese bowl mixed with pineapple and walnuts
**Snack:**
– Protein bar or boiled eggs
**Lunch:**
– Beef stir-fry featuring bell peppers and onions
– Served atop cauliflower rice
**Snack:**
– Greek yogurt combined with flaxseed
**Dinner:**
– Baked turkey breast
– Roasted potatoes
– Steamed broccoli and carrots
—
### **Tips for Success on a High-Protein Diet**
1. **Stay Hydrated:** Proper protein metabolism requires water. Ensure to drink sufficient fluids throughout the day.
2. **Balance Your Plate:** Incorporate vegetables, whole grains, and healthy fats for comprehensive nutrition.
3. **Select Lean Proteins:**

Easy Recipe for Korean Fried Chicken Prepared in an Air Fryer
# You’re Just 30 Minutes Away from the Simplest Korean Fried Chicken (Air Fried or Oven Baked)
If you haven’t indulged in Korean fried chicken yet, you’re in for a memorable experience! This dish is characterized by its extra crispy, double-fried chicken enveloped in a sweet and spicy sauce, making it a fantastic twist on the usual hot wings. With the assistance of an air fryer, you can prepare this scrumptious dish in just 30 minutes, providing a healthier version of a well-loved favorite.
## What is Korean Fried Chicken?
Korean fried chicken is famous for its distinctive cooking technique, which usually involves double (or even triple) frying the chicken to reach an exceptionally crunchy texture. The chicken is generally coated in a sticky, sweet, and spicy sauce that enhances the flavor. The most common sauce features gochujang, a Korean chili paste that contributes both depth and heat, bringing to mind buffalo wings but with a thrilling variation.

## Air Fryer Korean Fried Chicken
Although deep frying can be cumbersome, the air fryer provides a practical and healthier option. By employing a double air fry method, you can achieve a crunchy exterior that can compete with standard deep-fried chicken. This technique minimizes oil usage and streamlines the cooking process.

## How to Prepare Korean Fried Chicken
The key to achieving ideal Korean fried chicken is in the double frying process. Here’s how to accomplish it with an air fryer:
1. **Prepare the Chicken**: Begin by coating the chicken in oil to enhance heat conduction. Season with salt and pepper, then cover in corn or potato starch for a lighter, crunchier finish.
2. **Air Fry the Chicken**: Set your air fryer to 400ºF and cook the chicken for 15 minutes. No need for preheating the air fryer in advance.
3. **Prepare the Sauce**: While the chicken cooks, mix all the sauce ingredients and heat until just boiling.
4. **Flip the Chicken**: After the initial 15 minutes, turn the chicken over and continue air frying for another 5 minutes. Allow it to cool for 5 minutes afterward.
5. **Double Fry and Coat**: Lightly spray the chicken with oil again and air fry for an additional 5 minutes at 400ºF. Toss the chicken in the sauce and enjoy right away.

## How to Make a Large Batch of Wings
If you plan to entertain a crowd, you may need to prepare several pounds of wings. Here are some suggestions:
– **Utilize Air Fryer Racks**: This lets you cook several layers of wings simultaneously. Just remember to rotate the rack positions midway through for consistent cooking.
– **Convection Oven**: A convection oven can mimic an air fryer, enabling you to prepare larger quantities.
– **Traditional Oven**: If an air fryer isn’t available, you can bake the wings on a rack in a standard oven. While this will take more time, it remains a feasible choice.
## Korean Fried Chicken Sauce
The signature sauce for Korean fried chicken consists of honey, brown sugar, gochujang, and ketchup. While there are many variations of sauces for Korean fried chicken, this sweet and spicy mix is the most popular in the United States.

## What is Gochujang?
Gochujang is a fermented Korean chili paste that imparts a special flavor and moderate heat to various dishes. It’s commonly available at most grocery stores, often found in convenient squeeze bottles. This adaptable ingredient can enhance a variety of recipes, from marinades to soups.
## What If I Don’t Have Spray Oil?
Although spray oil is handy for air frying, you can substitute any oil with a high smoke point. Refrain from using olive oil due to its lower smoke point. If you prefer, it’s even possible to create your own spray oil.

## Deep/Pan Fry Korean Fried Chicken
If you lack an air fryer, you can still savor this dish by deep frying the chicken until it turns golden brown. Allow it to cool slightly before frying.
Read More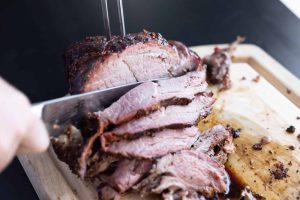
A Complete Manual for Crafting an Ideal Leg of Lamb
# Oven-Roasted Leg of Lamb: A Gourmet Treat
Oven-roasted leg of lamb is a timeless dish that captures the spirit of comfort cuisine. This recipe showcases the delectable flavors of the lamb while integrating fragrant herbs and spices to transform the dish into a gourmet delight. The slow-roasting technique guarantees that the meat stays juicy and tender, while the final sear results in a beautifully caramelized surface.
## Flavor Profile
The taste of oven-roasted leg of lamb is distinguished by its earthy and grassy undertones, enhanced by a light, fresh essence from the herb and mustard rub. This blend offers a delightful symphony that is both savory and aromatic, making it an ideal centerpiece for any special celebration or family gathering.
## Cooking Technique
This recipe features a two-phase roasting method known as reverse searing. The lamb is initially cooked at a low temperature to ensure tenderness and moisture retention. Once the desired internal temperature is achieved, the oven is raised to create a crispy, bronzed crust on the exterior. This approach not only amplifies the flavors but also guarantees that the meat remains juicy and succulent.
### Quick Tips for Success
– **Transfer for Searing**: To prevent burning the juices, move the lamb to a fresh pan before searing.
– **Use a Meat Thermometer**: This tool is crucial for achieving the ideal doneness. It helps ensure that the lamb is cooked to your preferred level without overcooking.
– **Resting Time**: Allow the lamb to rest after cooking to permit the juices to redistribute, enhancing its flavor and tenderness.
## Ingredient Tips
– **Lamb Selection**: This recipe calls for a boneless leg of lamb, which is leaner than a bone-in variant. The boneless cut is simpler to slice and perfect for even cooking.
– **Seasonings**: Fresh herbs like rosemary, thyme, and parsley, combined with garlic and mustard, create a savory crust that accentuates the lamb’s natural flavor.
## Step-by-Step Overview
1. **Season the Lamb**: Massage the leg of lamb with a blend of olive oil, garlic, herbs, mustard, salt, and pepper.
2. **Slow Roast**: Cook the lamb at a low temperature (approximately 250°F) until the internal temperature hits 110°-115°F.
3. **Rest and Increase Temperature**: Let the lamb rest for around 20 minutes while raising the oven temperature to 475°F.
4. **Sear for Crust**: Move the lamb to a new pan and roast until it reaches the desired internal temperature and a browned crust forms.
5. **Final Rest**: Allow the lamb to rest once more before slicing to guarantee maximum juiciness.
### Lamb Temperatures
– **Medium Rare**: 135°F (dark pink center)
– **Medium**: 145°F (pink center)
– **Medium Well**: 155°F (brown center with slight pink)
## Holly’s Tips for Perfect Roasted Lamb
– Let the lamb come to room temperature before cooking for more uniform cooking.
– Always relocate the roast to a new pan before searing to reduce smoke.
– Rest the lamb properly before slicing to enhance juiciness.
## Leftovers and Storage
Remaining leg of lamb can be kept in an airtight container in the refrigerator for up to five days. For longer preservation, freeze slices in zip-lock freezer bags for up to two months. Leftovers can be relished in sandwiches, reheated, or used in recipes like Greek-style gyros or Irish stew.
## Conclusion
Oven-roasted leg of lamb is more than just a dish; it’s a memorable experience. With its rich flavors and tender texture, it is guaranteed to impress both family and friends. Whether for a festive feast or a casual meal, this dish is a tribute to culinary tradition that brings warmth and joy to the dining table. Enjoy your cooking journey, and remember to leave a rating and share your thoughts on the experience!
Read More
Tasty Corn Casserole Recipe: A Household Favorite
### About the Author: Holly Nilsson
Holly Nilsson is a culinary innovator and the creative mind behind the renowned food blog, Spend With Pennies. With an emphasis on developing simple, comforting dishes that appeal to the everyday home chef, Holly has carved out a space for herself by demystifying cooking methods and highlighting nostalgic tastes. Her style not only accommodates those with hectic schedules but also fosters a passion for home-cooked dishes that inspire warmth and familiarity.
#### The Philosophy Behind Spend With Pennies
At Spend With Pennies, Holly holds the belief that cooking should be both approachable and fun for all, irrespective of their cooking skills. Her recipes generally include easily accessible ingredients and simple methods, making them ideal for busy households and beginner cooks alike. Holly’s enthusiasm for food is evident in her talent for turning basic ingredients into hearty, fulfilling meals that unite people.
#### A Journey Through Nostalgia
Holly’s culinary creations are deeply intertwined with nostalgia, frequently drawing influence from classic meals that remind us of family reunions and treasured occasions. She recognizes that dining is more than just nutrition; it’s about connection, comfort, and crafting enduring memories. This belief is mirrored in her diverse recipe assortment, which includes everything from traditional comfort foods to creative spins on well-loved classics.
#### Author of “Everyday Comfort”
Beyond her blog, Holly has penned the cookbook “Everyday Comfort.” This publication represents her culinary ethos, presenting readers with an array of hearty, home-cooked dishes that aim to motivate and delight. Centered on practical recipes that deliver on taste without compromise, “Everyday Comfort” is an essential addition for anyone wanting to enhance their home cooking skills.
#### Connect with Holly
Holly Nilsson is not only a skilled recipe creator; she is also a vibrant presence on social media. Her captivating content and friendly demeanor have attracted a devoted audience across various channels. You can connect with Holly on:
– **[Pinterest](https://www.pinterest.com/spendpennies/)**: For a visual delight of recipes and cooking ideas.
– **[Facebook](https://www.facebook.com/ispendwithpennies/)**: Join her community for news and engaging content.
– **[Twitter](http://spendpennies)**: Keep in touch for quick tips and cooking insights.
– **[Instagram](https://www.instagram.com/spendpennies/)**: Follow her for delectable food photography and exclusive looks into her culinary experiences.
#### Conclusion
Holly Nilsson’s commitment to making cooking a joyful and accessible endeavor has established her as a cherished personality in the culinary realm. Through her blog, cookbook, and social media engagement, she continues to encourage home cooks to whip up delicious meals that are not only simple to make but also abundant in flavor and nostalgia. Whether you’re an experienced chef or a novice in the kitchen, Holly’s recipes are bound to offer comfort and joy to your dining experience.
Read More