
Weekly Seasoned Chicken Recipe for Simple Meal Preparation
# Blackened Chicken Recipe: Smoky, Juicy Flavor with a Bold Crust
This blackened chicken recipe presents a delightful mix of smoky, juicy taste with a bold, crispy exterior. The key is a blend of zesty spices, savory seasonings, and a dash of brown sugar that forms a deliciously crunchy rub for pan-fried chicken breasts.
## Flavor Profile
– **Flavor**: Blackened chicken is defined by its robust, smoky, and slightly spicy taste, enhanced by a crunchy, flavorful crust.
– **Skill Level**: This recipe is suitable for beginners, making it straightforward for anyone to make. Just cut and season the chicken, then pan-fry until blackened.
– **Technique**: Pan frying at high temperature is vital to ensure the crust adheres to the chicken, producing an exceptionally juicy interior.
– **Recommended Tools**: A meat thermometer is essential for verifying the chicken is cooked to the correct doneness, especially for poultry.
## Serving Suggestions
Blackened chicken can be enjoyed warm or cool. It serves as a versatile component that can be included in various dishes:
– As a salad topping
– In wraps
– In hearty sandwiches, particularly with a zesty coleslaw on ciabatta bread
## What Is Blackened Chicken?
Blackened chicken is all about the perfect combination of savory and spicy flavors, balanced with a hint of sweetness.
### Key Ingredients
– **Chicken**: Chicken breasts work best for this recipe, but you can also opt for cutlets, boneless skinless thighs, or even wings.
– **Sugar**: Brown sugar aids in glazing the seasonings into a crunchy crust. Alternatives such as sugar-free brown sugar substitutes, honey, or maple syrup may also be utilized.
– **Seasonings**: Feel free to modify the seasoning amounts to match your preference. If cayenne pepper is too intense, consider swapping it for black pepper.
### Tips for Success
– For the best blackened crust, utilize a cast-iron skillet and heat it thoroughly beforehand.
– Allow the chicken to rest for 5 minutes following cooking to keep its juices intact.
– Consider preparing a double portion of the seasoning to have ready for future meals.
## Storing Leftovers
Leftover blackened chicken can be kept in a covered container in the refrigerator for up to 4 days. For extended storage, let it cool completely, wrap it carefully, or place it in an airtight container, marking it with the date. It can be frozen for up to 3 months.
## Ways to Use Blackened Chicken
This adaptable dish can enhance various meals, enriching salads, wraps, and sandwiches with its robust flavor.
### Recipe Overview
– **Prep Time**: 15 minutes
– **Cook Time**: 15 minutes
– **Total Time**: 30 minutes
– **Servings**: 4
### Ingredients
– **Blackened Seasoning**: A mix of paprika, smoked paprika, cumin, dark brown sugar, salt, oregano, garlic powder, onion powder, chili powder, and cayenne.
### Instructions
1. In a small bowl, mix the spices for the blackened seasoning.
2. Halve the chicken breasts horizontally to make thinner fillets.
3. Rub the seasoning blend over both sides of the chicken.
4. Heat olive oil in a skillet over medium heat.
5. Once hot, add the chicken and cook for approximately 4-6 minutes per side or until blackened and thoroughly cooked.
### Nutritional Information (per serving)
– **Calories**: 235
– **Carbohydrates**: 3g
– **Protein**: 24g
– **Fat**: 14g
– **Sodium**: 429mg
This blackened chicken recipe not only offers delicious flavor but also provides a healthy protein option for any meal. Enjoy the smoky, juicy delight that this dish adds to your table!
Read More
A Manual for Crafting the Finest Homemade Spaghetti Sauce
### About the Author: Holly Nilsson
Holly Nilsson is the imaginative mind behind Spend With Pennies, a platform focused on creating simple and comforting recipes designed for real-world cooking. With a strong love for nostalgic tastes and streamlined cooking methods, Holly motivates busy home chefs to whip up delectable meals that are both easy to make and gratifying.
Her culinary adventure is captured in her book, “Everyday Comfort,” which acts as a source of inspiration for those in pursuit of hearty, home-cooked dishes that evoke warmth and familiarity. Holly’s cooking philosophy highlights the pleasure of preparing meals that unite people, making her recipes a favorite among families and individuals alike.
For anyone eager to delve into more of Holly’s culinary wonders, you can visit her website where she shares an array of recipes that suit various tastes and occasions.
#### Follow Holly on Social Media:
– [Pinterest](https://www.pinterest.com/spendpennies/)
– [Facebook](https://www.facebook.com/ispendwithpennies/)
– [Twitter](http://spendpennies)
– [Instagram](https://www.instagram.com/spendpennies/)
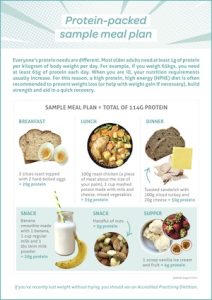
High Protein Weekly Meal Plan
**Protein-Rich Weekly Meal Plan**
A diet rich in protein can aid in muscle development, assist with weight management, and enhance overall well-being. Proteins are vital macronutrients that are key in tissue repair, enzyme production, and immune system support. Below is a protein-rich meal plan for one week to help you achieve your nutritional objectives.
**Day 1:**
– **Breakfast:** Scrambled eggs accompanied by spinach and feta cheese, served alongside turkey bacon.
– **Lunch:** Grilled chicken salad featuring mixed greens, cherry tomatoes, cucumbers, and a balsamic dressing.
– **Dinner:** Baked salmon paired with quinoa and steamed broccoli.
– **Snack:** Greek yogurt topped with almonds and berries.
**Day 2:**
– **Breakfast:** Protein shake including whey protein, banana, almond milk, and a tablespoon of peanut butter.
– **Lunch:** Turkey and avocado wrap in a whole grain tortilla paired with a side of carrot sticks.
– **Dinner:** Beef stir-fry with bell peppers, onions, and brown rice.
– **Snack:** Cottage cheese with chunks of pineapple.
**Day 3:**
– **Breakfast:** Omelette filled with mushrooms, tomatoes, and cheddar cheese.
– **Lunch:** Lentil soup served with whole grain bread.
– **Dinner:** Grilled shrimp skewers accompanied by a quinoa salad.
– **Snack:** Hard-boiled eggs.
**Day 4:**
– **Breakfast:** Overnight oats prepared with chia seeds, protein powder, and mixed berries.
– **Lunch:** Tuna salad featuring mixed greens, olives, and a lemon dressing.
– **Dinner:** Roasted chicken served with sweet potatoes and green beans.
– **Snack:** Edamame.
**Day 5:**
– **Breakfast:** Whole grain toast topped with avocado and poached eggs.
– **Lunch:** Quinoa and black bean salad with corn, cilantro, and lime dressing.
– **Dinner:** Baked cod served with asparagus and wild rice.
– **Snack:** Protein bar.
**Day 6:**
– **Breakfast:** Pancakes made with protein powder, garnished with fresh fruit.
– **Lunch:** Chicken Caesar salad topped with parmesan and croutons.
– **Dinner:** Turkey meatballs served with zucchini noodles and marinara sauce.
– **Snack:** Hummus accompanied by celery sticks.
**Day 7:**
– **Breakfast:** Smoked salmon on a whole grain bagel with cream cheese and capers.
– **Lunch:** Grilled tofu served with a side of roasted vegetables.
– **Dinner:** Lamb chops served with mashed cauliflower and sautéed spinach.
– **Snack:** Mixed nuts.
This meal plan includes a wide array of protein sources, such as animal-based options like chicken, beef, and fish, as well as plant-based alternatives like lentils, quinoa, and tofu. Modify portion sizes and ingredients based on your individual dietary requirements and preferences. Always seek advice from a healthcare professional or nutritionist before implementing major dietary changes.
Read More
Easy and Tasty Chocolate Hummus Recipe
**Discovering the Adaptability of Cocoa Powder in Your Kitchen**
Cocoa powder serves as a fundamental component in numerous kitchens, cherished for its decadent flavor and adaptability. Whether you’re crafting a traditional chocolate cake or trying out fresh recipes, comprehending the various types of cocoa powder can enhance your culinary endeavors. One commonly used type is Dutch process cocoa powder, recognized for its silky, gentle flavor and rich hue.
**What is Dutch Process Cocoa Powder?**
Dutch process cocoa powder, referred to as alkalized cocoa, undergoes treatment with an alkaline solution to neutralize its inherent acidity. This technique produces a cocoa powder that is darker and boasts a more pronounced chocolate taste than natural cocoa powder. Its neutral pH makes it a superb option for recipes that utilize baking powder, as it does not interact with baking soda in the way natural cocoa powder does.
**Where to Locate Dutch Process Cocoa Powder**
Dutch process cocoa powder can be located in the baking section of your nearby grocery store. Notable brands include Hershey’s Special Dark Cocoa Powder and Ghirardelli Dutch Process Cocoa Powder. For those who prefer online shopping, these brands are easily accessible through various retailers.
**A Fun Recipe Spin: Peanut Butter Twist**
For anyone wanting to introduce an exciting twist to their cocoa-based recipes, think about adding peanut butter. This blend not only enriches the flavor profile but also contributes a creamy consistency to your dishes. Whether you’re preparing cookies, brownies, or a straightforward chocolate spread, peanut butter can be a delightful enhancement.
**Recipe Modification: Sweetener and Cocoa Powder Alterations**
In response to reader insights, a favored recipe was revised on May 30, 2025, to better the measures of sweetener and cocoa powder. These modifications guarantee a harmonious taste and texture, addressing previous feedback concerning sweetness and chocolate richness.
**Nutritional Details**
When savoring cocoa-infused treats, it’s crucial to be aware of portion sizes. Nutritional information for the revised recipe is based on a serving size of about 3 tablespoons. This allows you to relish the luxurious flavors of cocoa while monitoring your dietary consumption.
**Conclusion**
Dutch process cocoa powder is an adaptable ingredient that can elevate a variety of recipes. Whether you’re an experienced baker or a kitchen novice, trying out different cocoa powders and flavor combinations, like incorporating peanut butter, can yield delightful and fulfilling outcomes.
Read More
An Educational Resource for Crafting the Finest Rhubarb Pie for Spring
### About the Author: Holly Nilsson
Holly Nilsson is the creative mastermind behind Spend With Pennies, a site devoted to sharing simple and comforting recipes designed for practical cooking. With a strong enthusiasm for cherished flavors and straightforward cooking methods, Holly inspires busy home chefs to whip up delightful meals that are both enjoyable and feasible. Her philosophy highlights the significance of preparing filling dishes that evoke the comfort of homemade food.
Alongside her efforts on Spend With Pennies, Holly has authored the book “Everyday Comfort.” This work seeks to motivate readers with a selection of wholesome, home-cooked recipes that address the demands of daily life, making it simpler for families to relish nutritious meals together.
For those eager to delve deeper into Holly’s culinary innovations, you can discover more posts and recipes on her website: [See more posts by Holly](https://www.spendwithpennies.com/author/holly/).
### Follow Holly on Social Media
Keep in touch with Holly and her latest culinary journeys via her social media platforms:
– [Pinterest](https://www.pinterest.com/spendpennies/)
– [Facebook](https://www.facebook.com/ispendwithpennies/)
– [Twitter](http://spendpennies)
– [Instagram](https://www.instagram.com/spendpennies/)

Toasted Tuna and Cheese Sandwich
**Grilled Tuna and Cheese Sandwich: An Exciting Take on a Timeless Favorite**
The grilled cheese sandwich is a cherished staple, adored for its straightforwardness and comforting tastes. Yet, for those seeking to enhance this classic dish, the grilled tuna and cheese sandwich presents a delightful variation that merges the creamy, melted richness of cheese with the hearty, savory flavors of tuna. This mixture not only improves the nutritional value of the sandwich but also adds a fresh layer of taste and texture.
**Ingredients and Preparation**
To craft the ideal grilled tuna and cheese sandwich, you will require the following ingredients:
– 2 slices of your preferred bread (sourdough, whole grain, or rye are excellent choices)
– 1 can of tuna, drained
– 2 slices of cheese (cheddar, Swiss, or mozzarella are popular options)
– 2 tablespoons of mayonnaise
– 1 tablespoon of Dijon mustard (optional)
– Salt and pepper to taste
– Butter for grilling
– Optional extras: sliced tomatoes, pickles, or onions for added flavor
**Instructions:**
1. **Prepare the Tuna Mixture:** In a bowl, blend the drained tuna with mayonnaise, Dijon mustard, salt, and pepper. Mix until thoroughly combined. This mixture acts as the tasty base of your sandwich.
2. **Assemble the Sandwich:** Lay out the slices of bread. On one slice, spread a generous amount of the tuna mixture. Top it with slices of cheese. If desired, include optional ingredients such as tomatoes or pickles for extra taste and texture. Place the second slice of bread on top to finish the sandwich.
3. **Grill the Sandwich:** Heat a skillet or griddle over medium heat. Spread butter on the outer sides of the sandwich. Place the sandwich in the skillet and grill for approximately 3-4 minutes on each side, or until the bread is golden brown and the cheese has melted.
4. **Serve and Enjoy:** Once perfectly grilled, take the sandwich out of the skillet. Allow it to cool slightly before slicing it in half. Serve with a side of chips, salad, or soup for a well-rounded meal.
**Nutritional Benefits**
The grilled tuna and cheese sandwich is not just tasty but also offers numerous nutritional advantages. Tuna is a fantastic source of protein and omega-3 fatty acids, crucial for heart health. Cheese contributes calcium and extra protein, while whole grain bread can boost fiber intake. By adding vegetables like tomatoes or onions, you can further enrich the sandwich’s nutritional benefits.
**Variations and Tips**
– **Spicy Kick:** Include a splash of hot sauce or sliced jalapeños in the tuna mixture for a spicy twist.
– **Herb Infusion:** Incorporate fresh herbs like dill or parsley into the tuna for added freshness.
– **Gourmet Touch:** Opt for artisanal bread and gourmet cheeses to elevate the sandwich to a more refined level.
The grilled tuna and cheese sandwich is a flexible dish that can be tailored to fit personal tastes and preferences. Whether relished as a quick lunch or a fulfilling dinner, this sandwich is bound to become a favorite for those in search of a delicious and healthy meal.
Read More
Easy and Tasty Pinwheel Recipe
Alex & Sonja: The Culinary Partners Behind A Couple Cooks
Introducing Alex and Sonja Overhiser, the energetic pair behind the renowned food blog, A Couple Cooks. As authors of two celebrated cookbooks, they have emerged as a reliable resource for home chefs in search of straightforward, seasonal dishes. Their adventure commenced in 2010 when they started their website to share their enthusiasm for cooking and the happiness it brings to their family.
Alex and Sonja’s culinary philosophy is centered on simplicity and seasonality. They advocate for using fresh, wholesome ingredients to craft tasty meals that everyone can enjoy. Their recipes are tailored to be easy for busy families, presenting a variety of choices that accommodate different palates and dietary needs.
Throughout the years, A Couple Cooks has evolved into an extensive resource for home cooks. The site boasts thousands of original recipes, each one carefully developed and tested by Alex and Sonja. From quick weeknight meals to grand weekend gatherings, their recipes are paired with breathtaking photography that encapsulates the spirit of each dish.
Beyond recipes, Alex and Sonja share invaluable cooking tips and meal planning suggestions. They recognize the difficulties of juggling a hectic lifestyle and healthy eating, and their advice aids readers in streamlining their cooking routines without compromising on flavor or nutrition.
As active parents, Alex and Sonja also prioritize crafting family-friendly meals that are both healthy and enjoyable for children. Their kids act as taste testers, guaranteeing that each recipe is approved by young eaters and suitable for family dining.
Through A Couple Cooks, Alex and Sonja have fostered a lively community of food lovers who share their passion for cooking. Their authentic enthusiasm and commitment to their craft have established them as cherished figures in the culinary scene, motivating many to appreciate the joy of home cooking.
Whether you are an experienced cook or a kitchen beginner, Alex and Sonja’s recipes and insights provide something for everyone. With their support, you’ll uncover the joy of making delicious, nutritious meals that unite people around the table.
Read More
How to Prepare Birria Tacos: A Detailed Recipe
# Birria Tacos: Flavorful, Cheesy, and Mouthwateringly Juicy
Birria tacos have captivated food lovers, and rightfully so. These tacos are not only mouthwatering but also surprisingly simple to prepare, making them an ideal choice for your weekly dinner lineup. With their savory, cheesy stuffing and deep flavors, birria tacos are bound to become a staple in your home.
## What Exactly are Birria Tacos?
Birria is a classic Mexican meal, generally prepared as a spicy and savory stew featuring beef or goat. The meat is slow-cooked to achieve tenderness and richness. The creative twist is when this delightful meat is encased in a taco shell, dipped into the stew, and then toasted until crisp. This technique has sparked the popularity of birria tacos, establishing them as a favorite for taco evenings.

## Beef Birria Tacos
Though goat is the traditional choice for birria, many opt for beef due to its accessibility. Beef shank is suggested for its robust taste, but alternatives like sirloin or short ribs can also be utilized. The preparation method stays consistent, no matter which meat you select.
## The Enchantment of Dipping and Frying
The secret to crafting the ultimate birria tacos is found in the dipping and frying technique. By immersing the tortilla in the stew and frying it in the fat, the flavor and texture are enhanced, resulting in a crunchy shell that enhances the whole taco experience. While this is typically done with butter or lard, using the fat from the stew brings an added depth of flavor.

## Ingredients for Birria Tacos
Essential ingredients for birria tacos can easily be sourced from your nearby grocery store:
– **Beef:** Opt for beef shank for superior flavor, and consider mixing in a leaner cut like sirloin.
– **Dried Guajillo Peppers:** These add an authentic Mexican taste. If not available, consider other dried peppers such as ancho or pasilla.
– **Chipotle Peppers in Adobo:** These offer a spicy-sweet profile and are readily found.
– **Mexican Oregano:** This type is generally fresher and more flavorful than the regular oregano available in spice sections.
## How to Create Birria Stew
Preparing birria stew is a straightforward process:
1. **Soak the Peppers:** Boil water, remove it from heat, and let the dried guajillo peppers soak.
2. **Season the Meat:** Chop the beef into cubes and season with salt and pepper.
3. **Create the Marinade:** Blend together the marinade components, including the soaked peppers, until smooth.
4. **Marinate the Beef:** Let the beef marinate for no less than two hours, or overnight for deeper flavor.
5. **Make the Stew:** Sauté onions until they turn golden, add the marinated beef, cover with chicken stock, and simmer until tender.

## How to Assemble Birria Tacos
Once your stew is prepared, putting together the tacos is a breeze:
1. **Shred the Meat:** Shred the cooked beef and optionally fry it for additional crunchiness.
2. **Warm the Tortillas:** This helps make them flexible for folding.
3. **Dip and Fill:** Dip the tortillas in the stew, then fill with beef, onions, cilantro, and cheese.
4. **Fold and Fry:** Fry the tacos until they are crispy and serve with a side of stew for dipping.

## Instant Pot, Dutch Oven, or Slow Cooker
You can make birria stew using different methods:
– **Instant Pot:** Quick and preserves flavor.
– **Dutch Oven:** Simmer on low for 4-6 hours.
– **Slow Cooker:** Combine all ingredients and let cook on low for 8 hours.
## The Tortillas
For birria tacos, choose small corn tortillas. If high-quality tortillas are hard to find, consider brands like La Tortilla Factory or Mission Foods. Always warm your tortillas prior to filling to avoid tearing.
## Quesabirria Tacos
For an extra cheesy variation, try quesabirria tacos. Just add shredded Oaxaca cheese before folding and
Read More
Healthy Celery Smoothie Recipe
Alex & Sonja: The Gastronomic Team Behind A Couple Cooks
Alex and Sonja Overhiser form the energetic team behind the well-known food blog, A Couple Cooks. As the creators of two celebrated cookbooks, they have made a notable influence in the realm of home cooking by disseminating their enthusiasm for straightforward, seasonal dishes. Their journey commenced in 2010 when they established their website to motivate others with the delight of cooking.
The couple’s food philosophy is anchored in simplicity and seasonality, concentrating on crafting meals that are both tasty and approachable. Their recipes are tailored to suit busy families, providing meal planning suggestions and culinary tips that facilitate the preparation of healthy meals at home. Each recipe results from their joint endeavor, with Alex and Sonja composing, photographing, and testing every dish themselves, often enlisting the assistance of their children.
A Couple Cooks has expanded to present thousands of unique recipes, varying from swift weeknight meals to intricate weekend celebrations. The Overhisers highlight the significance of family cooking, believing it fortifies relationships and creates enduring memories. Their efforts not only deliver practical culinary advice but also foster an appreciation for cooking that can be handed down through generations.
Through their blog, cookbooks, and social media engagement, Alex and Sonja have cultivated a community of like-minded individuals who share their passion for quality food and good company. Their commitment to promoting a healthy, balanced lifestyle continues to motivate home cooks worldwide to embrace the culinary arts with joy and inventiveness.
Read More
Creamy Asparagus Soup Recipe Free of Roux
# Creamy and Fresh Asparagus Soup Recipe
Asparagus soup is a delightful dish that captures the essence of spring. This rich soup is not only simple to make but also brings a subtle, earthy taste that is both fulfilling and light. Below, we explore the ingredients, cooking techniques, and tips for crafting the ideal cream of asparagus soup.
## Overview of Cream of Asparagus Soup
Cream of asparagus soup is created by sautéing asparagus, onions, and garlic in garlic butter, followed by blending them with a savory broth and a hint of cream for a luxurious finish. This one-pot dish is suitable for novices and can be prepared in less than an hour.
### Flavor Profile
– **Flavor**: The soup features a light, fresh, and slightly earthy taste, making it suitable for spring.
– **Skill Level**: Beginner-friendly, requiring minimal culinary expertise.
– **Recommended Tools**: An immersion blender is perfect for pureeing soups directly in the pot.
– **Budget Tip**: To extend the recipe, consider adding pureed veggies or potato flakes to thicken the soup.
## Ingredient Tips for Asparagus Soup
1. **Asparagus**: Select spears of uniform size for consistent cooking. Frozen or leftover asparagus is also acceptable.
2. **Broth**: Chicken broth can be swapped for vegetable broth for a vegetarian option. Homemade broth enhances the flavor profile.
3. **Cream**: Heavy cream gives structure and taste. Alternatives include half-and-half, sour cream, or Greek yogurt.
4. **Seasonings**: Basic seasonings and a touch of lemon elevate the asparagus flavor. Fresh herbs like parsley or mint can serve as beautiful garnishes.
## Favorite Variations
– **Add-ins**: Mix in cooked bay shrimp, roasted leeks, or sautéed mushrooms and onions for a more substantial meal.
– **Vegetable Boost**: Blend in peas or spinach for a pop of vibrant green color.
– **Cold Version**: Serve chilled with a swirl of yogurt and fresh herbs.
## How to Make Asparagus Soup
### Step-by-Step Instructions
1. **Sauté**: In a large pot over medium heat, sauté chopped onion and garlic in butter until soft. Add asparagus and cook for an extra 5 minutes.
2. **Add Broth**: Mix in broth and seasonings. Cover and simmer for 10-15 minutes until asparagus is tender.
3. **Puree**: Employ an immersion blender to puree the soup until smooth. Incorporate cream and lemon juice, adjusting seasonings as desired.
### Garnishing
Top with fresh herbs, crumbled goat cheese, or parmesan croutons for enhanced flavor and texture.
## Storing Leftovers
– **Refrigeration**: Keep leftover soup in a covered container in the refrigerator for up to 4 days.
– **Reheating**: Warm gently in the microwave or on the stovetop over low heat, avoiding boiling to maintain texture.
– **Freezing**: It’s not advisable to freeze cream-based soups due to the risk of curdling. However, you can freeze the soup before adding cream. Thaw in the refrigerator or on low heat, then incorporate cream before serving.
## Nutritional Information (per serving)
– **Calories**: 176
– **Carbohydrates**: 10g
– **Protein**: 6g
– **Fat**: 14g
– **Sodium**: 525mg
– **Fiber**: 4g
## Conclusion
This fresh and creamy asparagus soup is a beautiful way to honor the flavors of spring. With its easy preparation and delightful taste, it’s ideal for a light lunch or as an appetizer for dinner. Relish the vibrant flavors and the joy of making a homemade soup that everyone will enjoy!
Read More