
How to Get Ready and Cook Lion’s Mane Mushrooms: A Comprehensive Step-by-Step Manual
Discover Alex & Sonja Overhiser: The Pair Behind A Couple Cooks
Alex and Sonja Overhiser are the energetic couple leading A Couple Cooks, a beloved food blog that has motivated countless individuals to enjoy the delights of home cooking. Since they unveiled their website in 2010, the Overhisers have established themselves as trusted figures in the culinary scene, recognized for their friendly, seasonal recipes and commitment to making cooking achievable for everyone—from busy parents to novice home cooks.
From Kitchen Beginners to Cookbook Creators
Alex and Sonja’s path into the culinary realm is both relatable and motivating. Neither of them began as trained chefs. In fact, their enthusiasm for cooking developed after they tied the knot and started exploring the kitchen together. What started as a mutual pastime quickly transformed into a passionate venture, resulting in the launch of A Couple Cooks.
Over time, their blog has grown into a valuable resource for home chefs, featuring thousands of original recipes, meal planning suggestions, and practical cooking advice. Their friendly approach and stunning photography have garnered them a devoted audience and recognition from prominent media outlets.
Inspirational Cookbooks
Apart from their online presence, Alex and Sonja have authored two cookbooks that embody their culinary philosophy: straightforward, wholesome, and delectable meals that bring people together. Their books boast vibrant recipes that highlight fresh ingredients and seasonal produce, making them ideal for families and busy individuals alike.
Making Cooking a Family Experience
As parents, Alex and Sonja recognize the challenges of meal preparation amid the chaos of family life. That’s why numerous recipes they share are kid-tested and family-approved. They believe that cooking can be a joyful, collaborative pastime—even with young ones around—and frequently share tips for involving children in the kitchen.
What Awaits You on A Couple Cooks
Whether you’re in search of a quick weeknight meal, a healthy breakfast option, or a stunning dish for hosting, A Couple Cooks has something to offer everyone. Some standout features of their website include:
- Easy, Seasonal Recipes: From hearty soups to crisp salads, their recipes aim to be both nourishing and delightful.
- Meal Planning Tools: Weekly meal plans and shopping lists help eliminate the uncertainty of dinnertime.
- Cooking Tips & Techniques: Master the essentials or enhance your expertise with their straightforward guides.
- Focus on Plant-Based Ingredients: While not exclusively vegetarian, many of their recipes highlight plant-based elements.
More Than Just Culinary Creations
Beyond the culinary delights, Alex and Sonja leverage their platform to advocate for a lifestyle rooted in mindfulness, sustainability, and connection. They inspire readers to slow down, appreciate the cooking process, and bond with loved ones over a home-cooked meal.
Become Part of the A Couple Cooks Community
With their friendly, down-to-earth approach and a profound passion for food, Alex and Sonja Overhiser have cultivated more than just a recipe blog—they’ve fostered a community. Whether you’re an experienced cook or just beginning your journey, A Couple Cooks provides the motivation and encouragement needed to make cooking an enjoyable aspect of your daily routine.
To discover their recipes, cookbooks, and more, check out A Couple Cooks.
Read More
High-Protein Cottage Cheese Shake Recipe
🍓 Creamy Strawberry Cheesecake Cottage Cheese Smoothie: A Protein-Rich Treat
If you’re searching for a fast, healthy, and incredibly tasty way to kick off your day or get through an afternoon slump, say hello to your new go-to recipe: the Strawberry Cheesecake Cottage Cheese Smoothie. This smooth and luscious blend delivers a robust 20 grams of protein, making it an essential choice for health-savvy gourmets and busy households.
Why Include Cottage Cheese in a Smoothie?
Cottage cheese may not be the first item that springs to mind when considering smoothie ingredients, but it’s swiftly gaining popularity—and rightfully so. Unlike Greek yogurt, cottage cheese provides a slightly tangy taste and an indulgently creamy feel that echoes the decadence of cheesecake. Additionally, it boasts a high natural content of protein and calcium, serving as a powerhouse for muscle recovery, bone strength, and fullness.
The Strawberry Cheesecake Experience
This smoothie is not just nutritious—it tastes like a dessert! The mix of frozen strawberries, ripe banana, and creamy cottage cheese creates that familiar strawberry cheesecake flavor. A drizzle of maple syrup or a couple of Medjool dates introduces just the right level of sweetness without added refined sugars.
Here’s why it’s effective:
– Frozen strawberries produce a thick, milkshake-like texture.
– Ripe banana contributes natural sweetness and a silky feel.
– Full-fat cottage cheese enhances the cheesecake flavor and protein content.
Ingredients You Will Need
To prepare one serving of this protein-packed smoothie, collect the following ingredients:
– ½ cup full-fat cottage cheese
– 1 ripe banana
– 1 cup frozen strawberries
– 1 tablespoon maple syrup (or 1–2 Medjool dates)
– ½ cup milk of your choice (dairy or plant-based)
– ½ cup ice
Optional: Incorporate a scoop of vanilla protein powder for an added protein boost.
Tips for Perfect Blending
For an ultra-smooth, creamy texture, adhere to these expert blending suggestions:
1. Smart layering: Begin with the liquid (milk), add cottage cheese and banana, followed by frozen strawberries and ice.
2. Blend in stages: Start at low speed for 10 seconds to break up frozen pieces, then switch to high for 30–45 seconds until smooth.
3. Adjust as needed: Want it sweeter? Add more maple syrup. Too thick? Mix in a little more milk.
Exciting Variations to Consider
This smoothie is infinitely adaptable. Here are some delicious variations:
– Berry Cheesecake: Replace strawberries with blueberries, raspberries, or a mixed berry assortment.
– Tropical Cheesecake: Combine frozen pineapple and coconut milk for a tropical twist.
– Chocolate-Covered Strawberry: Mix in a tablespoon of cocoa powder or chocolate protein powder.
– Extra Protein: Incorporate a scoop of vanilla or unflavored protein powder for up to 15g more protein.
Preparation & Storage Recommendations
Pressed for time in the morning? You can prepare this smoothie ahead of time. Keep it in an airtight container in the refrigerator for up to 24 hours. Just shake or stir well before drinking, and add a little milk if it thickens.
Dietary Information
This smoothie is:
– Vegetarian
– Gluten-Free
For a vegan alternative, omit the cottage cheese and experiment with one of these vegan smoothie recipes.
What Others Are Saying
“Made the strawberry cheesecake smoothie as breakfast for my kiddos, and they absolutely loved it! I tried a sip, and wow, so creamy and delightful. It’s scrumptious!” — Tanvee ⭐⭐⭐⭐⭐
Final Remarks
The Strawberry Cheesecake Cottage Cheese Smoothie is more than just a fashionable recipe—it’s a fulfilling, protein-rich indulgence that nourishes your body while satisfying cravings. Whether you’re catering to finicky eaters, seeking a post-workout treat, or simply wishing to enjoy a healthier dessert, this smoothie is a must-try.
So grab your blender and prepare this creamy delight—you may just discover your new breakfast favorite!
📝 Want the printable recipe? Access it here: Cottage Cheese Smoothie (Strawberry Cheesecake!) »
More Cottage Cheese Recipes to Discover:
– Cottage Cheese Pancakes
– Cottage Cheese Mac and Cheese
– High-Protein Smoothie Bowls
Happy blending! 🥤
Read More
Vital Quinoa Dishes for All Occasions
Title: The Definitive Compilation of Essential Quinoa Recipes
Quinoa (pronounced KEEN-wah) has rapidly gained popularity in the culinary realm—and justifiably so. This ancient grain, which is technically a seed, serves as a nutritional juggernaut filled with protein, fiber, and necessary amino acids. It’s inherently gluten-free, simple to prepare, and remarkably adaptable, making it a fundamental ingredient in kitchens worldwide.
Whether you desire a hearty breakfast, a refreshing lunch, a fulfilling dinner, or even a dessert, quinoa has you covered. Below is a handpicked selection of the most essential quinoa recipes that highlight its versatility in both sweet and savory preparations.
Why Opt for Quinoa?
Before we jump into the recipes, let’s discuss why quinoa is such a favored ingredient:
– High in protein and includes all nine essential amino acids
– Abundant in fiber, iron, magnesium, and antioxidants
– Gluten-free and easily digestible
– Quick to prepare (ready in roughly 15 minutes)
– Subtle, nutty flavor that complements a wide range of ingredients
Now, let’s delve into the many delightful ways to savor quinoa.
1. Quinoa Salads
Quinoa salads are ideal for quick, nutritious meals. They’re excellent for meal prep and can be enjoyed warm or cold.
– Mediterranean Quinoa Salad: Combine cooked quinoa with cherry tomatoes, cucumbers, red onion, Kalamata olives, feta cheese, and a lemon-oregano dressing.
– Southwest Quinoa Salad: Toss black beans, corn, avocado, bell peppers, and cilantro with quinoa and a vibrant lime dressing.
– Quinoa Tabbouleh: A modern take on the classic Middle Eastern dish, substituting bulgur with quinoa for a gluten-free alternative.
2. Quinoa Soups
Quinoa contributes heartiness and texture to soups without overshadowing other flavors.
– Chicken Quinoa Soup: A comforting bowl featuring shredded chicken, carrots, celery, and quinoa in a flavorful broth.
– Quinoa and Kale Soup: A vegetarian delight loaded with greens, white beans, and herbs.
– Spicy Quinoa Chili: A hearty, meatless chili with kidney beans, tomatoes, and a spicy kick.
3. Quinoa Breakfasts
Kick off your day with a protein-rich breakfast incorporating quinoa.
– Quinoa Porridge: Cook quinoa with almond milk, cinnamon, and maple syrup. Garnish with fresh berries and nuts.
– Quinoa Pancakes: Light, fluffy pancakes crafted with quinoa flour or blended cooked quinoa.
– Breakfast Quinoa Bowl: Assemble quinoa with Greek yogurt, honey, fruit, and granola for a parfait-like breakfast.
4. Quinoa as a Side Dish
Quinoa serves as a fantastic alternative to rice or couscous.
– Garlic Herb Quinoa: Sauté garlic in olive oil, then mix into cooked quinoa with fresh herbs.
– Lemon-Parmesan Quinoa: A bright, cheesy side dish that pairs wonderfully with grilled chicken or fish.
– Coconut Curry Quinoa: Infuse quinoa with coconut milk and curry spices for a tasty twist.
5. Quinoa with Chicken
Quinoa and chicken create a protein-rich pairing.
– Quinoa-Crusted Chicken Tenders: Utilize quinoa as a crunchy, gluten-free coating for baked or pan-fried chicken.
– Chicken and Quinoa Stir-Fry: A quick skillet dish featuring veggies, soy sauce, and sesame oil.
– One-Pot Chicken Quinoa Pilaf: A complete meal of chicken, quinoa, vegetables, and spices all cooked in a single pot.
6. Vegetarian Quinoa Dishes
Quinoa is a favorite among vegetarians for its ample protein content.
– Quinoa Stuffed Peppers: Bell peppers filled with a blend of quinoa, beans, corn, and cheese.
– Quinoa Fritters: Crispy patties made with quinoa, zucchini, and herbs—perfect as a snack or main dish.
– Quinoa and Mushroom Stir-Fry: Earthy mushrooms and quinoa sautéed with garlic and soy sauce.
7. Quinoa Desserts
Indeed, you can even relish quinoa in desserts!
– Quinoa Chocolate Chip Cookies: Soft, chewy cookies made with quinoa flour or cooked quinoa.
– Quinoa Pudding: A creamy dessert akin to rice pudding, infused with vanilla and cinnamon.
– Chocolate Quinoa Cake: Moist and decadent, this cake incorporates cooked quinoa for a gluten-free indulgence.
8. Creative Quinoa Uses
Quinoa’s versatility is showcased in these distinctive applications.
– Quinoa Flatbread: A straightforward, gluten-free flatbread made from quinoa flour or blended soaked quinoa.
– Quinoa Crust Quiche: Employ quinoa to craft a crispy, protein-packed crust for your favorite quiche.
– Quinoa Parfaits: Layer quinoa with yogurt, fruit, and nuts for a nutritious snack or dessert.
Tips for Cooking Perfect Quinoa
– Rinse before cooking: Quinoa has a natural coating called saponin that
Read More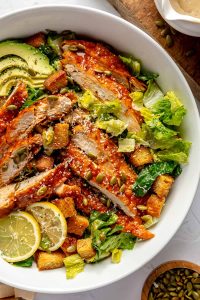
Oven-Baked Caesar Chicken with a Crunchy Crust
Crispy Baked Caesar Chicken: A Savory Spin on a Timeless Favorite
If you adore Caesar salad and have a hankering for the delightful crunch of crispy chicken, the Crispy Baked Caesar Chicken recipe is essential. This dish merges the creamy, zesty flavor of Caesar dressing with the mouthwatering texture of golden-baked chicken, resulting in a meal that is both comforting and upscale. Best of all, it’s easy to whip up, making it ideal for hectic weeknights or informal gatherings.
What Is Crispy Baked Caesar Chicken?
Crispy Baked Caesar Chicken is a straightforward yet flavorful dish that showcases boneless, skinless chicken breasts or thighs enveloped in Caesar dressing and a seasoned breadcrumb mixture, then baked to perfection for a golden finish. The outcome is a succulent, tender chicken with a crunch that delivers a rich, savory flavor similar to a Caesar salad.
Prep and Cook Time
– Prep Time: 10 minutes
– Cook Time: 20–25 minutes
– Total Time: 30–35 minutes
– Servings: 4
Key Ingredients
– Chicken: Boneless, skinless chicken breasts or thighs provide lean protein and a delicate texture. Flattening them assures uniform cooking.
– Caesar Dressing: Serves as both a marinade and a flavor enhancer. It contributes creaminess and zest while aiding the breadcrumbs in sticking to the chicken.
– Breadcrumbs: You may choose plain, seasoned, or panko breadcrumbs. For a unique touch, consider crushed Caesar croutons.
– Parmesan Cheese: Parmigiano Reggiano lends a nutty, salty richness to the breadcrumb coating.
– Seasonings: Garlic powder, onion powder, oregano, and a hint of cayenne introduce warmth and depth to the crust.
How to Make It
1. Prepare the Coating:
In a large bowl, combine 2 cups of breadcrumbs with ¼ cup grated Parmesan cheese, 1 teaspoon oregano, ½ teaspoon each of garlic and onion powder, and a dash of cayenne (if desired).
2. Coat the Chicken:
Submerge each piece of chicken in ½ cup Caesar dressing, shake off any excess, and press into the breadcrumb mixture to coat thoroughly.
3. Bake:
Arrange the coated chicken on a rack set over a baking pan. Optionally mist with oil for additional crispiness. Bake in a preheated oven at 425°F (220°C) for 20–25 minutes, or until the internal temperature hits 165°F (74°C).
4. Serve:
Allow the chicken to rest for a few minutes before serving. It pairs excellently with a side salad, roasted veggies, or pasta.
Nutritional Information (per serving)
– Calories: 192
– Fat: 6.1g (Saturated: 1.4g)
– Cholesterol: 24mg
– Sodium: 354mg
– Carbohydrates: 22g (Fiber: 2g, Sugars: 4g)
– Protein: 13g
Make It a Meal: Crispy Baked Caesar Chicken Salad
Transform your Crispy Baked Caesar Chicken into a complete meal by slicing it and serving it atop a bed of romaine lettuce with traditional Caesar salad components. This version is perfect for lunch or a light dinner.
Ingredients
– 1 lb crispy baked Caesar chicken, diced
– 8 cups chopped romaine lettuce
– 1 cup croutons (gluten-free if necessary)
– ½ cup Caesar dressing
– ¼ cup grated or shredded Parmesan
– Freshly ground black pepper to taste
– ½ lemon, sliced (for garnish)
Optional Add-Ins
– Bacon bits
– Sun-dried tomatoes
– Avocados, cucumbers, cherry tomatoes, or bell peppers
Instructions
1. In a large bowl, mix the lettuce, croutons, Parmesan, and Caesar dressing.
2. Incorporate the sliced chicken and toss gently to combine.
3. Top with lemon slices and freshly ground pepper. Serve right away.
Nutritional Information (per serving)
– Calories: 367
– Fat: 1.1g (Saturated: 2.8g)
– Cholesterol: 324mg
– Sodium: 554mg
– Carbohydrates: 27g (Fiber: 4.2g, Sugars: 4g)
– Protein: 19g
Tips and Variations
– Gluten-Free Option: Use gluten-free breadcrumbs or croutons.
– Fry Instead of Bake: For a more indulgent version, pan-fry the chicken in oil until crispy.
– Make It Spicy: Increase the cayenne or add a splash of hot sauce to the Caesar dressing.
– Meal Prep Friendly: Bake a batch of chicken and store it in the fridge for salads and wraps throughout the week.
Conclusion
Crispy Baked Caesar Chicken is a delectable and
Read More
A Complete Manual on Sushi Bake: Components, Cooking, and Serving Suggestions
# Unveiling Sushi Bake: The California Roll Reimagined
Have you come across sushi bake? This scrumptious creation has become extraordinarily popular, especially for potlucks, taking cues from the classic California roll. Envision a reimagined sushi experience, where the essence of a California roll is layered and baked into a cozy, creamy casserole. It’s a meal that is not only flavorful but also ideal for sharing during gatherings and social events.
## What Exactly is Sushi Bake?
Sushi bake is a contemporary spin on traditional sushi rolls, delivering all the beloved flavors in a more user-friendly presentation. Rather than crafting individual sushi pieces, the components are stacked in a baking dish, resulting in a hearty casserole that can be scooped up and relished with crispy roasted seaweed sheets. This engaging dining style makes it a fantastic choice for potlucks and family events, letting everyone dish out their portions and personalize their bites.
## How to Prepare Sushi Bake
Making sushi bake is uncomplicated and can be accomplished in a few easy steps:
1. **Prepare the Sushi Rice**: Begin by making sushi rice. While plain cooked short-grain rice will work, enhancing it with vinegar, sugar, and salt will boost the flavor and texture.
2. **Distribute the Rice**: After the sushi rice is prepared, spread it uniformly in an oven-proof dish and sprinkle furikake, a Japanese rice seasoning that imparts a delightful umami kick.
3. **Combine the Toppings**: In a bowl, mix shredded crab (or any seafood of your choice) with cream cheese and Kewpie mayo. Layer this mixture over the rice and top with additional furikake.
4. **Bake**: Place the dish in the oven and bake until the top achieves a golden brown hue and bubbly texture, usually around 15-20 minutes.
5. **Serve**: Share it warm, drizzled with extra Kewpie mayo and sriracha if preferred, alongside roasted seaweed snacks, cucumber slices, and avocado.
## Ingredients for Sushi Bake
To whip up a scrumptious sushi bake, gather the following ingredients:
– **Sushi Rice**: Short-grain rice, ideally Koshihikari, known for its stickiness, which is perfect for sushi.
– **Crab or Seafood**: You may opt for imitation crab, canned crab, or any seafood you prefer, like shrimp or salmon.
– **Kewpie Mayo and Cream Cheese**: These provide a creamy consistency and rich flavor to the dish.
– **Furikake**: A Japanese seasoning made from seaweed, sesame seeds, and various flavorings.
– **Roasted Seaweed Snacks**: Used for scooping the sushi bake, they offer a crispy contrast to the creamy filling.
## Serving Sushi Bake
Sushi bake is generally presented in a large dish, allowing guests to scoop their desired amount onto a sheet of roasted seaweed. This approach replicates the experience of enjoying sushi rolls but in a more relaxed and interactive manner. Alternatively, slicing the sushi bake into portions beforehand can simplify serving.
## Selecting the Right Seaweed
For the optimal experience, choose seasoned roasted Korean laver seaweed snacks. These can be easily found in grocery stores or online. They differ in texture and flavor from traditional sushi seaweed, offering a satisfying crunch that complements the creamy sushi bake perfectly.
## Variations of Sushi Bake
The charm of sushi bake lies in its adaptability. Here are a few variations to explore:
– **Miso Salmon**: Replace crab with canned salmon and incorporate miso for a distinctive taste.
– **Tuna Salad**: Utilize canned tuna and add chopped scallions for a refreshing touch.
– **Spicy Take**: Mix sriracha into the crab blend for a dash of heat.
– **Cheesy Treat**: Layer shredded cheese on top before baking for an additional indulgent element.
## Spicy Salmon Roll Sushi Bake
To whip up a spicy salmon roll variant, combine cooked and flaked salmon with Kewpie mayo and sriracha. Spread this combination atop the rice and bake as directed. This variation is bound to delight spice lovers.
## Making Sushi Bake in a Crock Pot
For those who want to keep their sushi bake warm for a gathering, using a Crock Pot is an excellent solution. After it’s baked, transfer the dish to the Crock Pot set on low to keep it warm without further cooking.
## Side Dishes to Enjoy with Sushi Bake
While sushi bake is filling enough to serve as a standalone meal, consider pairing it with lighter sides such as:
– **Edamame**: Steamed and lightly salted for a nutritious snack.
– **Miso Soup**: A warm, soothing soup that complements the flavors of sushi bake.
– **Pickled Vegetables**: Offering a zesty crunch to offset the richness of the bake.
## Conclusion
Sushi bake is a delightful and fulfilling creation that merges the flavors of sushi into a
Read More