A Comprehensive Guide to Flavoring Quinoa for Optimal Taste
Introducing Alex & Sonja Overhiser: The Minds Behind A Couple Cooks
Alex and Sonja Overhiser are the lively pair behind A Couple Cooks, a well-loved food blog that has motivated home chefs globally since its inception in 2010. As cookbook writers, parents, and food lovers, Alex and Sonja have cultivated a flourishing online community devoted to straightforward, seasonal dishes and the pleasure of cooking in tandem.
The Beginning of Their Journey
The tale of A Couple Cooks commenced when Alex and Sonja, newlyweds and kitchen novices, opted to embark on an adventure to master the art of preparing wholesome, tasty meals from scratch. What originated as a personal goal swiftly transformed into a mutual enthusiasm—and ultimately, a full-fledged profession. With expertise in design and writing, the couple melded their skills to establish a visually captivating and informative blog that appeals to home cooks of all abilities.
Culinary Writers & Creators
Alex and Sonja have penned two celebrated cookbooks that embody their culinary beliefs: uncomplicated, fulfilling meals created with genuine ingredients. Their books are packed with accessible recipes, stunning photography, and useful tips that inspire readers to savor the cooking process just as much as the finished meal.
What Awaits You on A Couple Cooks
The A Couple Cooks website is a goldmine of culinary creativity. With thousands of exclusive recipes, the blog encompasses an extensive array of categories including:
- Quick & Easy Weeknight Dinners – Ideal for busy families and professionals.
- Plant-Based & Vegetarian Meals – Emphasizing whole foods and eco-friendly dining.
- Seasonal Recipes – Dishes that spotlight fresh, in-season produce.
- Meal Planning Tips – Tactics to simplify grocery shopping and weekly meal prep.
- Cooking Techniques – Step-by-step instructions to enhance culinary skills.
All recipes are crafted, tested, and photographed by Alex and Sonja themselves—often with assistance from their young son, who eagerly serves as a taste tester.
Culinary Partnership
A standout feature of A Couple Cooks is its emphasis on cooking as a joint endeavor. Alex and Sonja hold that making meals together is a remarkable way to bond, relax, and forge lasting memories. Their blog and social media channels frequently showcase behind-the-scenes insights into their kitchen life, providing a relatable and motivating glimpse of how cooking can unite people.
Beyond Just Cooking
In addition to food, Alex and Sonja also impart thoughts on family dynamics, wellness, and eco-conscious living. Their comprehensive approach to cooking and eating prompts readers to reflect on the wider implications of their food decisions—on their health, interpersonal relationships, and the environment.
Be Part of the A Couple Cooks Community
Whether you’re an experienced home cook or just beginning your culinary journey, A Couple Cooks has something for everyone. With their inviting, approachable style and dedication to high-quality content, Alex and Sonja have fostered a friendly environment where cooking is enjoyable, accessible, and tremendously fulfilling.
To delve into their recipes, cookbooks, and more, visit A Couple Cooks and embark on your own culinary adventure today.
Read More
How to Correctly Sauté Onions for Culinary Purposes
Introducing Alex & Sonja Overhiser: The Founders of A Couple Cooks
Alex and Sonja Overhiser are the talented couple behind A Couple Cooks, a well-loved food blog that has been motivating home cooks since 2010. As authors of cookbooks, busy parents, and enthusiastic home chefs, Alex and Sonja have cultivated a vibrant online community focused on the joy of preparing healthy, seasonal dishes together. Their inviting recipes, stunning food photography, and personal anecdotes have established them as reliable voices in the realm of home cooking.
The Origins of A Couple Cooks
The journey of A Couple Cooks commenced when Alex and Sonja opted for a lifestyle transition. They shifted from a fast-food diet to a whole-food, plant-centric approach. As they began cooking together, they found not only a passion for food but also an enthusiasm for crafting and disseminating recipes. What originated as a personal venture swiftly transformed into a full-time mission to assist others in cooking more at home and savoring the experience.
Authors of Cookbooks and Creators of Culinary Content
Alex and Sonja have authored two cookbooks that embody their culinary philosophy: straightforward, seasonal, and nourishing dishes that foster connections among people. Their initial book, Pretty Simple Cooking, received accolades as the best vegetarian cookbook from Epicurious and Food & Wine. It contains 100 delightful recipes along with 10 life lessons aimed at healthy cooking and living. Their subsequent book furthers their goal of making cooking enjoyable and accessible for everyone, no matter the skill level.
Family Dynamics and Practical Testing
As parents, Alex and Sonja recognize the hurdles of preparing nutritious meals amidst the busyness of everyday life. Hence, all their recipes are not only tested in their kitchen but also by their family, including their young son. This practical testing guarantees that their dishes are both wholesome and delicious, making them suitable for hectic households.
What to Expect on A Couple Cooks
The A Couple Cooks website is a goldmine of culinary inspiration. It offers thousands of original recipes that range from quick weekday meals to impressive desserts. Visitors can also find:
- Meal prep tips to help plan weekly menus
- Cooking methods and instructional guides for novices
- Seasonal recipe collections showcasing fresh ingredients
- Healthy eating suggestions that maintain taste
Each recipe is paired with breathtaking photography captured by Alex and Sonja themselves, adding visual appeal to the informative content on the site.
Cooking Together: A Mutual Passion
One of the standout features of A Couple Cooks is the collaborative spirit behind Alex and Sonja’s endeavors. They hold the belief that cooking together enhances relationships and fosters community. Their blog not only shares recipes but also motivates couples, families, and friends to bond over food. Their narrative illustrates how shared meals can enrich lives and unite people.
Become Part of the A Couple Cooks Community
Whether you are an experienced home chef or a novice in the kitchen, Alex and Sonja’s friendly approach and extensive resources make A Couple Cooks a must-visit spot for anyone eager to cook more and eat healthier. With an emphasis on simplicity, seasonality, and joy, they continue to inspire thousands of readers to enjoy the art of home cooking.
To browse their recipes and discover more, visit A Couple Cooks.
Read More
Vegetable-Loaded Plant Protein Bowls
Veggie Protein Bowls: A Fast, Adaptable, and Nourishing Evening Meal
If you’ve been browsing social media lately, it’s likely you’ve come across the trending beef protein bowls. While they appear hearty and fulfilling, not everyone seeks a meal centered around meat. Here come the Veggie Protein Bowls — a plant-based, Mediterranean-inspired option that offers the same level of satisfaction, flavor, and protein content.
These bowls are my preferred quick weeknight dinner when I’m in the mood for something healthy and tasty. Featuring roasted sweet potatoes and chickpeas, creamy cottage cheese, and a zesty honey mustard drizzle, they meet all the criteria for a well-rounded meal. Moreover, they are infinitely customizable, making them great for utilizing leftovers from your fridge.
Why These Veggie Protein Bowls Shine
The charm of these bowls comes from their carefully selected ingredients. Here’s what makes them an ideal weeknight choice:
– Flavor & Texture Balance: Roasted sweet potatoes contribute a caramelized sweetness, while chickpeas provide a crunchy texture. Creamy cottage cheese smooths everything out, and crispy cabbage or coleslaw mix introduces a refreshing element.
– Packed with Nutrients: Each bowl offers a harmonious blend of macronutrients — complex carbohydrates from sweet potatoes, plant protein from chickpeas and cottage cheese, and healthy fats from avocado and olive oil.
– Adjustable Spice Level: The honey mustard sauce serves as an excellent sweet-savory topping. Spice things up by adding hot sauce if you crave some heat, or keep it mild for a more family-friendly option.
The Key Ingredient: Cottage Cheese
Cottage cheese may not be the first ingredient that springs to mind when assembling a protein bowl, but it can transform the dish. It lends a creamy, tangy quality that functions nearly like a sauce, all while providing a substantial amount of protein. Even the pickiest eaters (such as kids!) often enjoy it in this format.
How to Prepare Veggie Protein Bowls
This recipe is as straightforward as it is gratifying. Here’s how to put it all together:
1. Roast the Sweet Potatoes and Chickpeas
Begin by tossing cubed sweet potatoes and canned chickpeas (rinsed and drained) with olive oil, garlic powder, chili powder, and kosher salt. Spread them on a parchment-lined baking sheet — avoid overcrowding to prevent steaming instead of roasting. Bake at 450°F for approximately 25 minutes until the sweet potatoes are tender and the chickpeas are golden and crispy.
Pro Tip: Use two baking sheets if necessary to provide ample space for proper roasting of the vegetables.
2. Prepare the Honey Mustard Sauce
While the veggies roast, create a quick honey mustard sauce. Mix Dijon mustard, honey, a splash of vinegar, and a pinch of salt. If you want to spice it up, incorporate hot sauce for a sweet-spicy honey mustard blend.
3. Assemble the Bowls
Start with a base of shredded cabbage or coleslaw mix. Layer on the roasted sweet potatoes and chickpeas, add a generous dollop (about ½ cup) of cottage cheese, and include sliced avocado. Drizzle with the honey mustard sauce — ensuring not to pour it directly onto the cottage cheese to maintain texture differences.
Make It Your Own: Variations and Add-Ins
One of the fantastic aspects of these bowls is their versatility. Here are a few easy variations:
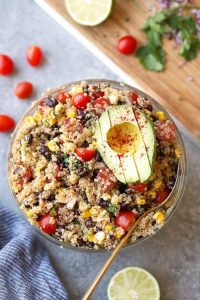
– Incorporate a Grain: To create a more substantial meal, add ½ cup of cooked quinoa or brown rice. Store-bought pre-cooked grains can make this process even faster.
– Enhance the Protein: Although chickpeas and cottage cheese provide ample protein, consider adding baked tofu, shredded chicken, air-fried chicken breast, or even canned tuna or salmon for additional variety.
– Change the Veggies: Use whatever you have on hand! Roasted broccoli, Brussels sprouts, cucumbers, bell peppers, or leftover roasted vegetables work wonderfully.
Meal Prep & Storage Guidance
These bowls are ideal for meal prep. Here’s how to manage storage and reheating:
– Keep Components Separate: Store the roasted veggies, cabbage, cottage cheese, and sauce in distinct containers in the fridge. They will remain fresh for 3–4 days.
– Fresh Avocado Only: Avoid slicing the avocado in advance — it browns quickly. Add it fresh right before you’re ready to eat.
– Reheat Wisely: Only warm the sweet potatoes and chickpeas. Maintain the cabbage and cottage cheese cold to preserve the contrast in textures and temperatures.
Dietary Information
These veggie protein bowls are:
– Vegetarian
– Naturally gluten-free
– Easily made vegan by swapping cottage cheese for baked tofu and opting for maple syrup or agave in the honey mustard sauce
Final Thoughts
These veggie protein bowls transcend being a mere meatless option — they represent a delicious, well-rounded meal on their own. Whether following a Mediterranean diet or seeking a high protein alternative, they deliver on taste and nutrition.
Read More
Oven-Roasted Salmon with Dill Flavored Potatoes on a Sheet Pan
# Sheet Pan Salmon with Dill Potatoes: A Simple and Tasty Family Favorite
When it comes to quick and fulfilling dinners, few meals can match the ease and taste of sheet pan salmon with dill potatoes. This recipe is not only straightforward to make but also combines the rich, buttery flavor of salmon with the comforting texture of roasted potatoes, all elevated by a delicious garlic dill butter sauce. It’s no surprise that this dish has become a go-to in many homes, including mine!
## Why This Recipe is a Family Favorite
One of the greatest features of this meal is how easy it is to prepare. The salmon is simply arranged on a sheet pan, covered with a blend of mayonnaise and Dijon mustard, and baked to perfection in just a few moments. The addition of red pepper flakes and a squeeze of lemon enhances the flavor profile, making it a memorable meal that even the fussiest eaters will relish.
But let’s not overlook the dill potatoes! These potatoes are steamed and roasted, resulting in a soft inside and a crispy outside. Tossed in a garlic butter sauce with an ample amount of dill, they pair wonderfully with the salmon. The mix of flavors is so delightful that it’s common for all family members to return for seconds!
## Ingredients You’ll Need
### For the Dill Potatoes:
– Baby potatoes (or your preferred small potatoes)
– Olive oil
– Salt
– Fresh dill
– Garlic
– Butter
### For the Sheet Pan Salmon:
– Salmon fillet (with skin)
– Mayonnaise
– Dijon mustard
– Red pepper flakes
– Lemon
## Cooking Instructions
### Step 1: Prep the Potatoes
1. Preheat your oven to 450°F (232°C).
2. On a sheet pan, coat the baby potatoes with olive oil and salt. Add a little water to the pan to assist in steaming the potatoes.
### Step 2: Roast the Potatoes
1. Roast the potatoes in the preheated oven for around 30 minutes. Stir them every 10-15 minutes to avoid sticking and ensure even cooking. The water will evaporate, permitting the potatoes to both steam and roast at the same time.
### Step 3: Prepare the Salmon
1. As the potatoes approach readiness, shift them to one side of the sheet pan. Position the salmon fillet in the middle, skin side down. Season it with salt.
2. In a small bowl, combine the mayonnaise and Dijon mustard, then spread this blend over the salmon. Bake for an extra 6 minutes, then switch to broil for 2-3 minutes to get a lovely browning on top.
### Step 4: Make the Garlic Butter
1. In a small bowl, mix melted butter, minced garlic, and fresh dill. Drizzle this mixture over the hot potatoes once they are finished roasting.
### Step 5: Serve
1. Squeeze fresh lemon juice over the dish. Flake the salmon into large pieces and serve alongside the dill potatoes. Enjoy!
## Tips for Perfect Salmon
– **Doneness**: The internal temperature for salmon can vary from 125°F to 145°F (52°C to 63°C), depending on your preference. Many chefs suggest cooking it to around 130°F (54°C) for a moist and buttery texture.
– **Quality**: Always buy salmon from trusted sources to guarantee freshness and safety.
## Conclusion
This sheet pan salmon with dill potatoes is more than just a meal; it’s an occasion that unites families. With its easy preparation and delightful flavors, it’s a dish that can quickly become a weekly favorite. Whether you’re serving it for a family dinner or a casual get-together, it’s sure to impress. So, gather your ingredients, preheat your oven, and prepare to enjoy a wonderful dinner that everyone will adore!
Read More
Chilled Yogurt Pie Featuring a Naturally Sweet Date and Nut Crust (No-Bake Recipe)
**Chilled Yogurt Pie with a Naturally Sweet Date and Nut Crust (No-Bake Recipe)**
Are you in search of a light, wholesome dessert that’s simple to prepare and doesn’t involve using the oven? A chilled yogurt pie featuring a naturally sweet date and nut crust could become your new go-to dessert. This no-bake recipe is not just delectable and gratifying, but it also provides a healthier option compared to classic pies by incorporating nutrient-dense ingredients and natural sweeteners.
—
### Why Opt for a No-Bake Yogurt Pie?
No-bake desserts are ideal for warm seasons, hectic routines, or when you prefer an uncomplicated recipe. This yogurt pie is particularly attractive because:
– **It’s airy and revitalizing**, perfect for spring and summer.
– **It’s sweetened naturally**, with no refined sugars added.
– **It’s adaptable**, letting you select your favorite yogurt flavors and toppings.
– **It’s full of nutrients**, due to the wholesome ingredients in both the crust and filling.
—
### The Naturally Sweet Date and Nut Crust
Conventional pie crusts typically depend on butter, flour, and sugar. In contrast, this crust consists of a mixture of dates and nuts, providing a chewy, sweet, and slightly crunchy base that’s abundant in fiber, healthy fats, and natural sugars.
#### Ingredients for the Crust:
– 1 cup pitted Medjool dates (soft and sticky)
– 1 cup raw nuts (such as almonds, walnuts, or pecans)
– 1/4 teaspoon sea salt
– Optional: 1/2 teaspoon cinnamon or vanilla extract for an enhanced flavor
#### Instructions:
1. In a food processor, pulse the nuts until finely chopped (but not a paste).
2. Add the dates and salt, and blend until the mixture adheres when pressed.
3. Evenly press the mixture into the bottom and up the sides of a 9-inch pie dish or tart pan.
4. Refrigerate the crust while you prepare the filling.
—
### Creamy Yogurt Filling
The highlight of this pie is the creamy yogurt filling. Greek yogurt is a favored option due to its thick consistency and high protein levels, but feel free to use any yogurt you like, including dairy-free variants such as coconut or almond yogurt.
#### Ingredients for the Filling:
– 2 cups plain or flavored Greek yogurt (or plant-based yogurt)
– 1/4 cup honey or maple syrup (optional, based on yogurt sweetness)
– 1 teaspoon vanilla extract
– 1 tablespoon lemon juice (for a zesty flavor)
– Optional: 1/2 cup whipped coconut cream or whipped topping for extra richness
#### Instructions:
1. In a mixing bowl, combine the yogurt, sweetener (if desired), vanilla, and lemon juice.
2. Fold in whipped coconut cream or topping if using, for a lighter consistency.
3. Pour the filling into the prepared crust and smooth out the top.
4. Cover and chill for at least 4 hours, or until set.
—
### Topping Suggestions
This pie serves as a blank canvas for your favorite toppings. Here are some scrumptious and wholesome ideas:
– Fresh berries (strawberries, blueberries, raspberries)
– Sliced kiwi, mango, or peaches
– A drizzle of honey or maple syrup
– Chopped nuts or toasted coconut flakes
– A sprinkle of granola for crunch
—
### Tips for Success
– **Use soft, sticky dates** for the crust. If your dates are overly dry, soak them in warm water for 10 minutes and drain prior to use.
– **Opt for a thick yogurt** to guarantee proper setting of the filling. If your yogurt is too watery, strain it through cheesecloth for several hours to eliminate excess liquid.
– **Chill thoroughly** before serving to allow the pie to firm up and for flavors to blend.
—
### Health Benefits
This chilled yogurt pie is not only delicious—it’s loaded with nutrients:
– **Dates** provide natural sweetness, fiber, and essential minerals like potassium and magnesium.
– **Nuts** contribute healthy fats, protein, and antioxidants.
– **Yogurt** promotes gut health with probiotics and is an excellent source of calcium and protein.
—
### Final Thoughts
A chilled yogurt pie with a date and nut crust is a delightful way to enjoy dessert without sacrificing health. It’s simple to make, infinitely customizable, and guaranteed to impress guests or satisfy your sweet cravings on a warm day. Whether you’re hosting a summer event or just yearning for a cool, creamy delight, this no-bake pie is an essential recipe that merges flavor, nutrition, and ease in every slice.
—
**Try it today and savor a slice of wholesome indulgence!**
Read More
Cilantro Lime Chicken and Rice Soup Instructions
Cilantro Lime Chicken and Rice Soup: A Delicious and Comforting Dish
If you desire a soup that is both filling and bursting with lively, rich flavors, the Cilantro Lime Chicken and Rice Soup is the perfect option. This wholesome yet light meal combines the tangy zest of lime, the fresh herbaceousness of cilantro, and the warm comfort of chicken and rice into one bowl. Whether you’re in search of a warm meal on a cold night or a revitalizing lunch, this soup is a flexible and enjoyable selection.
Overview
– Prep Time: 10 minutes
– Cook Time: 50 minutes
– Total Time: 1 hour
– Servings: 6
This soup is an enchanting blend of Southeast Asian and Latin American elements, fusing ingredients such as ginger, turmeric, coconut milk, and fish sauce with traditional chicken soup components. The outcome is a luxurious, fragrant broth that is both calming and energizing.
Key Ingredients
– Chicken: Boneless, skinless chicken breasts or thighs are simmered until they become tender, then shredded, providing protein and substance to the soup.
– Aromatics: Onion, garlic, ginger, and bell pepper form a flavorful foundation, while optional turmeric and cayenne infuse richness and a touch of heat.
– Vegetables: Carrots and red bell pepper add sweetness and a splash of color. Optional extras like celery, peas, or jalapeño can improve the texture and taste.
– Broth & Coconut Milk: A mixture of chicken broth and coconut milk results in a savory, slightly creamy broth with a hint of tropical flavor.
– Rice: Jasmine rice or any long-grain kind soaks up the broth and delivers a gratifying texture.
– Lime & Cilantro: Fresh lime juice and zest elevate the soup’s brightness, while chopped cilantro brings a wave of herbal freshness.
– Seasonings: Fish sauce or soy sauce imparts umami, and green onions add a final burst of flavor.
Cooking Instructions
1. Sauté the Base: Start by heating oil in a large saucepan. Add diced onion, carrot, and red bell pepper, cooking until softened (around 10 minutes).
2. Add Aromatics: Mix in garlic, ginger, turmeric, and cayenne. Cook for 1 minute until aromatic.
3. Simmer the Chicken: Incorporate chicken broth and coconut milk, then add the chicken. Bring to a boil, lower the heat, and let simmer for 20–30 minutes until the chicken is thoroughly cooked. Remove and shred the chicken.
4. Cook the Rice: Reintroduce the shredded chicken to the pot and add rice. Simmer for another 20 minutes until the rice is soft.
5. Finish with Flavor: Mix in lime juice and zest, fish sauce, chopped cilantro, and green onions. Serve hot.
Optional Add-Ins & Variations
This soup is highly adaptable. Here are some suggestions to customize it to your liking:
– Toss in diced celery or jalapeño for added crunch or heat.
– Add peas for a touch of sweetness and color.
– Swap rice for noodles for a quicker version (cut cook time to 10 minutes).
– Drizzle in some hot sauce or top with nam prik pao (Thai chili paste) for an extra kick.
– Mix in a teaspoon of sugar to balance the sourness of the lime.
Nutritional Information (Per Serving)
– Calories: 424
– Fat: 21g (Saturated Fat: 13g)
– Cholesterol: 62mg
– Sodium: 640mg
– Carbohydrates: 43g (Fiber: 2g, Sugars: 7g)
– Protein: 27g
Why You’ll Adore It
Cilantro Lime Chicken and Rice Soup offers more than merely a meal—it’s a feast for the senses. The tangy flavor of lime, the creamy indulgence of coconut milk, and the savory richness of chicken broth come together in splendid balance. It’s a cozy dish that feels lavish yet remains light and nutritious.
Ideal for meal prep, this soup stores splendidly and tastes even more delicious the following day as the flavors continue to blend. Whether you’re cooking for a family or preparing lunches for the upcoming week, this recipe is a tasty and practical selection.
Final Thoughts
This Cilantro Lime Chicken and Rice Soup is an exceptional recipe that infuses global flavors into your kitchen with minimal effort. With only an hour from start to finish and a blend of fresh, healthful ingredients, it’s a reliable meal for any season. Try it once, and it’s bound to become a staple in your cooking repertoire.
Read More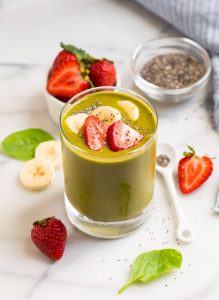
Simple DIY Strawberry Smoothie Recipe
How Minor Adjustments Can Change Your Smoothie: Advice for Taste and Consistency
Smoothies provide a fast, healthy, and tasty method to savor fruits, vegetables, and other nourishing components. While the foundational recipe for a smoothie generally comprises fruit, a liquid, and occasionally a thickener like yogurt or banana, subtle modifications in your ingredients can dramatically alter the flavor, consistency, and nutritional value of your beverage. Whether you’re making a classic smoothie or trying out vegan alternatives, knowing how to tweak your recipe can assist you in achieving the perfect mix each time.
Sweeteners: Begin with a Little and Modify
One of the most frequent errors made when preparing smoothies is using too much sweetener. If you incorporate flavored yogurts such as vanilla or strawberry, they often come with added sugars that can lead to a smoothie that is sweeter than anticipated. In such instances, it’s advisable to commence with minimal or no added sweetener. Sample your smoothie post-blending and make adjustments as required—particularly if your fruit isn’t as ripe or sweet as you wish. Natural sweeteners such as honey, maple syrup, or dates can be gradually incorporated to boost flavor without overwhelming it.
Yogurt and Non-Dairy Substitutes
Greek yogurt is widely used in smoothies because it contributes creaminess and a protein boost. However, if your goal is to create a vegan smoothie, you can easily remove the yogurt and replace it with plant-based substitutes. Oat milk, almond milk, and coconut milk serve as fantastic options that mix well and provide their own distinct flavors. For instance, coconut milk introduces a tropical essence, whereas almond milk offers a light and nutty profile.
For an easy and pleasing vegan choice, consider a Strawberry Banana Smoothie. This variation generally consists of merely two primary ingredients—strawberries and bananas—along with water and ice. It’s a wonderful way to indulge in a naturally sweet and creamy smoothie, free from dairy.
Blending Techniques for the Ideal Consistency
Achieving the perfect smoothie consistency is all about layering and blending methods. Always start by pouring your liquids into the blender first. This allows the blades to function more efficiently and blend the components better. If your smoothie appears too thick or isn’t mixing properly, pause the blender, scrape down the sides, and add a bit more liquid. This minor adjustment can lead to a significant enhancement in reaching a smooth, drinkable texture.
Experiment and Personalize
The charm of smoothies lies in their adaptability. Once you grasp the basics of how ingredients work together, you can begin trying out various fruits, vegetables, spices, and superfoods. Toss in a handful of spinach for an extra nutrient kick, a pinch of cinnamon for warmth, or a dollop of nut butter for creaminess and protein.
To sum up, minor adjustments to your smoothie recipe—such as modifying sweeteners, substituting dairy for plant-based milk, or altering blending techniques—can greatly influence the end result. By focusing on these subtle changes, you’ll be equipped to create smoothies that are not only delicious but also personalized to your taste and dietary needs.
Read More
A Complete Manual for Roasting Mushrooms: Methods and Advice
# Elevating Common Vegetables: The Craft of Roasted Mushrooms
With their rich taste and crisp edges, roasted mushrooms provide a rapid and effortless method to transform an ordinary vegetable into a delightful side dish. This adaptable ingredient not only boosts the aesthetic appeal of any meal but also introduces a deep umami flavor that can enhance numerous dishes.
## Why Choose Roasted Mushrooms?
### Flavor Profile
Roasted mushrooms are celebrated for their savory umami taste, which is further enhanced when garlic and soy sauce are added. This mixture generates a complex flavor that can elevate a basic meal to one that is exceptional.
### Skill Level
One of the most appealing features of roasting mushrooms is its ease. The method requires minimal prep—just season, roast, and serve. This makes it a fantastic option for both beginner cooks and experienced chefs.
### Cooking Technique
To achieve perfectly roasted mushrooms, it’s crucial to roast them at a high temperature. Placing the flat side down on the baking tray allows the edges to caramelize, enhancing both the flavor and texture of the dish.
### Preparation Tips
When getting mushrooms ready for roasting, it’s vital to clean them properly. Wipe them clean with a damp paper towel or a soft brush to eliminate any dirt. Steer clear of soaking them in water, as excess moisture can hinder proper browning in the oven.
### Serving Suggestions
Roasted mushrooms can be enjoyed as an independent dish or as a wonderful accompaniment to any protein. Their rich flavor and attractive appearance make them an ideal side for grilled meats, pasta creations, or even as part of a vegetarian spread.
## Ingredient Tips for Roasted Mushrooms
– **Mushrooms**: Any mushroom variety can be roasted, but cremini or baby bella mushrooms often possess a deeper flavor than white mushrooms. Adjust the size of the mushrooms according to your liking.
– **Seasonings**: A mix of soy sauce and garlic provides a savory, umami taste. Adding a dash of salt and pepper balances the dish beautifully. For an added layer of richness, consider tossing the mushrooms with a little butter just before serving.
## Variations to Try
– **Herbs**: Along with parsley, think about using fresh herbs like sage, rosemary, or thyme. Place sprigs between mushrooms on the baking sheet for increased flavor, and save some to chop and sprinkle as a garnish post-roasting.
– **Balsamic Drizzle**: A drizzle of balsamic vinegar or glaze can enhance the flavor profile of roasted mushrooms, adding a sweet and tangy contrast to their earthy notes.
Roasted mushrooms can also be served as an appetizer when paired with a homemade garlic aioli or creamy tahini sauce. They provide a touch of steakhouse sophistication when presented alongside a juicy sirloin or classic burger.
## Storing Leftovers
If you have any remaining roasted mushrooms, keep them in an airtight container in the fridge for up to four days. They can also be frozen for as long as three months. Leftovers are fantastic in stir-fries, soups, or as a topping for steaks.
## Conclusion
Roasted mushrooms are a straightforward yet transformative side that can enhance any meal. With their deep flavor and golden edges, they are sure to impress both your family and guests. Whether enjoyed as an appetizer or with your favorite protein, roasted mushrooms are a delightful addition to any table.
Did you create these roasted mushrooms? Leave a comment and a rating below!
Read More