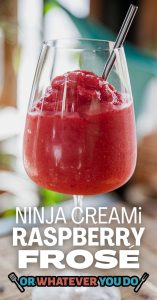
How to Create the Ultimate Frosé: An Exquisite Frozen Rosé Recipe
This beautifully pink frosé recipe provides a delightful frozen rosé experience at home! Crafted with only 3 natural ingredients and devoid of refined sugar, it’s the quintessential summer cocktail that genuinely resembles your beloved rosé wine.
Do you recall when frosé became a sensation at every bar a couple of summers back? I was completely taken with it—and since Alex and I are passionate cocktail creators, we felt compelled to try our hand at crafting frozen rosé at home. After experimenting with numerous recipes (I know, what a tough task!), most ended up being overly sweet or bore little resemblance to actual rosé.
At last, we discovered the recipe that transformed everything. It tastes just like your preferred rosé, merely frozen and even more invigorating! Our friends, who eagerly volunteered as our tasters, absolutely adored it. The secret? We incorporate authentic strawberries instead of synthetic syrups, along with a clever trick at the end that restores the wine’s true character.
The 3 frosé components
When I first tried to make frosé, I thought I could be clever by simply placing rosé in the freezer. Major blunder! Freezing wine on its own results in bitterness and dullness—all those nuanced flavors vanish. Through trial and error, I realized that alcohol remains unfrozen solid, causing a slushy, separated mess rather than the smooth delight we seek.
The remedy? Incorporating natural sugars from strawberries combats the bitterness, while honey adds just the right amount of sweetness to accentuate (not overpower) the flavor of the rosé wine. This blend produces the ideal slushy consistency while retaining what makes rosé delightful.
Selecting the perfect rosé
Not all rosés are equally suited for frosé. After testing various options from $8 bottles to $30 extravagances, I found that it’s best to select a rosé you would enjoy by itself.
Dry rosés shine— they won’t turn overly sweet once you mix in the strawberries and honey. My top picks are Provence-style rosés or any crisp, minerally varieties. Avoid the overly sweet white zinfandels; they transform your frosé into a sugary beverage (unless that’s your preference!).
Featured reader feedback
“This is fantastic and super easy – the only frosé recipe you’ll ever require. I just made it for the second time… and this time I doubled the quantity :)” -Emi
How to prepare frosé
Making frosé is quite straightforward: the toughest aspect is planning ahead! Here’s what to understand about the method:
1. Blend the berries, rosé, and honey, then strain. Transfer the mixture into a covered baking dish.
2. Freeze for 6 hours or overnight! Here’s the crucial point: you’ll need 6 hours to freeze! It’s simplest to prepare the frosé recipe the night prior, then blend and serve the next day. Alternatively, you can make it in the morning for evening gatherings!
3. The enchanting final step: After 6 hours of freezing, here’s where the magic begins. Blend the frozen mixture until it resembles fluffy pink snow. Then comes my secret: pour a splash of the reserved room-temperature rosé into each glass. This technique achieves two outcomes: it creates the ideal slushy texture (not too icy, not too liquid) and revives all the wine flavors that the freezing process may have muted.
Storage and advance preparation tips
Looking to prepare this frosé recipe ahead of time? You can store the blended wine and strawberry mixture in your freezer for several days prior to serving. As long as it is kept in a sealed container, your frosé should remain in good condition in the freezer! However, try to avoid keeping it frozen for too long, as the fresh strawberries and rosé wine can lose some of their flavors when frozen.
Other beverages with rosé wine
Adore rosé? Here are a few additional delectable rosé drinks made with this pink wine:
Best Frosé Recipe (Frozen Rosé)
This all-natural frosé recipe is effortless, contains no refined sugar, and tastes identical to rosé wine! Here’s how to create frozen rosé.
Author: Sonja
Prep Time: 6 hours 30 minutes
Cook Time: 0 minutes
Total Time: 6 hours 30 minutes
Yield: 6
Category: Drinks
Method: Blended
Cuisine: American
Ingredients:
– 1–750 mL bottle rosé wine (one that you enjoy drinking; we prefer ours on the dry side)
– 8 large strawberries (approximately 1 ½ cups ripe strawberries, halved), plus extra for garnish
– 3 tablespoons honey (or maple syrup for vegan)
Instructions:
1. Uncork the rosé and pour 2/3 cup into a glass measuring cup; set aside for serving.
2. Remove the green tops from the strawberries and slice them in half.
3. In a blender, combine the remaining rosé, strawberries, and honey, blending until smooth and well-integrated. Then pour the
How to Prepare Invigorating Lemon Water
Alex & Sonja: The Culinary Team Behind A Couple Cooks
Introducing Alex and Sonja Overhiser, the energetic husband-and-wife duo who transformed their love for cooking into a flourishing online platform. As the creators of two notable cookbooks and the pioneers of the well-known website A Couple Cooks, Alex and Sonja have been motivating home chefs since 2010 with their straightforward, seasonal recipes and contagious passion for the culinary world.
Their adventure started more than ten years ago when they made the decision to share their cooking enthusiasm with the globe. What commenced as a modest blog has evolved into an all-encompassing resource for anyone eager to delve into the pleasures of home cooking. Featuring thousands of original recipes, cooking advice, and meal planning suggestions, A Couple Cooks has established itself as a prime destination for culinary lovers in search of inspiration and support in the kitchen.
Alex and Sonja’s cooking philosophy emphasizes simplicity and seasonality. They assert that delightful dishes can be made with minimal ingredients and effort, permitting even the busiest individuals to relish the cooking experience. Their recipes are crafted to be approachable and enjoyable, motivating cooks of all abilities to explore and have fun in the kitchen.
Along with their website, Alex and Sonja have penned two cookbooks that further highlight their culinary skills and imagination. These books are brimming with delectable recipes and stunning photography, all produced by the couple themselves. Each recipe undergoes meticulous testing, not just by Alex and Sonja but also by their children, ensuring that the meals are both delightful and suitable for families.
In addition to their recipes, Alex and Sonja provide invaluable cooking advice and meal planning strategies to assist their audience in maximizing their time in the kitchen. They recognize the difficulties of juggling hectic schedules with the aspiration to prepare nutritious meals, and their practical suggestions aim to make cooking a more enjoyable and stress-free task.
As busy parents and a real-life couple who share the cooking journey, Alex and Sonja offer a relatable and genuine viewpoint in their endeavors. Their enthusiasm for food and dedication to spreading the joy of cooking to others shines vividly in all their activities. Whether you are an experienced chef or a beginner cook, A Couple Cooks is certain to offer you the motivation and tools needed to whip up delicious meals and create lasting memories in the kitchen.
Read More
Easy Recipe for Whole Roasted Cauliflower
### About the Author: Holly Nilsson
Holly Nilsson is the imaginative talent behind Spend With Pennies, a site committed to creating simple and comforting recipes designed for everyday living. With a profound enthusiasm for nostalgic tastes and uncomplicated cooking methods, Holly empowers busy home chefs to whip up delightful meals that are both doable and gratifying. Her method highlights the significance of preparing hearty meals that reflect the coziness of home cooking.
Besides her contributions to Spend With Pennies, Holly is the author of “Everyday Comfort,” a cookbook intended to motivate readers to relish the pleasure of home-prepared meals. The book showcases a collection of recipes crafted to spark feelings of warmth and nostalgia, making it an ideal addition to any kitchen.
For those eager to dive deeper into Holly’s culinary artistry, you can check out her posts and recipes on her website.
#### Follow Holly on Social Media:
– [Pinterest](https://www.pinterest.com/spendpennies/)
– [Facebook](https://www.facebook.com/ispendwithpennies/)
– [Twitter](http://spendpennies)
– [Instagram](https://www.instagram.com/spendpennies/)
Holly Nilsson continues to motivate home cooks with her commitment to making cooking fun and reachable for everyone.
Read More
Crispy Roasted Chickpeas Seasoned with Spices
If you are beginning with dried chickpeas, it’s essential to either boil them or make use of a pressure cooker prior to baking. I typically let my dried chickpeas soak for 10-12 hours before placing them in a pressure cooker for a more uniform cooking process. Neglecting this step will result in a longer cooking time.
An air fryer may also be a suitable option, particularly if you intend to shorten your baking duration. Rinse, dry, and season your chickpeas prior to air frying them for approximately 15 minutes, shaking them midway through.
Read More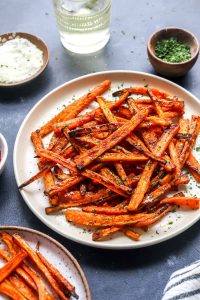
Carrot Fries Prepared in an Air Fryer
These crunchy air fryer carrot sticks are sure to become your latest favorite! Ready in merely 15 minutes, they’re a delightful and healthier side dish option compared to French fries.
I must admit: these air fryer carrot sticks have dominated our dinner rotation. This recipe originated from a reader’s inquiry about whether our well-loved baked carrot sticks could be made in the air fryer—such an insightful question!
Indeed, what began as a reader suggestion has evolved into our household’s most sought-after side dish. A friend even refers to them as “nature’s multivitamin in fry form”! Here’s what makes them so appealing:
– Kid-approved: Even those who dislike veggies enjoy these
– Crispy outside, soft inside: The air fryer produces the perfect consistency
– No need for deep frying: All the crunch with a fraction of the oil
– Ready in 15 minutes: Quicker than warming up frozen fries
Recently, we showcased these on Instagram alongside a Cool Ranch aioli dip, which readers adored—keep reading for both recipes!
**Air fryer recommendation:** We utilize this spacious air fryer, which has a basket allowing you to prepare larger portions at once. You can also use it for more simple recipes like air fryer chicken, air fryer asparagus, and our top quick meal—air fryer taquitos!
## A few secrets to this recipe
Consider these tips before diving into the recipe:
– **Select the right carrots.** I prefer organic carrots when feasible, not only for health benefits but also because they tend to be sweeter. Avoid baby carrots—they’re actually created from larger carrots and lack natural sweetness. Look for carrots that are firm, vibrant orange, and at least 1 inch thick at the wider end.
– **Incorporate cornstarch.** Just 1 tablespoon ensures a crispy coating that rivals any deep-fried version. I stumbled upon this while trying to recreate restaurant-style sweet potato fries. The cornstarch absorbs moisture and creates tiny crispy bits all over.
– **Experiment with ranch seasoning blend.** It’s optional, but the garlic powder, onion powder, and dried dill add a delightful twist to these fries!
## How to make air fryer carrot sticks
### 1. Slice the carrots into fry shapes.
First, completely peel the carrots. Then—and this is crucial—square them off. Cut 3/8-inch slices to form a rectangular box shape, then slice into long fry shapes. Aim for uniformity in your cuts.
### 2. Mix with olive oil and seasoning.
In a large bowl, toss your carrot sticks with the olive oil first, followed by the spice mixture. Ensure each fry is evenly coated. The oil aids in adhering the spices and encourages browning.
### 3. Air fry for 10 to 12 minutes, shaking once.
Cook for 5 minutes, then shake the basket vigorously. This prevents sticking and guarantees even cooking. Cook an additional 5-7 minutes until they are golden and crispy. They’re finished when they have browned and slightly shrunk.
## Dipping sauce ideas
While the fries are fantastic on their own, I crafted a Cool Ranch Aioli that elevates them even more! I devised this dip to capture that irresistible ranch flavor without smothering the carrot fries in heavy dressing. The mix of Greek yogurt and mayo provides tang and richness, while the pickle brine contributes a refreshing pop.
Here are various fry dipping sauce ideas: consider garlic aioli, tarragon aioli, or cilantro sauce (dairy-free).
## Serving suggestions
These carrot fries have become our preferred side dish for numerous meals:
– **Burger night:** They’re lighter than traditional fries but still satisfy that craving
– **Grilled chicken:** Their sweetness pairs perfectly with grilled chicken
– **Fish tacos:** They offer a colorful, crunchy contrast to fish tacos
– **Veggie bowls:** Add protein and substance to any grain bowl or power bowl
## A few flavor variations
Once you master the foundational recipe, the opportunities are limitless:
– **Spicy Sriracha Fries:** Mix cayenne into the spice blend and drizzle with sriracha mayo
– **Parmesan Herb:** Toss hot fries with grated parmesan and finely chopped fresh herbs such as basil, thyme, or fresh rosemary
– **Everything Bagel:** Swap the spice blend for a sprinkle of everything bagel seasoning
## Storing leftovers and reheating tips
Carrot fries are best enjoyed immediately—the crispiness begins to diminish after about 10 minutes. However, if you have any leftovers, store them in an airtight container in the refrigerator for up to 3 days.
To reheat, place them back into the air fryer at 350°F for a few minutes. They won’t regain the exact crispness of fresh but will remain tasty.
## Dietary notes
These air fryer carrot fries are suitable for vegetarians, vegans, plant-based diets, dairy-free, and gluten-free.
Read More
Tasty Chicken Meatballs in Lemon Caper Sauce
Chicken Piccata Meatballs
Prep Time: 10 minutes Cook Time: 40 minutes Total Time: 50 minutes Servings: 4
Delicious chicken meatballs served in a buttery lemon and caper sauce!
Ingredients
- 1 pound ground chicken
- 1 small onion, shredded
- 2 cloves garlic, minced or shredded
- 2 tablespoons parsley, chopped (or 2 teaspoons dried parsley)
- 1/2 teaspoon salt
- 1/2 teaspoon pepper
- 1 teaspoon Italian herbs (link)
- 1 teaspoon lemon zest
- 2 tablespoons parmigiano reggiano (parmesan cheese), shredded
- 1 large egg
- 1/3 cup bread crumbs (gluten-free for gluten-free)
- 2 tablespoons butter
- 2 cloves garlic, diced
- 1 tablespoon all-purpose flour (gluten-free for gluten-free)
- 1 cup chicken broth (link)
- 2 tablespoons lemon juice
- 1 teaspoon lemon zest
- 2 tablespoons capers
- 1 tablespoon butter
- salt and pepper to taste
- 1 tablespoon parsley, chopped
For the meatballs:
For the piccata:
Directions
- Combine all ingredients thoroughly, shape into 2 tablespoon balls, arrange on a baking sheet and bake in a preheated 400F/200C oven until done and lightly browned, about 25-30 minutes.
- Heat the butter in a skillet over medium heat, add the garlic and sauté until aromatic, about a minute.
- Add the flour, stir well and cook for an additional minute.
- Incorporate the broth, lemon juice, lemon zest, capers, and meatballs, bring the mixture to a boil, lower the heat and let it simmer for a few minutes.
- Stir in the butter, allowing it to melt into the sauce, season with salt and pepper to taste, mix in the parsley, and savor!
For the meatballs:
For the piccata:
Option: Include 1/2 teaspoon red pepper flakes in the meatball mixture.
Option: Add 1 tablespoon honey to the sauce.
Option: Stir in 1/4 cup heavy/whipping cream into the sauce.
Option: Serve topped with parmesan.
Option: Pair with pasta, rice, or mashed potatoes!
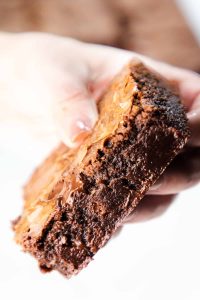
Homemade Brownies: An Excellent Substitute for Store-Bought Choices
# Homemade Brownies: An Indulgent Treat
This homemade brownie recipe is irresistibly moist and gooey with a crinkly top. Crafted with everyday staples like cocoa powder, butter, sugar, eggs, and a (secret!) sprinkle of espresso powder, these brownies taste as though they were sourced from an artisanal bakery.
## Flavor Profile
These brownies are dense, fudgy, and packed with chocolaty richness, showcasing melted chocolate chips in every mouthful. The inclusion of espresso powder amplifies the chocolate essence, turning each bite into a joyous moment.
## Skill Level
This recipe is ideal for novices. With merely one bowl needed for mixing, you can pour the batter into a pan and bake it. It’s just that simple!
## Freezing
You can freeze a batch or individual pieces of brownies for up to one month, allowing you to savor this treat whenever you wish.
## What’s in Homemade Brownies?
### Brownie Batter
The foundation of the brownies contains real butter, oil, large eggs, plain white flour, sugar, and a hint of vanilla extract.
### Cocoa
Utilizing either natural or Dutch cocoa powder imparts a deep chocolate taste. Dutch cocoa will lend the brownies a richer hue.
### Chocolate Chips
Chocolate chips are essential for achieving that chewy, fudgy consistency. Feel free to use any variety of chocolate chips or combine dark and white chips for a playful visual effect.
### Espresso Powder
A hint of espresso powder or instant coffee enriches the brownies, elevating the overall chocolate profile.
## Favorite Additions
Brownies are adaptable and excellent for mix-ins! Think about incorporating nuts, coconut, dried fruits, mini M&Ms, or chopped peanut butter cups. For an elegant dessert, serve with a scoop of ice cream and a drizzle of strawberry sauce, or simply top with homemade whipped cream and fresh blueberries.
## Tips for Perfect Brownies
– **Room Temperature Eggs**: Ensure your eggs are at room temperature for fluffier brownies. If you forget, place them in a bowl of warm water while gathering the other components.
– **Avoid Overmixing**: Brownies taste best when they are not overmixed or overbaked. A little residue on a toothpick indicates they’ll stay gooey after cooling.
– **Use Parchment Paper**: Lining the baking pan with parchment paper or aluminum foil aids in easy release of the brownies and simplifies cleanup.
– **Cool Before Cutting**: Allow brownies to cool thoroughly before cutting. A plastic knife is ideal, as brownies won’t cling to it. If using a standard knife, spray it with pan release between slices.
## Keeping Homemade Brownies Fresh
Store homemade brownies in a sealed container at room temperature for up to 4 days. For a fresh-baked warmth, microwave them briefly for a melt-in-your-mouth sensation.
## Recipe Overview
### Ingredients
– Butter
– Oil
– Sugar
– Cocoa powder
– Eggs
– Vanilla extract
– Espresso powder
– Flour
– Chocolate chips
### Instructions
1. Preheat oven to 350°F. Line a 9×9 pan with foil and spray with cooking spray.
2. In a large bowl, combine melted butter, oil, sugar, and cocoa powder. Stir until smooth.
3. Incorporate the eggs, vanilla, espresso powder, and salt.
4. Gradually fold in the flour (the batter should be thick) and gently mix in the chocolate chips.
5. Pour the batter into the prepared pan and top with additional chocolate chips if desired.
6. Bake for 21-25 minutes or until shiny around the edges and a toothpick comes out clean when inserted 1-inch from the edge.
7. Allow to cool before cutting.
### Nutrition Information (per brownie)
– Calories: 227
– Carbohydrates: 28g
– Protein: 3g
– Fat: 13g
– Saturated Fat: 7g
– Cholesterol: 36mg
– Sodium: 133mg
– Fiber: 2g
– Sugar: 21g
### Conclusion
These homemade brownies are exquisitely indulgent, delicious, and packed with chocolate chips. Whether enjoyed solo or adorned with toppings, they are guaranteed to satisfy any chocolate enthusiast’s desires. Enjoy baking and relishing this delightful treat!
Read More