
Before & After: Just $300 Transformed This âPlain, Boringâ Kitchen into a Colorful Oasis
![]()
Itâs totally renter-friendly!
READ MORE…

Recipe for Ooni Pizza Dough Fit for Pizza Ovens
This Ooni pizza dough formula boasts an exceptional chewy texture and flavor! Utilize it when preparing with any outdoor pizza oven.
Have a pizza oven and eager to use it? Experiment with my Ooni pizza dough formula, which is compatible with any style of outdoor pizza oven! This dough creates the ultimate pliable crust that’s perfect for cooking at high temperatures.
Alex and I are authors of cookbooks and specialists in homemade pizza who have dedicated the last ten years to refining the art of pizza making at home. This is our proven pizza oven dough formula—it emerges light and chewy on the inside while charred on the outside, with the ideal hydration ratio for high-heat cooking!
What defines the best Ooni pizza dough?
In my view, the finest pizza you can create at home is one made in an outdoor pizza oven! There are numerous outstanding pizza ovens available these days. Alex and I have owned and gained significant experience with both the Ooni pizza oven and the ROCCBOX. This recipe is optimized for both pizza ovens. Here’s what we’ve learned from our exploration of the best Ooni pizza dough formula:
– Use a dough with 62% hydration for high temperatures. This may get a bit technical, but this recipe features slightly lower hydration compared to our classic pizza dough recipe. Hydration refers to the ratio of water to flour in a dough. A lower hydration dough performs better under the high temperatures of a pizza oven while being somewhat easier to handle (less sticky).
– If possible, opt for Tipo 00 flour. Tipo 00 flour is the Italian flour favored by Neapolitan pizza establishments. It yields a supple and airy dough that surpasses all-purpose flour. Tipo 00 is becoming increasingly accessible at your local grocery store or online. You can substitute all-purpose flour if that’s what you have, but it’s worthwhile to seek out the quality option.
Guidelines for preparing Ooni pizza dough
This Ooni pizza dough formula is simple, yet it requires some practice. Here’s what to anticipate during the dough preparation:
– Weigh ingredients with a food scale. Measuring by weight with a food scale offers greater precision compared to measuring with cups, accounting for environmental variations.
– Knead the dough by hand or with a stand mixer. A stand mixer allows for a hands-off approach, but you can certainly get your hands involved as well. In both methods, it only takes 8 minutes.
– Let the dough rest for 45 minutes. This phase, also referred to as “proofing,” allows the dough to rise, resulting in the ideal fluffy texture.
– Alternatively, prepare the dough up to 3 days in advance. The flavor actually improves with time! For optimal results, refrigerate the dough for 2 to 3 days, which adds a subtle, nutty flavor.
How to stretch the dough
Stretching the dough represents the most challenging aspect of the Ooni pizza dough process—other than cooking it, of course! You’ll need to stretch it into an 11-inch circle. For optimal outcomes, view our video on How to Stretch Pizza Dough. Follow these guidelines:
– Sprinkle the pizza peel with cornmeal or semolina flour. This facilitates the dough sliding easily onto the stone. We favor semolina flour.
– First, shape the dough into a circle. Place it on a lightly floured surface and gently press it into a circle, flipping it multiple times and adding a bit of flour if it becomes too sticky.
– Carefully stretch the dough over your knuckles. Once you achieve an approximate 8-inch circle, lift the dough and delicately drape it over the knuckles of both hands. Slowly rotate it, letting gravity help stretch it into a circle of about 11 inches in diameter. If the dough begins to resist stretching, set it down and let it rest for a few minutes; then it will stretch more readily.
Essential pizza peel tips
Alex has been crafting Ooni pizza dough for years and has a slightly different approach for using the pizza peel. He discovered that cornmeal or semolina on the bottom can tend to burn slightly in a pizza oven.
Thus, he constructs and tops the pizza dough first on this conveyor Super Pizza Peel (to avoid using semolina). Afterward, he utilizes the conveyor to transfer the dough onto the stainless steel pizza peel that comes with the oven. It’s a slight workaround, but it’s our best practice! You can still achieve good results using cornmeal and semolina.
Another suggestion: We employ this ROCCBOX turning peel to rotate the pizza while it bakes in the oven, which is very beneficial. You can also use the nonstick peel for transfer (which is included with the oven).
My preferred pizza ovens
Alex and I have developed a bit of an obsession with pizza ovens. We’ve had an Ooni pizza oven for several years and recently added a Gozney ROCCBOX to our collection. Here’s my perspective on the top pizza
Read More
The $6 Bag I Break Out for the Most Amazing Summer Slaw (It Adds a âa Jolt of Flavorâ)

It lasts practically forever in the fridge.
READ MORE…


I Asked 2 Grocery Store Butchers How to Pick Out the Best Meat and Save Money â Hereâs What All Shoppers Need to Know

Plus, three more tips they swear by.
READ MORE…
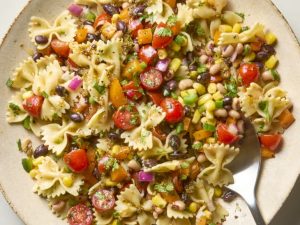
“Cowboy Pasta Salad” Is Always the First Side to Disappear

One bite will make you say âYeehaw!”
READ MORE…
Try These Soft Cottage Cheese Gnudi Rather Than Ricotta
Title: Uncover the Joys of Soft Cottage Cheese Gnudi: A Delectable Substitute for Ricotta
Introduction
Gnudi, a traditional Italian creation, is a form of dumpling typically crafted with ricotta cheese, flour, and occasionally spinach. These airy, fluffy treats resemble gnocchi but prioritize cheese over potato. Lately, food lovers have begun to explore using cottage cheese instead of ricotta in gnudi, introducing a novel take on this cherished recipe. This article delves into the advantages and preparation of soft cottage cheese gnudi, offering a delightful option for those eager to try something different.
Why Opt for Cottage Cheese?
1. **Texture and Flavor**: Cottage cheese provides a slightly distinct texture and flavor compared to ricotta. It is richer and carries a mild tang that can enhance the overall taste of the gnudi.
2. **Nutritional Advantages**: Cottage cheese generally contains less fat and fewer calories than ricotta, making it a fantastic choice for anyone seeking a lighter option. It is also rich in protein, beneficial for muscle development and recovery.
3. **Accessibility and Price**: Cottage cheese is readily available in most supermarkets and is usually less expensive than ricotta, making it a feasible choice for home chefs.
Making Soft Cottage Cheese Gnudi
Ingredients:
– 1 cup of cottage cheese (preferably small curd)
– 1/2 cup of Parmesan cheese, grated
– 1 large egg
– 1 cup of all-purpose flour (plus more for dusting)
– Salt and pepper to taste
– Optional: chopped fresh herbs such as basil or parsley
Instructions:
1. **Drain the Cottage Cheese**: Place the cottage cheese into a fine-mesh strainer or cheesecloth and let it drain for approximately 30 minutes. This step is vital to eliminate excess moisture, ensuring the gnudi maintain their shape.
2. **Combine the Ingredients**: In a large bowl, mix the drained cottage cheese, Parmesan cheese, egg, and a dash of salt and pepper. If incorporating herbs, add them now. Stir until everything is thoroughly combined.
3. **Shape the Gnudi**: Gradually incorporate the flour into the cheese mixture, mixing until a soft dough is formed. The dough should be slightly sticky but manageable. Dust your hands with flour and shape the dough into small balls, about the size of a walnut.
4. **Cook the Gnudi**: Bring a large pot of salted water to a gentle boil. Carefully add the gnudi to the water in batches, ensuring they do not stick together. Boil for around 3-4 minutes or until they rise to the top. Remove with a slotted spoon and let drain on a paper towel.
5. **Serve**: Serve the gnudi with your preferred sauce, such as a basic tomato sauce, brown butter and sage, or a light pesto. Garnish with extra Parmesan cheese and fresh herbs if desired.
Conclusion
Soft cottage cheese gnudi offer a charming alternative to the classic ricotta-based variety, presenting a distinctive texture and flavor that can enhance your cooking skills. With their nutritional advantages and simple preparation, these gnudi are perfect for a weeknight meal or a special gathering. Embrace the flexibility of cottage cheese and savor this tasty twist on a traditional Italian dish.
Read More
The Best Hot Dogs to Grill, According to a Former MLB Playerâs Private Chef

Plus, three more items your game day spread.
READ MORE…
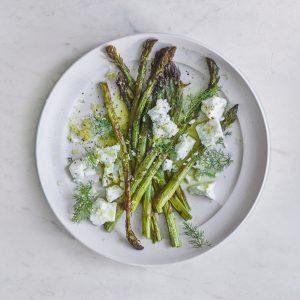
Frittata featuring Asparagus and Dill
Frittata with Asparagus and Dill
Preparation Time: 5 minutes Cooking Time: 25 minutes Overall Time: 30 minutes Portions: 6
A delicious and light frittata featuring cottage cheese, asparagus, and dill!
ingredients
- 8 large eggs
- 1 cup cottage cheese
- 1/4 cup grated parmigiano reggiano (parmesan cheese)
- 8 ounces asparagus, cleaned and sliced into bite-sized pieces
- 2 tablespoons chopped fresh dill (or 1 teaspoon dried dill)
- 2 green onions, chopped
- salt and pepper to taste
directions
- Combine the eggs, cottage cheese, parmesan, asparagus, dill, green onions, salt, and pepper, then pour into an oven-safe pan that is 8-10 inches wide.
- Bake in an oven preheated to 375F/190C until the eggs firm up, approximately 25-30 minutes.
Alternative: Swap cottage cheese for heavy cream or crumbled goat cheese (chevre), feta, chopped/diced cheddar, chopped/diced gruyere, chopped/diced havarti, etc.
Alternative: Incorporate 1 teaspoon of lemon zest.
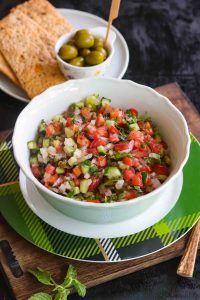
Cucumber and Onion Salad Instructions
### About the Author: Holly Nilsson
Holly Nilsson is the innovative mind behind Spend With Pennies, a site devoted to delivering simple and heartwarming recipes tailored for everyday cooking. With an intense love for nostalgic tastes and straightforward culinary techniques, Holly strives to enable busy home cooks to whip up delicious dishes that are both fulfilling and doable.
Her culinary path is characterized by a dedication to making cooking approachable for everyone, irrespective of their experience. Holly’s recipes frequently showcase a fusion of classic comfort food and contemporary ease, ensuring that even the busiest lives can enjoy homemade meals.
Alongside her endeavors on Spend With Pennies, Holly authored the book “Everyday Comfort,” which expands on her goal to motivate the creation of hearty, home-cooked fare. This book features recipes that bring about feelings of warmth and familiarity, making it an essential guide for anyone eager to broaden their cooking skills.
For those eager to delve deeper into Holly’s culinary offerings, you can find more posts and recipes on her website: [See more posts by Holly](https://www.spendwithpennies.com/author/holly/).
### Follow Holly on Social Media
Keep in touch with Holly and explore more of her delightful recipes by following her on social platforms:
– [Pinterest](https://www.pinterest.com/spendpennies/)
– [Facebook](https://www.facebook.com/ispendwithpennies/)
– [Twitter](http://spendpennies)
– [Instagram](https://www.instagram.com/spendpennies/)