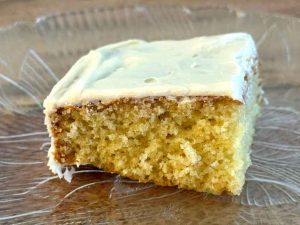
I Tried Chrissy Teigenâs Boxed âOld-School Vanillaâ Cake Mix

Itâs so good!
READ MORE…
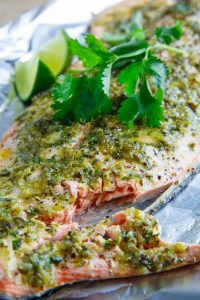
Tasty Grilled Salmon Dish for Summer Delight
### About the Author: Holly Nilsson
Holly Nilsson is the imaginative mind behind Spend With Pennies, a site devoted to creating simple and cozy recipes tailored for everyday cooking. With a profound enthusiasm for nostalgic tastes and straightforward cooking methods, Holly encourages busy home chefs to make delightful meals that are both enjoyable and dependable. Her methodology emphasizes making cooking accessible and pleasurable for all, no matter their skill level in the kitchen.
Beyond her contributions to Spend With Pennies, Holly is the writer of “Everyday Comfort,” a cookbook that seeks to motivate readers with wholesome, homemade dishes. This publication showcases her dedication to offering comforting recipes that capture the essence of home and family gatherings.
For those eager to discover more of Holly’s culinary inventions, her blog includes an array of recipes that suit various preferences and occasions, ensuring there’s something for everyone.
To keep in touch and follow her culinary adventures, you can connect with Holly on several social media platforms:
– [Pinterest](https://www.pinterest.com/spendpennies/)
– [Facebook](https://www.facebook.com/ispendwithpennies/)
– [Twitter](http://spendpennies)
– [Instagram](https://www.instagram.com/spendpennies/)
Holly Nilsson continues to motivate home cooks with her user-friendly recipes and commitment to making cooking a delightful experience.
Read More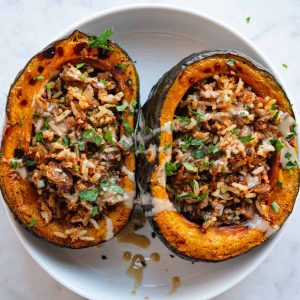
Fast and Simple Roasted Squash Side Dish Prepared in Less Than 20 Minutes
**Fast and Simple Roasted Squash Side Dish Ready in Less than 20 Minutes**
As the seasons shift and the air cools, the temptation for warm, soothing meals becomes undeniable. One such enticing choice is roasted squash—a dish that not only adds a splash of color to your dining experience but also delivers a punch of flavor and nutrition. The best part? You can create this fast and simple roasted squash side dish in less than 20 minutes, making it ideal for hectic weeknights or spontaneous get-togethers.
**Ingredients:**
– 1 medium squash (like acorn, butternut, or delicata)
– 2 tablespoons olive oil
– Salt and pepper to your liking
– Optional: 1 teaspoon garlic powder, 1 teaspoon paprika, or 1 tablespoon fresh herbs such as rosemary or thyme
**Instructions:**
1. **Preheat the Oven:** Begin by preheating your oven to 425°F (220°C). A hot oven helps the squash cook swiftly and achieve a lovely caramelized surface.
2. **Prepare the Squash:** Rinse the squash thoroughly under running water. Depending on the variety, peeling may be necessary. For example, butternut squash usually needs peeling, while delicata squash doesn’t. Halve the squash and remove the seeds. Then chop it into evenly-sized cubes or wedges to ensure consistent cooking.
3. **Season the Squash:** Place the squash pieces in a large mixing container. Drizzle with olive oil and add salt and pepper. For extra flavor, you might want to add garlic powder, paprika, or fresh herbs. Toss the squash until every piece is evenly coated with the oil and seasonings.
4. **Roast the Squash:** Arrange the seasoned squash in a single layer on a baking sheet lined with parchment paper for easy cleanup. Make sure there’s space between the pieces for even roasting. Put the baking sheet in the preheated oven.
5. **Cook Time:** Roast the squash for about 15 minutes. Halfway through, use a spatula to turn the pieces for even browning. The squash is finished when it’s tender and golden brown on the edges.
6. **Serve:** After roasting, take the squash out of the oven and transfer it to a serving dish. This side dish complements a range of main courses, from roasted chicken to grilled fish, or can be enjoyed by itself as a wholesome snack.
**Nutritional Benefits:**
Squash is packed with nutrients, high in vitamins A and C, fiber, and antioxidants. It bolsters immune health, aids digestion, and contributes to overall wellness. By roasting the squash, you maintain its nutritional value while enhancing its natural sweetness.
**Conclusion:**
This fast and simple roasted squash side dish exemplifies the notion that basic ingredients can produce remarkable outcomes. With minimal prep and short cooking time, you can relish a tasty and nutritious addition to any meal. Embrace the season’s flavors and enjoy the satisfaction of a well-prepared dish, all in under 20 minutes.
Read More
This âMust-Haveâ $25 Gadget Is My Secret for Bold Iced Lattes (Itâs Not a Coffee Maker)

Itâs âperfect.â
READ MORE…

How to Prepare Tasty Gluten-Free Pancakes
Pancake enthusiasts, this recipe has been created just for you, regardless of whether you are gluten-free! This simple recipe requires one nutritious flour—oat flour—along with staple ingredients such as Greek yogurt, maple syrup, butter, and eggs. (If you don’t have oat flour available, you can easily prepare your own by blending old-fashioned or quick-cooking oats in a food processor or blender.)
These delightful pancakes are light and tasty, featuring a gentle oatmeal essence. The yogurt adds a slight tang reminiscent of buttermilk, plus a boost of protein, and the maple syrup brings a richer flavor than regular sugar.
You could definitely argue that these pancakes are a healthier alternative to your typical stack of pancakes, especially when you opt for nutritious toppings to complement them. Most importantly, they make a fun indulgence to prepare on weekends, and they reheat wonderfully for quick breakfasts during the week.
Oat Flour Pancake Tips
Crafting pancakes is an art! These pointers will assist you in making your initial batch.
Allow the batter to rest for ten minutes. This gives the oat flour time to soak up some moisture, resulting in pancakes that are fluffy and light.
Ensure your batter has the appropriate texture. It should not be overly runny or so thick that stirring becomes difficult. The right consistency is achieved when you can pour some batter into a pan, creating a nice round shape without needing to assist it in spreading. If necessary, add up to 1/4 cup of milk to thin it out.
Gently grease your griddle or skillet with oil or butter. I prefer using avocado oil for cooking pancakes due to its high smoke point and neutral taste (butter tends to burn more quickly). Regardless of what you choose, make sure to remove any excess with a paper towel to prevent smoking.
Always start by cooking just one pancake first. After you’ve practiced with one pancake and verified that your skillet is adequately preheated, you can proceed to make more simultaneously. Leave a couple of inches between each pancake for easier flipping.
The pancakes are ready to be flipped when about 1/2-inch of the edges have transitioned from glossy to matte. Don’t expect to see bubbles forming around the edges for this particular recipe. The underside should be a lovely golden color at this stage. If in doubt, it’s wiser to wait a bit longer than risk ending up with a doughy disaster.
As you continue, reduce the heat gradually. The skillet will become hotter over time. If your pancakes are burning on the outside before being cooked through, your skillet is too hot. Lower the temperature slightly after every few pancakes.
Pancake Serving Suggestions
These pancakes are delicious with both traditional and healthier toppings. Here’s a selection of toppings or sides that you might like to pair with your pancakes.
More Gluten-Free Pancake Recipes
I enjoy making pancakes using wholesome gluten-free flours like oat flour, almond flour, and buckwheat flour. Here are six additional pancake recipes for you to savor:
Please share how your pancakes turn out in the comments. I value your input and always love hearing from you.
Gluten-Free Pancakes
This gluten-free pancake recipe utilizes oat flour and creates pancakes that are light, golden, and delightful. They are simple to prepare with fundamental ingredients. The recipe yields about 10 pancakes.
Instructions:
1. In a small mixing bowl, combine the yogurt, butter, and maple syrup. Crack in the eggs and whisk until well blended.
2. In a medium bowl, mix together the oat flour, baking soda, salt, and cinnamon. Use a large spoon to stir until everything is thoroughly combined.
3. Pour the wet ingredients into the dry ingredient bowl. Stir just until everything is mixed (avoid overmixing, as it will deflate the air bubbles that keep these pancakes airy). If you plan to include any mix-ins, gently fold them in now.
4. Allow the batter to rest for 10 minutes to thicken. In the last minute or two, heat a large stainless steel or nonstick skillet over medium-low heat. (Alternatively, preheat an electric griddle to 325 degrees Fahrenheit).
5. Once the pan is hot enough that a drop of water sizzles on it, lightly grease it, removing any surplus with a paper towel. Pour ¼ cup of batter onto the pan. Allow the pancake to cook for around 3 to 4 minutes, until the edges appear more matte than shiny and the bottom is golden. (If the batter is too thick and requires assistance to spread, thin it with milk as needed.)
6. After the underside is adequately cooked, flip it with a spatula and cook for another 90 seconds or so, until both sides are golden brown. You may need to lower the heat at this stage. Continue with the remaining pancakes, greasing the pan as necessary.
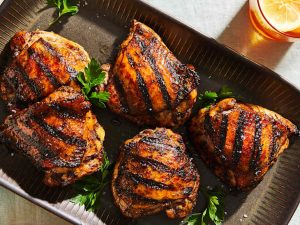
This $4 Pantry Staple Is So Good, I Started Buying 2 Jars at a Time (It Makes Chicken Taste Incredible)

âTry it on anything and everything.â
READ MORE…
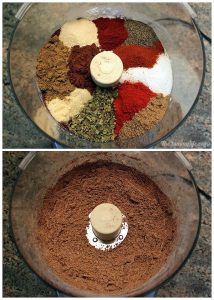
Fast DIY Taco Seasoning with Pantry Spices
**Quick Taco Seasoning Made at Home with Pantry Spices**
Taco night is a cherished ritual in numerous homes, providing a tasty and adjustable meal option that everyone loves. Although pre-packaged taco seasoning from the store is handy, crafting your own taco seasoning at home with pantry spices is not just fast and simple—it also empowers you to tailor the flavors and ingredients. This homemade recipe is devoid of preservatives and additives, ensuring a healthier choice for your family.
**Reasons to Create Your Own Taco Seasoning**
1. **Personalization**: Modify the spice levels to match your personal taste. Whether you prefer it mild or intensely spicy, you have full control.
2. **Freshness**: Employing fresh spices guarantees a more lively and fragrant seasoning mix.
3. **Budget-Friendly**: Using spices you already possess in your pantry can lead to savings over time.
4. **Additive-Free**: Steer clear of undesirable preservatives, artificial colors, and excessive sodium commonly found in bought mixes.
**Fundamental Spices for Taco Seasoning**
To concoct a balanced taco seasoning, you will need a combination of these spices, many of which are staples in numerous kitchens:
– **Chili Powder**: The cornerstone of the seasoning, offering mild heat and deep flavor.
– **Cumin**: Contributes a warm, earthy essence vital for genuine taco flavor.
– **Paprika**: Provides a touch of sweetness and vibrant hue. Smoked paprika introduces a savory smoke.
– **Garlic Powder**: Infuses a savory richness without the use of fresh garlic.
– **Onion Powder**: Complements the garlic powder and elevates the overall taste.
– **Oregano**: Adds a hint of herbal freshness that harmonizes the spices.
– **Salt and Black Pepper**: Crucial for seasoning and enhancing the overall flavors.
– **Red Pepper Flakes or Cayenne Pepper**: Optional, for those seeking a spicier addition.
**Basic Recipe for Homemade Taco Seasoning**
Here’s a straightforward recipe to guide you. Adjust the amounts to fit your taste:
– 1 tablespoon chili powder
– 1 teaspoon cumin
– 1 teaspoon paprika
– 1 teaspoon garlic powder
– 1 teaspoon onion powder
– 1/2 teaspoon dried oregano
– 1/2 teaspoon salt
– 1/4 teaspoon black pepper
– 1/4 teaspoon red pepper flakes or cayenne pepper (optional)
**Directions**
1. **Combine**: Mix all the spices in a small bowl. Stir until thoroughly blended.
2. **Store**: Place the mixture in an airtight container or spice jar. Mark it with the date and contents.
3. **Apply**: For taco meat, use about 2 tablespoons of the seasoning mixture per pound of ground meat. Adjust to your liking.
**Advice for Optimal Results**
– **Use Fresh Spices**: Make sure your spices are fresh for the best flavor. Ground spices usually last 2-3 years, but their effectiveness can diminish over time.
– **Batch Making**: Prepare a larger quantity to have on hand for future use. This saves time and guarantees you always have taco seasoning available.
– **Get Creative**: Don’t hesitate to experiment by including additional spices such as coriander, smoked paprika, or even a hint of cinnamon for a unique flavor.
**Final Thoughts**
Making your own taco seasoning with pantry spices is a straightforward and fulfilling endeavor. Not only does it enrich your taco meals with fresh, customizable flavors, but it also promotes a healthier lifestyle by removing unnecessary additives. When taco night arrives again, grab your homemade mix and savor the delightful difference it brings.
Read More
Organizing a Korean BBQ Gathering at Home: Essential Information You Should Have
# Hosting a Korean BBQ at Home: The Ultimate Dinner Gathering
Korean BBQ isn’t merely a meal; it’s a delightful journey packed with excitement, taste, and engagement. Organizing a Korean BBQ dinner gathering at home is simpler than you may assume, and it offers a flexible dining experience that everyone will love. Here’s a detailed guide on how to host the perfect Korean BBQ at home.
## Reasons to Host a Korean BBQ Gathering
Korean BBQ revolves around achieving harmony and contrast among flavors and textures. It provides total customization, letting each individual at the table enjoy precisely what they wish. When dining out for Korean BBQ, you’re welcomed with banchan—small side dishes that complement the main course. You select your meats, grill them at the table, wrap them in lettuce, and savor them with different sauces. The experience is engaging, communal, and delectable.
## What Exactly is Korean BBQ?
Korean BBQ entails grilling meat right at the dining table. Restaurants usually feature gas, charcoal, or portable stove grills integrated into the tables. Marinated meats like bulgogi and kalbi are grilled and presented with an array of banchan. The core of Korean BBQ is to grill meat, wrap it in leafy greens, drizzle it with sauce, and enjoy the flavors.
### Basic Requirements for Korean BBQ
To host a Korean BBQ, you’ll require:
1. A grill or hot plate.
2. Marinated meats.
3. Vegetables and sauce.
4. Banchan (optional yet suggested).
5. Beverages (a crucial aspect of the experience).
## Steps to Prepare Korean BBQ
1. **Preparation**: A few hours in advance or the previous day, marinate your meats, prepare vegetables, purchase banchan, and make sauces. Remember to chill your drinks!
2. **Table Setup**: Prepare rice and noodles, and arrange the table with banchan, dipping sauces, rice, and noodles.
3. **Preheat the Grill**: Ensure your grill or hot plate is ready, and open the windows for ventilation.
4. **Cook the Meat**: Apply oil to the grill, add meat slices, and turn as necessary.
5. **Serve and Savor**: As the meat cooks, take it off the grill, wrap it in lettuce, top it with sauce, and relish the meal. Repeat as desired!
## How to Enjoy Korean BBQ
Korean BBQ is traditionally consumed in ssam style, which involves wrapping grilled meat in lettuce with sauce. Here’s how to do it:
1. Grill the meat and cut it into manageable pieces if needed.
2. Encase the meat in lettuce and perilla leaves.
3. Add or dip it in sauce.
4. Enjoy in a single bite and appreciate the flavors.
## What Should I Purchase for Korean BBQ at Home?
You can source everything you need at a Korean grocery store like H-Mart, which often has marinated meats ready. If there isn’t a Korean grocery around, you can marinate the meat yourself. Key items include:
– Marinated meats (beef, pork, chicken).
– Fresh produce (lettuce, perilla leaves, garlic).
– Banchan (side dishes).
– Dipping sauces.
## What Type of Grill Do You Need?
A grill or hot plate is crucial for Korean BBQ. Options include:
– **Charcoal**: Delivers the best flavor but isn’t suitable for indoor use.
– **Induction**: Safe and easy to clean, though it may not reach high temperatures.
– **Portable Butane Stove**: Perfect for indoor use if proper ventilation is ensured.
## Where to Purchase the Finest Korean BBQ Meats
H-Mart is a superb location to buy Korean BBQ meats, providing various cuts and marinated choices. Other Asian grocery stores might carry pre-sliced meats ideal for BBQ. Standard grocery stores also stock cuts like rib-eye, pork belly, and chicken, which can be marinated for grilling.
## Top Cuts of Meat for Korean BBQ
### Beef
– **Kalbi/Short Ribs**: Flanken cut short ribs are perfect.
– **Bulgogi**: Thinly sliced sirloin, ribeye, or brisket.
### Pork
– **Samgyeopsal/Pork Belly**: Well-liked for grilling.
– **Hanjungsal/Pork Jowl**: Succulent and flavorful.
### Chicken
– **Cheese Buldak**: Chicken thighs marinated in spicy sauce topped with cheese.
– **Chicken Bulgogi**: Thighs marinated in bulgogi sauce.
## Banchan for Korean BBQ
Banchan are vital side dishes that elevate the BBQ experience. Common banchan include:
– **Kimchi**: Various kinds, such as napa cabbage and radish.
– **Kongnamul**: Seasoned soybean sprouts.
– **Danmuji**: Pickled yellow daikon.
– **Gim**

Ina Just Revealed Her Kitchen Paint Color, and Itâs the Perfect Warm Neutral

Itâs stunning!
READ MORE…

This $35 Costco Find Creates a Gorgeous Gallery Wall Out of Thin Air

A gallery wall delivered in one box!
READ MORE…