
Crunchy and Succulent Baked Chicken Recipe for a No-Mess Culinary Adventure
# Oven-Baked Chicken: A Crispy Treat
Succulent, moist chicken is turned into a crispy treat with a coating of panko, corn flakes, cornmeal, and a mix of flavorful seasonings. This oven-baked approach results in a golden-brown surface that competes with traditional frying while keeping the cooking process tidy and straightforward.
## Holly’s Recipe Highlights
– **Flavor:** This oven-baked chicken achieves the ideal harmony of flavorful seasonings with a crunchy, golden skin, guaranteeing a delightful bite every single time.
– **Difficulty:** This simple recipe delivers all the crunch without the mess linked to frying. Just coat and bake!
– **Recommended Tools:** A meat thermometer is crucial for confirming the chicken is properly cooked, reaching an internal temperature of 165°F.
– **Serving Suggestions:** Serve with creamy mashed potatoes, coleslaw, or corn on the cob for a complete meal.
## Ingredient Tips for Oven-Baked Chicken
– **Chicken:** This recipe can use a whole, cut-up chicken or individual skin-on, bone-in cuts like thighs, breasts, drumsticks, wings, and legs. Modify baking times to ensure all pieces hit 165°F internally.
– **Coating:** The mix of cornflakes, cornmeal, and Panko breadcrumbs forms a light, crispy blend. For an extra enhancement, think about making homemade panko breadcrumbs.
– **Seasonings:** Basic spices like garlic powder and paprika boost the flavor, but don’t hesitate to try blends like Cajun or adobo for a distinctive twist.
– **Variations:** Incorporate cayenne pepper for spice or parmesan cheese for a tangy flavor that also aids in better coating adherence.
## How to Prepare Oven-Baked Chicken
1. Preheat your oven to 375°F.
2. In three separate bowls, set up the flour, egg, and crumb mixtures.
3. Dredge the chicken in flour, then dip in the egg mixture, and lastly cover with the crumb mixture, pressing to stick.
4. Arrange the coated chicken on a prepared pan and bake for 45-55 minutes, or until juices run clear and the chicken reaches 165°F.
### Tips for Optimal Results
– Make sure chicken pieces are patted dry for better coating stickiness.
– Avoid overcrowding the pan to facilitate proper air circulation for crispness.
– Allow the chicken to rest for 5-10 minutes before serving to retain the juices.
## Leftover Love!
Leftover oven-baked chicken can be kept in a covered container in the refrigerator for up to 4 days. To reheat while preserving crispiness, use an air fryer or microwave followed by a brief broil. Enjoy leftovers in a burrito bowl, Caesar wrap, or chicken pasta salad.
For freezing, let the chicken cool, then flash freeze on a baking sheet. Once solid, move to freezer bags, remove excess air, and seal. Thaw in the fridge overnight and reheat in the oven or air fryer.
## More Crispy Chicken Favorites
Discover more delicious recipes that showcase the crispy charm of chicken, perfect for any occasion.
—
Savor this oven-baked chicken recipe and share your thoughts and ratings!
Read More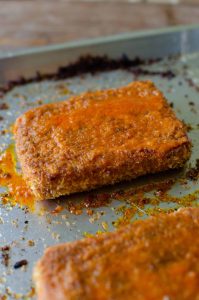
Crispy Buffalo Tofu Accompanied by Caesar Salad
### Crispy Buffalo Tofu with Caesar Salad
This Buffalo Tofu dish offers a wonderful blend of tastes and textures, merging the zesty heat of buffalo sauce with the rich creaminess of a Caesar salad. It’s remarkably simple to prepare, needing only two key ingredients for the sauce and a quick air-fry for the tofu. This meal is ideal for a speedy dinner or a delightful finger food choice.
#### Why I Adore This Recipe
Buffalo tofu has established itself as a go-to in my kitchen, and I frequently end up making it several times each week. Its adaptability allows it to be savored alone as a snack or placed atop a robust salad. The mix of crispy tofu and a creamy kale Caesar salad results in a fulfilling dish that feels both luxurious and nutritious.
The charm of this recipe is found in its straightforwardness. There’s no necessity for intricate batters or breading, and cleaning up is effortless. The tofu is air-fried to reach a crunchy consistency, then combined with a quick sauce made from just hot sauce and butter. It’s a meal that’s not just easy to whip up, but also exceptionally tasty.
#### Ingredients
**For the Crispy Tofu:**
– Firm or extra-firm tofu
**For the Buffalo Sauce:**
– Hot sauce (your preference)
– Butter (or a plant-based alternative)
**For Serving:**
– Kale Caesar salad (store-bought or homemade)
#### Instructions
1. **Prepare the Tofu:** Take the tofu out of its packaging and drain the water. Wrap it in a clean dish towel or paper towels and gently press to remove excess moisture.
2. **Cut the Tofu:** Tear the tofu into bite-sized pieces.
3. **Season the Tofu:** Coat the tofu chunks with cornstarch, soy sauce, oil, paprika, and garlic powder until well-covered.
4. **Air Fry the Tofu:** Preheat your air fryer to 400°F (200°C). Air fry the tofu for 8 minutes, shake or toss, then continue cooking for another 5-6 minutes until golden and crunchy.
5. **Make the Sauce:** In a small bowl, melt the butter and whisk it with the hot sauce. Toss the crispy tofu in the sauce to coat thoroughly.
6. **Serve:** Place the buffalo tofu over a bed of kale Caesar salad. Enjoy as is, or include your favorite dipping sauces on the side.
#### Tips and Variations
– **For Kids:** If the buffalo sauce is too hot for younger tastes, reserve some plain tofu pieces for dipping in ranch or ketchup.
– **Oven Baking:** If you prefer baking, preheat your oven to 400°F (200°C) and bake the tofu for about 20 minutes, turning halfway through.
– **Tofu Brands:** I suggest using extra-firm tofu for the best texture. Brands like Fountain of Health from Costco perform well, but any firm tofu will suffice.
#### Frequently Asked Questions
– **How spicy is this?** The buffalo sauce can have a kick, so think about leaving some tofu pieces plain for those who like subdued flavors.
– **Can I use chicken instead of tofu?** Yes, chicken can be used as a substitute. Modify the cooking time accordingly, and utilize the same seasoning mix.
– **What air fryer do you suggest?** I use the Ninja Air Fryer Pro XL, which is excellent for recipes like this because of its size and basket style.
This Buffalo Tofu is not only simple to create but also a favorite among crowds. Whether you’re indulging in it as a snack or part of a meal, it’s guaranteed to fulfill your cravings for something spicy and tasty.
Read More
Grilled Chicken Sandwich accompanied by Monterey Jack Cheese
Monterey Chicken Sandwich
Prep Time: 10 minutes Cook Time: 20 minutes Total Time: 30 minutes Servings: 4
An appetizing sandwich featuring BBQ chicken, gooey cheese, crispy bacon, lettuce, and tomato!
ingredients
- 1 pound boneless, skinless chicken breasts or thighs, sliced thinly or diced
- 2 tablespoons oil (or mayonnaise)
- 1 teaspoon garlic powder
- 1 teaspoon salt
- 1 teaspoon pepper
- 1 teaspoon paprika
- 1/2 teaspoon cayenne
- 8 strips bacon
- 1/4 cup BBQ sauce
- 4 slices cheese (cheddar, jack, etc.)
- 4 buns or 8 slices of bread (gluten-free for gluten-free)
- 1/4 cup mayonnaise (optional)
- 4 leaves lettuce
- 1 large tomato, sliced
- 1/4 cup red onion, thinly sliced
directions
- Soak the chicken in a blend of oil, garlic, salt, pepper, paprika, and cayenne, covered, in the refrigerator for 20 minutes to overnight.
- Fry the bacon in a large skillet and then place it on paper towels to drain while removing any excess fat from the pan.
- Sauté the chicken in the skillet over medium heat until fully cooked, roughly 10-15 minutes.
- Stir in the BBQ sauce.
- Top with cheese slices and allow them to melt before switching off the heat.
- Build the sandwiches using buns, mayo, lettuce, tomato, onion, bacon, and chicken, and enjoy!
Option: Include 1 sliced avocado.

Grilled Eggplant Parmesan
**Grilled Eggplant Parmesan: A Tasty Variation of a Timeless Recipe**
Eggplant Parmesan is a cherished Italian-American meal celebrated for its robust flavors and cozy layers of eggplant, marinara sauce, and gooey cheese. While traditionally baked in the oven, this iconic dish can receive a wonderful twist by making it on the grill. Grilling lends a smoky richness to the eggplant, enhancing its innate flavors and providing a distinctive culinary experience. Here’s how to create Eggplant Parmesan on the grill.
**Ingredients:**
– 2 large eggplants, cut into 1/2-inch thick rounds
– Salt
– Olive oil
– 2 cups marinara sauce
– 2 cups shredded mozzarella cheese
– 1 cup grated Parmesan cheese
– Fresh basil leaves, for decoration
– Black pepper, to taste
**Instructions:**
1. **Prepare the Eggplant:**
Start by salting the eggplant rounds to extract excess moisture and diminish bitterness. Place the slices on a baking tray and sprinkle both sides with salt. Allow them to rest for about 30 minutes, then rinse and dry with paper towels.
2. **Preheat the Grill:**
Heat your grill to medium-high temperature. For a charcoal grill, ensure the coals are spread evenly for uniform heat.
3. **Grill the Eggplant:**
Brush both sides of the eggplant rounds with olive oil and season with black pepper. Lay the slices on the grill and grill for approximately 4-5 minutes per side, or until tender and marked. Remove from the grill and set aside.
4. **Assemble the Dish:**
In a heatproof grill-safe pan or cast-iron skillet, spread a thin layer of marinara sauce. Layer the grilled eggplant slices over the sauce. Add more marinara sauce, a sprinkle of mozzarella cheese, and a layer of Parmesan cheese. Continue layering until all components are used, ending with a generous layer of cheese on top.
5. **Grill the Eggplant Parmesan:**
Return the assembled dish to the grill. Close the lid and cook for around 15-20 minutes, or until the cheese is melted and bubbly. If your grill has a temperature gauge, target about 375°F (190°C).
6. **Serve:**
Carefully take the dish off the grill. Allow it to cool for a few moments before garnishing with fresh basil leaves. Serve hot, either as a main dish or as a side.
**Tips for Success:**
– **Choose Firm Eggplants:** Opt for eggplants that are sturdy and feature smooth, shiny skin for optimal texture.
– **Use Quality Marinara Sauce:** A high-quality marinara sauce will elevate the dish’s overall taste. Think about making your own or selecting a trustworthy store-bought option.
– **Experiment with Cheese:** Although mozzarella and Parmesan are classic, don’t hesitate to try other cheeses like provolone or fontina for added flavor.
Grilled Eggplant Parmesan is a delightful variation that infuses a smoky, charred essence into the beloved classic. It’s ideal for summer barbecues or any occasion when you wish to relish a comforting meal with a refreshing spin. Pair this dish with crusty bread or a simple green salad for a complete dining experience.
Read More
Eggs Florentine: A Timeless Recipe Featuring Poached Eggs, Spinach, and Hollandaise Sauce
### Eggs Florentine: An Ideal Brunch Recipe at Home
Brunch is commonly regarded as a pleasant weekend tradition, yet the decision between eating out and savoring a homemade dish can be challenging. While numerous individuals enjoy the thought of brunching at a restaurant, the experience may occasionally disappoint—overdone eggs, limp bacon, and lengthy waits can diminish the enjoyment. For those who favor the coziness of home, whipping up a tasty brunch can be both fulfilling and cost-effective. One exceptional dish that captures the spirit of brunch is Eggs Florentine.
#### What is Eggs Florentine?
Eggs Florentine is a twist on the traditional Eggs Benedict, replacing Canadian bacon with sautéed spinach. This dish comprises poached eggs placed on a toasted English muffin, all covered with a luscious and creamy hollandaise sauce. The blend of flavors and textures makes it a favorite among many, particularly those who value the subtle harmony of eggs and greens.
#### The Allure of Preparing Eggs Florentine at Home
Although making Eggs Florentine may appear intimidating due to the necessity of poaching eggs and preparing hollandaise sauce, the effort is extremely worthwhile. You have control over the ingredients and flavors, and you can also tailor the dish to your preferences. Additionally, making it at home creates a more laid-back ambiance, free from the noise and rush of a busy restaurant.
#### Ingredients Overview
To whip up this appetizing dish, you will require the following ingredients:
**For the Hollandaise Sauce:**
– 2 large egg yolks
– 1/2 cup unsalted butter, melted and warm
– 1/2 teaspoon kosher salt (plus extra to taste)
– 1/2 to 1 tablespoon lemon juice (to taste)
– A dash or two of hot sauce (to taste)
**For the Spinach:**
– 10 ounces baby spinach
– 1 tablespoon unsalted butter
– 3 tablespoons minced shallot
– Salt and freshly ground black pepper
**For the Assembly:**
– 6 large eggs
– A splash of white vinegar
– 3 English muffins, halved
– Extra butter for toasting
#### Step-by-Step Instructions
1. **Prepare the Hollandaise Sauce:**
– Using either an upright or immersion blender, blend the egg yolks until mixed. Slowly drizzle in the melted butter while blending until the sauce thickens. Adjust seasoning with salt, lemon juice, and hot sauce to taste. Set aside.
2. **Cook the Spinach:**
– In a skillet, add a small amount of water and bring to a simmer. Add the spinach and cook until wilted. Drain and squeeze out extra water. In the same skillet, melt butter, sauté shallots until golden, then reintroduce the spinach, seasoning with salt and pepper.
3. **Poach the Eggs:**
– In a saucepan filled with simmering water and a splash of vinegar, create a gentle whirlpool and carefully drop in the eggs. Cook for 3-5 minutes until the whites are firm but the yolks remain runny. Remove with a slotted spoon.
4. **Toast the English Muffins:**
– In the skillet, melt butter and toast the English muffin halves until golden brown.
5. **Assemble the Dish:**
– Place the toasted muffin halves on a plate, top with sautéed spinach, a poached egg, and drizzle with hollandaise sauce. Season as desired and serve immediately.
#### Conclusion
Eggs Florentine is an elegant yet accessible dish that can enhance your home brunch experience. With practice, you can perfect the technique of poaching eggs and crafting hollandaise sauce, enabling you to relish this restaurant-quality meal in the comfort of your own kitchen. So gather your ingredients, invite some friends or family, and revel in the triumph of your culinary skills. Enjoy your homemade brunch!
Read More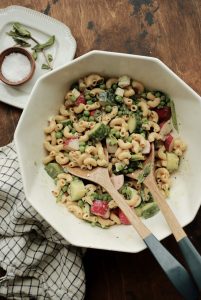
Summer Pasta Salad with Fresh Garden Veggies and Feta Cheese
# Present the Finest Garden-Fresh Vegetables with Delicate Pasta Mixed in a Zesty Dressing featuring Feta Cheese and Fresh Herbs
This delightful Summer Pasta Salad recipe is a lively and invigorating dish that showcases the finest garden-fresh vegetables of the summer season. With delicate pasta mixed in a zesty dressing, enriched by creamy feta cheese and vibrant herbs, this salad is ideal for any warm-weather occasion.
## Flavor Profile
The salad boasts a fresh and zesty taste, thanks to a tangy vinaigrette that pairs wonderfully with the sweet corn, succulent tomatoes, and crunchy vegetables. The creamy feta cheese contributes a lovely salty contrast, ensuring each bite is bursting with flavor.
## Skill Level
This recipe is created to be straightforward, making it perfect for all skill levels, from novice cooks to experienced home chefs.
## Preparation Tips
– **Make Ahead**: You can prepare the salad and dressing up to a day in advance. Just keep it chilled until you’re ready to dress and serve.
– **Budget-Friendly**: Feel free to incorporate leftover vegetables and cheese from your fridge to enhance the recipe without overspending.
– **Serving Suggestions**: To transform it into a main course, consider adding diced salami, tuna, salmon, or leftover chicken.
## Ingredient Tips for Summer Pasta Salad
– **Pasta**: Opt for firmer pasta types such as rotini, bowtie, cavatappi, or penne. Cooking it to ‘al dente’ ensures it maintains its integrity alongside the other ingredients.
– **Vegetables**: Utilize a variety of vibrant vegetables like bell peppers, zucchini, tomatoes, carrots, corn, and radishes. You can also use frozen mixed vegetables for convenience.
– **Cheese**: Hard cheeses such as feta, parmesan, or blue cheese crumbles contribute a salty essence. For a dairy-free option, simply omit the cheese.
– **Dressing**: A traditional vinaigrette made with oil, vinegar, Dijon mustard, and herbs is ideal. You can personalize it with fresh herbs such as parsley, basil, or cilantro. If short on time, a ready-made Italian or Greek vinaigrette is an excellent substitute.
– **Variations**: Elevate your salad with additions like sliced black olives, pepperoncini, jalapenos, sundried tomatoes, or artichoke hearts.
## Storing Summer Pasta Salad
Store the summer pasta salad in a sealed container in the refrigerator for up to 5 days. Before serving leftovers, stir and adjust seasonings as necessary.
**Pro Tip**: It’s not advisable to freeze pasta-based dishes, as they don’t thaw well compared to fresh. This recipe is quick and easy enough to make fresh each time.
## Recipe Overview
### Summer Pasta Salad
**Prep Time**: 20 minutes
**Cook Time**: 15 minutes
**Total Time**: 35 minutes
**Servings**: 8
### Ingredients
– Pasta (rotini, bowtie, cavatappi, or penne)
– Fresh vegetables (bell peppers, zucchini, tomatoes, carrots, corn, radishes)
– Feta cheese
– Dressing ingredients (vegetable oil, vinegar, mustard, sugar, oregano, garlic powder, salt, and pepper)
### Instructions
1. Cook pasta al dente according to package directions. Drain and rinse with cold water to halt cooking.
2. In a mason jar, mix vegetable oil, vinegar, mustard, sugar, oregano, garlic powder, salt, and pepper. Shake well to blend.
3. In a large bowl, combine the pasta, onion, bell pepper, zucchini, tomatoes, carrots, corn, radishes, and feta. Toss to blend. Garnish with additional feta cheese and herbs if desired.
### Nutrition Information (per serving)
– Calories: 304
– Carbohydrates: 30g
– Protein: 7g
– Fat: 17g
– Saturated Fat: 3g
– Cholesterol: 8mg
– Sodium: 145mg
– Potassium: 336mg
– Fiber: 2g
– Sugar: 4g
– Vitamin A: 2300 IU
– Vitamin C: 37.8 mg
– Calcium: 80 mg
– Iron: 1.2 mg
This Summer Pasta Salad is not only visually appealing with its bright colors but also a delicious dish that embraces the tastes of summer. Savor this refreshing salad at your next gathering or as a light meal on a warm day!
Read More
Pizza Topped with Vegetables
### Crescent Roll Veggie Pizza: A Fresh and Flavorful Treat
This crescent roll veggie pizza serves as a charming appetizer that merges a flaky crescent crust with a creamy, savory topping and a selection of fresh, crunchy vegetables. Ideal for gatherings, potlucks, or a light meal, this recipe is not only straightforward to make but also visually striking with its vivid hues.
#### Flavor Profile
The taste of this veggie pizza is cool and creamy, enriched by herbal dill and garlic undertones. The fresh snap of colorful raw vegetables contributes a delightful texture, making each mouthful invigorating and pleasurable.
#### Preparation Tips
– **Cooling the Crust**: It’s crucial to allow the crust to cool entirely before applying the cream cheese mixture. This guarantees that the spread stays smooth and doesn’t seep into the crust.
– **Time-Saving**: To simplify the task, chop the vegetables and blend the spread while the crust bakes and cools.
#### Serving Suggestions
Present the veggie pizza chilled, cut into squares. It pairs excellently with soups or salads, offering a flexible option for different events.
### Ingredient Tips for Veggie Pizza
1. **Crescent Rolls**: The delicate texture of crescent rolls makes them a perfect choice for the crust. Alternatively, homemade pizza dough can be utilized, with any excess dough stored in the freezer for later use.
2. **Seasoned Cream Cheese**: For optimum flavor, utilize full-fat softened cream cheese and sour cream. Low-fat variants are also an option. Enhance the taste by incorporating red pepper flakes for a spicier twist or adding a homemade Italian seasoning mix or ranch blend.
3. **Vegetables**: Broccoli, cucumber, bell peppers, carrots, and diced tomatoes are superb selections, offering a colorful and nutritious topping.
4. **Variations**: Feel free to personalize with ingredients such as chopped spinach, sliced red onions, mushrooms, black olives, or jalapenos. Add tender greens like arugula after baking for maximum flavor.
### Storing Leftovers
Keep any leftover veggie pizza in a single layer within a covered container in the refrigerator for up to three days. To revive the flavors before serving, consider adding fresh vegetables or a dash of extra seasonings or parmesan cheese. Freezing is not advisable due to the high dairy content.
### Recipe Overview
– **Prep Time**: 10 minutes
– **Cook Time**: 16 minutes
– **Chill Time**: 1 hour
– **Total Time**: 26 minutes
– **Servings**: 16 pieces
### Instructions
1. Preheat the oven to 375°F.
2. Unroll the crescent dough and press it into an ungreased 13×18-inch pan. Pinch the seams to seal and poke with a fork to prevent bubbles.
3. Bake for 14 to 16 minutes or until golden brown. Remove from the oven and cool completely.
4. In a medium bowl, combine cream cheese, sour cream, dill, garlic powder, and onion powder until smooth. Spread the mixture over the cooled crust.
5. Top with broccoli, cucumber, bell pepper, carrot, and tomato, pressing down gently to adhere.
6. Cover and refrigerate for at least 1 hour. Cut into squares and serve.
### Nutritional Information (per piece)
– **Calories**: 82
– **Carbohydrates**: 4g
– **Protein**: 1g
– **Fat**: 7g
– **Sodium**: 79mg
– **Vitamin A**: 1082 IU
– **Vitamin C**: 10mg
This crescent roll veggie pizza is a delightful and healthful choice that will surely impress your guests while being easy to prepare. Savor the fresh tastes and bright colors that make this dish a highlight at any gathering!
Read More