Quinoa-Powered Tabbouleh Salad Recipe
**Quinoa Tabbouleh: A Gluten-Free Variation on a Classic**
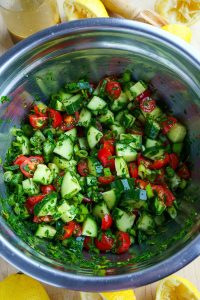
For tabbouleh fans, have you thought about substituting quinoa for bulgur wheat? This creative recipe turns the cherished Lebanese salad into a gluten-free treat. Quinoa, known for its airy texture and mildly nutty taste, blends perfectly into the dish, preserving the spirit of classic tabbouleh.
**Ingredients and Optional Additions**
Although quinoa is the main replacement, don’t hesitate to try adding ingredients like chickpeas and feta cheese. These extra elements enhance the dish’s heartiness, making it substantial enough to serve as a light meal.
**Refreshing and Herbaceous**
This colorful salad is ideal for sunny days, incorporating fresh parsley, mint, tomato, cucumber, olive oil, lemon juice, and garlic. The ratios respect the traditional recipe, ensuring parsley shines as the main ingredient, accentuated by a lively lemon flavor.
**Recipe Tips & Tricks**
1. **Perfect Quinoa**: Utilize a dependable quinoa cooking technique for optimal fluffiness.
2. **Flavor Concentration**: Salt and drain tomatoes and cucumbers to elevate their taste and avoid excess moisture in the salad.
3. **Parsley Preparation**: Use a generous amount of parsley, finely chopping it for the best texture and flavor.
4. **Seasoning**: Use ample lemon juice and salt to create a zesty, flavorful salad.
**Serving Suggestions**
This quinoa tabbouleh complements a variety of gluten-free choices, enhancing its flexibility for different dietary needs.
**Recipe Instructions**
1. Rinse quinoa and cook until all water is absorbed. Allow it to steam, then fluff using a fork.
2. Salt the tomatoes and cucumbers and let them sit before draining the extra juice.
3. Finely chop parsley, using a food processor if you have one.
4. In a bowl, combine the cooled quinoa, mint, green onion, and drained vegetables.
5. Mix olive oil, lemon juice, garlic, and salt, and then incorporate it into the salad. Include chickpeas or feta if you wish.
6. Let the salad sit to allow the flavors to combine or serve right away. It can be stored in the fridge for up to four days.
**Notes**
– To make a dairy-free or vegan version, exclude feta cheese.
– Nutritional information is approximate and should not substitute professional guidance.
Savor your gluten-free quinoa tabbouleh, and don’t hesitate to share your thoughts in the comments!
Read More
Macaroni and Cheese Recipe by Tini
# Tini’s Mac and Cheese Sensation: A Decadent and Tasty Treat
Tini’s mac and cheese has gone viral on the internet, garnering over 60 million views on TikTok. This rich and cheesy dish is essential for any mac and cheese lover. Featuring three varieties of cheese and corkscrew pasta, it’s a pairing that is destined to delight. Ideal for potlucks, barbecues, or family reunions, this recipe is bound to impress.
## What is Tini’s Mac and Cheese?
Tini’s mac and cheese surged in popularity when it was showcased on TikTok, enchanting viewers with its deep flavors and velvety texture. It has become a go-to for many during holiday festivities, particularly Thanksgiving. If you’re looking to elevate your mac and cheese experience, this recipe is an excellent option.
## Ingredients for Tini’s Mac and Cheese
To recreate Tini’s scrumptious mac and cheese, you will require these ingredients:
– **Pasta**: 1 lb of corkscrew pasta (cavatappi) is favored for its ability to trap the creamy sauce.
– **Cheese**:
– 1 lb mozzarella cheese
– 1 lb colby jack cheese
– ½ lb sharp cheddar cheese
– **Butter**: 3 tablespoons of unsalted butter for making the roux.
– **Flour**: 3 tablespoons of all-purpose flour for creating the roux.
– **Evaporated Milk**: 12 oz (1 can) for added creaminess.
– **Heavy Cream**: 2 cups to enhance the richness.
– **Seasonings**:
– ¼ tsp salt
– ¼ tsp freshly ground pepper
– ½ tsp garlic powder
– ½ tsp smoked paprika
– **Dijon Mustard**: 1 tablespoon to offset the richness of the cheese.
## How to Prepare Tini’s Mac and Cheese
1. **Cook the Pasta**: In a large pot of salted boiling water, cook the pasta per package directions. Drain thoroughly.
2. **Prepare the Roux**: In a large non-stick skillet, melt 3 tablespoons of butter over medium heat. Add half of the seasoning mix and mix well. Next, add 3 tablespoons of flour and cook until bubbling.
3. **Incorporate Evaporated Milk**: Gradually whisk in the can of evaporated milk until the mixture thickens slightly.
4. **Add Heavy Cream**: Mix in the heavy cream and the rest of the seasoning, letting the sauce thicken.
5. **Melt Cheese**: Slowly add half of the cheese, whisking until melted before introducing more.
6. **Mix Pasta and Sauce**: Combine the cooked pasta, ensuring each noodle is enveloped in the creamy sauce.
7. **Layer the Mac and Cheese**: In an oven-safe casserole, layer half of the mac and cheese, followed by half of the remaining cheese. Repeat with the rest of the mac and cheese and finish with the additional cheese on top.
8. **Bake**: Preheat the oven to 350°F and bake for 25-30 minutes until the top is melted and bubbly.
9. **Broil**: For a crispy crust, broil for another 2 minutes.
10. **Serve**: If desired, garnish with sliced chives, scoop, and savor!
## Who is Tini?
Tini is a skillful cook and TikTok influencer boasting over 5.5 million followers. She gained fame for her creative recipes, including this trending mac and cheese.
## Tips and Tricks for Ideal Mac and Cheese
– **Grate Your Own Cheese**: Steer clear of pre-shredded cheese, as it often has additives that can make the sauce grainy.
– **Layering**: Similar to lasagna, layering mac and cheese creates pockets of melted cheese and a crispy top.
– **Seasoning**: Don’t overlook garlic powder, smoked paprika, and mustard; they add complexity and boost the flavor.
## Make Ahead Mac and Cheese
You can prepare this dish beforehand. Assemble the mac and cheese up to the baking point, wrap it securely, and refrigerate for up to three days. When ready to bake, cover with foil and bake for 30 minutes, then remove the foil and continue baking until heated through.
## Alternative Pasta Shapes
While corkscrew pasta is encouraged, feel free to use any pasta shape you like, such as classic macaroni, mini penne, or rotini. The creamy sauce will make any shape irresistible.
## Conclusion
Tini’s mac and cheese is a luxurious, creamy dish that suits any event. With its blend of three cheeses and flavorful seasonings, it’s guaranteed to become a favorite in your home. Whether for a festive occasion or a cozy evening in,
Read More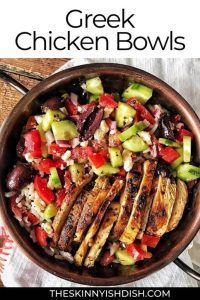
Fast and Simple High-Protein Greek Chicken Meal Prepared in an Air Fryer
**Simple and Quick High-Protein Greek Chicken Meal Prepared in an Air Fryer**
In today’s swift-moving world, it can be tough to carve out time for a wholesome and tasty meal. Nonetheless, with the advent of the air fryer, cooking has become easier and more health-conscious. One of the top recipes to consider is a high-protein Greek chicken meal, which is not just fast and straightforward to prepare but also brimming with flavor and nutrients.
**Ingredients:**
– 2 skinless, boneless chicken breasts
– 2 tablespoons olive oil
– 1 tablespoon lemon juice
– 2 cloves garlic, chopped
– 1 teaspoon dried oregano
– 1 teaspoon dried thyme
– 1 teaspoon paprika
– Salt and pepper to taste
– 1 cup cherry tomatoes, halved
– 1 small red onion, cut into slices
– 1/2 cup Kalamata olives, pitted and halved
– 1/2 cup feta cheese, crumbled
– Fresh parsley, chopped (for garnishing)
**Instructions:**
1. **Marinate the Chicken:**
– In a bowl, blend olive oil, lemon juice, chopped garlic, oregano, thyme, paprika, salt, and pepper.
– Incorporate the chicken breasts into the marinade, ensuring they are thoroughly coated. Allow them to marinate for a minimum of 15 minutes, or up to 2 hours in the fridge for deeper flavor.
2. **Prepare the Air Fryer:**
– Preheat your air fryer to 375°F (190°C) for around 5 minutes.
3. **Cook the Chicken:**
– Place the marinated chicken breasts in the air fryer basket. Cook for 12-15 minutes, flipping halfway, until the chicken reaches an internal temperature of 165°F (74°C).
4. **Prepare the Vegetables:**
– While the chicken cooks, mix the cherry tomatoes, red onion, and olives in a bowl with a splash of olive oil, salt, and pepper.
5. **Cook the Vegetables:**
– After the chicken is finished, take it out of the air fryer and let it rest. Add the vegetable mixture to the air fryer basket and cook for 5-7 minutes until the tomatoes are slightly blistered and the onions are soft.
6. **Assemble the Dish:**
– Slice the rested chicken and place it on a serving platter. Top with the cooked vegetables, sprinkle with crumbled feta cheese, and garnish with fresh parsley.
**Nutritional Benefits:**
This Greek chicken meal is a nutritional powerhouse. Chicken breast is a fantastic source of lean protein, crucial for muscle healing and growth. The olive oil and olives offer healthy fats, while the tomatoes and red onions infuse a range of vitamins and antioxidants. Feta cheese adds calcium and a zesty flavor, making this meal both nourishing and delightful.
**Conclusion:**
This high-protein Greek chicken meal is ideal for hectic weeknights when you crave a wholesome dish without dedicating hours in the kitchen. The air fryer not only hastens the cooking time but ensures that the chicken remains juicy and the vegetables are roasted to perfection. Savor this tasty and wholesome meal that brings a slice of the Mediterranean to your dining table.
Read More
Tasty Tender Homemade Breadsticks Recipe
# The Ideal Garlic Butter Parmesan Breadsticks
Soft, chewy breadsticks coated in garlic butter and garnished with parmesan cheese make a wonderful addition to any dining experience. These breadsticks are not only simple to prepare but also remarkably adaptable, complementing a wide range of dishes including pasta, pizza, salads, and soups.
## Taste Profile
These breadsticks feature a buttery, subtly garlicky taste, enhanced by a golden outer layer and a soft center. Each mouthful delivers a melt-in-the-mouth sensation that will surely satisfy any taste.
## Skill Level
This recipe is suitable for beginners, making it a fantastic option for those just starting with baking. The clear instructions and forgiving characteristics of the yeast dough guarantee that anyone can create tasty results.
## Serving Recommendations
These breadsticks are excellent for serving with:
– Pasta meals
– Pizza evenings
– Crisp salads
– Robust soups
## Freezing for Future Use
A standout feature of these breadsticks is their capability to be frozen. Bake them and keep them in the freezer for as long as six months. This way, you can savor fresh breadsticks whenever you want a quick accompaniment.
## Simple Breadstick Components
### Dough
Creating the dough for these breadsticks is straightforward. Ensure your yeast is active, and whisk the flour prior to measuring for optimal outcomes. You may also opt for a gluten-free flour mix if you prefer, just adhere to the package’s conversion guidelines.
### Cheese
Parmesan cheese imparts a salty taste and contributes to a crisp topping. You are welcome to swap it with your preferred shredded cheese. For an additional touch, position the baking sheet underneath the broiler for approximately 30 seconds to create a lightly toasted and melted cheese topping.
## Preferred Variations
Tailor your breadsticks to enhance your meal:
– **Cajun Style**: Add Cajun seasoning to the melted butter for an extra kick.
– **Garlic Enthusiasts**: Mix garlic powder into the butter for a pronounced garlicky flavor.
– **Italian Twist**: Combine with Italian herbs for a delightful enhancement to lasagna soup.
– **Everything Bagel**: Utilize everything bagel seasoning for a fun twist that children will adore.
## Instructions for Breadstick Preparation
1. **Combine Dry Ingredients**: In a large bowl, mix flour, instant yeast, sugar, and salt.
2. **Incorporate Wet Ingredients**: Add warm water and olive oil, stirring well.
3. **Form the Dough**: Gradually integrate the remaining flour until the dough becomes a non-sticky ball. More flour may be needed.
4. **Initial Rise**: Move the dough to an oiled bowl, cover, and allow it to rise for 20 minutes.
5. **Shape**: Cut the dough into 10 equal portions and roll each segment into a log about 7 inches long. Arrange on a parchment-lined baking sheet and cover with a kitchen towel.
6. **Preheat Oven**: While the dough rises for an additional 15 minutes, preheat the oven to 400°F.
7. **Prepare Butter**: Melt the butter and mix in garlic. Brush over the breadsticks.
8. **Bake**: Bake for 12-14 minutes or until golden brown.
9. **Finish**: Brush with the remaining melted butter and top with parmesan cheese. Serve warm.
## Optimal Ways to Store Breadsticks
– **Room Temperature**: Keep breadsticks in a zippered bag at room temperature for up to 5 days.
– **Freezing**: Place on a baking sheet to freeze before moving to a zippered bag for up to 3 months. Thaw at room temperature prior to serving.
– **Crouton Option**: Excess cheesy breadsticks can be diced into bite-sized pieces and baked at 350°F until dried for homemade croutons.
## Tasty Dips for Breadsticks
These breadsticks are fantastic for dipping in marinara sauce, garlic butter, or your favorite salad dressings.
Did you try this breadsticks recipe? Leave a comment and rate it below! Relish the warm, buttery delight of homemade breadsticks at your next meal.
Read More