
How to Create Ideal Scrambled Eggs
**Fluffy Scrambled Eggs: Your Ultimate Breakfast Guide**
Scrambled eggs are an essential breakfast item, and perfecting the technique can enhance your morning experience. This guide will assist you in crafting fluffy scrambled eggs using either a stainless steel or cast iron skillet, eliminating the need for a nonstick pan.
### Scrambled Egg Tips
1. **Getting Rid of Eggshells**: Should an eggshell fragment fall into your egg mix, use the edge of a broken shell to remove it or moisten your fingers with water to extract it.
2. **Incorporate Dairy**: Blend in a dash of milk, half-and-half, or heavy cream for creamier results. This addition softens the eggs, lessens the eggy flavor, and imparts a lovely pale yellow hue.
3. **Salt Early**: Sprinkle a bit of salt to soften the eggs. Allow the mixture to sit as you preheat the skillet for optimal texture.
4. **Whisk Well**: Employ a small whisk to fully combine the eggs until they appear uniformly yellow, avoiding stringy white parts.
5. **Let It Rest**: Permit the egg mixture to come to room temperature to minimize sticking.
6. **Preheat the Skillet**: Check your skillet’s temperature by flicking water droplets onto it. They should dance and evaporate quickly. If they sizzle loudly, the pan is insufficiently hot. If the butter immediately turns brown, the heat is excessive.
### Seasoning and Cooking
– **Chives and More**: Mix in chopped chives for a delicate onion flavor. Season scrambled eggs after cooking to prevent sticking and discoloration.
– **Cheese**: Grated cheddar, Parmesan, or Monterey Jack are great options. Crumbled goat cheese or feta can add extra creaminess to the eggs.
### Recommended Equipment
– **Skillet**: A 12-inch stainless steel or cast iron skillet is best.
– **Whisk**: A small whisk is ideal for egg mixing.
– **Spatula**: A silicone spatula is useful for stirring and serving the eggs.
– **Bamboo Scraper**: Handy for cleaning the skillet while warm.
### Recipe: Fluffy Scrambled Eggs
**Ingredients:**
– Eggs
– Half-and-half
– Salt
– Butter
– Chives (optional)
– Cheese (optional)
**Instructions:**
1. Gather a spatula and plate. Whisk together eggs, half-and-half, and salt until fully uniform in color.
2. Preheat a skillet over medium heat. Test by adding water droplets.
3. Include butter and chives. Once the butter bubbles, pour in the eggs.
4. Allow the eggs to rest until a white edge appears, then stir.
5. Continue the resting and stirring process until the eggs are glossy but mostly set.
6. Plate the eggs, sprinkle with cheese, and serve warm.
**Dairy-Free Alternative**: Substitute non-dairy milk and avocado or olive oil for the butter.
This method requires some practice, but with determination, you’ll produce perfect scrambled eggs consistently. Have fun experimenting with various cheeses and seasonings to match your preferences.
Read More
Revitalizing Watermelon Salsa Recipe
This vibrant watermelon salsa combines sweet melon with lime, jalapeño, and cilantro for a zesty dip! Perfect with chips or grilled meats, this simple recipe serves as a delightful summer appetizer that’s also vegan and gluten-free.
One summer, Alex’s mom introduced watermelon salsa at a family barbecue, and initially, I was a bit doubtful—but one taste transformed my perspective! The blend of sweet, succulent watermelon with tangy lime and fiery jalapeño was enchanting. She encouraged Alex and me to create our variation of the recipe: and I’m so grateful she did.
Now this vibrant watermelon salsa is a go-to summer appetizer at my place! It’s simple to prepare, requires no cooking, and always vanishes quickly at gatherings. It pairs wonderfully with tortilla chips, and it’s also excellent alongside grilled fish, chicken, or tacos. Just be sure to serve it with a slotted spoon, as it’s extremely juicy!
Key components in watermelon salsa
Salsa simply translates to “sauce” in Spanish, encompassing a broad range of sauces within Mexican cuisine that can be prepared with or without tomatoes. While the most common salsa features red tomatoes, there are numerous popular variations such as corn salsa, peach salsa, and mango salsa.
This watermelon salsa follows the same principle as a fresh tomato salsa but incorporates cubed watermelon instead! I prefer cutting the cubes fairly small for a uniform texture, but you can leave them in larger chunks for a chunkier appearance. The ingredients you’ll include are:
– Fresh ripe watermelon: The main attraction
– Tomato: Adds conventional salsa taste (optional but suggested)
– Red onion: I favor this over white onion due to its milder flavor
– Jalapeño pepper: Begin with half and modify according to your spice level
– Fresh cilantro: Key for that genuine Mexican taste
– Fresh lime juice: Always use fresh—bottled is not an option
– Granulated sugar: Balances acidity and boosts the fruit’s sweetness
– Kosher salt: Unites all the flavors
How to chop a watermelon into cubes
Often, we used to feel intimidated by watermelon recipes due to the notoriously tricky nature of cutting this melon. However, here’s a method for slicing a watermelon that makes it quick, easy, and hassle-free:
1. Halve the watermelon. Use a large Chef’s knife to cut the watermelon in half through the center (not lengthwise).
2. Slice into sections. Flip the half onto its flat side, then cut into sections.
3. Remove the rinds with a paring knife. Switch to a small paring knife for better control. Cut away the rind from each section.
4. Create a grid for cubes. Return to your knife and cut a grid pattern to cube the watermelon.
Pro tips for watermelon salsa
Watermelon salsa is similar to any fresh salsa: the only time-consuming aspect is chopping all the fruits and vegetables! However, here are a few things to consider when adjusting the flavors:
– Tailor the heat level according to preference. This watermelon salsa recipe is on the milder side since we’ve advised removing the jalapeño seeds. But if you enjoy spicy salsas, incorporate some seeds, or even use the whole pepper.
– Add sugar or salt to suit your taste. Depending on your melon’s ripeness, you might want to incorporate more sugar into the salsa. It also might need an additional pinch or two of salt: be sure to taste and adjust as needed!
Storage guidelines
This watermelon salsa is at its best on the day it’s prepared. However, it can be stored in the fridge for up to 2 days. It will release liquid during refrigeration, so you may need to drain it or use a slotted spoon for serving. Personally, I prefer to enjoy it the day it’s made, with extra tortilla chips!
Serving suggestions
The best way to enjoy watermelon salsa? Pair it with a large bag of tortilla chips and you’re set! It also pairs wonderfully with plantain chips or your favorite dipping option. But don’t limit it to chips: it’s a zesty sauce for grilled fish and beyond. Here are some serving ideas:
Dietary considerations
This watermelon salsa recipe is vegetarian, vegan, plant-based, dairy-free, and gluten-free.
Watermelon Salsa
This vibrant watermelon salsa combines sweet melon with lime, jalapeño, and cilantro for a zesty dip! Perfect with chips or grilled meats, this simple recipe serves as a delightful summer appetizer that’s also vegan and gluten-free.
Author: Sonja Overhiser
Prep Time: 20 minutes
Cook Time: 0 minutes
Total Time: 20 minutes
Yield: 8
Category: Appetizer
Method: No Cook
Cuisine: Mexican Inspired
Diet: Vegan
Ingredients
– 2 cups finely diced fresh ripe watermelon
– ½ cup diced tomato (
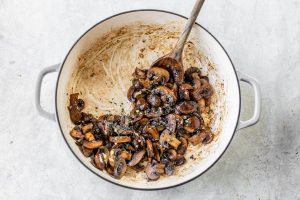
Sautéed Spinach and Mushrooms in Garlic Butter
This simple sautéed spinach and mushrooms dish combines cremini mushrooms with spinach, garlic, and lemon to create a vibrant, nutritious side! Ready in just 10 minutes, it’s ideal for hectic weeknights or as toppings for grilled cheese, lasagna, or pizza.
Over the years, I’ve tried numerous variations of sautéed veggies, and here’s an exciting new combo I discovered: sautéed spinach and mushrooms! It might not sound groundbreaking, but I assure you that my family adores this straightforward side dish every time we prepare it!
I adore how a few secret flavors elevate these two basic ingredients into something both cozy and refreshing. The earthy flavor of cremini mushrooms combined with zesty lemon juice and a touch of Parmesan cheese is truly delectable! While I typically serve this as an effortless side, it also makes an excellent topping for pizza or a gourmet grilled cheese!
5-Star review
“This is so delicious and vibrant! We enjoyed it as a side with chicken. I absolutely love the combination of spinach and mushrooms, and this was fantastic with the lemon and parm. Made for a lovely side that wasn’t heavy. I plan to have some for lunch alongside a grilled cheese!” -Tanvee
Ingredient spotlight: baby bella mushrooms
For this dish, I prefer baby bella mushrooms, also known as cremini mushrooms. They offer significantly more flavor than plain white button mushrooms. They come from the same variety as portobello mushrooms; they are simply harvested earlier.
Baby bellas maintain their shape during sautéing, and their hearty texture makes this side dish very fulfilling. If baby bellas aren’t available, standard white button mushrooms are a suitable alternative. You can also explore other mushroom types like shiitake.
Pro tips for sautéed spinach and mushrooms
From numerous batches of sautéed vegetables, I’ve discovered some tips that create a big impact:
– Avoid crowding the pan. Use your largest skillet. If doubling the recipe, opt for a larger skillet or cook in batches. Crowded mushrooms steam instead of sauté, resulting in a loss of browning.
– Add garlic at the right time. I wait until the mushrooms are almost finished before incorporating minced garlic, preventing it from becoming overcooked while enhancing its flavor.
– Finish with brightness. Fresh lemon juice and a final sprinkle of salt are crucial for balancing the flavors. Be sure to purchase a fresh lemon: bottled juice lacks the same flavor quality.
A few serving ideas
This sautéed spinach and mushrooms recipe works wonderfully as a healthy side, but is also highly versatile. Here are my preferred ways to enjoy it:
Storage and reheating advice
This recipe stays fresh in the refrigerator for up to 4 days. Keep it in an airtight container and reheat gently in a skillet over medium heat. (Freezing this dish is not recommended, as it tends to become quite watery upon thawing.)
Dietary notes
This sautéed spinach and mushrooms recipe is vegetarian, vegan, plant-based, dairy-free, and gluten-free. It’s also suitable for a Mediterranean diet.
Sautéed Spinach and Mushrooms
This simple sautéed spinach and mushrooms dish combines cremini mushrooms with spinach, garlic, and lemon to create a vibrant, nutritious side! Ready in just 10 minutes, it’s ideal for hectic weeknights or as toppings for grilled cheese, lasagna, or pizza.
Ingredients:
– 16 ounces baby bella (also known as cremini) mushrooms*
– 2 tablespoons olive oil
– ½ teaspoon kosher salt
– Fresh ground black pepper, to taste
– 2 garlic cloves, minced
– 5 ounces baby spinach leaves
– 2 tablespoons fresh lemon juice
– 1 sprinkle grated Parmesan cheese
Instructions:
1. Clean the mushrooms, then slice them.
2. In a large sauté pan or skillet, warm the olive oil over medium-high heat. Add the mushrooms and cook for 4 minutes, stirring frequently. Sprinkle in the kosher salt and a few grinds of black pepper and continue cooking for 2 minutes, stirring occasionally, until most of the liquid has evaporated and the mushrooms are tender.
3. Add the garlic and cook for 1 additional minute, then stir in the spinach and cook for 2 minutes until wilted.
4. Turn off the heat, add lemon juice and 2 pinches of salt, and mix. Taste and adjust salt or fresh ground pepper if needed. If desired, top with a sprinkle of Parmesan cheese. This is delightful in a grilled cheese, as a filling for lasagna, or as a pizza topping!

Weekly Meal Schedule for August 18, 2025
### About the Author: Holly Nilsson
Holly Nilsson is the innovative mind behind Spend With Pennies, a site committed to offering simple and comforting recipes that align with the realities of daily life. With a profound love for nostalgic tastes and straightforward cooking methods, Holly enables busy home chefs to create delightful meals that are both enjoyable and feasible.
Her cooking philosophy is grounded in the conviction that everyone should be able to savor hearty, home-cooked dishes, irrespective of their cooking skills or time limitations. Holly’s recipes are crafted to be uncomplicated, making them suitable for cooks at every level. This principle is captured in her book, “Everyday Comfort,” which acts as a resource to motivate readers to prepare nourishing meals that evoke a sense of warmth and nostalgia.
Beyond her endeavors with Spend With Pennies, Holly actively connects with her followers through multiple social media platforms, sharing her culinary adventures and engaging with fellow food lovers.
For more valuable insights and tasty recipes, you can follow Holly on her social media channels:
– [Pinterest](https://www.pinterest.com/spendpennies/)
– [Facebook](https://www.facebook.com/ispendwithpennies/)
– [Twitter](http://spendpennies)
– [Instagram](https://www.instagram.com/spendpennies/)
Holly Nilsson continues to motivate home cooks everywhere, demonstrating that cooking can be both effortless and fulfilling.
Read More
Highly Rated Nugget Ice Machines Offered on Amazon and Other Stores
**Have You Ever Envisioned Having a Nugget Ice Machine at Home? Here’s What You Should Know!**
If you know, you know nugget ice. It’s the fantastic ice. The cute, chewable ice that is nearly a snack by itself. I ADORE nugget ice with fervor, and last year my dream was realized when Mike presented me with a nugget ice machine for Christmas.
A nugget ice machine has been on my mind for ages. I conveniently overlooked home nugget ice makers, and I must say, my Christmas present was both an unexpected delight and a complete success! Christmas day was filled with nugget ice, and ever since, we have joyfully utilized our nugget ice maker every day.
### What is Nugget Ice?
If you’re not familiar, you might be asking, what exactly is nugget ice? Yes, it’s merely ice, but truly, it’s exceptional ice! Nugget ice contains air pockets, creating layers and layers. Think of nugget ice as the pastry of the ice universe. The layers form pockets of air, rendering nugget ice light and fluffy, not at all hard or dense. Nugget ice is both fluffy and chewy.
### Why is Nugget Ice Unique?
Nugget ice is not just regular ice. It’s shaped, unsurprisingly, like a tiny nugget. Because it’s produced in a machine that incorporates air pockets, the nuggets are softer and more chewable. The air pockets allow liquid to seep in, infusing the ice with flavors from whatever drink you’re enjoying, turning it into delightful chewable nuggies. It cools beverages quickly while melting slowly. The special aspect is the texture: crunchy on the outside and chewy within.
### How is Nugget Ice Created?
Nugget ice is produced through a unique method of flash freezing water while pushing it through small openings. Most nugget ice makers operate like this:
1. The water moves through an extruder with tiny holes.
2. As the water is forced through under pressure, small droplets form.
3. The droplets flash freeze into nuggets, with air pockets naturally occurring during the freezing.
4. Boom, you have nugget ice!
### Homemade Nugget Ice
It once seemed that nugget ice at home was just a fantasy, but now, numerous countertop nugget ice machines are available. The only means to create nugget ice at home is with a nugget ice machine.
### Top Nugget Ice Machines
We are absolutely fond of our Easyera nugget ice maker. It produces ice swiftly, in about 20 minutes, it’s extremely easy to clean, and it’s quite compact. Admittedly, it’s a bit noisy, but the nature of nugget ice means that the extrusion and freezing process will invariably be somewhat loud. We’ve never encountered any problems with our nugget ice machine. It has a self-cleaning feature and generates more than enough ice for both of us. I appreciate that it’s smaller than many other nugget ice machines available because it permanently sits on our countertop.
The GE Profile Opal 2.0 Ultra nugget ice maker has been gaining attention recently, but it’s MASSIVE and reportedly not easy to clean. Additionally, at $629, it’s double what we spent on our nugget ice maker. We haven’t sampled the ice from the Opal, so I can’t comment on its quality, but for the countertop size and cost, I definitely believe the Easyera is the better option. Plus, call me old-fashioned, but I’m not really sure why I would need a nugget ice maker with integrated wifi and voice control.
I spent some time browsing Amazon because let’s face it, there’s nothing I enjoy more than online shopping, and if I had to choose another nugget ice machine, I think I would select the Vevor. It’s said to be super quiet, perfect for those who are sensitive to humming or machine sounds, and it keeps the nugget ice frozen for a significant duration. It does appear a bit large, but I appreciate the stainless steel exterior and it has multiple positive verified purchase reviews.
### Where Can You Find Nugget Ice?
Probably the most famous spot for nugget ice is Sonic Drive-In. People flock to Sonic primarily for their ice: both in drinks and to purchase bags of nugget ice. Numerous other places offer nugget ice as well, provided they have nugget ice machines. I’ve visited gas stations with nugget ice as well as independent soda shops. HTeaO in Texas has nugget ice (try a blend of sweet coconut and sweet almond green, it’s divine!).
### Nugget Ice vs Crushed Ice
There’s no contest; it’s nugget ice every single time. Crushed ice is regular ice that has been crushed into small, uneven pieces. It shares the same consistency and hardness.
Read More
Pasta with Sauce of Cherry Tomatoes
Alex & Sonja: The Culinary Team Behind A Couple Cooks
Introducing Alex and Sonja Overhiser, the energetic pair who have been motivating home chefs globally with their enthusiasm for straightforward, seasonal cuisine. As the creators of two highly praised cookbooks and the innovative brains behind the well-known website A Couple Cooks, Alex and Sonja have committed themselves to spreading the delight of cooking to others.
The Adventure Starts
In 2010, Alex and Sonja began a culinary adventure that would alter their lives eternally. With a mutual passion for food and a goal to make cooking easy for everyone, they established A Couple Cooks. Their aim was clear: to offer simple, follow-along recipes that highlight the tastes of each season, motivating people to cook more at home.
A Family Endeavor
As busy parents, Alex and Sonja recognize the difficulties of juggling family life with their passion for cooking. Their recipes are crafted to be both tasty and practical, accommodating the needs of families who wish to enjoy nutritious meals together. Each recipe is carefully tested by the couple and their children, ensuring that all dishes are family-approved.
A Rich Source of Information
Over the years, A Couple Cooks has evolved into a thorough resource for home chefs. The website features thousands of unique recipes, each paired with stunning photography and comprehensive instructions. Alongside recipes, Alex and Sonja share useful cooking advice and meal planning concepts, aiding their audience in gaining confidence in the kitchen.
Cookbooks and More
Besides their online activities, Alex and Sonja have written two cookbooks that have been well-received by both reviewers and home cooks alike. These books embody their philosophy of simple, seasonal cooking, providing readers a tangible means to bring the couple’s culinary knowledge into their own kitchens.
Fostering a Community
Through their efforts, Alex and Sonja have nurtured a lively community of food lovers who share their passion for cooking. Their approachable demeanor and sincere enthusiasm for food have made them cherished figures in the culinary realm, motivating countless individuals to discover the pleasures of cooking.
Whether you’re an experienced cook or just beginning, Alex and Sonja Overhiser’s A Couple Cooks is a goldmine of inspiration, supplying everything you need to craft delicious, unforgettable meals for you and your family.
Read More
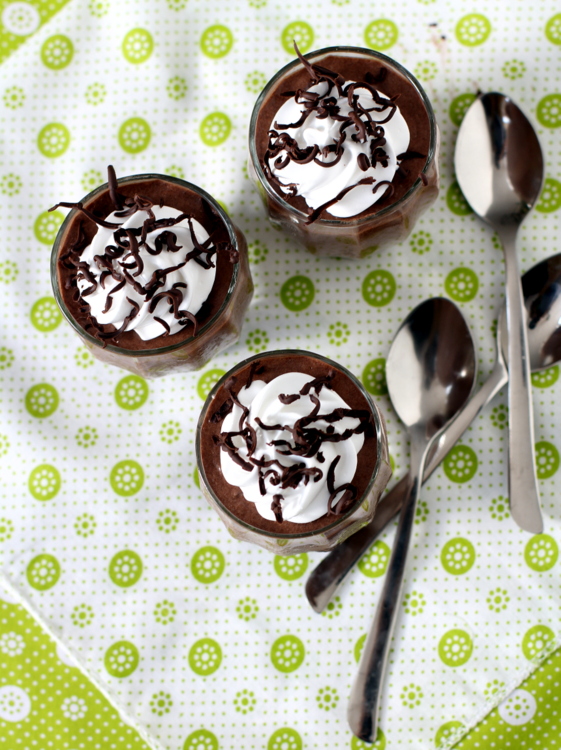
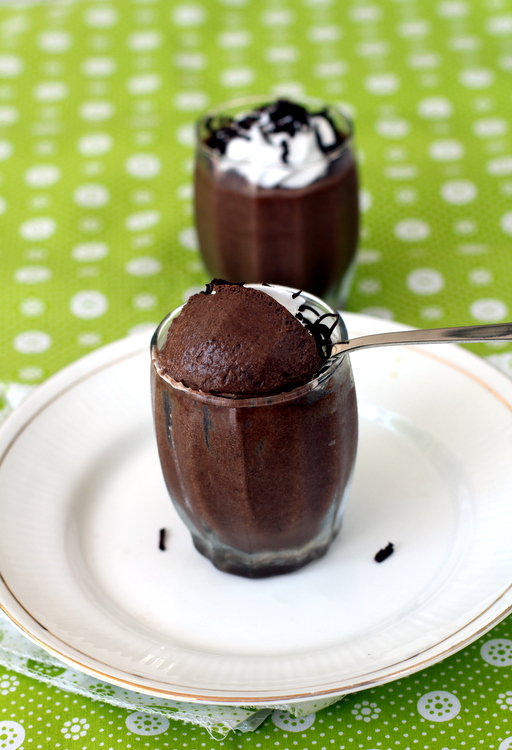
A Manual for Preparing Chocolate Mousse
# Chocolate Mousse: Simple Dessert Recipes for Children
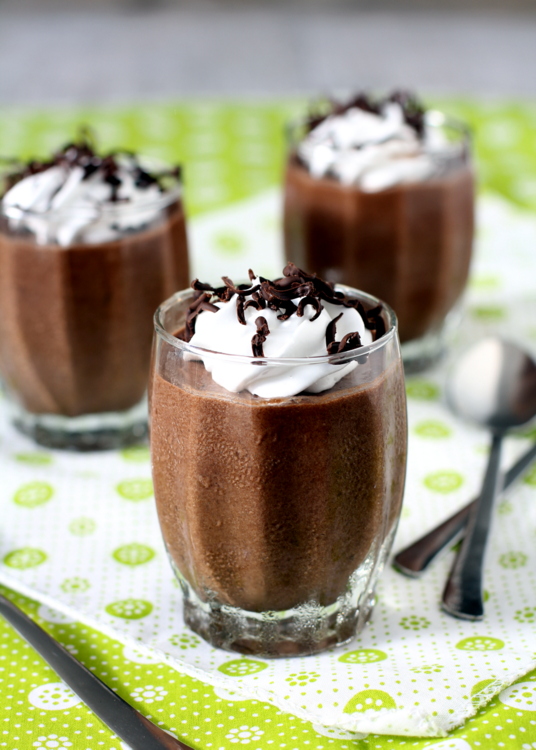
Savoring rich confections is a pleasurable experience, and chocolate frequently ranks high for numerous dessert enthusiasts. Chocolate mousse, featuring its velvety smooth consistency and intense flavor, serves as an ideal treat for special events or merely to appease a craving for sweetness. This dessert not only appeals to adults but is also a straightforward recipe that children will love to create.
## Why Choose Chocolate Mousse?
Chocolate mousse stands as a timeless dessert that merges the profound taste of chocolate with a light, fluffy texture. It’s a flexible dish that can be presented in various environments, from informal family dinners to sophisticated parties. The highlight? It’s surprisingly easy to make, rendering it an exceptional option for kids wanting to assist in the kitchen.
## Ingredients
To create a scrumptious chocolate mousse, you will need:
– High-quality dark chocolate
– Eggs
– Sugar
– Heavy cream
– Vanilla extract (optional)
## Step-by-Step Instructions
1. **Melt the Chocolate**: Begin by melting the dark chocolate in a heatproof bowl set over simmering water or in the microwave. Stir until smooth and allow it to cool slightly.
2. **Whip the Cream**: In a separate bowl, beat the heavy cream until soft peaks form. Take care not to over-whip, as it should remain light and airy.
3. **Prepare the Egg Mixture**: In another bowl, whisk together the eggs and sugar until they become pale and fluffy. A hand mixer can be used for convenience in this step.
4. **Combine Ingredients**: Carefully fold the melted chocolate into the egg mixture until thoroughly mixed. Next, gradually fold in the whipped cream, ensuring to preserve the light texture.
5. **Chill**: Spoon the mousse into serving containers and place them in the refrigerator for at least an hour to set.
6. **Serve**: Add a dollop of whipped cream on top and sprinkle with grated chocolate for an added touch of sophistication.
## Tips for Success
– **Quality Ingredients**: Utilizing high-quality dark chocolate greatly enhances the flavor.
– **Temperature is Key**: Ensure that the melted chocolate is not overly hot when combined with the eggs to prevent cooking them.
– **Encourage Kids to Help**: This recipe presents a fantastic opportunity for children to acquire fundamental cooking skills, from measuring components to folding mixtures.
## Conclusion
Chocolate mousse is a delightful treat that is simple to create and guaranteed to impress. With its intense flavor and airy texture, it is a fantastic addition to any dessert collection. Whether for a special celebration or a fun cooking activity with kids, this chocolate mousse recipe is essential to try. Relish the process and the delectable outcomes!
Read More
Coriander Poha: An Authentic Indian Recipe Featuring Kothimeera
### Kids Tiffin Recipes – Kothimeera Atukulu/Fresh Coriander Poha
Poha, known as beaten rice or flattened rice, is a fundamental component in numerous Indian kitchens. It originates from dehusked rice that is compressed into light, dry flakes, which can vary in thickness. Commonly identified as poha, aval, avalakki, and atukulu, this adaptable ingredient lends itself to an array of dishes, both savory and sweet. For busy mothers looking for quick and healthy tiffin recipes for their children, poha is a preferred choice.
One appealing recipe that shines is Kothimeera Atukulu, or Fresh Coriander Poha. This dish is not only easy to make but also infused with flavor, thanks to the addition of fresh coconut and coriander leaves. The fragrant spices enhance the overall taste, making it a delightful meal for both children and adults.
#### Ingredients:
– 1 cup poha (flattened rice)
– 1/2 cup fresh coriander leaves, finely chopped
– 1/4 cup grated fresh coconut
– 1-2 green chilies, finely chopped (adjust according to taste)
– 1/2 teaspoon mustard seeds
– 1/2 teaspoon cumin seeds
– 1/4 teaspoon turmeric powder
– Salt to taste
– 1 tablespoon oil
– Lemon juice (optional)
– Peanuts (optional, for crunch)
#### Instructions:
1. **Preparation of Poha**: Quickly rinse the poha in water and drain it. Let it sit for about 10-15 minutes to become tender.
2. **Tempering**: In a pan, warm oil over medium heat. Introduce mustard seeds and cumin seeds. When they begin to splutter, add the chopped green chilies and sauté for a minute.
3. **Adding Spices**: Incorporate the turmeric powder and mix thoroughly.
4. **Mixing Ingredients**: Place the softened poha in the pan along with salt to taste. Gently combine all the components without breaking the poha flakes.
5. **Finishing Touches**: Add the grated coconut and chopped coriander leaves. Stir well and cook for another 2-3 minutes. If desired, add a squeeze of lemon juice for extra tanginess.
6. **Serving**: Serve warm, optionally topped with peanuts for added crunch.
#### Benefits:
Kothimeera Atukulu is not only quick to assemble but also nutritious. It is light on the stomach, making it an excellent breakfast or snack choice for children. The dish is abundant in vitamins and minerals from fresh coriander and coconut, while the poha provides carbohydrates for energy.
This recipe presents a wonderful alternative to traditional upma and can be enjoyed by the entire family. It is also suitable for fasting days during festivals, rendering it a versatile addition to your culinary repertoire.
In conclusion, Kothimeera Atukulu is a tasty and healthy tiffin recipe that is bound to satisfy kids and adults alike. Its straightforward preparation and delightful flavor make it an ideal selection for busy mornings or unexpected visitors. Savor this delightful dish and see it become a favorite in your home!
Read More
Yellow Moong Dal Ladoo: A Healthy Indian Dessert Delight
### Moong Dal Ladoo: A Tasty Indian Dessert for Diwali
Diwali, the festival of lights, brings joy, festivity, and the pleasure of scrumptious sweets. Among the many traditional Indian desserts made during this celebration, Moong Dal Ladoo is notable for its ease of preparation, health benefits, and delightful flavor. This protein-rich delicacy is not only simple to create but also cherished in different parts of India.
#### Ingredients
To make Moong Dal Ladoo, you will require the following ingredients:
– 1 cup yellow moong dal (split yellow lentils) or whole green gram
– 1 cup jaggery (or sugar, to preference)
– 1/4 cup ghee (clarified butter)
– 1/2 teaspoon cardamom powder
– Chopped nuts (cashews, almonds) for decoration (optional)
#### Preparation Steps
1. **Roasting the Dal**: Start by dry roasting the moong dal in a skillet over medium heat until it turns a golden brown and releases a nutty fragrance. This step is vital as it boosts the ladoos’ flavor. Let the roasted dal cool.
2. **Powdering the Dal**: After cooling, grind the roasted moong dal into a fine powder using a blender or food processor, ensuring the powder is smooth and lump-free.
3. **Mixing Ingredients**: In a pan, warm the ghee and add the powdered moong dal. Stir continuously for several minutes until thoroughly combined and aromatic. Then, include jaggery (or sugar) and cardamom powder, mixing until the jaggery melts and merges well with the dal mix.
4. **Shaping the Ladoos**: As the mixture cools slightly, grease your hands with ghee and take small portions of the mixture to form round ladoos. If you wish, roll them in chopped nuts for extra crunch and flavor.
#### Storage
Moong Dal Ladoo can be kept in an airtight container at room temperature for up to a week. For extended preservation, refrigerate them, and they will remain good for a couple of weeks.
#### Nutritional Benefits
Moong Dal Ladoo is not only a delightful treat but also rich in nutrients. Moong dal provides a good source of protein, fiber, and essential vitamins, making these ladoos a healthier option than many other sweets. The incorporation of jaggery contributes natural sweetness along with iron and minerals, boosting the overall health advantages.
#### Conclusion
This Diwali, wow your family and friends with homemade Moong Dal Ladoo. Its rich flavor, paired with the wholesome benefits of lentils, makes it an excellent inclusion in your festive spread. With just a few straightforward steps, you can whip up a delightful sweet that captures the essence of celebration and unity. Savor the festivities with this traditional delicacy that is bound to delight!
Read More
Chiroti: An Authentic Indian Sweet Pastry
### Chiroti (Chirote) ~ Indian Dessert Recipes for Diwali
Chiroti, frequently referred to as Chirote, is a cherished classic sweet from Karnataka, India, typically made for special events and religious celebrations. This exquisite confection is also a key element in traditional Maharashtrian fare. Primarily crafted from all-purpose flour, Chiroti is a fried crisp pastry known for its tender concentric layers. It is conventionally relished either dusted with cardamom-scented powdered sugar or immersed in a sweet cardamom syrup.
An alternative version of Chiroti, termed Pathir Pheni, employs “chiroti rava,” a mixture of all-purpose flour and fine semolina (sooji). This variant is often paired with badami haalu, a sweetened almond milk infused with saffron and cardamom, which enhances its decadent flavor. Chiroti is an essential feature at Kannadiga weddings, with many recalling delightful memories of this treat during festivities.
#### How to Prepare Chiroti – Steps to Follow
Creating Chiroti might appear intimidating initially, but it is quite a simple procedure. The preparation includes the following steps:
1. **Dough Preparation**: Start by making a soft dough using all-purpose flour. Allow it to rest for a bit.
2. **Rice Flour Paste Creation**: Combine rice flour with water to form a smooth paste.
3. **Roll the Rotis**: Roll out three to four thin rotis from the dough.
4. **Paste Application**: Evenly distribute the rice flour paste over the rolled rotis.
5. **Stack and Roll**: Layer the smeared rotis on top of each other and roll them into a cylindrical shape.
6. **Log Slicing**: Cut the rolled log into 1/2-inch thick slices.
7. **Re-Rolling**: Take each slice and roll it out thinly again.
8. **Deep Frying**: Heat oil in a pan and deep fry the rolled pieces until they achieve a golden brown color.
9. **Serving**: After frying, Chiroti can be topped with cardamom-flavored powdered sugar or served alongside sugar syrup.
Chiroti is a delightful crunchy treat that is bound to impress your family and friends. It stands out as one of the finest Indian sweets to prepare for Diwali festivities, making it an excellent addition to your celebratory menu. Enjoy the journey of crafting this traditional sweet and share it with loved ones during the festive occasion of Diwali.
Read More