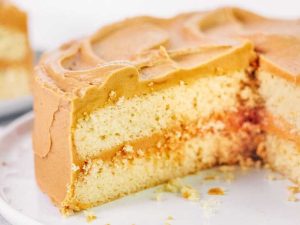
Dolly Parton Quietly Launched a New $3 Boxed Cake Mix That Screams Fall

âIâve gotta try that!â
READ MORE…
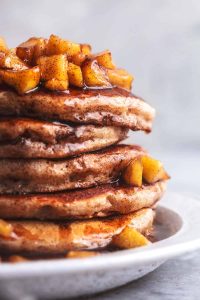
How to Create Tasty Apple Pancakes
Let’s rejoice in the cooler temperatures with a pile of cozy apple pancakes! These pancakes infused with apple flavor are an ideal breakfast indulgence for the autumn season. They represent an easy weekend breakfast endeavor that stores well for swift mornings during the week (they freeze and defrost nicely, too).
This recipe for apple pancakes is crafted from scratch with freshly grated apples, complemented by a hint of ground cinnamon. Tangy apples such as Honeycrisp or Granny Smith deliver the most pronounced flavor. You’ll notice I utilized Honeycrisp apples for this batch—they’re a favorite of our family, and they produce amazing pancakes.
You may already possess all the ingredients necessary to whip up these pancakes in your pantry. Let’s get cooking.
Apple Pancake Tips
The comprehensive recipe is listed below. Here are several tips to ensure pancake perfection.
Your flour selections can include white whole wheat flour, standard whole wheat flour, or all-purpose flour. I often opt for whole-grain flours whenever possible, but all-purpose flour provides the most neutral taste, allowing the apple flavor to stand out. Alternatively, you can use white whole wheat flour (now termed “golden wheat” by King Arthur Flour) for the health benefits of whole wheat minus the nutty taste.
Gently grease your griddle or skillet with oil. I prefer to use avocado oil for cooking my pancakes due to its high smoke point and neutral taste (butter tends to burn rapidly). Whatever oil you choose, make sure to blot away the excess with a paper towel to prevent smoking.
Start by cooking a single pancake. Once you’ve mastered one pancake and confirmed that your skillet is sufficiently heated, you can proceed to cook more simultaneously. Ensure to leave a couple of inches of space between pancakes for seamless flipping.
The pancakes will be ready for flipping when about 1/2-inch of the edges has changed from shiny to matte. The bottom should be beautifully golden at this stage. If you’re unsure, it’s wiser to wait a bit longer rather than risk a doughy disaster.
As you continue, reduce the heat. The skillet will become hotter the longer it’s on the burner. If your pancakes are burning on the outside before they’re fully cooked inside, your skillet’s temperature is too high. Lower the heat slightly after cooking a batch of a few pancakes.
Pancake Serving Suggestions
These apple pancakes are delightful with a drizzle of maple syrup, but even more enjoyable with additional toppings. Here’s a list of toppings or sides to think about:
More Apple Recipes to Savor
Here are a few more timeless apple recipes to prepare this fall:
Please share how your pancakes turn out in the comments! I genuinely enjoy hearing from you. You can find more pancake recipes right here.
Apple Pancakes
This recipe for apple pancakes contains freshly grated apple and ground cinnamon. These pancakes are nourishing, flavorful, and simple to create. The recipe yields 8 to 9 pancakes.
Instructions
1. In a medium bowl, whisk together the flour, baking powder, baking soda, cinnamon, and salt.
2. In a smaller bowl, mix the buttermilk, egg, melted butter, maple syrup, and vanilla. Whisk until completely combined.
3. Pour the liquid mixture into the flour mixture. Incorporate the grated apple. Stir just until blended (a few small lumps of flour are acceptable). Allow the batter to rest for 5 minutes for fluffy pancakes.
4. Meanwhile, if using an electric griddle, preheat to 350 degrees Fahrenheit. Otherwise, heat a large stainless steel or nonstick skillet over medium-low heat. You’re set to start making pancakes once a drop of water sizzles upon contact with the heated surface. If needed, lightly oil the cooking area and wipe away the excess with a paper towel (nonstick cookware typically won’t need oil).
5. Pour a scant ¼ cup of batter onto the heated skillet, maintaining a couple of inches of space around each pancake for spreading. Cook until small bubbles appear on the surface, about 2 to 3 minutes (it’s time to flip when approximately ½-inch of the edges appears matte rather than shiny). Turn the pancakes, then cook until lightly golden on both sides, about 1 to 2 minutes more.
6. Continue the process with the remaining batter, adding more oil and adjusting the heat as necessary (I typically end up on low heat after a while—if the pancakes are browning too quickly on the outside before cooking through, it means it’s too hot). Serve the pancakes immediately with your chosen toppings, or keep them warm in a 200 degrees Fahrenheit oven.
7. Leftover pancakes can be stored in the refrigerator for up to 4 days, or frozen* for up to 2 months. To reheat, stack the leftover pancakes and wrap them in a paper towel before gently warming in the microwave.
Notes
Recipe adapted from my Whole Wheat Pancakes.
*To make your own buttermilk: Combine 1 cup milk of
Read More


The Perfect Frozen Dinner Find This Famous Italian Chef Always Has in His Freezer

It makes dinner 100x easier.
READ MORE…
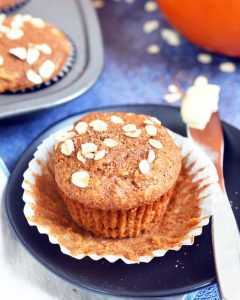
Pumpkin-Flavored Oatmeal Muffins
These nutritious pumpkin oatmeal muffins are blended for a quick snack or breakfast! Featuring pumpkin puree, Greek yogurt, and hearty oats, they are naturally sweetened and filled with whole grains and protein.
Here’s an enjoyable new favorite recipe that originated from a simple request by family members: pumpkin oatmeal muffins! Recently, my aunt Cheryl inquired if I had a pumpkin oatmeal muffin recipe available on this site. I didn’t, so we collaborated to develop this recipe, merging aspects from my well-loved healthy banana muffins and healthy oatmeal muffins.
All ingredients are tossed right into the blender, and there’s no all-purpose flour involved: making them naturally gluten-free as well. This is the only muffin type I consume nowadays (the same goes for Aunt Cheryl). Everyone in my family enjoys these: in fact, we have to restrict each person to just one per day to avoid them disappearing too quickly!
Reasons to adore these muffins
These pumpkin oatmeal muffins are naturally sweetened with maple syrup, rich in protein from Greek yogurt, and brimming with fiber from old-fashioned oats. The fantastic part is that no all-purpose flour is used: the blender turns the oats into oat flour.
Using the blender method means they can be prepared in minutes without the need for mixing bowls, and the texture turns out moist and soft. They are satisfying enough for breakfast when spread with almond or peanut butter, and ideal for afternoon snacking. I add one to my daughter’s lunch box every day!
Highlighted ingredients
This recipe maintains simplicity using wholesome ingredients that work in harmony. Here’s what makes each item noteworthy:
– Rolled oats: Old-fashioned oats lend these muffins their robust texture and sustenance. Quick oats can work in a pinch too.
– Pumpkin puree: Opt for canned pumpkin puree (avoid pumpkin pie filling). It contributes moisture and a touch of orange hue.
– Greek yogurt: This is the key to moist muffins! Greek yogurt provides protein while maintaining tenderness. Choose plain, full-fat Greek yogurt for optimal results.
– Maple syrup: Pure maple syrup offers natural sweetness. I always use containers labeled “Grade A: Dark color and robust flavor,” which delivers the richest taste.
– Pumpkin pie spice: This blend often contains cinnamon, nutmeg, ginger, and allspice. You may use store-bought or create your own pumpkin pie spice.
– Neutral oil: Sunflower, vegetable, or grapeseed oil keeps the muffins moist without clashing with other flavors. I have begun using “mild flavor” olive oil for baking, as it is slightly healthier.
Some yogurt alternatives
I tried this recipe without yogurt, and the batter turned out too thick. Adding the yogurt lightened the texture, making it moist and airy. For a dairy-free option, use vegan coconut yogurt.
If you lack Greek yogurt but have another variety, plain or even vanilla yogurt could work.
Suggestions for pumpkin oatmeal muffins
Blender muffins are nearly foolproof, but here are my essential tips for consistent success every time:
– Avoid under-blending or over-blending. I use a high-speed blender, and a smooth batter comes together quickly. I’ve made these with family using less powerful blenders, which takes longer: just ensure the batter is smooth.
– Generously fill those cups. I prefer to fill the muffin cups nearly to the top for taller, bakery-style muffins. This recipe yields 12 muffins.
– Check doneness with care. A toothpick should emerge with only a few moist crumbs attached. If it comes out completely clean, they could be overbaked.
– Allow to cool completely before tasting. Let them reach room temperature before sampling. If tasted while warm, the pumpkin spice flavor may not be as prominent.
Storage and make-ahead tips
One of the greatest features of these muffins is their longevity. Store them in an airtight container for up to 5 days. However, I typically keep them in the refrigerator, where they last up to 10 days.
You can also freeze the muffins for up to 3 months. Thaw them overnight in the fridge or heat them in the microwave directly from frozen.
A few variations and mix-ins
While this recipe is delightful as it is, there are numerous fun variations to explore! Many pumpkin muffin recipes incorporate chocolate chips, which would be tasty here but don’t quite fit the “healthy snack” goal I aimed for. Here are some ideas:
– Incorporate mix-ins: Add chopped pecans, walnuts, or dried cranberries for enhanced texture and flavor.
– Alter the spices: Use a chai spice blend instead of pumpkin pie spice.
– Vegan option: Substitute eggs with flax eggs and opt for non-dairy yogurt. (I haven’t tested this, so please let me know if you try it in the comments!)
– Sweetener alternatives: Swap maple syrup for honey or agave syrup.
Dietary notes
These
Read More
M&Mâs Is Launching 3 New Limited-Edition Flavors â Iâm Petitioning to Make This One Permanent

Mark your calendars.
READ MORE…

Informative Resource for Dispersed Camping in Alabama Hills
# Camping in Alabama Hills: A Distinct Experience for Nature Enthusiasts
Mike and I are passionate campers, traveling for outdoor escapades over 10 times annually. Our camping approach favors car camping instead of the classic hike-in, backpacking method. With an 18-inch tall double-wide inflatable mattress and actual sheets, we enjoy a glamping atmosphere. Our enthusiasm for camping is driven by our appreciation for gorgeous campsites and tasty camp meals, which are always more enjoyable in the great outdoors.
## The Alabama Hills
This year, one of our most unforgettable camping locations was the Alabama Hills. Tucked away in California, this region is a haven for nature enthusiasts, recognized for its impressive rock formations and vast sky. It’s the ideal spot for those looking for a secluded yet approachable boondocking experience. We found ourselves revisiting this breathtaking landscape numerous times, enchanted by its splendor.

## What is Boondocking?
For those who aren’t aware, boondocking denotes free, dispersed camping on public lands under the supervision of the Bureau of Land Management and the US Forest Service. The main guideline of boondocking is to leave no trace—pack it in, pack it out. This implies bringing all essential supplies and maintaining the area’s cleanliness. The charm of boondocking lies in the serene camping experience amidst stunning scenery, and Alabama Hills certainly excelled in that regard.

## What are the Alabama Hills?
The Alabama Hills are a National Scenic Area situated in California, part of the Sierra Nevada mountain range. This area is famous for its beautiful rock formations, endless skies, and remarkable vistas. At night, the stars illuminate the sky, presenting a stunning view of bright specks against a rich blue-black backdrop.

## Where are the Alabama Hills?
Located in the Owens Valley, the Alabama Hills are easily reachable from the quaint town of Lone Pine. To get to this picturesque region, simply drive along Highway 395 towards Lone Pine, turn west on Whitney Portal Road, and travel for 2.5 miles to Movie Road.

## What is Alabama Hills Known For?
Alabama Hills boasts a rich film history, serving as the setting for many Western films during the golden age of Hollywood. Its rugged landscape and seclusion create a perfect filming venue. Notable films produced in this location include “Iron Man” and “Django Unchained.”

## Where Can You Go Camping in Alabama Hills?
Camping in Alabama Hills has gained considerable popularity, requiring a free camping permit that can be obtained online ahead of your trip. Although the permit doesn’t guarantee a campsite, it permits you to camp in allowed areas. All camping operates on a first-come, first-served basis, with various dispersed campsites indicated on maps. Some sites necessitate 4WD access, but many can be reached with high-clearance vehicles.

## Camping in Alabama Hills
For dispersed camping, obtaining a permit is crucial, alongside understanding the rules and guidelines. Arriving around 1 PM is optimal for locating a suitable site. If you plan to enjoy a campfire, be sure to secure a campfire permit and verify any fire restrictions. Alternatively, Tuttle Creek Campground, positioned just outside Alabama Hills, provides standard amenities and operates on a first-come, first-served basis.

## What is the Best Time to Camp in Alabama Hills?
Alabama Hills is accessible throughout the year, but spring and fall are the most favored times due to pleasant temperatures. Summer can become quite hot, but for those who relish the warmth, it can be a less crowded experience. We visited during peak summer and appreciated the serenity of the locale.

## Hiking in Alabama Hills
One essential hike in the region is the Arch Loop Trail,
Read More
The âSo Deliciousâ Instant Noodles That Are Almost Better Than Homemade

âNo one knows it’s from a box.â
READ MORE…

There Are Hundreds of New Groceries Hitting Trader Joeâs Stores This Fall â These Are the 13 Staffers Are Most Excited About

There are hundreds of products this season.
READ MORE…
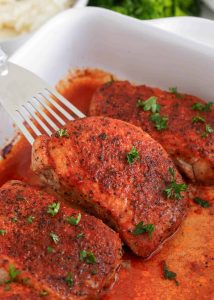
How to Make Juicy and Tasty Pork Chops
### Pork Chop Brine: A Comprehensive Guide to Tasty and Tender Chops
Pork chops are a popular meal, appreciated for their adaptability and taste. One of the most effective methods to augment their flavor and tenderness is through the brining process. This article presents a straightforward brine recipe featuring salt, brown sugar, bay leaf, rosemary, and pepper, guaranteeing your pork chops will be succulent and tasty.
#### Flavor Profile
The brine achieves a pleasing harmony of salty and sweet tastes, imbued with fresh herbs and warm spices. This blend not only boosts the flavor but also aids in tenderizing the meat.
#### Skill Level
Brining pork chops is a straightforward task that needs basic skills: whisking, simmering, and marinating. Anyone can easily acquire this technique with a bit of practice.
#### Recommended Tools
A meat thermometer is crucial for verifying the doneness of your pork. The USDA advises that pork should attain an internal temperature of 145°F, assessed at the thickest section of the chop, avoiding contact with the bone.
### Ingredient Suggestions for Pork Chop Brine
– **Brine Components**: The brine is made up of water, kosher salt, brown sugar, peppercorns, a bay leaf, and fresh rosemary. This concoction not only flavors but also tenderizes the pork chops.
– **Selecting Pork Chops**: Choose pork chops of consistent thickness, between ½-inch and 1 ½-inches, to ensure uniform cooking. Opt for either bone-in or boneless chops that have not undergone prior brining.
### Personalize It!
You can modify your brine by including:
– **Liquid Alternatives**: Replace water with apple juice, apple cider, vegetable broth, or white wine for enhanced flavor.
– **Sweetener Substitutes**: Feel free to use your preferred brown sugar alternative if you wish.
– **Seasoning Mixes**: Play around with Italian seasoning or seasoned salt to elevate your dish.
### Steps to Brine Pork Chops
1. **Create the Brine**: In a medium saucepan, mix water, kosher salt, brown sugar, peppercorns, bay leaf, and rosemary. Simmer until the salt and sugar have completely dissolved.
2. **Chill the Brine**: Take off the heat and place in the refrigerator until entirely cool.
3. **Marinate the Chops**: Put the pork chops in a zippered bag, pour in the cooled brine, and marinate for up to 2 hours.
4. **Rinse and Dry**: Before cooking, rinse the chops in cold water and dry them with a paper towel to eliminate excess salt.
#### Successful Brining Tips
– Confirm that the sugar and salt are completely dissolved in the brine.
– Do not exceed 2 hours of brining to prevent a mushy texture.
– Rinsing the chops helps avoid excessive saltiness.
– You may prepare the brine a few days ahead, but it’s best utilized within two weeks. Always discard any unused brine.
### Storing Leftovers
Keep cooked pork chops in a sealed container for up to 4 days. They can be enjoyed cold, sliced in salads, or reheated in the microwave. Leftovers are also excellent for stir-fries or fajitas.
### Conclusion
Brining pork chops is a straightforward yet powerful method to guarantee they are juicy, tender, and full of flavor. With just a handful of ingredients and steps, you can elevate your pork chop experience. Enjoy experimenting with various flavors and discover your ideal brine!