
Simple Gingerbread Cake Recipe
Storing Leftovers: Optimal Practices for Freshness and Taste
When it comes to keeping leftovers, making sure your food stays fresh and tasty is essential. Whether you’ve baked a scrumptious cake or any other meal, utilizing the right storage methods can significantly impact its quality. Here are some crucial tips for effectively storing leftovers:
Storage at Room Temperature: For specific baked items such as cakes, keeping them at room temperature helps preserve their texture and flavor. Wrap your cake in plastic wrap or aluminum foil to shield it from air exposure and maintain its freshness. It can be safely stored at room temperature for up to 4 days. To avoid powdered sugar from soaking into the cake, it’s advisable to sprinkle it just before serving.
Refrigerated Storage: If you want to prolong the life of your leftovers, refrigeration is an excellent choice. Place your covered cake in the refrigerator, where it can remain fresh for 7 to 10 days. This method is especially beneficial for those who wish to relish their dessert over an extended period without sacrificing flavor.
Advance Preparation Tip: Preparing for a celebration or gathering? You can bake your cake the day before the occasion. After it comes out of the oven, let it cool entirely. Next, cover it well and leave it on the counter overnight. This technique not only saves you time on the event day but also guarantees that your cake will be ready to wow your guests. Remember to dust it with powdered sugar approximately an hour before serving for that ideal finishing touch.
By adhering to these storage recommendations, you can relish your leftovers at their finest, whether you’re enjoying a slice of cake or any other delightful meal. Proper storage not only helps maintain the quality of your food but also reduces waste, enabling you to fully benefit from your culinary creations.
Read More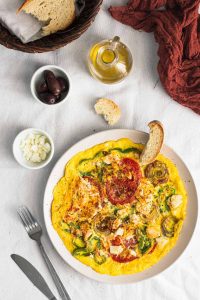
Classic Omelette Recipe
**Mastering the Craft of the American Style Omelette**
Making an omelette is a pleasurable culinary expertise that can be both easy and gratifying. The American style omelette, specifically, is renowned for its airy consistency and golden-brown surface. However, the cooking phase is rapid, so it’s vital to be adequately prepared before you commence. Here’s an all-encompassing guide to assist you in perfecting this traditional dish.
**Preparation is Essential**
Prior to beginning your cooking, make certain that you have reviewed the complete procedure. The making of an omelette is swift, and being unready can result in overdone eggs or an unsatisfactory texture. Assemble all your ingredients and utensils, including a non-stick frying pan, spatula, and any fillings you desire to add.
**The Cooking Method**
1. **Heat the Skillet:** Start by warming a non-stick frying pan over medium-high heat. It’s important to have the skillet at the appropriate temperature to avoid sticking and to guarantee uniform cooking.
2. **Prepare the Eggs:** Crack the eggs into a bowl and whisk them until the yolks and whites are thoroughly mixed. Season with a touch of salt and pepper for taste.
3. **Pour and Set:** When the skillet is hot, pour the beaten eggs into it. Let them cook undisturbed for 1 to 1 ½ minutes. This initial cooking time is vital for establishing the foundation of the omelette.
4. **Adjust the Temperature:** After the eggs have set a bit, lower the heat to low. This aids in preventing the bottom from burning while the top continues to cook softly.
5. **Add Cheese and Fillings:** Scatter your selected cheese over one side of the omelette. You may also introduce other fillings, such as sautéed veggies, cooked meats, or fresh herbs. Be sure to explore the Creative Fillings section for ideas.
6. **Fold and Complete:** With a spatula, gently fold the omelette in half over the fillings. Press softly to secure the edges. Keep cooking for another minute until the cheese melts and the top turns a golden brown.
**Filling Variations**
The charm of an omelette resides in its adaptability. You can personalize it with numerous fillings to match your preferences. Think of combinations such as spinach and feta, ham and cheddar, or mushrooms and Swiss cheese. The options are limitless, giving you the chance to experiment and discover your favorite blend.
**Conclusion**
Crafting an American style omelette is a quick and pleasurable endeavor that can be perfected with some practice. By preparing beforehand and adhering to these steps, you can attain a perfectly cooked omelette featuring a delectably golden exterior and a rich, tasty filling. Whether you relish it for breakfast, brunch, or a light supper, this classic dish is bound to please.
Read More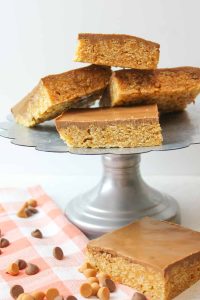
Fast and Simple Chewy Chocolate Scotcheroos Recipe Prepared in 30 Minutes
### No-Bake Scotcheroo Bars: An Easy and Tasty Snack
These no-bake Scotcheroo bars can be prepared in just a few minutes and quickly get devoured. They are a favorite treat for holidays, last-minute desserts, or for packing into lunchboxes throughout the week.
#### Flavor Spectrum
Scotcheroo bars feature a blend of sweet and salty tastes in a peanut buttery foundation with crunchy cereal, topped off with a silky chocolate butterscotch layer. This delightful mix makes them hard to resist.
#### Suggested Equipment
To create these bars, you will require:
– A large saucepan
– A microwave-safe dish
– A 9×13 pan
#### Ingredient Alternatives
This recipe is quite flexible; you can substitute Special K, Cornflakes, or any crisp cereal you prefer for an exciting variety of textures.
#### Freezing Advice
Wrap the chocolate butterscotch bars individually, then freeze them for convenient, sweet snacks!
### Handy Ingredient Suggestions
– **Rice Krispies**: This crispy rice cereal provides the bars their signature light, crunchy texture and mixes effortlessly with the warm peanut butter blend.
– **Sweeteners**: Sugar and light corn syrup create a sugary and thick syrup that keeps the blend soft and chewy. Avoid boiling the mix to keep the bars from hardening.
– **Creamy Peanut Butter**: Smooth peanut butter holds the cereal together; steer clear of natural peanut butter as it may cause the mix to fall apart. For a twist, replace half of the peanut butter with cookie butter and add a hint of vanilla.
– **Baking Chips**: Butterscotch chips lend the traditional flavor and blend into the chocolate for a smooth finish. Opt for milk chocolate for a sweeter bar, dark chocolate for less sweetness, or all butterscotch for a more intense flavor.
### Assembly Instructions
1. **Prepare the Peanut Butter Blend**: In a large saucepan, warm sugar and corn syrup over medium heat until the sugar is dissolved. Take off the heat and mix in peanut butter until creamy. Fold in the cereal and press into the prepared baking pan.
2. **Melt the Topping**: In a microwave-safe dish, melt the butterscotch and chocolate chips in short intervals, stirring until just melted. Drizzle over the cereal blend and spread evenly.
3. **Cool and Cut**: Allow to cool completely before cutting into bars.
### Storing Chocolate Butterscotch Bars
Keep Scotcheroos at room temperature for up to 5 days. For extended storage, wrap bars individually in wax paper or plastic wrap and place them in a zippered bag for up to 2 months.
### Nutritional Information (Per Serving)
– **Calories**: 259
– **Carbohydrates**: 41g
– **Protein**: 4g
– **Fat**: 10g
– **Sodium**: 149mg
– **Sugar**: 32g
### Final Thoughts
These no-bake Scotcheroo bars are not only quick to whip up but also a delightful treat that everyone will enjoy. Ideal for any event, they are bound to become a staple in your dessert collection. Have fun making and sharing these tasty bars!

Classic Swedish Meatballs Recipe
# Authentic Swedish Meatballs, Just Like They Serve in Sweden
Swedish meatballs, or köttbullar, represent a cherished meal that brings to mind the warmth and comfort of Nordic culture, particularly during festive occasions. This recipe embodies the spirit of genuine Swedish meatballs, recalling the delightful experience of feasting in Sweden.
## A Culinary Adventure in Sweden
A couple of years back, I journeyed to Sweden, with my primary culinary ambition being to taste real Swedish meatballs. I ended up at Bakfickan, a delightful little restaurant situated within the Royal Swedish Opera House in Stockholm. The meatballs offered a memorable experience—succulent, flavorful, and paired with velvety mashed potatoes, luxurious gravy, pickled cucumbers, and freshly mashed lingonberries. Each mouthful was a discovery, leading to a second visit the very next day.
## How to Prepare Swedish Meatballs
### Ingredients
– **For the Meatballs:**
– 1 lb ground pork
– 1 lb ground beef
– 1/2 medium onion, finely chopped
– 2 eggs, slightly beaten
– 1/2 cup panko breadcrumbs
– 1 tsp salt
– 1 tsp freshly ground pepper
– 1/4 tsp freshly grated nutmeg
– 2-4 tbsp butter (for frying)
– **For the Cream Sauce:**
– 2 tbsp butter
– 2 tbsp flour
– 1 cup beef stock
– 1/2 cup heavy cream
– 1 tsp soy sauce
– Salt and freshly ground pepper to taste
### Instructions
1. **Sauté the Onions:** Heat 1 tablespoon of butter in a large non-stick skillet and sauté the onions until tender and translucent. Remove from heat and let cool.
2. **Combine the Meatballs:** In a large mixing bowl, blend ground pork, ground beef, eggs, panko, salt, pepper, nutmeg, and the cooled onions. Mix thoroughly using your hands.
3. **Form the Meatballs:** Roll the mixture into 1-inch meatballs, ensuring they are packed tightly.
4. **Cook the Meatballs:** In the same skillet, melt 1-2 tablespoons of butter over medium heat. Add the meatballs in batches, gently shaking the pan to keep them round. Cook until golden brown and fully cooked.
5. **Prepare the Sauce:** Once the meatballs are cooked, add 2 tablespoons of butter to the pan. Whisk in the flour and cook for 1-2 minutes. Gradually pour in the beef stock and cream, whisking until thickened. Season with salt, pepper, and soy sauce.
6. **Serve:** Serve the meatballs drizzled with the cream sauce, alongside mashed potatoes, pickled cucumbers, and lingonberry jam.
## Tips and Tricks
– **Shape Firmly:** Make sure the meatballs are compact to retain their shape while cooking.
– **Opt for Non-Stick Cookware:** This helps prevent the meatballs from sticking and losing their form.
– **Fry in Butter:** This enriches the flavor, which is characteristic of traditional Swedish meatballs.
## What Makes Swedish Meatballs Unique?
Swedish meatballs are more than just a dish; they are a cultural emblem in Sweden, enjoyed as both regular meals and festive delicacies. Their distinct flavor, enhanced by nutmeg and the creamy sauce, differentiates them from other meatball varieties. The practice of serving them with lingonberry jam and pickled cucumbers provides a delightful contrast to the savory meatballs.
## Conclusion
This Swedish meatball recipe is a tribute to flavors and traditions that will transport you to Sweden with each bite. Whether relished during holiday gatherings or as a comforting meal throughout the year, these meatballs are bound to become a beloved dish in your household. Relish the experience of crafting and enjoying this timeless recipe!
Read More
The Top Cranberry Cocktails: 15 Essential Recipes to Experience
Alex & Sonja Overhiser: The Culinary Partnership Behind A Couple Cooks
Alex and Sonja Overhiser are the innovative pair responsible for the well-known culinary platform, A Couple Cooks. As the authors of two celebrated cookbooks, they have profoundly influenced the realm of home cooking by promoting their enthusiasm for straightforward, seasonal dishes. Their adventure started in 2010 when they established their website with the goal of sharing the delight of cooking with a broader audience.
The couple’s philosophy revolves around crafting accessible and delectable meals that everyone can savor, independent of their culinary skills. Their recipes highlight the use of fresh, seasonal produce, motivating home chefs to delve into the abundance of each season. This method not only fosters healthier eating habits but also endorses sustainable food practices.
Alex and Sonja’s knowledge extends beyond just recipe development; they also provide valuable cooking advice and meal planning suggestions. Their website serves as a rich repository of culinary information, boasting thousands of original recipes that cater to diverse dietary needs and restrictions. Each recipe is carefully tested and photographed by the duo, ensuring that readers can recreate the dishes effortlessly.
As devoted parents, Alex and Sonja are aware of the difficulties in balancing family responsibilities with a love for cooking. Their recipes are tailored to be practical and time-efficient, simplifying the process for families to savor home-cooked meals together. Their children frequently act as taste testers, adding an extra dimension of authenticity to their culinary endeavors.
Beyond their online presence, Alex and Sonja have written two cookbooks that further highlight their passion for cooking and their dedication to making it approachable for everyone. These books are filled with inspiring recipes and stunning photography, showcasing the couple’s commitment to their art.
Through A Couple Cooks, Alex and Sonja Overhiser have cultivated a lively community of food lovers who share their zeal for cooking. Their efforts continue to motivate countless individuals to embrace the joy of preparing and sharing meals with family and friends, demonstrating that cooking together can enhance both culinary abilities and personal relationships.
Read More