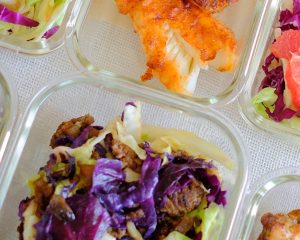
Simple Cabbage Stir-Fry Meal with Ground Beef
**Simple Cabbage Stir-Fry Dinner with Ground Beef**
If you are on the hunt for a quick, healthy, and tasty dinner choice, an effortless cabbage stir-fry with ground beef is ideal. This meal is not only straightforward to make but also rich in flavor and nutrients, rendering it a perfect selection for a weeknight dinner. Here’s how to prepare this fulfilling dish in no time.
**Ingredients:**
– 1 pound ground beef
– 1 medium head of cabbage, thinly sliced
– 1 large onion, sliced
– 2 cloves garlic, minced
– 2 tablespoons soy sauce
– 1 tablespoon olive oil or sesame oil
– 1 teaspoon ground ginger
– 1/2 teaspoon black pepper
– Optional: 1 tablespoon sriracha or chili paste for heat
– Optional: sliced green onions and sesame seeds for garnish
**Instructions:**
1. **Prepare the Ingredients:**
Start by prepping your vegetables. Thinly slice the cabbage and onion, and mince the garlic. Having everything ready beforehand will streamline the cooking process.
2. **Cook the Ground Beef:**
In a large skillet or wok, heat the olive oil over medium-high heat. Add the ground beef and cook until browned, breaking it apart with a spatula as it cooks. This should take roughly 5-7 minutes. Once browned, drain any excess fat from the skillet.
3. **Sauté the Aromatics:**
Incorporate the sliced onion and minced garlic into the skillet with the ground beef. Sauté for about 2-3 minutes until the onion turns translucent and the garlic becomes fragrant.
4. **Add the Cabbage:**
Mix in the sliced cabbage, ensuring it is well combined with the beef and onion. Cook for about 5-7 minutes, stirring occasionally, until the cabbage is soft yet still slightly crisp.
5. **Season the Stir-Fry:**
Drizzle the soy sauce over the cabbage and beef mixture. Add the ground ginger and black pepper, stirring thoroughly to coat everything evenly. If you prefer some heat, incorporate sriracha or chili paste at this point.
6. **Finish and Serve:**
Keep cooking for another 2-3 minutes, allowing the flavors to blend. Taste and adjust the seasoning if needed. Once finished, take it off the heat.
7. **Garnish and Enjoy:**
Transfer the stir-fry to a serving dish. If desired, garnish with sliced green onions and sesame seeds. Serve hot, either by itself or over a bed of steamed rice or noodles for a complete meal.
**Benefits of Cabbage Stir-Fry:**
This cabbage stir-fry is not just quick and simple but also provides numerous health advantages. Cabbage is loaded with vitamins C and K, fiber, and antioxidants, while ground beef delivers protein and vital minerals like iron and zinc. The blend of these ingredients results in a well-rounded meal that promotes overall health.
**Conclusion:**
A simple cabbage stir-fry with ground beef is a flexible dish that can be personalized to fit your taste preferences. Whether you seek a low-carb dinner or simply wish to savor a flavorful meal, this recipe is certain to become a regular in your kitchen. With minimal ingredients and maximum flavor, it’s an excellent choice for busy cooks and hungry families alike.
Read More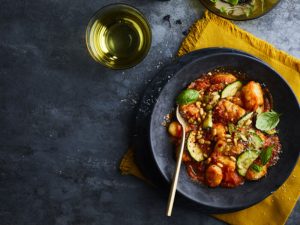
Rich Tomato Sauce with Poultry and Gnocchi
Gnocchi with Chicken in a Rich Tomato Sauce
Preparation Time: 5 minutes
Cooking Time: 25 minutes
Total Duration: 30 minutes
Number of Servings: 6
Tender chicken and fluffy potato gnocchi in a flavorful tomato sauce!
Ingredients
- 2 tablespoons olive oil (or oil from sun-dried tomatoes)
- 1 pound boneless, skinless chicken breasts or thighs, chopped into bite-sized pieces
- 1 onion, finely chopped
- 3 cloves garlic, minced
- 2 tablespoons tomato paste (optional)
- 1/2 teaspoon crushed red pepper flakes (optional)
- 1/2 teaspoon ground fennel seeds (optional)
- 2 cups chicken broth (or water)
- 1 (15-ounce) can of diced tomatoes
- 1/4 cup sun-dried tomatoes, thinly cut (optional)
- 1 teaspoon Italian herbs (or oregano)
- 1 pound gnocchi (gluten-free if desired)
- 1/2 cup heavy/whipping cream (or sour cream, or 4 ounces cream cheese)
- 1/4 cup grated parmigiano reggiano (parmesan cheese)
- 4 ounces baby spinach (optional)
- Salt & pepper to taste
- 1 tablespoon chopped parsley (or basil) (optional)
Instructions
- Heat the oil in a large skillet over medium-high heat, add the chicken and onion, cooking until the chicken is done, around 7-10 minutes.
- Stir in the garlic, tomato paste, red pepper flakes, and fennel seeds, cooking for an additional minute.
- Incorporate the broth, diced tomatoes, sun-dried tomatoes, Italian herbs, and gnocchi, bring to a simmer, reduce the heat, and cook until the gnocchi is soft, about 5-10 minutes.
- Remove from heat, stir in the cream and cheese, mixing until the cheese has melted into the sauce.
- Add the spinach, stir, and allow it to wilt.
- Adjust seasoning with salt and pepper, mix in the parsley, and serve!
Suggestion: Season your chicken with your preferred spices; I enjoy using: 1/2 teaspoon onion powder, 1/2 teaspoon garlic powder, 1/2 teaspoon (smoked) paprika, 1/2 teaspoon salt, 1/2 teaspoon pepper
Suggestion: Include vegetables like diced bell peppers, peas, carrots, etc.
Nutritional Information
Calories 400, Fat 17g (Saturated 7g, Trans 0.2g), Cholesterol 98mg, Sodium 441mg, Carbohydrates 34g (Fiber 4g, Sugars 6g), Protein 27g
Read More
Tini’s Manual for Preparing Mac and Cheese: A Detailed Recipe
# Tini’s Viral Mac and Cheese: A Luxurious and Tasty Treat
Tini’s mac and cheese has captured the hearts of many online, racking up over 60 million views on TikTok. This recipe is essential for mac and cheese aficionados, showcasing a mix of three kinds of cheese and corkscrew pasta, resulting in a dish that is both indulgent and velvety. Ideal for social events, this mac and cheese is bound to make a lasting impression at any potluck, cookout, or holiday festivity.
## What is Tini’s Mac and Cheese?
Tini’s mac and cheese is a viral hit, praised for its sumptuous flavors and smooth texture. The recipe has become a classic for numerous celebrations, making it a favorite for family gatherings and occasions.
## Ingredients for Tini’s Viral Mac and Cheese
– **Pasta**: 1 lb of corkscrew pasta (cavatappi), perfect for capturing the creamy sauce.
– **Cheese**:
– 1 lb mozzarella cheese
– 1 lb colby jack cheese
– ½ lb sharp cheddar cheese
– **Butter**: 3 tablespoons of unsalted butter for the roux.
– **Flour**: 3 tablespoons of all-purpose flour for thickening the sauce.
– **Evaporated Milk**: 12 oz (1 can) for added creaminess.
– **Heavy Cream**: 2 cups to boost richness.
– **Seasonings**:
– ¼ tsp salt
– ¼ tsp freshly ground pepper
– ½ tsp garlic powder
– ½ tsp smoked paprika
– **Dijon Mustard**: 1 tablespoon to complement the cheese’s richness.
## How to Make Tini’s Mac and Cheese
1. **Cook the Pasta**: Boil a large pot of salted water and prepare the pasta following package directions. Drain thoroughly.
2. **Make the Roux**: In a large non-stick skillet, melt 3 tablespoons of butter. Incorporate half of the seasoning blend and stir. Then, add 3 tablespoons of flour and cook until bubbly.
3. **Add Evaporated Milk**: Gradually whisk in the evaporated milk until the mixture begins to thicken.
4. **Incorporate Heavy Cream**: Mix in the heavy cream and the remaining seasoning, allowing the sauce to thicken.
5. **Add Cheese**: Slowly add half of the cheese, whisking until fully melted.
6. **Combine Pasta and Sauce**: Fold in the cooked pasta, ensuring each noodle is enveloped in the creamy sauce.
7. **Layer in Casserole Dish**: In an oven-safe baking dish, layer half of the mac and cheese, followed by half of the remaining cheese. Add the rest of the mac and cheese and top it with the leftover cheese.
8. **Bake**: Bake in a preheated oven at 350°F for 25-30 minutes until bubbling and golden.
9. **Broil**: Broil for 2 minutes for a crunchy topping.
10. **Serve**: Garnish with chopped chives if desired and enjoy!
## Who is Tini?
Tini is a skilled cook and TikTok influencer, recognized for her captivating cooking videos and recipes. With over 5.5 million followers, she has made a notable mark in the culinary scene, particularly with her viral mac and cheese recipe.
## Tips and Tricks for Perfect Mac and Cheese
– **Shred Your Own Cheese**: Skip pre-shredded cheese, as it may contain additives that impact texture.
– **Layering**: Much like lasagna, layering mac and cheese achieves pockets of melted cheese and a crunchy top.
– **Seasoning**: Don’t overlook the garlic powder, smoked paprika, and mustard; they significantly elevate the flavor profile.
## Make Ahead and Storage
Tini’s mac and cheese can be prepared ahead of time, up to the baking stage. Refrigerate it for up to 3 days. When ready to bake, cover with foil and bake for 30 minutes, then remove the foil to finish baking.
## Conclusion
Tini’s mac and cheese is a luxurious, creamy dish that fits any occasion. With its assortment of cheeses and easy preparation, it’s no surprise this recipe has gone viral. Whether served as a side or a main dish, it’s destined to be a favorite!
Read More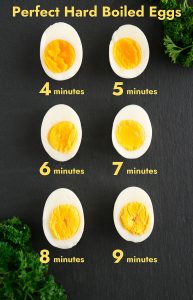
10 Techniques for Preparing Eggs
**Discover How to Prepare Eggs in 10 Unique Methods**
Good morning! Your go-to egg expert is here (I can’t help it!). Eager to perfect sunny side up? Need a panful of scrambled eggs or an exquisite omelette? I’m at your service.
As a cookbook author and recipe creator, I present to you my top 10 methods for cooking eggs! These skilled techniques will elevate your breakfast game in mere minutes. These are the essential egg skills every home cook must possess.
## How To Prepare Eggs: 10 Techniques
Here, I share my top 10 techniques for preparing eggs, ranging from the fastest fried eggs on the stove to slowly baked eggs in the oven. Each method includes cues for doneness so you can determine the ideal moment the eggs are cooked. I’ve linked to comprehensive recipes for those who want to explore a particular technique further!
### 1. Sunny Side Up
Sunny side up eggs are cooked until the whites are solid while keeping the yolk runny. The round golden yolk resembles a sun, which is how it got its name!
**Method:** Heat butter in a non-stick or cast iron skillet over medium low flame. Crack in the egg and season with salt and pepper. Cook for 2 to 3 minutes until the whites are set but the yolk remains runny. No flipping required.
💡 **Tip:** Maintain medium-low heat throughout the process. High heat causes the egg whites to cook too quickly, resulting in rubbery edges before the yolk can firm up.
### 2. Over Easy
Over easy eggs are cooked on both sides, but the yolk stays runny. The second side receives just enough heat to solidify the upper portion of the egg white.
**Method:** Heat butter in a non-stick or cast iron skillet over medium low flame. Crack in the egg and season with salt and pepper. Cook for 2 to 3 minutes until the whites are set. Flip and cook for an additional 20 to 30 seconds.
### 3. Over Medium
Over medium eggs are cooked on both sides until the yolk is slightly runny and jammy, similar to a soft boiled yolk.
**Method:** Heat butter in a non-stick or cast iron skillet over medium low flame. Crack in the egg and season with salt and pepper. Cook for 2 to 3 minutes until the whites are set. Flip and continue cooking for another minute.
### 4. Over Hard
Over hard eggs are fully cooked on both sides, resulting in a fully cooked yolk.
**Method:** Heat butter in a non-stick or cast iron skillet over medium low flame. Crack in the egg and season with salt and pepper. Cook for 2 to 3 minutes until the whites are set. Flip and cook for about 2 more minutes until the yolk is fully cooked, gently pressing the yolk with a spatula until it breaks.
### 5. Scrambled Eggs
Scrambled eggs are whisked and then gently cooked, folding them into shapes. The secret is to resist the urge to hurry! I’ve also experimented with fluffy scrambled eggs using a few extra techniques to elevate them.
**Method:** Whisk the eggs, typically 2 eggs per person. Season with salt and pepper. Heat butter in a non-stick or cast iron skillet over medium flame. Add the eggs. When they begin to set, use a flat spatula to slowly lift sections of eggs, forming folds. Remove from heat just before they completely firm up, taking about 2 minutes in total.
💡 **Tip:** Avoid constant stirring. Allow the eggs to rest briefly between folds to achieve those fluffy layers.
### 6. Poached Eggs
Poached eggs are prepared outside the shell in boiling water until the whites are firm and the yolk remains runny. It may seem daunting, but once you get the hang of it, it’s quite manageable.
**Method:** Fill a large skillet with 1 ½ inches of water, adding a splash of white vinegar. Heat to just below simmering (190°F). Quickly crack each egg into a small bowl and gently slide it into the water. Cook for 4 minutes until the whites are set. Remove with a slotted spoon.
💡 **Tip:** The white vinegar aids the egg white in coagulating and maintaining shape. Fresh eggs also poach more effectively than older ones.
### 7. Hard Boiled Eggs
Hard boiled eggs are cooked in their shells in water until the yolks are completely firm. I utilize this technique frequently—it’s ideal for egg salad, deviled eggs, and quick snacks. Additionally, you can hard boil eggs in an Instant Pot or prepare steamed hard boiled eggs.
**Method:** Place eggs in a large pot and cover with 1 inch of water. Bring the
Read More