
Raspberry Swirl Cheesecake Bar Recipe
### Raspberry Swirl Cheesecake Bars
Cheesecake is a cherished dessert that appears in various styles, but the Raspberry Swirl Cheesecake Bars are distinctive for their vivid hues and pleasing tastes. These bars blend a smooth cheesecake layer with a sweet-tart raspberry swirl, all resting on a rich graham cracker crust. They are ideal for picnics, potlucks, or any event where an exquisite dessert is desired.
#### Ingredients
**Crust:**
– 1 cup (110 grams) graham or digestive cracker crumbs (approximately 7 sheets of grahams)
– 2 tablespoons (25 grams) granulated sugar
– Pinch of salt
– 3 tablespoons (45 grams) unsalted butter, melted
**Swirl:**
– 6 ounces (170 grams) fresh or thawed frozen raspberries
– 2 tablespoons (25 grams) granulated sugar
**Cheesecake:**
– 2/3 cup (130 grams) granulated sugar
– 1 pound (2 8-ounce or 225-gram packages) cream cheese, at room temperature
– 3 large eggs
– Finely grated zest and juice (1 to 2 tablespoons) from half a medium/large lemon
#### Instructions
1. **Preheat the Oven:** Set the oven to 325 degrees F (160 degrees C). Line the bottom and sides of an 8×8-inch square baking pan with parchment paper.
2. **Make the Crust:** In a bowl, mix the graham cracker crumbs, sugar, salt, and melted butter. Combine until uniform. Firmly press the mixture into the bottom of the prepared pan and bake for 10 minutes.
3. **Prepare the Raspberry Swirl:** In a food processor or blender, combine the raspberries and sugar. Process until smooth, then strain the puree through a fine sieve to eliminate the seeds. Set aside.
4. **Make the Cheesecake Filling:** In a mixing bowl, beat the cream cheese with the sugar until light and fluffy. Incorporate the eggs one at a time, mixing thoroughly after each addition. Lastly, mix in the lemon zest and juice. Pour the cheesecake batter over the warm crust.
5. **Add the Raspberry Swirl:** Using a squeeze bottle or a zip-lock bag with a corner cut off, drizzle the raspberry sauce over the cheesecake batter. Use a toothpick or skewer to swirl the raspberry sauce into the batter, creating a marbled design.
6. **Bake:** Place the pan in the oven and bake for 40 to 50 minutes, or until the cheesecake jiggles slightly in the center. Take it out of the oven and let it cool on a rack for 15 minutes before moving it to the refrigerator to chill completely.
7. **Serve:** Once cooled, lift the bars out of the pan using the parchment paper and cut into 16 squares. For tidy slices, clean the knife between each cut.
8. **Storage:** The cheesecake bars can be kept in the refrigerator for 5 to 7 days.
These Raspberry Swirl Cheesecake Bars are not only visually captivating but also a delightful indulgence for any occasion. Their creamy consistency and fruity swirl make them a favorite among cheesecake enthusiasts and a wonderful introduction for those new to this classic dessert. Enjoy!
Read More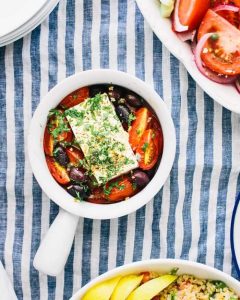
Baked Tomato and Feta Cheese
This simple baked feta dish featuring tomatoes transforms into a warm, creamy appetizer inspired by Greek cuisine in less than 25 minutes. Enjoy it with crusty bread for a delightful treat!
This recipe takes inspiration from my journey to Greece a few years back: I developed a fondness for a specific baked feta appetizer. It was prepared in various styles but was consistently delicious: melty, gooey feta in a tomato sauce, occasionally accompanied by onions or red peppers, and topped with a few herbs.
One server presented it to us while exclaiming, “Feta in the oven!” and I soon discovered this was the common English phrase found on most menus. Alex and I even tried to recreate it a few times during our stay in Greece in the kitchen of our rental home. This baked feta is the version I now whip up whenever hosting friends, and it vanishes quicker than anything else on the table!
Reasons to Adore This Baked Feta Recipe
– It’s irresistibly tasty. The finest appetizers are usually the most straightforward. A block of feta goes into a small dish with tomatoes, garlic, and olive oil, then bakes until warm and melty: pure bliss!
– It’s based on an authentic recipe from Greece. While it may not be exactly what I enjoyed there, it captures a similar, carefree essence!
– It’s simple to prepare: It comes together in under 25 minutes, most of which is oven time, and it’s highly adaptable.
Necessary Ingredients
During my time in Greece, we used large fresh tomatoes for baking the feta, which worked wonderfully. However, when attempting this at home in the US, the tomatoes turned out too watery. We opted for cherry tomatoes, which yielded better results. Here’s what you’ll need:
– Feta cheese: Choose a solid block of feta, avoiding the pre-crumbled version. I prefer feta packed in brine for optimal texture and flavor.
– Cherry tomatoes: This is my trick for achieving a jammy, non-watery outcome.
– Garlic: Adds just the right savory touch.
– Olive oil: A good drizzle is vital.
– Dried oregano: The quintessential Greek herb here. Fresh oregano or thyme are fantastic if you have them available.
– Kalamata olives: Optional, yet they contribute a briny kick.
Steps for Making Baked Feta
This is more of a technique than a strict recipe; here’s the core method:
1. Preheat and prepare. Set the oven to 400°F. Halve the cherry tomatoes and mix them with a few pinches of kosher salt while waiting for the oven to heat.
2. Assemble the ingredients in a small dish. In an oven-safe dish, combine the tomatoes, minced garlic, and olives. Place the feta block in the center, drizzle it with olive oil, and sprinkle oregano on top.
3. Bake and serve. Bake for approximately 18 minutes, until the feta is warm and soft, and the tomatoes have burst. Serve right away.
Pro tip: If desired, you can place the dish under the broiler for the final minute or two to achieve a lightly golden surface on the feta.
Serving Suggestions
Baked feta is best enjoyed warm straight from the oven, paired with something to dip in it, and a few Mediterranean-style platters on the side. Here are my suggestions:
Flavor Variations
– Honey baked feta: Drizzle warm honey over the feta just before serving for a delightful sweet-and-salty blend.
– Roasted red peppers: Incorporate sliced roasted red peppers into the dish before baking for added sweetness and color.
– Baked feta pasta: This is the viral recipe that captivated the internet! Double the recipe (8 oz feta and 2 pints tomatoes) along with ¼ cup olive oil, then mix the softened mixture into a pound of hot cooked pasta with a splash of pasta water.
Storage and Preparation Ahead of Time
Baked feta is best enjoyed fresh and warm. Leftovers can be stored in a sealed container in the refrigerator for up to 3 days: reheat gently in a 350°F oven. You can also prepare the entire dish in advance, cover it, and refrigerate for a few hours before baking: simply add a few minutes to the cooking time.
Dietary Information
This baked feta recipe is suitable for vegetarians and is gluten-free.
Baked Feta with Tomatoes
This simple baked feta dish featuring tomatoes transforms into a warm, creamy appetizer inspired by Greek cuisine in less than 25 minutes. Enjoy it with crusty bread for a delightful treat!
Author: a Couple Cooks
Prep Time: 5 minutes
Cook Time: 18 minutes
Total Time: 23 minutes
Yield: 4 as a small appetizer
Category: Appetizer
Method: Baked
Cuisine: Mediterranean
Diet: Vegetarian
Ingredients
– 8 to 10 cherry tomatoes*
– 1 garlic clove
– 2 tablespoons fresh parsley
– 10 Kalamata olives
– 4 to 5 ounce

Easy Recipe for Strawberry Pie
# The Simplest Strawberry Pie with Graham Cracker Crust Made at Home
As the summer season draws near, the desire for fresh, fruity desserts becomes simply irresistible. One of the most enjoyable treats you can create is a homemade strawberry pie, featuring a rich graham cracker crust and adorned with a decadent cream cheese whipped topping. This pie is not only straightforward to prepare but also a favorite among crowds, making it ideal for family gatherings or summer celebrations.
## Reasons This Strawberry Pie is Beloved
This strawberry pie has turned into a beloved dish for numerous families, mine included. It’s an uncomplicated yet delectable dessert that merges the sweetness of fresh strawberries with the delightful salty-sweet taste of a graham cracker crust. The inclusion of cream cheese whipped cream enhances the pie, transforming it into a delightful indulgence that everyone will adore.
### A Recipe Handed Down Through Families
This pie recipe has been treasured in many homes for generations. It’s a tradition that fosters family togetherness, inviting kids to partake in the cooking process. From washing and slicing strawberries to aiding in mixing the filling, this pie is a fantastic way to get children involved in the kitchen.
## Ingredients
### For the Crust:
– 1 ½ cups graham cracker crumbs
– ½ cup unsalted butter, melted
– ¼ cup sugar
### For the Filling:
– 4 cups fresh strawberries, hulled and halved
– 1 cup sugar
– 2 tablespoons cornstarch
– 1 cup cold water
– 1 package (3 oz) strawberry Jell-O
### For the Cream Cheese Whipped Cream:
– 1 cup heavy cream
– 4 oz cream cheese, softened
– ¼ cup maple syrup
## Instructions
### 1. Create the Graham Cracker Crust
Preheat your oven to 350°F (175°C). In a bowl, combine the graham cracker crumbs, melted butter, and sugar until well blended. Press the mixture into a 9-inch pie plate. Bake for 10 minutes, and then allow it to cool.
### 2. Prepare the Strawberries
Thoroughly wash the strawberries and dry them using a paper towel. Remove the tops and cut the larger strawberries in half while keeping the smaller ones intact.
### 3. Prepare the Jell-O Mixture
In a small saucepan, mix the sugar, cornstarch, and cold water. Heat over medium-low, stirring constantly until the mixture thickens and bubbles. Once thickened, take it off the heat and stir in the strawberry Jell-O until completely dissolved. Let it cool slightly.
### 4. Construct the Pie
Put half of the strawberries in the cooled pie crust. Drizzle some of the Jell-O mixture over the berries, allowing it to seep in. Repeat with the remaining strawberries and top with more Jell-O mixture to coat. Gently press the berries down and brush the top with the leftover mixture for a shiny appearance.
### 5. Chill
Cover the pie and chill for 4-6 hours, or until it sets. For optimal freshness of the strawberries, serve within 24 hours.
### 6. Prepare the Cream Cheese Whipped Cream
Using a hand mixer, whip the heavy cream until soft peaks form. In another bowl, beat the softened cream cheese until smooth, then gradually incorporate the maple syrup. Gently fold the cream cheese mixture into the whipped cream until thoroughly combined.
### 7. Serve
Cut the pie and serve it cold, topped with a generous spoonful of cream cheese whipped cream.
## Conclusion
This homemade strawberry pie with a graham cracker crust represents the essence of summer desserts. It’s easy to prepare, visually stunning, and full of flavor. Whether you’re hosting a family gathering or enjoying a quiet night at home, this pie is guaranteed to add joy to your table. Savor the delightful combination of fresh strawberries, a sweet crust, and creamy topping that makes this dessert a seasonal favorite!
Read More
Get Ready to Whip Up a Flavorful Chicken Rice Bowl in Under 20 Minutes
# Street Corn Chicken Rice Bowl: The Ultimate Quick Weeknight Meal
This Street Corn Chicken Rice Bowl is an excellent answer for hectic weeknights, merging tasty Cajun-seasoned chicken, rich street corn, and fresh garnishes atop fluffy rice. Best of all, it can be ready in under 20 minutes, making it a great choice for a swift and gratifying dinner.
## Recipe Highlights
### Why Make It
Utilizing cooked rice speeds up this recipe, while the creamy street corn topping provides a significant flavor enhancement without needing an additional sauce.
### Recommended Tools
You will require a large skillet, a mixing bowl, and a cutting board for this recipe.
### Serving Suggestions
Elevate your meal by presenting toppings such as lime wedges, pickled jalapeños, fresh pico de gallo, pickled red onions, and crushed tortilla chips, allowing everyone to personalize their bowl according to their preferences.
**Total Time:** 18 Minutes
**Servings:** 4
**Cooking Method:** Skillet
## Ingredient Notes
– **White Rice:** Leftover cooked rice is ideal for this dish. Alternatives include brown rice, cilantro lime rice, quinoa, or cauliflower rice.
– **Chicken:** Chicken breasts and thighs both work well, with breasts being leaner and thighs retaining moisture.
– **Seasoning:** Cajun seasoning gives a smoky, savory kick, but you can replace it with taco seasoning or a milder Southwest blend.
– **Yogurt:** Plain Greek yogurt adds a creamy, tangy taste; sour cream can be used as an alternative.
– **Cotija:** This cheese offers a salty, crumbly finish typical of street corn, but feta can substitute if Cotija isn’t available.
– **Variations:** Think about including black beans for a heartier bowl or topping with avocado or guacamole.
## How to Make Street Corn Chicken Rice Bowls
1. **Cook the Chicken:** Dice the chicken into bite-sized pieces and coat with Cajun seasoning. Heat olive oil in a large skillet over medium-high heat, add the chicken, and cook for 6 to 8 minutes until browned and fully cooked.
2. **Make the Street Corn:** In a medium bowl, combine Greek yogurt, mayonnaise, lime juice, lime zest, cumin, and a pinch of salt until well-blended. Incorporate corn, Cotija, cilantro, jalapeño, and red onion, mixing thoroughly.
3. **Assemble the Bowls:** Serve the cooked chicken over rice and top with the street corn mixture.
## Tips for Success
– **Cut Chicken Evenly:** Make sure the chicken is cut into even pieces for consistent cooking.
– **Get a Good Sear:** Utilize a hot skillet and limit stirring to achieve flavorful browned edges on the chicken.
– **Drain the Corn Well:** Ensure to drain canned corn properly to keep the mixture thick and rich.
– **Char for Extra Flavor:** If time permits, char the corn kernels in the skillet before mixing them into the dressing for enhanced flavor.
## Storing Rice Bowls
Store remaining chicken, rice, and street corn in separate airtight containers. The chicken and rice will last for up to 4 days in the refrigerator or up to 3 months in the freezer. **Note:** Do not freeze the street corn topping.
## Conclusion
This Street Corn Chicken Rice Bowl is not only quick and straightforward to make but also bursting with flavor and customizable toppings. Ideal for a busy weeknight, it’s a meal that everyone in the family will love.
Read More