Nourishing Green Goddess Salad Recipe
### If You Adore Chopped Salads, This Green Goddess Salad Will Delight You
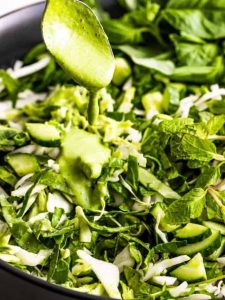
Chopped salads have surged in popularity, and the Green Goddess Salad certainly stands out. This colorful dish has taken TikTok by storm, featuring a delightful take on the traditional Green Goddess salad. Whether you’re looking to eat healthier, try out vegan options, or simply savor a tasty salad, this recipe is essential.
#### What is the Green Goddess Salad?
A Green Goddess Salad is any salad showcasing the beloved green goddess dressing. With numerous variations to choose from, this salad offers incredible customization possibilities, letting you adjust it to your preferences.
#### Green Goddess Salad Dressing
The term “Green Goddess” derives from the dressing’s striking green color. Originally crafted in San Francisco, the classic dressing contains anchovies, green onions, parsley, tarragon, mayo, sour cream, and chives. However, the contemporary vegan alternative excludes anchovies, mayo, and sour cream, instead using fresh herbs and nutritional yeast for a creamy, zesty taste. This dressing is akin to vegan pesto, providing a fresh and vibrant flavor with a cheesy undertone.
#### Ingredients for Green Goddess Salad
The salad base is made up of finely chopped cabbage, cucumbers, green onions, and chives, akin to a finely diced coleslaw. The dressing features walnuts and nutritional yeast, imparting a rich taste without any dairy.
#### How to Prepare Green Goddess Dressing
**Ingredients:**
– Juice of two lemons
– 1/4 cup extra virgin olive oil
– 2 tablespoons rice vinegar
– 1 small shallot
– 2 cloves garlic
– 1 cup fresh basil
– 1 cup spinach
– 1/3 cup nutritional yeast
– 1/4 cup walnuts
– 1 teaspoon salt
**Instructions:**
1. Blend all ingredients in a blender, starting with the liquids. Process until smooth and creamy.
#### Storage and Advanced Preparation Tips
This salad can be kept in the refrigerator for 2-3 days, whether it has been dressed or not. For the best freshness, it’s advisable to dress the salad in advance, as the acidity in the dressing helps preserve the ingredients.
#### What is Nutritional Yeast?
Nutritional yeast is a deactivated yeast that imparts a cheesy, nutty flavor. It is packed with protein, B vitamins, and antioxidants, making it a favored ingredient in vegan cuisine. This recipe is best suited for large flake nutritional yeast, which can be purchased at health food stores or online.
#### Green Goddess FAQ
– **Can I prepare this beforehand?** Yes, the salad can be made in advance and stored well in the fridge.
– **What if cabbage isn’t to my liking?** You can substitute with shredded kale or chopped lettuce.
– **How long is the dressing good for?** The dressing can be refrigerated for up to 3 days.
– **Does the salad taste good the next day?** Yes, the flavors blend beautifully, much like coleslaw.
– **What nuts can I use in place of walnuts?** Other alternatives include pecans, almonds, or sunflower seeds.
#### Variations
This salad is naturally vegan, but if you’re not vegan and desire a richer taste, you can replace the nutritional yeast with parmesan. Here are some exciting variations to try:
– Add crispy bacon for texture.
– Include diced chicken breast or crumbled tofu for additional protein.
– Sprinkle with toasted sesame seeds for extra flavor.
– For some heat, add diced jalapeños.
– Make a guacamole variant by mixing in diced avocados and lime juice.
– Exchange cabbage for shredded Brussels sprouts and toss in chopped spinach and kale for an ultra-green salad.
### Conclusion
The Green Goddess Salad is a revitalizing and fulfilling dish that can be enjoyed in numerous ways. Whether you enjoy it with a spoon or pair it with protein, this salad is bound to become a favorite. Enjoy trying out various ingredients and flavors!
Read More
Easy DIY Chicken Marsala Recipe
### Chicken Marsala: A Swift and Tasty One-Pan Dish
Chicken Marsala is an enjoyable one-pan recipe that showcases succulent chicken breasts simmered in a sumptuous mushroom Marsala sauce. This delightful meal can be whipped up in merely 35 minutes, making it a fantastic option for hectic weeknights or festive events.
#### Flavor Profile
The essence of Chicken Marsala is defined by its deep, earthy taste from the mushrooms, accented by a touch of sweetness from the Marsala wine. This pairing results in a perfectly balanced dish that is bound to impress.
#### Time-Saving Tips
To streamline the cooking time, think about using 8 thin chicken cutlets instead of breasts and opting for pre-sliced mushrooms. This not only cuts down on preparation time but also guarantees uniform cooking.
#### Serving Suggestions
Chicken Marsala goes splendidly with pasta or garlic mashed potatoes, making it a flexible choice for any occasion.
### Ingredient Tips for Chicken Marsala
– **Chicken**: Select boneless chicken breasts, thighs, or cutlets for optimal results.
– **Marsala Wine**: Go for a dry Marsala wine, as sweeter types are more suitable for desserts. If it’s not available, sherry, port, or Madeira can serve as alternatives.
– **Sauce**: The sauce is made from chicken broth, butter, shallots, and thyme, thickened with flour to achieve a smooth texture.
– **Mushrooms**: While baby Bella (cremini) mushrooms are preferred, white mushrooms or portobellos can also be great options.
### Variations
– **Flavor Enhancements**: Add garlic alongside the mushrooms, or replace shallots with red or white onions for a different taste experience.
– **Creamy Version**: For a more luxurious sauce, stir in about ¼ cup of heavy cream near the end of cooking.
– **Vegetable Additions**: Brighten up the dish by mixing in chopped asparagus, spinach, or peas for extra color and health benefits.
### Storage and Leftovers
Keep leftover Chicken Marsala in an airtight container in the fridge for up to 3 days. Reheat it in the microwave or on the stove over medium heat. For extended storage, freeze cooled servings in zippered bags for up to four months. Defrost overnight in the fridge prior to reheating.
### Conclusion
Chicken Marsala is not only a speedy and straightforward meal but also a tasty dish that can enhance any dining occasion. Whether enjoyed during a family meal or a special event, this recipe is sure to become a beloved favorite. Savor your culinary creation!


6 Aldi âLittle Luxuriesâ Iâm Picking Up Before the End of Summer (Theyâre All $3 or Less!)

Plus, five more under-$3 finds to grab this month.
READ MORE…

Step-by-Step Instruction for Creating the Ideal Cheese Blintz at Home
**Step-by-Step Guide to Making the Ideal Cheese Blintz at Home**
Cheese blintzes are an exquisite indulgence, ideal for breakfast, brunch, or dessert. These delicate crepes brimming with a smooth cheese mixture are a traditional dish in Eastern European cuisine and can be served plain or adorned with various toppings. Follow this comprehensive guide to create the ideal cheese blintz in your own kitchen.
**Ingredients:**
*For the Crepes:*
– 1 cup all-purpose flour
– 1 cup milk
– 2 large eggs
– 1 tablespoon sugar
– 1/4 teaspoon salt
– 1 tablespoon melted butter
– Extra butter for cooking
*For the Cheese Filling:*
– 1 cup ricotta cheese
– 4 ounces cream cheese, softened
– 1/4 cup sugar
– 1 teaspoon vanilla extract
– 1 egg yolk
– Pinch of salt
**Instructions:**
**Step 1: Prepare the Crepe Batter**
1. In a large bowl, combine the flour, sugar, and salt by whisking together.
2. In another bowl, beat the eggs before adding the milk and melted butter, mixing thoroughly.
3. Slowly incorporate the wet ingredients into the dry ingredients, whisking constantly until the mixture is smooth. The batter should be thin and free of lumps.
4. Allow the batter to rest for a minimum of 30 minutes to enable the flour to hydrate completely.
**Step 2: Cook the Crepes**
1. Warm a non-stick skillet or crepe pan over medium heat and lightly grease with butter.
2. Pour around 1/4 cup of batter into the skillet, swirling it to evenly cover the bottom.
3. Cook for approximately 1-2 minutes until the edges start to lift and the underside turns golden brown.
4. Flip the crepe and cook for an additional 30 seconds. Move to a plate and continue with the remaining batter.
**Step 3: Prepare the Cheese Filling**
1. In a medium-sized bowl, mix together the ricotta cheese, cream cheese, sugar, vanilla extract, egg yolk, and salt.
2. Blend until smooth and creamy. Adjust the sweetness if needed according to your preference.
**Step 4: Assemble the Blintzes**
1. Lay a crepe on a flat surface, with the browned side facing up.
2. Spoon about 2 tablespoons of cheese filling onto the bottom third of the crepe.
3. Fold the lower edge over the filling, then fold in the sides, and roll it up to completely encase the filling.
**Step 5: Cook the Blintzes**
1. In a skillet, melt a small amount of butter over medium heat.
2. Arrange the blintzes seam-side down and cook for around 2-3 minutes on each side until they are golden brown and heated through.
**Step 6: Serve and Enjoy**
1. Serve the blintzes warm, garnished with sour cream, fruit compote, or a sprinkle of powdered sugar.
2. Delight in your homemade cheese blintzes as a tasty treat for any celebration.
With this guide, you can whip up scrumptious cheese blintzes that will undoubtedly impress your family and friends. Relish in the joy of crafting these delightful crepes and savor the luscious, creamy filling with every bite.
Read More


I Tried the âTake Away 10â Decluttering Method on My Kitchen Junk Drawer

It was even fun!
READ MORE…

The Pioneer Womanâs âBeautifulâ 12-Piece Dinnerware Set Is Only $25

Itâs so pretty!
READ MORE…
Skewered Barbecued Meat Treats
**The Ultimate Recipes for Skewered Meat: The Pinnacle of Summer Grilling!**
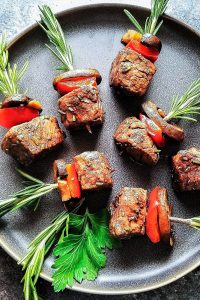
With the sun shining brilliantly and the days extending, summer encourages us to indulge in the pleasures of outdoor cooking. There’s a special satisfaction in grilling meat on a stick, a culinary custom that merges the fondness of childhood treats with the exquisite joy of perfectly prepared meat. Whether it involves beef, chicken, pork, shrimp, or kebabs, grilled and skewered meats are essential for summer parties, providing a delightful and convenient choice for socializing and relishing the great outdoors.
**1. Beef Skewers:**
To create a traditional beef skewer, begin with tender cuts such as sirloin or ribeye. Marinate the beef in a blend of soy sauce, garlic, ginger, and a hint of honey for sweetness. Skewer the beef with pieces of bell pepper and onion, then grill over medium-high heat until the exterior is charred and the interior remains juicy.
**2. Chicken Satay:**
Take your palate on a journey to Southeast Asia with chicken satay. Marinate chicken chunks in a mix of coconut milk, curry powder, turmeric, and lime juice. Skewer and grill until fully cooked, then serve alongside a rich peanut sauce for dipping.
**3. Pork Souvlaki:**
This Greek-inspired dish showcases pork marinated in olive oil, lemon juice, oregano, and garlic. Thread the pork onto skewers along with red onion and cherry tomatoes. Grill until the pork is tender and slightly charred, and accompany it with tzatziki sauce and warm pita bread.
**4. Shrimp Skewers:**
For a lighter alternative, opt for shrimp skewers. Marinate shrimp in olive oil, lemon zest, garlic, and fresh herbs like parsley and dill. Skewer the shrimp and grill them for just a few minutes on each side until they turn pink and are slightly charred. Serve with a dash of fresh lemon juice.
**5. Vegetable Kebabs:**
For a vegetarian option, craft vibrant vegetable kebabs. Include a variety of zucchini, bell peppers, cherry tomatoes, and mushrooms. Brush with olive oil and season with salt, pepper, and herbs such as rosemary or thyme. Grill until the vegetables are tender and lightly charred.
**Grilling Tips:**
– Submerge wooden skewers in water for at least 30 minutes prior to grilling to avoid burning.
– Preheat the grill to guarantee uniform cooking and achieve those desirable grill marks.
– Rotate the skewers often to cook evenly and prevent burning.
– Allow the meat to rest for a few minutes after grilling to keep its juices intact.
Skewered grilled meat is not merely a dish; it’s an occasion that unites people. The fusion of marinated tastes, the excitement of grilling, and the simplicity of eating make it an ideal selection for summer celebrations. So ignite the grill, assemble your favorite ingredients, and savor the irresistible flavor of summer grilling at its finest!
Read More