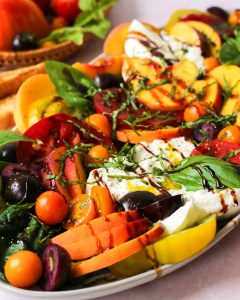
Burrata Cheese Salad with Ripe Tomatoes and Basil
Let’s give a cheer for burrata cheese! I always choose burrata whenever it’s available on restaurant menus, and we’ve enjoyed some amazing combinations this summer. I can’t resist the unique textures of burrata—it resembles fresh mozzarella on the outside, but is delightfully soft and creamy within.
For this recipe, I created a classic summertime burrata salad featuring fresh tomatoes. Pair it with crostini or a crusty loaf of bread to turn it into an appetizer. This burrata dish can be prepared in just 15 minutes, believe it or not, and it’s truly a showstopper.
I aimed to keep it straightforward while making it taste exceptional, so I drew inspiration from my Easy Tomato Salad and Tomato Basil Bruschetta. I chose a mix of cherry tomatoes and sun-dried tomatoes for added flavor, along with freshly toasted pine nuts for a savory touch. It’s not complete without a drizzle of rich olive oil, tangy balsamic vinegar, and a sprinkle of fresh basil. I hope it becomes one of your favorite go-to recipes!
What is Burrata?
Burrata is an exquisitely rich and creamy type of fresh mozzarella. It appears like a standard mozzarella ball on the outside. The interior contains stracciatella, a decadent blend of cream and mozzarella curds. It’s milky and delightful.
Burrata can be crafted from buffalo milk or cow milk. Buffalo milk is more traditional and delivers a brighter, slightly tangy flavor, while cow’s milk is subtler and may taste more familiar. Either option is great for this recipe.
Look for burrata near the fresh mozzarella in well-stocked grocery stores such as Whole Foods. Use it quickly, especially after opening the package—it’s stored in water and doesn’t preserve well like hard cheeses.
Serve burrata at room temperature for optimal flavor, or anywhere from lightly chilled to slightly warmed.
Burrata Serving Suggestions
Burrata complements the Italian flavors highlighted in this recipe: ripe tomatoes, basil (including pesto), balsamic vinegar, olive oil, and pine nuts or pistachios. If you’re not in the mood for tomatoes, substitute them with fruits like sliced peaches, plums, cherries, or cantaloupe.
Present this burrata dish as a salad or appetizer. It pairs well with most summertime meals, from relaxed cookouts to elegant dinner parties. Enhance your meal with any of these summer options:
More Burrata Recipes
Check out my Caprese Salad with Burrata, which showcases heirloom tomatoes. Burrata is a great substitute for fresh mozzarella balls, as long as the recipe doesn’t require cooking the mozzarella. Try my panzanella with torn pieces of burrata instead of mozzarella for an exciting twist!
You can add burrata to pizza, but wait to include torn burrata until the pizza is fully baked, or add it in the final minute to warm it. If it melts entirely, it loses the contrast of the creamy center and turns into a melty, unpredictable blob of mozzarella. Try swapping the mozzarella in my Margherita Pizza or Arugula-Almond Pesto Pizza with torn burrata, or serve it on Grilled Pizza.
Please share how your burrata turns out in the comments! I love hearing from you.
Burrata with Tomatoes and Basil
This burrata salad recipe features tomatoes, basil, and pine nuts, finished with a drizzle of balsamic vinegar and olive oil. It’s irresistible and ready in 15 minutes. Serve it as a salad or appetizer with crostini or crusty bread. Recipe yields 4 to 6 servings.
Instructions:
1. If using pine nuts: In a small skillet over medium-low heat, warm the pine nuts until they’re fragrant and lightly golden on the edges, about 3 to 5 minutes, stirring frequently (don’t allow them to burn!). Transfer them to a bowl to cool.
2. In a shallow serving bowl, mix the cherry tomatoes, sun-dried tomatoes, basil, and garlic. Add 1 tablespoon of olive oil and 1 teaspoon of vinegar, and stir to combine all ingredients.
3. Carefully tear open each ball of burrata and gently place them into the center of the tomato mixture. Drizzle the burrata with the remaining 1 teaspoon of olive oil and 1 teaspoon of balsamic vinegar. Sprinkle the pine nuts throughout the dish, followed by some reserved basil leaves and a dash of black pepper. Add a pinch of flaky salt over the cheese, if desired.
4. Serve with crostini or crusty bread on the side, if applicable. This burrata tastes best the same day it’s made, but leftovers can be stored in the refrigerator for several days, covered.
Notes:
Switch it up: Replace half of the tomatoes with a large sliced peach. Or for a fruitier twist, substitute peaches, nectarines, or cherries for the tomatoes entirely (about
Read More
The Secret to Café-Quality Coffee Without Leaving Your Kitchen

If your mornings are anything like mine, coffee isn’t optional; it’s essential. But here’s the thing: not all coffee vibes are created equal. Some mornings call for a strong, bold shot of espresso. Others demand a smooth, frothy latte. And some days (okay, all days), all we want is an icy cold brew that doesn’t take all day to steep.
READ MORE…
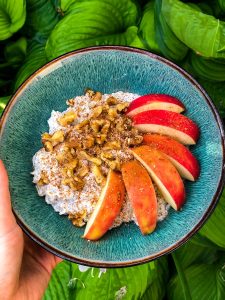
Overnight Oats with Apple and Cinnamon Taste
These overnight oats with apple and cinnamon are a tasty, whole-grain option for a healthy breakfast! This simple prep-ahead recipe brings together sweet-tart apples, aromatic cinnamon, and chewy oats for an excellent morning dish.
I’ve been preparing overnight oats for a long time, but this apple cinnamon variation has swiftly become a favorite in my household! The sweet-tart apple pieces contribute wonderful texture, and the cinnamon elevates the warm flavors. My son instantly requested I prepare another batch!
When I envision the perfect healthy breakfast that can be made ahead, these apple cinnamon overnight oats fulfill every requirement. I appreciate that this recipe serves two, making it ideal for pairs or for preparing meals the night before (plus, it’s simple to double).
Advice for the ideal apple cinnamon overnight oats
Through recipe trials, I’ve found a few essential tips that make these apple cinnamon overnight oats utterly delightful:
– Select the appropriate apple type. I prefer crisp, tart apples such as Pink Lady, Honeycrisp, or Granny Smith because they maintain their texture throughout the night without turning mushy. If you know me, you’ll realize I’m a big fan of Pink Lady: it’s my top pick here!
– Don’t omit the chia seeds. That half tablespoon may seem minimal, but chia seeds are vital for holding everything together and achieving a creamy consistency (without being overly gooey — which is my pet peeve!).
– Allow them to soak for the full time (or skip it!). These easy overnight oats are technically ready after 2 hours: I actually find them tasty right away! However, they are meant to rest in the fridge overnight, allowing the flavors to combine even more.
Highlight ingredient: rolled oats
Much like in my favorite oatmeal recipe, I always utilize old-fashioned rolled oats for my overnight oats. They deliver the ideal texture: creamy and soft without turning mushy. Quick oats can become too mushy, although they can be used in a pinch.
Nonetheless, steel-cut oats should not be used! Steel-cut oats simply don’t soften adequately overnight: they retain the rigidity of uncooked rice grains even after soaking overnight (trust me, I’ve experienced it!).
Innovative serving suggestions and toppings
One thing I love about these apple cinnamon overnight oats is their adaptability for toppings and serving styles:
– Chopped pecans or walnuts for added crunch
– More fresh apple pieces diced
– A dollop of maple-sweetened Greek yogurt for extra protein
– A scoop of almond or peanut butter
– Hemp seeds or more chia seeds
– Chopped almonds or your preferred nuts
Storage and meal prep guidelines
Store in wide-mouth mason jars or glass containers with secure lids. Alternatively, you can keep the oats in one large container (which I’ve found to be preferable for preparing multiple servings simultaneously). Refrigerate for up to 2 days; they begin to acquire a gooey texture after 3 days.
I like to make 4-6 servings on a Sunday night, providing us with breakfast for the first few days of the week. The recipe easily doubles or triples, and having them ready to take out from the fridge makes busy mornings far more manageable.
A note on serving temperature
While overnight oats are meant to be enjoyed cold, you can heat them if you choose. Microwave for 30-60 seconds, stirring halfway through.
However, I’ve discovered that the cold version truly showcases the flavors of apple and cinnamon! It’s a taste you’ll need to explore. (Honestly, Alex is still getting accustomed to it!)
Dietary information
This recipe for apple cinnamon overnight oats is vegetarian and naturally gluten-free (when using certified gluten-free oats). It becomes vegan if made with plant-based milk and is also naturally dairy-free, nut-free, and refined sugar-free.
Apple Cinnamon Overnight Oats
These overnight oats with apple and cinnamon are a tasty, whole-grain option for a healthy breakfast! This simple prep-ahead recipe brings together sweet-tart apples, aromatic cinnamon, and chewy oats for an excellent morning dish.
Author: Sonja Overhiser
Prep Time: 5 minutes
Cook Time: 0 minutes
Total Time: 5 minutes
Yield: 2 servings
Category: Breakfast
Method: No Cook
Cuisine: Breakfast
Diet: Vegan
Ingredients:
– 1 cup rolled Old Fashioned oats (do not use steel cut or quick cooking)
– 1 cup milk of choice (2%, oat or almond milk)
– 3 tablespoons pure maple syrup
– 1 teaspoon vanilla extract
– ½ tablespoon chia seeds
– ¾ cup chopped crisp tart apple (like Pink Lady)
– ¾ teaspoon cinnamon
– ¼ teaspoon salt, optional
– Chopped pecans, for garnish (optional)
Instructions:
1. In a glass container with a lid, combine the oats, milk, maple syrup, vanilla, chia seeds, apple, cinnamon, and salt, stirring well to mix. (If desired, you can divide the mixture into two half-pint jars.
Read More
How to Prepare Meatball Subs in an Air Fryer
**How to Create Meatball Subs with an Air Fryer**
Meatball subs represent a timeless comfort dish that merges flavorful meatballs with robust marinara sauce and gooey cheese, all contained within a tender sub roll. Utilizing an air fryer to craft this savory meal can save you time and minimize the use of excess oil, resulting in a healthier yet just as gratifying dinner. Here’s a detailed guide to creating meatball subs with an air fryer.
**Ingredients:**
– 1 pound ground beef or turkey
– 1/4 cup breadcrumbs
– 1/4 cup grated Parmesan cheese
– 1 egg
– 2 cloves garlic, minced
– 1 teaspoon Italian seasoning
– Salt and pepper to taste
– 1 cup marinara sauce
– 4 sub rolls
– 1 cup shredded mozzarella cheese
– Fresh basil or parsley for garnish (optional)
**Instructions:**
1. **Make the Meatballs:**
– In a large mixing bowl, blend the ground meat, breadcrumbs, Parmesan cheese, egg, garlic, Italian seasoning, salt, and pepper. Stir until all components are thoroughly combined.
– Shape the mixture into 1-inch meatballs, ensuring uniformity in size for proper cooking.
2. **Preheat the Air Fryer:**
– Set your air fryer to 375°F (190°C) and preheat for about 3-5 minutes. This allows the meatballs to begin cooking right away once placed in the basket.
3. **Cook the Meatballs:**
– Spray the air fryer basket lightly with cooking spray to avoid sticking.
– Arrange the meatballs in a single layer within the basket, keeping them separate. You may have to cook them in batches based on your air fryer capacity.
– Cook the meatballs for 10-12 minutes, shaking the basket halfway through for even cooking. They should be browned and fully cooked with an internal temperature of 160°F (71°C).
4. **Heat the Marinara Sauce:**
– While the meatballs are cooking, warm the marinara sauce in a saucepan over medium heat until bubbling. Alternatively, it can be heated in the microwave.
5. **Build the Subs:**
– Cut the sub rolls lengthwise, making sure not to slice all the way through.
– Insert 3-4 meatballs into each roll, adjusting based on their size.
– Ladle warm marinara sauce over the meatballs, ensuring they are generously coated.
6. **Melt the Cheese:**
– Generously sprinkle shredded mozzarella cheese over the sauced meatballs.
– Place the assembled subs back into the air fryer basket. Lower the temperature to 350°F (175°C) and cook for 2-3 minutes, or until the cheese is melted and bubbling.
7. **Serve:**
– Gently take the subs out of the air fryer and arrange them on a serving platter.
– Optionally garnish with fresh basil or parsley for an extra burst of flavor and color.
– Serve immediately while hot.
**Success Tips:**
– For enhanced flavor, think about mixing in chopped onions or bell peppers with the meatball mixture.
– If you like a spicier sub, include a pinch of red pepper flakes in the marinara sauce.
– To make the subs even more indulgent, brush the insides of the rolls with garlic butter prior to assembling.
Using an air fryer for preparing meatball subs is a practical and effective technique that yields delightful results. Enjoy this satisfying meal alongside a side salad or some crispy fries for a complete and fulfilling dinner.
Read More
Add a Splash of This to Canned Beans for the âBest Flavor Everâ (Itâs Probably in Your Fridge!)

It adds subtle sweetness.
READ MORE…


Momofukuâs âSo Deliciousâ Noodles Are the Perfect Weeknight Dinner (Only $3 Per Pack)

A pantry must-have!
READ MORE…

Pasta infused with Chicken Cheesesteak Tastes
Pasta with Chicken Cheesesteak
Preparation Time: 10 minutes Cooking Time: 20 minutes Overall Time: 30 minutes Yield: 4
A fast and simple pasta dish packed with the flavors of chicken cheesesteak sandwiches!
ingredients
- 8 ounces pasta (gluten-free if needed)
- 1 tablespoon oil
- 1 pound boneless, skinless chicken breasts or thighs, cut into strips
- 1 teaspoon (smoked) paprika
- 1 teaspoon garlic powder
- 1 teaspoon onion powder
- 1/2 teaspoon oregano (or Italian seasoning (link))
- 1/2 teaspoon cayenne (optional)
- 1/2 teaspoon salt
- 1/2 teaspoon pepper
- 1 onion, chopped
- 1 bell pepper, chopped
- 1/2 cup chicken broth (link) (or water)
- 1 tablespoon soy sauce (optional) (use gluten-free or tamari for gluten-free)
- 1 tablespoon Worcestershire sauce (optional) (choose gluten-free for gluten-free)
- 1 tablespoon hot sauce (like Frank’s RedHot)
- 1 tablespoon Montreal steak seasoning (link) (or adjust salt and pepper to taste)
- 1/2 cup cheese whiz (optional)
- 4 slices provolone cheese
instructions
- Begin cooking the pasta according to the package instructions.
- In the meantime, heat the oil in a large skillet over medium-high heat, then add the chicken, seasoned with paprika, garlic powder, onion powder, oregano, cayenne, salt, and pepper, and cook for 5 minutes.
- Add the onion and bell pepper, cooking until just tender, about 5 minutes.
- Incorporate the broth, soy sauce, Worcestershire sauce, hot sauce, and seasoning, bringing to a boil; then reduce heat and let simmer for a few minutes.
- Turn off the heat, stir in the cheeses, allowing them to melt into the sauce.
- Combine the pasta, adding some of the reserved pasta water for desired sauce consistency, and enjoy!
Alternative: Use ground chicken.
Alternative: Stir in 1 cup heavy/whipping cream, along with the cheeses.
Alternative: Introduce 4 ounces cream cheese to blend in with the cheeses to melt into the sauce.
Alternative: Incorporate 1 cup shredded mozzarella cheese along with the cheeses for melting into the sauce.
Alternative: Mix in 1/4 cup grated parmesan cheese, along

Japanese Cheesecake Recipe: A Comprehensive Step-by-Step Tutorial
# Promised to Be Among the Finest Japanese Cheesecakes in Tokyo: Mr. Cheesecake
If you’ve had the opportunity to visit Japan, you’d observe that if there is one thing for which people will queue up, it’s delicious food. Whether it’s chewy udon noodles, airy shokupan, or crunchy gyoza, if it’s good, expect a line. We’ve stood in numerous lines across Tokyo, and the results were nearly always phenomenal.
## The Finest Japanese Cheesecake
Mr. Cheesecake is considered Tokyo’s most sought-after and exclusive cheesecake. Ironically, there are no queues, but that’s simply because they don’t operate a physical storefront. The rich rectangular cheesecakes are available for purchase online only two days a week, and they disappear in minutes. Enthusiastic food lovers in Japan have dubbed it the phantom cheesecake. Even if you happen to be one of the fortunate individuals who successfully order a cheesecake, you aren’t able to select the delivery date or time.

Chef Koji Tamura is the mastermind behind Mr. Cheesecake. His cheesecakes are crafted from a sumptuous blend of cream cheese, sour cream, heavy cream, yogurt, tonka beans (a highly fragrant bean that imparts warming flavors of vanilla, cherry, almond, and cinnamon), white chocolate, vanilla beans, and lemon. The outcome is a remarkably creamy yet airy cheesecake that echoes Basque cheesecake, but is significantly more delicate. Tamura suggests savoring it in three different ways: frozen, directly from the refrigerator, and at room temperature. The various temperatures influence the flavor and texture.
Regrettably, we never had the opportunity to order a Mr. Cheesecake while in Tokyo, but fortunately, chef Tamura made an official recipe available online. While the recipe involves various steps, it is quite straightforward to execute. The outcome is delectable: extremely creamy, incredibly rich, subtly sweet, and tangy cheesecake.

I prepared the cheesecake twice, once in a standard loaf pan and once in a mini pan. I didn’t quite achieve the height I desired in either the regular or mini loaf pan, leading me to believe they likely utilize a Japanese standard size. Nevertheless, I adore this cheesecake. I froze some to conduct three comparative taste tests.
## What Makes This Cheesecake So Irresistible?
The cheesecake that was frozen from the fridge possessed a firm, frozen custardy texture with the lemon flavor distinctly prominent. From the refrigerator, the cheesecake exhibited that timeless melt-in-your-mouth feeling, with a subtle hint of vanilla and a perfect balance of sweetness. My favorite was at room temperature, featuring a melty, almost creamy core that was velvety and soft, reminiscent of crème brûlée but cheesecake-like and slightly firmer.
## How to Create Mr. Cheesecake
1. **Cream.** Mix the cream cheese and sugar over a double boiler until fully blended.
2. **Melt.** Warm the cream with the chocolate until the chocolate has completely melted.
3. **Mix.** Unite the cream cheese mixture with the chocolate cream mixture.
4. **Prepare the batter.** In a different bowl, blend the sour cream, yogurt, egg yolks, and vanilla. Incorporate the cornstarch until the mixture is smooth.
5. **Combine.** Stir everything together well.
6. **Bake.** Pour the batter into a lined baking pan and bake in a water bath. Allow it to cool completely and enjoy!
Wishing you the chance to sample this cheesecake! It’s the simplest and most straightforward way to experience a taste of Tokyo right now.
**Note:** I omitted the tonka beans as they are quite difficult to source, but if you opt to include them and have access, you’ll need 1/2 a tonka bean, grated. It should be added to the white chocolate mixture.
**Tip:** I found the lemon a bit too pronounced, so during the preparation of the second mini cheesecake, I left it out and enjoyed it even more.
## The Finest Japanese Cheesecake Recipe
### Serves: 8
### Ingredients
– 200 grams cream cheese (at room temperature, about 3/4 cups)
– 100 grams sugar (about 1/2 cup)
– 100 grams cream (about 6 tbsp)
– 50 grams white chocolate (about 1/3 cup)
– 180 grams sour cream (about 3/4 cup)
– 50 grams Greek yogurt (about 1/4 cup)
– 2 egg yolks (at room temperature)
– 9 grams lemon juice (about 2 tsp)

How to Prepare Homemade Applesauce
## Homemade Applesauce: A Simple Autumn Treat
Homemade applesauce is a beloved recipe for making the most of fresh autumn apples. This scrumptious dish consists of a simple mix of apples, sugar, and cinnamon, embodying the spirit of fall in every spoonful.
### Key Advantages of Homemade Applesauce
– **Few Ingredients**: It requires just **3 ingredients** plus a dash of water.
– **All Types of Apples**: You may use **any type of apples** on hand.
– **Adjustable Flavor**: It’s **wholesome and tasty**, enabling you to modify the sugar and spice according to your taste.
– **Freezable**: This recipe **freezes beautifully**, making it an easy snack or dessert, especially when served warm with ice cream.
### Ideal Apples to Use
Nearly any apple variety is suitable for homemade applesauce. Think about blending various kinds like Granny Smith, Gala, Golden Delicious, Honeycrisp, Jonagold, or Fujis. Sweeter apples will create a sweeter sauce, while tart apples like Granny Smith offer a tangier taste. Modify the sugar based on the sweetness of your apples for an ideal balance.
### Steps for Making Applesauce
1. **Prepare the Apples**: Peel, core, and dice the apples.
2. **Cook the Mixture**: Combine the apples with cinnamon, water, and sugar in a saucepan. Cook over medium heat, stirring from time to time.
3. **Mash or Blend**: Once the apples are soft, mash them with a masher for a chunky consistency or blend until smooth.
Serve your applesauce as a dessert with yogurt, atop vanilla ice cream, or as a side with savory dishes like pork chops.
### Variations to Explore
– Replace water with your favorite juice or apple cider for enhanced flavor.
– Boost with additional spices like pumpkin pie spice or a dash of nutmeg.
– Use a sweetener of your choice instead of sugar, adjusting to your preference.
– For convenience, prepare the applesauce in a slow cooker on low for around 3 hours.
### Storing Leftovers
Homemade applesauce can be kept in the refrigerator for up to one week. For extended storage, freeze it in small containers or freezer bags, ideally in one-cup portions, for up to four months.
### Final Thoughts
Homemade applesauce is not only a delightful way to relish autumn apples but also a multipurpose ingredient that can be included in various meals. Whether you savor it as a snack, dessert, or accompaniment, this easy recipe is sure to become a staple in your kitchen.
Read More