
Layered Taste Starter: An Audience-Enjoying Treat in Each Scoop
# 7-Layer Dip: A Party Hit
Prepare the chips because this 7-layer dip presents a lively combination of creamy, tangy, and crunchy layers that elevate any party’s flavor! This colorful dip not only pleases the crowd but is also remarkably simple to make, establishing it as a go-to for events, game days, or informal gatherings.
## Flavor Profile
The 7-layer dip features a scrumptious mix of fresh, creamy, and tangy flavors, complemented by a hint of heat from taco seasoning and salsa. Each layer adds to a distinct taste sensation that encourages guests to indulge further.
### Key Features:
– **Skill Level**: This taco layer dip assembles swiftly with straightforward steps and no cooking necessary.
– **Prep Note**: It tastes even more incredible when prepared the night prior, allowing for the flavors to blend beautifully. Just top it off before serving.
– **Time-Saving Tips**: Opt for pre-shredded cheese and ready-made guacamole to reduce preparation time.
– **Serving Suggestions**: Pair with tortilla chips or fresh veggies for dipping.
## What’s In 7-Layer Dip?
This dip includes seven delectable layers, but feel free to modify or add ingredients based on your taste!
1. **Refried Beans**
2. **Sour Cream** (combined with cream cheese and taco seasoning)
3. **Guacamole**
4. **Salsa** (well-drained)
5. **Cheese**
6. **Green Onions**
7. **Olives or Tomatoes**
### Variations:
Mix things up by using a Mexican cheese blend in place of cheddar. For an extra kick, include pickled jalapeños. You can also be inventive by adding shredded lettuce, bell peppers, or a sprinkle of cilantro. For a more filling option, think about incorporating cooked and seasoned ground beef.
## How To Make 7-Layer Dip
Making this dip is simple and enjoyable. Here’s the process:
1. **Prepare the Refried Bean Layer**: Blend refried beans with a splash of milk for a smooth texture.
2. **Prepare the Sour Cream Mixture**: Combine cream cheese, sour cream, and taco seasoning using a hand mixer to achieve a fluffy consistency.
3. **Layer the Ingredients**: In a casserole dish, arrange the ingredients starting with the refried beans, followed by the sour cream blend, guacamole, and salsa.
4. **Top and Chill**: Complete with cheese, olives/tomatoes, and green onions. Chill for a minimum of an hour before serving.
### Tips for Success:
– Utilize a hand mixer for the cream cheese layer to guarantee a creamy texture, making it easier to scoop with chips.
– Fully cover the guacamole to avoid browning; store-bought guacamole typically lasts longer.
– Allow the dip to chill for an hour (or overnight) to intensify the flavors. If resting overnight, add toppings just before serving.
– Ensure salsa is drained well to maintain clean layers and avoid sogginess.
## Keep it Fresh
For any leftovers, keep them in an airtight container in the refrigerator for up to four days. Some natural separation may occur; gently drain any excess liquid before serving. Refrain from freezing the dip, as the fresh and creamy layers will alter in texture.
## Conclusion
This 7-layer dip is a superb addition to any gathering, providing a delightful mix of flavors and textures that anyone will adore. With its straightforward preparation and customizable layers, it’s bound to become a favorite at your upcoming event. Savor it with chips or veggies, and watch it vanish!
### Did you enjoy this 7 Layer Dip? Share your thoughts and rating below!
Read More
Key Lime Pie Martini Recipe: A Revitalizing Dessert-Inspired Drink
## Key Lime Pie Martini: A Dessert in a Glass
Savor a sweet treat in a cocktail glass with this **Key Lime Pie Martini**! It’s a *rich* and *zesty* drink that encapsulates all your preferred tastes of the *traditional* Key Lime Pie.
### Introduction
A fantastic cocktail can enhance any event, and when it has the flavors of a Key Lime Pie, it quickly becomes a favorite! This Key Lime Pie Martini recipe is a *heavenly* dessert cocktail brimming with creamy coconut and sharp key lime juice. Adorning this drink with a graham cracker crust and a lime wedge not only boosts its aesthetic charm but also heightens its tastiness.
### Recipe Ingredients
– **Coconut Rum**: Delivers an island vibe with its coconut essence.
– **Vanilla Vodka**: Introduces a sweet note to the concoction.
– **Key Lime Juice**: Imparts the cocktail’s distinct and tangy key lime taste.
– **Simple Syrup**: For extra sweetness.
– **Cream of Coconut**: Adds to the smooth texture.
For a complete list of ingredients and their measurements, refer to the recipe card below.
### How to Make a Key Lime Pie Martini
1. **Fill a cocktail shaker with ice.**
2. **Add the vanilla vodka, coconut rum, key lime juice, simple syrup, and cream of coconut.**
3. **Shake thoroughly for 30 seconds.**
4. **Pour into your preferred martini glass and savor!**
### FAQs
**How do I create a Graham Cracker Crust Rim?**
Place 2 graham crackers in a zip-top bag and crush them into fine crumbs using a rolling pin or cup. Moisten the rim of the glass with lime juice, frosting, or candy melts, then dip it into the crushed graham crackers.
**Can I substitute regular lime juice for key lime juice in this Key Lime Pie Martini?**
Yes, feel free to use regular lime juice instead of key lime juice in this recipe.
### Storage Information
You can **keep** any remaining portions of this refreshing cocktail in your refrigerator for up to 2 days.
### More Fun Cocktail Recipes to Try
For additional delightful cocktail recipes, consider exploring:
– Candy Cane Martini
– Cranberry Margarita
– Rum Hot Toddy
### Nutritional Information
– **Serving Size**: 1 drink
– **Calories**: 452 kcal
– **Carbohydrates**: 51 g
– **Protein**: 0.1 g
– **Fat**: 6 g
– **Sodium**: 28 mg
– **Sugar**: 46 g
Treat yourself to this Key Lime Pie Martini for a refreshing take on a classic dessert!
Read More
How to Create Easy Chocolate Bark at Home
This homemade chocolate bark recipe showcases dark chocolate adorned with cranberries, pistachios, and coconut for a delightful sweet and salty snack. Here’s how to temper chocolate to achieve the ideal crisp texture and shiny appearance.
As a dedicated chocoholic, one of my favorite treats to prepare is Chocolate Bark! It’s incredibly easy to make, and I adore finishing it off with a sweet and salty assortment. It’s the ultimate healthy dessert that’s also enjoyable to create as a gift or for a festive cookie platter.
I prefer using cranberries, pistachios, coconut, and sea salt for the toppings, but you have complete freedom to choose! Here’s how to create the perfect chocolate bark: achieving a smooth luster on the chocolate along with the right crisp snap when you take a bite.
Why Tempering Is Crucial
Some individuals skip tempering their chocolate for chocolate bark, but I’ve discovered it truly makes a difference. Tempered chocolate has a shiny surface, maintains its firmness at room temperature, and breaks cleanly when you snap it. Without tempering, the chocolate may appear dull and can develop white streaks during storage (known as chocolate bloom: which has occurred to me more than once!).
This process entails heating chocolate to a precise temperature, cooling it, and then gently warming it again. It’s not my favorite task (it can be a bit tricky), but the resulting texture is well worth the effort.
Selecting Ingredients for Chocolate Bark
Here’s what you’ll require for this chocolate bark recipe:
– High-quality semi-sweet or 60% dark chocolate: In my experience, 60% dark chocolate has the most delightful flavor. Even though I’m a massive fan of dark chocolate, 70% can be a touch too bittersweet. The better the quality of the chocolate, the richer the taste!
– Dried cranberries: Contribute a tart sweetness that balances the richness of dark chocolate. I’m also fond of the vibrant color they add.
– Pistachios: Provide a buttery crunch and stunning green hue.
– Large coconut flakes: Introduce an interesting flavor and a confetti-like appearance.
– Sea salt or smoked sea salt: I am a big supporter of the salty and sweet combination. If you opt for smoked salt, it’s the secret ingredient that has everyone asking for the recipe.
How to Temper Chocolate
Chocolate is temperamental: end of story! As mentioned earlier, tempering is a specialized technique that heats and cools chocolate to stabilize it for candy-making. This process results in the most stable texture, shiny surface, and avoids the white “bloom” that may develop on chocolate during storage. Here are a few tips for tempering chocolate:
– You’ll need a food thermometer and a small saucepan filled with barely simmering water. The essential rule: do not allow even a drop of water to contact your chocolate, or it will seize into a grainy disaster.
– Melt two-thirds of your chopped chocolate by placing a bowl over the simmering water until it reaches 108-115°F. Remove it from heat and mix in the remaining unmelted chocolate pieces: these are referred to as “seed” pieces, and they assist the melted chocolate in crystallizing properly as it cools to 85-86°F. Then, reheat it until it reaches 90-91°F. Now you’re prepared to create chocolate bark!
If you don’t have a food thermometer or prefer to skip this step, you can still produce decent chocolate bark. It simply won’t have that beautiful sheen and crisp snap.
Chocolate Bark Mix-In Suggestions
Once you’ve successfully navigated the chocolate melting stage, making chocolate bark is a breeze! For this batch, I used cranberries, pistachios, coconut, and smoked salt. To me, the blend of sweet, salty, crunchy, tropical, and smoky is perfection!
The smoked salt is optional, but if you can track it down, it adds a unique twist (if not, regular sea salt will suffice). Naturally, you can incorporate any mix-ins you enjoy. Here are a few more suggestions for chocolate bark toppings:
– Nuts such as pistachios, walnuts, cashews, pecans, hazelnuts
– Seeds like pumpkin seeds or sesame seeds
– Dried fruits such as dried cranberries, cherries, apricots, blueberries, or freeze-dried strawberries (great for a Valentine’s Day version)
– Crystalized ginger
– Broken pretzel pieces
– Crushed peppermint candies
– Chopped candies of any kind
– Crushed potato chips
– Sprinkles
Serving and Gifting Suggestions
After your chocolate bark has set and is broken into irregular shards, it makes a delightful addition to holiday cookie platters. You can also package pieces in plastic bags tied with ribbons for charming gifts.
For dinner gatherings, chocolate bark pairs wonderfully with espresso martinis or as a component of a dessert board featuring chocolate mousse and fresh berries.
Storage Recommendations
Tempered chocolate is stable at room temperature, but I
Read More
Easy Recipe for Glossy Frosting on Sugar Cookies
Easy Sugar Cookie Frosting: A Quick Reference for Holiday Adorning
This easy sugar cookie frosting mixes swiftly, pipes effortlessly, and dries with a delicate, shiny finish, making it ideal for holiday adorning. With its sweet and creamy flavor, accented by a touch of vanilla, this frosting is guaranteed to elevate your festive edibles.
Essential Tools
- Piping Bag: Crucial for tidy outlines.
- #2 Cake Decorating Tip: Perfect for intricate designs.
- Zip-Top Bags: A convenient substitute for piping if a piping bag isn’t available.
Yield
This recipe yields sufficient frosting to embellish around 48 medium cookies, depending on your decorating approach.
Freezing
Cookies that have been decorated freeze effectively once the frosting has completely set, enabling you to prepare in advance for your holiday celebrations.
Ingredient Insights
- Powdered Sugar: Produces a smooth, shiny surface; sifting prior to use guarantees optimal texture.
- Vanilla Extract: Clear vanilla preserves a bright white color, while regular vanilla contributes flavor and a subtle tint. You can also try almond, peppermint, or lemon extracts for distinctive flavors.
- Light Corn Syrup: Adds luster and aids the frosting in hardening while keeping a soft texture.
- Milk: Whole, non-dairy, or skim milk may be utilized. Be aware that non-dairy milk might influence the frosting’s hue.
- Gel Food Coloring: Blends seamlessly without thinning the frosting; use sparingly for striking colors.
How to Prepare Frosting for Sugar Cookies
- Combine all ingredients until smooth (full recipe below).
- Modify the thickness as desired and color with food coloring.
Add festive sprinkles or crushed candy canes for additional excitement in your cookie decorating!
To Frost Cookies
- Fill a piping bag with thicker frosting for outlining each cookie.
- Once the outlines set for about 10 minutes, flood the inner part with thinner frosting.
- Top with sprinkles or other fun toppings!
Consistency Tips
- Incorporate milk gradually to achieve the preferred consistency.
- The flood frosting should flow effortlessly but remain confined within the edge.
- For vibrant hues, blend gel food coloring slowly and let it sit to develop.
Storing Your Frosted Cookies
- Frosting: Keep any leftovers in an airtight container in the fridge for up to 4 days. Rewhisk and adjust consistency with a splash of milk if necessary.
- Cookies: Let decorated cookies dry thoroughly before storing them between layers of parchment. They can be kept at room temperature for up to 4 days or frozen for up to 3 months.
Recipe Recap
- Prep Time: 10 minutes
- Total Time: 10 minutes
- Servings: 48 iced cookies
Ingredients
- 2 cups powdered sugar
- 2 tablespoons light corn syrup
- 1 teaspoon vanilla extract
- 1 tablespoon milk (adjust for consistency)
- Gel food coloring (optional)
Instructions
- Using a hand mixer, whip together powdered sugar, corn syrup, vanilla, and 1 tablespoon of milk in a small bowl until smooth.
- Add milk a few drops at a time to achieve the desired consistency.
- Incorporate food coloring to reach the desired shade. Decorate cookies and allow the frosting to set.
This easy sugar cookie frosting is a charming way to add a special touch to your holiday baking. Enjoy decorating and sharing your festive creations!
Read More
How to Create Genuine Neapolitan Pizza at Home
Alex & Sonja: The Culinary Team Behind A Couple Cooks
Introducing Alex and Sonja Overhiser, the energetic pair behind the well-loved culinary site, A Couple Cooks. As the authors of two praised cookbooks and busy parents, Alex and Sonja have perfected the balancing act of family life alongside their culinary passion. Their adventure started in 2010 with the inception of A Couple Cooks, a platform focused on presenting simple, seasonal recipes and the delight of preparing food.
Throughout the years, Alex and Sonja have developed an extensive array of thousands of original recipes, each created with love and originality. Their selection spans from quick dinners for the week to intricate meals for special events, all aimed at motivating home chefs of all experience levels. The recipes feature impressive photography, showcasing the vivid colors and textures of each dish, all expertly styled and captured by the couple.
In addition to recipes, A Couple Cooks serves as a valuable resource for cooking tips and meal planning strategies. Alex and Sonja are dedicated to making cooking both accessible and enjoyable, equipping readers with the necessary tools for kitchen success. Whether offering guidance on selecting the freshest ingredients or techniques for honing a specific dish, their knowledge is vital for both beginners and seasoned cooks alike.
The Overhisers’ culinary approach is deeply grounded in simplicity and seasonality. They advocate that cooking should be a fun, relaxed experience that brings people together. This philosophy shines through in their recipes, which prioritize fresh, wholesome ingredients and easy preparation methods. By highlighting the natural tastes of seasonal produce, Alex and Sonja inspire their audience to appreciate the charm of uncomplicated cooking.
As parents, Alex and Sonja recognize the difficulties of cooking for a family. Their recipes are tested on their own children, guaranteeing that every dish is not just delicious but also suitable for families. This pragmatic approach resonates with their audience, many of whom are balancing the demands of work, parenting, and a healthy lifestyle.
Through A Couple Cooks, Alex and Sonja have created a lively community of food lovers who share their enthusiasm for cooking. Their captivating content and authentic love for food have garnered them a devoted following, both online and in print. As they pursue new culinary adventures, Alex and Sonja remain committed to motivating others to experience the joy of cooking together.
Read More
A Compilation of 50 Easy Seafood Dishes and Recipes
Alex & Sonja: The Gastronomic Pair Behind A Couple Cooks
In the extensive realm of food blogging, Alex and Sonja Overhiser shine as an energetic pair who have fused their enthusiasm for cooking with their affection for each other. As the founders of the renowned site “A Couple Cooks,” they have been motivating home chefs worldwide since 2010. Their evolution from passionate food enthusiasts to published writers and impactful bloggers is proof of their commitment to spreading the joy of culinary arts to others.
The Genesis of A Couple Cooks
Alex and Sonja Overhiser began their culinary adventure over ten years ago, fueled by a wish to delve into the realm of straightforward, seasonal dishes. What commenced as a personal endeavor swiftly transformed into a platform for sharing their culinary masterpieces with a broader audience. Their method was clear-cut: craft tasty, approachable recipes that anyone could replicate at home.
A Love for Easy, Seasonal Cooking
The core philosophy of A Couple Cooks is anchored in simplicity and seasonality. Alex and Sonja hold that the finest meals stem from fresh, nutritious ingredients that are readily accessible. Their recipes frequently emphasize the inherent tastes of fruits and vegetables, highlighting the significance of dining with the seasons. This methodology not only elevates the flavor of their creations but also advocates for sustainable and healthy eating practices.
From Blog to Published Works
The triumph of A Couple Cooks propelled Alex and Sonja to write two cookbooks, further solidifying their role as culinary trendsetters. Their books serve as an extension of their blog, presenting readers with a thoughtfully curated selection of recipes that embody their culinary beliefs. Each recipe is carefully developed and tested, guaranteeing that readers can achieve the same delectable outcomes in their kitchens.
Cooking as a Family Experience
As active parents, Alex and Sonja recognize the hurdles of meal preparation for a family. They frequently involve their kids in the cooking activities, transforming it into a fun and educational adventure for everyone. This interactive approach not only teaches their children essential cooking techniques but also nurtures a passion for healthy eating from an early age.
Imagery and Presentation
An outstanding aspect of A Couple Cooks is the breathtaking photography that accompanies each recipe. Alex and Sonja take pride in showcasing the allure of their dishes through their photography, ensuring each recipe is visually striking. Their meticulous attention to detail in both presentation and imagery adds an additional layer of inspiration for their audience.
Engaging with a Global Community
Throughout the years, A Couple Cooks has evolved into a vibrant community of food lovers who share a mutual passion for cooking. Alex and Sonja connect with their audience through social media, newsletters, and interactive content, fostering a sense of unity and kinship. Their authentic enthusiasm for cooking and their approachable demeanor have endeared them to followers around the globe.
Final Thoughts
Alex and Sonja Overhiser have converted their passion for cooking into a thriving enterprise that continues to motivate and instruct home chefs everywhere. Through A Couple Cooks, they have demonstrated that cooking can be a delightful and fulfilling endeavor, one that unites families and celebrates the splendor of simple, seasonal ingredients. As they persist in sharing their culinary experience, Alex and Sonja remain a cherished source of inspiration for anyone wishing to venture into the world of home cooking.
Read More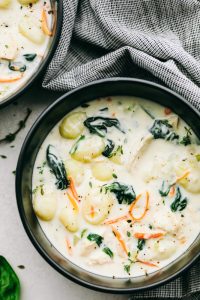
Rich Chicken and Gnocchi Dish
### Creamy Chicken and Gnocchi: An Easy and Delectable Evening Meal
Creamy Chicken and Gnocchi is an exquisite dish that fuses succulent chicken with soft gnocchi in a decadent, creamy sauce. This recipe is not only quick and straightforward to make but also remarkably gratifying, making it ideal for a weekday meal. Pair it with a light green salad, and you have a wholesome dish that the entire family will adore.
#### Why This Recipe Is Exceptional
The blend of sautéed chicken and creamy gnocchi crafts a cozy meal that’s overflowing with taste. The inclusion of shallots and sun-dried tomatoes elevates the flavor, while the cream contributes a luxurious consistency. Utilizing pre-made gnocchi streamlines the cooking method, letting you prepare this dish in just 30 minutes.
#### Ingredients
– **Chicken:**
– 2 chicken breasts, horizontally halved
– All-purpose seasoning blend
– **Gnocchi:**
– 1 package of gnocchi (mini or regular)
– **Finishers:**
– Olive oil
– Shallots
– Sun-dried tomatoes
– Chicken broth
– Heavy cream
– Fresh spinach
– Salt and pepper
– Fresh thyme
– Parmesan cheese (optional)
#### Instructions
1. **Sauté the Chicken:**
– Heat olive oil in a large skillet over medium-high heat. Season the chicken on both sides with the spice blend. Cook for 3-4 minutes each side until golden brown and fully cooked (165°F). Remove the chicken and set aside.
2. **Sauté the Shallots:**
– In the same skillet, add more olive oil if necessary, then incorporate the shallots and sun-dried tomatoes. Cook for approximately 5 minutes until the shallots are golden and tender.
3. **Incorporate Gnocchi and Broth:**
– Add the gnocchi and chicken broth to the pan. Simmer for around 5 minutes until the gnocchi are soft.
4. **Mix in Cream and Spinach:**
– Stir in the heavy cream and spinach. Allow it to simmer for a few minutes to thicken the sauce. Season with salt, pepper, and fresh thyme.
5. **Reintroduce Chicken to the Pan:**
– Add the cooked chicken back to the skillet, letting it absorb the flavors of the sauce.
6. **Serve:**
– Plate the chicken with a generous portion of the creamy gnocchi and sauce. Sprinkle with Parmesan cheese if desired.
#### Tips for Excellence
– **Gnocchi Choices:** You can opt for mini or standard gnocchi, or even gluten-free options as needed.
– **Flavor Boosts:** For more depth, consider using Better Than Bouillon chicken base mixed with water for the broth.
– **Vegetable Alternatives:** If sun-dried tomatoes aren’t your preference, try DeLallo tomato bruschetta for a juicier substitute.
#### Conclusion
Creamy Chicken and Gnocchi makes for an ideal meal during hectic weeknights, providing a delightful mix of flavors and textures that will satisfy everyone at the table. With minimal preparation and cooking time, this dish is destined to become a household favorite. Relish your sumptuous dinner!
Read More
Holiday Pull Apart Bread in the Form of a Christmas Tree
This pull-apart bread shaped like a Christmas tree is a charming and festive starter ideal for holiday celebrations. Composed of cheese-filled dough balls brushed with garlic herb oil and baked to a golden perfection, it is sure to bring a bit of enchantment to any occasion. The bread dazzles the eyes and delights the palate, combining garlicky, Parmesan, and herb rolls stuffed with stretchy mozzarella. Accompany it with marinara sauce for an added holiday flair.
### Ingredients You’ll Require
– **All-purpose flour**: For a tender, fluffy consistency.
– **Instant or active dry yeast**: To facilitate the rise of the dough.
– **Olive oil**: A flavorful alternative to butter.
– **String cheese mozzarella sticks**: Key for achieving the ultimate cheese pull.
– **Garlic cloves and Italian seasoning**: To provide a fragrant, savory taste.
– **Grated Parmesan cheese**: Essential for a crispy crust.
– **Fresh rosemary**: Imparts an earthy, herbal taste.
### Instructions for Crafting Christmas Tree Pull Apart Bread: Step by Step
**Step 1: Prepare the dough and allow it to rise.**
Combine the ingredients, knead for 8 minutes until smooth, and let it rise until it doubles in volume.
**Step 2: Form the Christmas tree shape.**
Preheat the oven to 425°F. Split the dough into 32 sections, stuff with cheese, and roll into balls. Place them in a tree formation on a baking sheet.
**Step 3: Apply the garlic herb glaze and bake.**
Coat with garlic herb oil, dust with Parmesan, and bake until they are golden brown. Garnish with fresh rosemary.
### Serving Suggestions for Holiday Celebrations
This bread is ideal for any festive occasion. Serve it warm alongside marinara sauce for dipping.
### Storage and Preparation Tips
Keep in an airtight container for up to 4 days. Reheat at 350°F for 8-10 minutes. To prepare in advance, refrigerate the shaped dough overnight and bake it the following day.
### Dietary Information
This Christmas tree pull apart bread is suitable for vegetarians.
### Common Questions
**Can I substitute a different type of cheese?**
String cheese is advised for optimal cheese pull and taste.
**Can I incorporate additional fillings besides cheese?**
Absolutely, consider adding cooked bacon, sundried tomatoes, or olives, making sure they’re well-drained.
**How can I tell when the bread is completely baked?**
The rolls should turn golden brown and emit a slightly hollow sound when tapped.
This festive bread is guaranteed to impress at your next holiday event, adding both beauty and flavor to your table.
Read More
Kielbasa and Cheese Pasta Recipe
Cheesy Kielbasa Pasta: An Irresistible One-Pan Treat
For those in search of a quick and fulfilling meal, this Cheesy Kielbasa Pasta is the answer. This recipe merges the smokiness of kielbasa sausage with a creamy, cheesy sauce, all prepared in a single pan for hassle-free cleanup.
Kielbasa, a variety of smoked sausage, takes center stage in this dish. Its deep, savory flavor complements the creamy sauce beautifully, making it a hit among sausage enthusiasts. The process is simple, beginning with frying the kielbasa to enhance its taste. Following that, onions and bell peppers are sautéed, providing a sweet and fragrant foundation for the dish.
The magic unfolds when you introduce tomatoes, broth, and pasta to the skillet. As the pasta cooks, it soaks up the flavors from the sausage and vegetables, resulting in a delightful combination of tastes. Once the pasta reaches the perfect doneness, cream and cheese are mixed in, yielding a rich, smooth sauce that envelops every bite.
This one-pan marvel is not just tasty but also practical, making it a perfect option for hectic weeknights. With few ingredients and an abundance of flavor, Cheesy Kielbasa Pasta is bound to become a fixture in your meal lineup. Share this comforting dish with loved ones, and relish the wonderful blend of kielbasa and cheese.
Read More
Butter Candle: An Overview of Its Applications and Advantages
# Step Aside Butter Boards, the Butter Candle Has Arrived!
Butter candles are the newest sensation in gastronomy, merging the coziness of melted butter with the charm of candlelight. These charming innovations not only function as a distinctive centerpiece but also elevate the pleasure of savoring bread, steak, or any meal that pairs wonderfully with butter. If you adore warm butter and fresh bread, or if you appreciate the idea of butter boards, the butter candle is bound to captivate you.
## What Exactly is a Butter Candle?
A butter candle is just as it sounds: a candle crafted from butter. Featuring a food-safe wick that is ignited at the table, the butter gently melts, turning into a creamy, dip-able, or pourable treat. Although butter candles are typically enjoyed alongside bread, they can also complement a variety of dishes, including seafood, vegetables, meats, mashed potatoes, rice, and even popcorn. The options are limitless, and it’s hard to think of anything that wouldn’t taste better with butter!
## Who Came Up with the Butter Candle Idea?
Butter candles are a contemporary adaptation of traditional tallow candles, which have been utilized since Ancient Rome. Tallow candles, created from beef fat, have recently made a comeback in daring restaurants, often paired with steak. The idea of butter candles gained traction on platforms like TikTok, with creators such as Soozie the Foodie and SAMO demonstrating their unique interpretations of this delectable trend.
## How to Create a Butter Candle
There are two main methods for making a butter candle: hand pouring and hand shaping. Both approaches yield delightful results, but hand pouring is usually more straightforward and results in a more polished look.
### Hand Pouring a Butter Candle
1. **Melt the Butter:** Use a small pot over low heat or microwave in 20-second intervals, stirring after each interval.
2. **Craft the Wick:** Cut a piece of food-safe string and dip it into the melted butter to create a wick.
3. **Position the Wick in the Mold:** Tie the buttered string around a stick or chopstick and set it over your butter candle mold, ensuring it touches the bottom.
4. **Pour the Butter:** Gently pour the melted butter into the mold, centering the wick.
5. **Allow the Candle to Set:** Refrigerate until firm, for at least one hour.
6. **Light and Relish:** Remove the stick, trim the wick, ignite it, and enjoy the melted butter!
### Hand Shaping a Butter Candle
1. Begin with slightly softened butter. Leave it at room temperature for around 20 minutes.
2. Spread a piece of plastic wrap flat and position the stick of butter in the middle.
3. Flatten the butter with your hands or a rolling pin, placing a piece of kitchen string in the center for the wick.
4. Utilize the plastic wrap to roll and shape the butter into a candle form, then refrigerate to firm it up.
### Butter Candle Wicks
For both methods, a food-safe wick is crucial. Utilizing 100% cotton food-safe twine is suggested, as it can be located near the meat section in grocery stores. To prepare the wick, simply dip it in melted butter to improve its flame-holding capabilities.
### Butter Candle Molds
Your choice of mold will be guided by whether you want a free-standing candle or one that stays in a container. For a dippable candle, a shallow vessel like a ramekin works well. For a pourable candle, consider using a small cream pitcher or espresso pourer.
## Salted or Unsalted Butter?
While many opt for salted butter to accompany bread, unsalted butter can also be used, especially when complemented with flaky sea salt. Ultimately, the decision boils down to personal taste.
## Ideal Pairings with Butter Candles
Butter candles can enhance a diverse array of dishes. As a starting point, crusty breads are a timeless selection. At breakfast or brunch, think about pairing them with pancakes, waffles, or muffins. For dinner, melted butter amplifies the flavors of rice, noodles, vegetables, seafood, and meats. An herbed butter candle with steak frites is a classic combination.
## Flavoring Butter Candles
You can concoct a variety of flavored butter candles by blending in ingredients with your melted butter. Some favored options include:
– **Garlic Butter:** 1/2 cup butter plus 4 minced garlic cloves.
– **Herbed Butter:** 1/2 cup butter plus 2 tablespoons fresh herbs.
– **Jalapeño Butter:** 1/2 cup butter plus 2 tablespoons finely chopped jalapeño.
– **Paprika Butter:** 1/2 cup butter plus 1 teaspoon smoked paprika.
– **Shallot Butter:** 1/2 cup butter plus 2 tablespoons finely diced shallots.
– **Red Wine Butter:** 1/2 cup butter, 2 tablespoons red wine, and additional flavorings.
– **Lemon Butter:** 1/