Straightforward and Soothing Cabbage Accompaniment Recipe
### Steamed Cabbage: A Fast, Tender, and Rich Side Dish
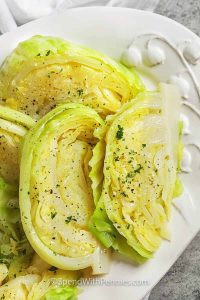
Steamed cabbage is an uncomplicated yet delightful side dish that pairs well with numerous meals. Its gentle, slightly sweet taste, accentuated by a hint of butter and seasoning, makes it a warming enhancement to any dining experience. This article will walk you through the advantages, preparation, and serving ideas for this straightforward dish.
#### Taste Profile
Steamed cabbage is appreciated for its gentle and subtly sweet flavor. The incorporation of butter, salt, and pepper amplifies its inherent tastes, resulting in a soothing side dish that complements various main courses.
#### Cost-Effective
Cabbage ranks among the most economical vegetables, making this dish a cost-effective choice for families and individuals. It adds a healthy component to meals without straining the budget.
#### Flavor Boosters
To enhance the taste of steamed cabbage, consider these alternatives:
– **Broth**: Substitute water with vegetable or chicken broth for a deeper flavor.
– **Bacon Fat**: Incorporate a spoonful of bacon fat into the pot for a smoky essence.
#### Serving Recommendations
Steamed cabbage can accompany numerous entrees, including:
– [Irish Soda Bread](https://www.spendwithpennies.com/irish-soda-bread/)
– [Corned Beef](https://www.spendwithpennies.com/instant-pot-corned-beef/)
– [Ham](https://www.spendwithpennies.com/crock-pot-ham/)
– [Sausage](https://www.spendwithpennies.com/roasted-sausage-and-potatoes/)
#### Ingredient Insights
– **Cabbage**: It is advisable to choose green cabbage. Opt for a sturdy head with compact leaves, keeping the core intact to preserve wedge shape while cooking.
– **Seasonings**: Generously salt the water to ensure the cabbage is thoroughly flavored.
– **Butter**: Pour melted butter over the cabbage after draining for extra richness. Variations may include garlic butter or a hint of Dijon mustard.
– **Variations**: For a burst of freshness, mix in herbs like parsley or chives, or include a dash of lemon juice. Garnishing with green onions or bacon bits can also elevate the dish.
#### How to Steam Cabbage
1. Discard any wilted leaves and slice the cabbage into wedges, retaining the core.
2. Steam the wedges in salted water until soft, generally around 8-12 minutes.
3. Drain thoroughly and drizzle with butter, seasoning to preference.
**Tips for Ideal Steamed Cabbage**:
– Slice wedges consistently for even cooking.
– Salt the water generously, as you would for pasta.
– Begin checking for softness at 8 minutes; the cabbage should be tender while still maintaining its shape.
– Drain well and allow to rest in the colander for a minute to eliminate extra water.
#### Storing Remaining Steamed Cabbage
Store any leftover steamed cabbage in a sealed container in the refrigerator for up to 4 days, or freeze for as long as 2 months. Be aware that freezing may alter the texture, making it better suited for soups, casseroles, or stir-fries. To reheat, warm in a skillet with butter or microwave in short intervals.
### Conclusion
Steamed cabbage is a flexible, swift, and budget-conscious side dish that can enhance a wide range of meals. With its straightforward preparation and versatility, it’s a wonderful addition to any home-cooked dinner. Relish this comforting dish and feel free to explore different flavors and serving suggestions!

30 Vibrant and Lively Dinner Recipes for Spring
### My Ultimate Favorite Spring Dinner Recipes
Spring signifies a time of rejuvenation and freshness, making it an ideal period to shift your dinner selections from substantial winter fare to lively, colorful meals. Here’s a collection of my ultimate favorite spring dinner recipes that feature vibrant salads, fresh sandwiches, herby sauces, and quick weeknight delights. These recipes are not only tasty but also simple to make, making them perfect for hectic spring evenings.
#### 1. Roasted Peanut Kale Crunch Salad
This salad boasts a delightful blend of crunchy kale, cabbage, fresh herbs, and Fresno peppers, garnished with chopped peanuts and a roasted peanut vinaigrette that infuses every bite. It’s a refreshing and nutritious choice for any spring dinner.
#### 2. Sun-Dried Tomato Focaccia Turkey Sandwich
This sandwich showcases fluffy sun-dried tomato focaccia generously layered with pesto mayo, turkey, juicy tomato slices, and greens. It’s a stunning and satisfying meal that’s ideal for gatherings.
#### 3. Spring Roll Bowls with Sweet Garlic Lime Sauce
These bowls are brimming with basil, mint, rice noodles, and your preferred protein and vegetables, all drizzled with a sweet garlic lime sauce. They are easily customizable and can be prepared meatless for a lighter alternative.
#### 4. Salmon Tacos with Mango Corn Salsa
These salmon tacos are remarkably easy to prepare and packed with a fresh mango, sweet corn, and cucumber salsa. They are a perfect way to savor the flavors of spring.
#### 5. Avocado Mojo Bowls with Sweet Potato and Chicken
This dish includes seasoned sweet potato wedges and chicken meatballs or rotisserie chicken, all topped with a vibrant avocado mojo sauce. It’s a colorful and hearty bowl that’s bound to impress.
#### 6. Miso Crunch Salad
A blend of shredded cabbage, kale, shrimp, avocado, and chili-flavored peanuts, all tossed in a sweet miso dressing. This salad is both crunchy and satisfying.
#### 7. Cilantro Orange Chicken with Rice and Beans
This savory chicken dish is crisped to golden perfection and served with rice, beans, and a quick homemade pineapple salsa. It’s a delightful medley of flavors that’s perfect for spring.
#### 8. Ginger Chicken Meatball Sandos
Golden brown chicken meatballs are paired with cucumbers, shallots, kewpie mayo, mint, and cilantro, creating a delicious and simple sandwich option.
#### 9. Liz’s Bistro Salad
This French-inspired bistro salad is light and fresh, featuring tender greens, fresh herbs, pickled onions, and a delicate vinaigrette, making it an ideal side for any dinner.
#### 10. Chipotle Orange Shrimp with Cilantro Rice
Tender shrimp are cooked in a sweet-meets-smoky cream sauce and served atop cilantro-speckled rice, accompanied by tangy cucumbers.
#### 11. Harissa Meatballs with Whipped Feta
These meatballs combine store-bought meatballs, bell peppers, zucchini, and whipped feta, resulting in an easy and flavorful dinner.
#### 12. Chicken Lettuce Wraps with Lime Drench
Crispy ground chicken, fluffy quinoa, and sautéed vegetables are enveloped in crisp butter lettuce leaves for a fresh and satisfying meal.
#### 13. Elote Style Quinoa Salad
This salad merges velvety peppers confit, juicy sweet corn, homemade dressing, cotija cheese, lime, and spices for a perfect spring dish.
#### 14. Pesto Shrimp and Parmesan Risotto
Juicy shrimp are brushed with pesto and served over creamy Parmesan risotto, topped with fresh tomatoes and herbs for an indulgently rich meal.
#### 15. Garlic Cream Bucatini with Peas and Asparagus
Bucatini noodles are twirled in a garlic-infused creamy sauce with buttery asparagus and peas, creating a delightful spring pasta dish.
#### 16. Spring Salmon with Creamed Leeks, Potatoes, and Asparagus
This dish features golden-crisp salmon served with oven-roasted asparagus and a rich creamy leek sauce over crispy potatoes.
#### 17. Red Chile Chicken Tacos with Creamy Corn
These tacos are stuffed with tender chicken and a creamy corn salsa, resulting in a flavorful and satisfying meal.
#### 18. The Oliver’s Salad
Inspired by a restaurant in Minnesota, this salad incorporates tender salmon, savory peppers, garlic confit, avocado, fire-roasted corn, and a smoky ranch dressing.
#### 19. 5 Ingredient Lemon Chicken with Asparagus
A quick and effortless dish featuring pan-fried chicken infused with lemon flavors and tender asparagus, ready in just 20 minutes.
#### 20. Yummy Salmon Burgers with Slaw
These salmon burgers are crafted with just five ingredients and are ideal for a quick, high-protein meal.
#### 21. Easy Crockpot Carn
Read More
A Summary of the Elements of a Complete English Breakfast
# Bacon, Sausages, Eggs, Tomatoes, Mushrooms, Toast, and Beans All on One Plate: Is a Full English Breakfast the Most Ultimate Breakfast Ever?
## What is a Full English Breakfast?
Commonly known as a “fry-up,” a Full English breakfast is a hearty meal traditionally offered in the UK and Ireland. Its popularity has resulted in its availability throughout the day as an all-day breakfast choice. A traditional Full English breakfast usually features sausages, back bacon, eggs, tomatoes, mushrooms, fried bread, and baked beans.
## Essential Components of a Full English Breakfast
1. **Sausages**: The selection of sausages can differ, but many meals showcase a combination. Common varieties include standard breakfast sausages and black pudding, a type of blood sausage that is a key component in numerous Full English breakfasts.
2. **Back Bacon**: Unlike typical bacon sourced from pork belly, back bacon contains a segment of the loin, giving it a distinct flavor and consistency. It is generally less crisp than American bacon.
3. **Eggs**: Most Full English breakfasts feature sunny-side-up eggs, although individual preferences can influence the cooking style.
4. **Tomatoes**: Generally cut in half and cooked in a pan, these are seasoned with salt and pepper, enough to heat them without fully cooking.
5. **Mushrooms**: Typically included for added taste, mushrooms are often sautéed until they are browned and caramelized.
6. **Toast**: Unlike standard toast, the bread in a Full English breakfast is fried in oil or butter, yielding a crispy texture.
7. **Beans**: Baked beans are a traditional component, with Heinz being the most popular brand in the UK.
## How to Make a Full English Breakfast
Making a Full English breakfast necessitates some multitasking, usually requiring two pans. Here’s a detailed guide:
1. **Warm the Beans**: Heat a can of beans in a small saucepan over low heat, stirring from time to time.
2. **Cook the Sausages and Bacon**: In one pan, cook the sausages over medium heat until they are browned and fully cooked. Push them to one side and add the bacon, frying until it is crispy.
3. **Add Black Pudding**: If incorporating black pudding, add it to the pan and fry until fully cooked.
4. **Cook the Mushrooms and Tomatoes**: In a separate pan, sauté the mushrooms until browned. Move them aside and sear the halved tomatoes cut-side down.
5. **Fry the Bread and Cook the Eggs**: Take the meat out of the pan and fry the bread in the residual drippings until golden. Use the same pan to fry the eggs to your preferred doneness.
6. **Plate and Enjoy**: Place the beans in the middle of the plate, then arrange the bacon, sausages, eggs, tomatoes, mushrooms, and fried bread around them.
## Ingredients
– 1 can of baked beans (ideally Heinz)
– 4 breakfast sausage links
– 4 slices of back bacon
– 4 slices of black pudding (optional)
– 1 cup of sliced or halved mushrooms
– 2 small tomatoes, halved
– 4 slices of thick-cut bread
– 4 eggs
## Additional Notes
– **Potatoes/Hash Browns**: Traditionalists frequently object to the addition of potatoes or hash browns, seeing them as unnecessary filler. If you want to add potatoes, consider bubble and squeak, which mixes fried potatoes and cabbage.
– **Baked Beans**: British baked beans differ from American varieties, characteristically featuring a tomato sauce seasoned with vegetables. Heinz is the best-known brand for this dish.
– **Beverages**: A Full English breakfast is commonly accompanied by coffee or tea, with tea being the customary preference.
## Conclusion
The Full English breakfast is a filling and gratifying meal that has established its reputation as a cherished breakfast option in the UK and beyond. While not everyone may find it appealing, its mixture of flavors and textures creates a distinctive culinary experience worth sampling. Whether enjoyed at home or in a café, a Full English breakfast promises to leave you satisfied and content.
Read More
Miffy Sprinkle Cookies: A Perfect Delight for Easter Festivities
# I Am Infatuated with Sprinkle Cookies
Sprinkle cookies, often referred to as funfetti or confetti cookies, have stolen the hearts of many, including my own. With their soft and chewy interiors, subtly crisp edges, and vibrant splashes of colorful sprinkles, they are my undeniable favorite cookie. Given the option between chocolate chip and sprinkle cookies, I would certainly opt for sprinkle cookies each and every time. My affection for sprinkles is so intense that my partner, Mike, frequently purchases enormous bags of rainbow sprinkles, which might appear a bit overboard, but the happiness they bring me is irrefutable.
## What Are Sprinkle Cookies?
Sprinkle cookies are fundamentally soft and chewy cookies embellished with colorful sprinkles. They can be compared to chocolate chip cookies, excluding the chocolate chips and incorporating sprinkles instead. The recipe I enjoy includes both brown sugar and white sugar, which enhances the classic chocolate chip cookie taste. Numerous sprinkle cookie recipes rely heavily on white sugar, yielding a lighter, sugar cookie-like look. Nevertheless, I favor the deep caramel flavor that brown sugar imparts, making these cookies genuinely unique.
This specific sprinkle cookie recipe is my treasured creation, and even Mike, who has a discerning palate for cookies, loves them. We have established a delightful tradition of concluding our evenings with a freshly baked sprinkle cookie each.
## How to Make Sprinkle Cookies
### Ingredients
– **Butter**: 1/2 cup (melted)
– **All-purpose flour**: 1.5 cups
– **Baking soda**: 1/2 tsp
– **Salt**: 1/2 tsp
– **Brown sugar**: 3/4 cup
– **Granulated sugar**: 1/4 cup
– **Egg**: 1 (extra large)
– **Vanilla extract**: 1 tsp
– **Rainbow sprinkles**: 3/4 cup
### Instructions
1. **Melt**: Melt the butter in a saucepan over low heat until it becomes liquid. Pour it into a large mixing bowl and allow to cool.
2. **Measure**: In a separate bowl, whisk together the dry ingredients: flour, baking soda, and salt.
3. **Whisk**: Combine the brown sugar and granulated sugar with the melted butter, mixing until smooth. Add the egg and vanilla, whisking well.
4. **Stir**: Slowly incorporate the dry ingredients until around 80-90% mixed.
5. **Fold**: Delicately fold in the sprinkles, making sure there are no dry patches.
6. **Scoop**: Utilize a medium cookie scoop (approximately 1.5-2 tbsp of dough) to shape the cookies.
7. **Bake**: Preheat the oven to 350°F and bake until the edges are firm and the tops are golden. Let cool before indulging.
## The Sprinkles
The choice of sprinkles can greatly influence the flavor of your cookies. I prefer rainbow jimmies, which are long and colorful, over nonpareils, which are small balls that can be overly crunchy for incorporation into cookies. Fresh, flavorful sprinkles are crucial as they constitute a significant portion of the cookie. I suggest the Canadian brand Yupik, available on Amazon, for their delightful flavor and texture.
## The Secret for the Best Cookies: Melted Butter
A defining aspect of this recipe is the employment of melted butter. While many cookie recipes require room-temperature butter to be creamed with sugar, melted butter produces a chewier, fudgier cookie. This method aids in the cookies spreading and becoming denser as they cool, resulting in a perfectly crisp outside and a tender inside.
### How to Melt Butter for Cookies
To melt butter, simply place it in a small saucepan over low heat and stir until it becomes liquid. Pour it into a bowl to cool slightly before adding it to your cookie dough.
## Miffy Cookies for Easter
In addition to my sprinkle cookie obsession, I am an enormous admirer of Miffy, the charming Dutch bunny. With Easter on the horizon, I find myself eager to create various Miffy-themed delights. Crafting Miffy-shaped cookies is straightforward and enjoyable, bringing a playful element to my baking.
### How to Make Miffy Cookies
1. **Shape her head**: Use a cookie scoop to form a ball of dough for Miffy’s head.
2. **Shape her ears**: Split one cookie dough ball into eight pieces to form short logs for the ears. Attach them atop the head.
3. **Bake and decorate**: Bake until golden and then embellish with melted chocolate for Miffy’s eyes and mouth.
## Conclusion
Sprinkle cookies are not merely a delightful indulgence; they symbolize joy and nostalgia. Although I didn’t grow up with them, I find myself enchanted by their vibrant hues and cheery atmosphere.
Read More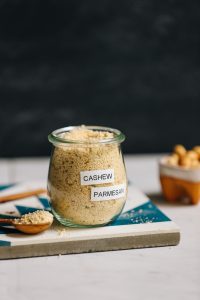
Cheesy Jalapeño Cashew Salad Dressing Formula
### Cheesy Jalapeño Cashew Dressing: A Creamy Vegan Delight
Step aside, Ranch; a new creamy dressing has arrived that’s capturing our affection! This cheesy jalapeño cashew dressing has become our favorite for salads, wraps, and vegetable dipping. It’s savory, rich, and features a mild spicy zing!
#### Quick and Simple Preparation
The best part? It comes together in just **5 minutes** with **9 easy ingredients**. Grab your blender, and let’s get started!
### Ingredients to Prepare Cashew Dressing
– **Cashews**: This adaptable nut forms a rich, creamy foundation that’s naturally oil-free and neutral-tasting, allowing the other flavors to stand out!
– **Water**: Essential for transforming cashews into a dressing-like consistency.
– **Lime juice**: A generous splash of lime (or lemon) juice provides the brightness you desire in this dressing.
– **Nutritional yeast + miso paste + Dijon mustard + sea salt**: This blend of umami and salty elements gives this dressing a kick that may have you wanting to drink it straight from the blender.
– **Maple syrup**: A small amount of maple syrup balances the flavors, particularly the acidity of the lime.
– **Garlic + jalapeño**: These two components introduce zest and heat! The modest quantity ensures the dressing remains well-balanced and not excessively spicy or bitter.
### How to Create Vegan Cashew Jalapeño Dressing
With your ingredients on hand, dressing is just moments away! Simply toss everything into a **high-speed blender** and **blend for a minute or two until ultra-smooth and creamy**. Soaking the cashews is optional, but if you do, adjust the amount of water as necessary.
#### Troubleshooting Tips
– **Blender Quality**: Make sure you are using a high-quality, high-speed blender. Some blenders may lack the power to achieve a fully creamy cashew texture.
– **Volume of Dressing**: If the ingredients aren’t adequately covering the blender blades, the machine might struggle to achieve a smooth consistency. Consider doubling the ingredients or using a smaller blender.
### Why You’ll Adore This Dressing
This dressing is:
– Creamy
– “Cheesy”
– Savory
– Balanced
– Mildly spicy
– Flexible
– Quick and simple!
Whether drizzled over salads, in wraps, or used as a dip for vegetables or chips, it adds immense flavor and richness. This dressing is especially exceptional with taco salad or alongside crispy breaded cauliflower wings or chickpea shawarma sandwiches!
### More Homemade Vegan Salad Dressings
If you try this recipe, we’d love to hear from you! Leave a comment, give it a rating, and don’t forget to tag a photo on Instagram.
### Recipe Details
**Prep Time**: 5 minutes
**Total Time**: 5 minutes
**Servings**: 12 (2-Tbsp servings)
**Course**: Dressing, Sauce
**Cuisine**: Gluten-Free, Vegan
**Does it keep?**: 5-7 Days
#### Ingredients
– 1 cup raw cashews*
– 3/4 cup water
– 1/4 cup lime juice (or lemon juice)
– 2 Tbsp nutritional yeast
– 1 tsp white miso paste (or chickpea miso for soy-free)
– 1 tsp Dijon mustard
– 1 tsp maple syrup
– 3/4 tsp sea salt
– 2 cloves garlic, peeled
– 1 small jalapeño pepper, seeds removed, roughly chopped
#### Instructions
1. Combine all ingredients in a **high-speed blender** and blend on high until extremely smooth and creamy, about 1-2 minutes.
2. Use immediately at room temperature or store in a jar and refrigerate for 3-4 hours to chill. It will thicken in the fridge, so you can add more water later to thin if necessary.
3. Enjoy with salads, cauliflower wings, wraps, or as a dip for veggies. Store leftover dressing covered in the fridge for up to 5-7 days.
*Soaking cashews is optional; adjust water if using soaked cashews. For a nut-free option, consider a blend of raw sunflower seeds and hemp hearts.
#### Nutrition Information (per serving)
– Calories: 70
– Carbohydrates: 5g
– Protein: 2.8g
– Fat: 4.9g
– Saturated Fat: 0.9g
– Sodium: 171mg
– Potassium: 112mg
– Fiber: 0.8g
– Sugar: 1.2g
Savor this delightful dressing that brings creamy, cheesy goodness to your meals!
Read More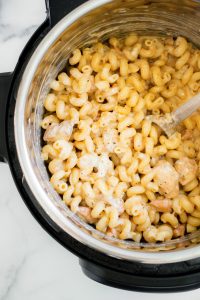
Worldwide One-Pot Meal Recipes
**Embarking on Culinary Journeys with The Wanderlust Kitchen**
In a realm where culinary delights reflect the rich tapestry of their cultural origins, The Wanderlust Kitchen emerges as a lively center for gastronomes and travel aficionados alike. Founded by Linda, this platform is devoted to presenting genuine recipes and travel narratives that motivate individuals to discover new tastes and locales.
### A Tribute to Global Gastronomy
At The Wanderlust Kitchen, the emphasis lies on honoring food traditions from all corners of the world. Every recipe is meticulously created, ensuring that the soul of classic dishes is maintained while also integrating contemporary techniques and ingredients. This fusion of the traditional and the innovative empowers home cooks to recreate genuine meals with assurance, regardless of their culinary expertise.
### Recipes That Spark Exploration
Linda inspires her readers to embrace adventure in the kitchen. The recipes showcased on her blog go beyond mere cooking; they serve as portals to uncover new cultures and experiences. From the fiery curries of India to the exquisite pastries of France, each dish narrates a tale and beckons you to set off on a culinary expedition.
### Food and Travel: An Ideal Combination
Traveling is a vital component of the experience offered by The Wanderlust Kitchen. Linda shares her travel escapades alongside her recipes, granting readers a peek into the places that fuel her culinary creations. Each destination brings forth distinct ingredients and cooking methods, enriching the recipes she shares. This dual emphasis on travel and cuisine encourages readers to not only experiment with new recipes but also to contemplate visiting the inspirations behind them.
### Assurance in Cooking
A fundamental aim of The Wanderlust Kitchen is to build confidence among home cooks. Linda imparts straightforward instructions, useful tips, and personal stories that make the cooking journey accessible and delightful. Whether you’re an experienced cook or a beginner in the kitchen, you’ll discover recipes that match your skill level and encourage you to venture into unfamiliar territory.
### Become Part of the Culinary Adventure
The Wanderlust Kitchen transcends a mere recipe blog; it forms a community for individuals passionate about food and travel. Linda welcomes everyone to partake in this culinary journey, motivating readers to step beyond their comfort zones and explore the world through gastronomy.
### Conclusion
With a dedication to genuine flavors and a spirit of exploration, The Wanderlust Kitchen serves as a delightful resource for anyone eager to broaden their culinary horizons and traverse the globe. So, whether you’re preparing for your upcoming meal or your next adventure, keep in mind Linda’s mantra: Bon Appétit! Bon Voyage!
Read More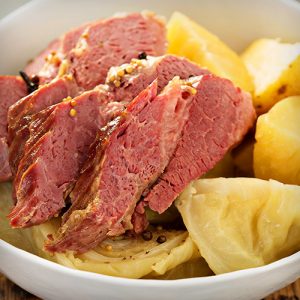
Recipes for Honoring St. Patrick’s Day
**The Top Irish Dishes to Commemorate St Patrick’s Day!**
St Patrick’s Day is approaching, and it’s the ideal moment to start organizing your festive menu! Whether you’re throwing a party or relishing a cozy dinner at home, these classic Irish recipes will assist you in celebrating elegantly.
**Corned Beef and Cabbage**
A classic St Patrick’s Day dish, corned beef is both tasty and simple to make. Just put the beef in a slow cooker in the morning, and by dinner time, you’ll have a tender, scrumptious meal. For an additional flair, glaze the beef and finish it in the oven. Pair with sautéed cabbage and colcannon, a traditional Irish mashed potato dish made with cabbage or kale, for a complete feast. Don’t forget the soda bread to absorb all the delicious juices!
**Irish Stew**
A robust Irish stew is yet another timeless option. Prepared with lamb or beef, potatoes, carrots, and onions, this dish is ideal for warming up on a brisk March day. Cook it slowly to let the tastes blend together wonderfully.
**Shepherd’s Pie**
This comforting meal boasts a flavorful meat filling topped with creamy mashed potatoes. Typically made with lamb, you can also opt for beef for a cottage pie variation. It’s a gratifying dish that’s bound to delight everyone at the table.
**Fish and Chips**
For a taste of the Irish shores, consider preparing fish and chips. Use a light beer batter for the fish and accompany it with crunchy fries. A side of mushy peas and tartar sauce rounds out this pub favorite.
**Guinness-Infused Dishes**
Integrate the rich flavors of Irish stout into your cooking. Guinness complements beef beautifully, so think about making a Guinness beef stew or a Guinness pie. The stout contributes depth and richness to these meals.
**Desserts with a Twist**
No St Patrick’s Day feast is complete without dessert. Guinness and chocolate create a perfect combination, so try a Guinness chocolate cake or brownies. The stout boosts the chocolate flavor, resulting in a luxurious treat.
With these recipes, your St Patrick’s Day celebration will be both delightful and unforgettable. Relish the festivities with excellent food and wonderful company!
Read More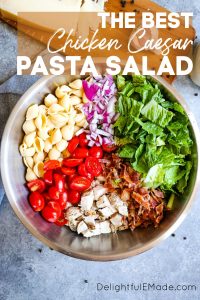
Pasta with Chicken and Caesar Sauce
### Quick and Simple Chicken Caesar Pasta Recipe
If you’re keen on the classic tastes of chicken Caesar salad, then this quick and simple chicken Caesar pasta is a must-try. Merging the creamy, tangy delight of Caesar dressing with tender chicken and pasta, this dish is a charming twist on two cherished favorites. Ideal for hectic weeknights, this one-pot marvel is both easy to make and exceptionally fulfilling.
#### Ingredients:
– 2 cups cooked chicken, cubed or shredded
– 8 oz pasta of your selection
– 2 cups chicken broth
– 1 cup Caesar dressing ([recipe here](https://www.closetcooking.com/caesar-salad-dressing/))
– 1 cup grated Parmesan cheese
– Optional add-ins: crispy bacon bits, peas, baby spinach, sun-dried tomatoes
– Optional toppings: fresh shredded romaine lettuce, croutons
#### Instructions:
1. **Cook the Chicken**: In a large pot or skillet, cook the chicken over medium heat until completely cooked and golden brown. Take out from the pot and set aside.
2. **Prepare the Pasta**: In the same pot, add the pasta and chicken broth. Bring to a boil, then lower the heat and simmer until the pasta is al dente and most of the liquid is absorbed.
3. **Combine Ingredients**: Mix in the Caesar dressing and Parmesan cheese, blending until the cheese is melted and the sauce is creamy.
4. **Add Chicken and Extras**: Put the cooked chicken back into the pot, along with any optional add-ins like bacon, peas, or spinach. Stir until everything is well mixed and heated through.
5. **Serve**: Plate the pasta and, if you wish, top with fresh shredded romaine lettuce and croutons for an added Caesar salad flair.
This chicken Caesar pasta is not only tasty but also adaptable. Feel free to customize it with your preferred ingredients or whatever you have available. Whether you stick to the base recipe or experiment with add-ins, this dish is sure to be a family favorite. Savor the comforting flavors of Caesar salad in a robust pasta form, ideal for any evening of the week!
Read More
Easy and Fast Rice Bowl Recipe
Alex & Sonja: The Culinary Team Behind A Couple Cooks
Alex and Sonja Overhiser constitute the vibrant duo behind the well-known food blog, A Couple Cooks. As creators of two cookbooks and busy parents, they have channeled their enthusiasm for cooking into a flourishing online space that motivates countless home cooks globally. Their adventure started in 2010 when they founded A Couple Cooks with the aim of sharing straightforward, seasonal recipes and the joy of cooking as a pair.
The Overhisers’ philosophy regarding food is based on simplicity and seasonality. They hold the belief that cooking should be within reach for everyone, irrespective of skill level, and that some of the best meals are the simplest ones. This principle is clear in the thousands of original recipes they have created, each one thoughtfully crafted and tested in their kitchen. From hearty breakfasts to refined dinners, their recipes accommodate a broad spectrum of tastes and dietary requirements.
Beyond recipes, Alex and Sonja provide an abundance of cooking advice and meal planning suggestions. Their blog serves as a rich resource for anyone eager to enhance their culinary abilities or simplify their meal preparation. Whether offering guidance on selecting the freshest fruits and vegetables or providing detailed instructions for mastering new techniques, they deliver valuable insights that make cooking more pleasurable and less intimidating.
Photography is a fundamental aspect of A Couple Cooks. Each recipe features striking visuals that highlight the beauty and allure of the dishes. The Overhisers’ photography skills add to the overall enjoyment of their blog, captivating readers and motivating them to experiment with new recipes.
As a real-life couple who enjoy cooking together, Alex and Sonja imbue a personal touch into their work. Their authentic passion for food and one another shines in every entry, fostering a warm and welcoming atmosphere that resonates with their audience. They frequently share stories from their own experiences, providing a glimpse into their family life and the significance of food in their everyday routines.
Through A Couple Cooks, Alex and Sonja have cultivated a community of fellow enthusiasts who share their love for cooking and healthy eating. Their commitment to producing high-quality content and nurturing a sense of community has secured them a devoted following, establishing them as respected figures in the culinary landscape.
In conclusion, Alex and Sonja Overhiser are more than mere food bloggers; they are storytellers, mentors, and champions of the joy of cooking. Their efforts on A Couple Cooks continue to motivate and equip home cooks everywhere, demonstrating that with a pinch of creativity and a heap of love, anyone can craft delicious meals that unite people.
Read More
How to Prepare Over Hard Eggs
**The Art of Frying Eggs: Techniques and Tips for Ideal Results**
Frying eggs is a culinary endeavor that appears straightforward but requires a hint of skill to attain excellence. The quality of the eggs and the cooking technique are vital in influencing the final result. Here, we explore the intricacies of frying eggs, emphasizing the freshness of the eggs and the necessity of slow cooking.
**Fresh Eggs: The Key to Perfectly Formed Whites**
In the realm of frying eggs, the freshness of the eggs is crucial. Fresh eggs are perfect for frying as their whites are sturdier and maintain their shape better in the pan. This sturdiness is attributed to the increased protein content in the whites of fresh eggs, which diminishes with age. Thus, older eggs often have runnier whites that spread in the pan, making them harder to manage.
For those who desire their fried eggs to appear visually appealing, opting for fresh eggs is essential. The whites of fresh eggs will remain compact, resulting in a neat presentation. However, if older eggs are the only option at hand, don’t lose hope. You can use a spatula to gently guide the spreading whites back toward the center of the egg. While this method may not produce the same aesthetic as fresh eggs, it will still yield a tasty fried egg.
**The Slow Cooking Method: Preventing Overcooked Eggs**
A crucial element of frying eggs is the pace of cooking. Eggs are fragile and can easily become overcooked when exposed to high heat. The secret to perfect fried eggs is encapsulated in the phrase: the slower, the better. Cooking eggs gently over low heat guarantees that the whites are thoroughly cooked without turning rubbery, and the yolks stay delectably runny.
When frying eggs, patience is essential. Begin by warming your skillet over low to medium heat and adding a small amount of oil or butter. Once the fat is warm, crack the eggs into the pan and allow them to cook gently. Avoid the temptation to raise the heat, as this can lead to overcooked whites and yolks.
It’s also vital to think about the residual heat of the skillet, especially if you are preparing several batches of eggs. The skillet retains heat, so if you are frying a second batch, you might need to reduce the heat slightly to avoid cooking the eggs too rapidly. This adjustment ensures that every batch of eggs is cooked to perfection, featuring tender whites and creamy yolks.
**Conclusion**
Frying eggs is an art that merges the right ingredients with the correct technique. By choosing fresh eggs, you guarantee that the whites maintain their structure, resulting in an appealing dish. Cooking the eggs slowly over low heat wards off overcooking, allowing you to relish the ideal texture and flavor. Regardless of whether you’re an experienced chef or a home cook, perfecting the art of frying eggs will elevate your breakfast experience and impress anyone fortunate enough to gather at your table.
Read More