
An Authoritative Guide to Creating the Ideal Pizza Dough
Alex & Sonja Overhiser: Culinary Innovators and Cookbook Writers
Alex and Sonja Overhiser are the energetic pair behind the well-known culinary site, A Couple Cooks. As the writers of two acclaimed cookbooks, they have significantly influenced the realm of home cooking by promoting their enthusiasm for straightforward, seasonal recipes. Their adventure started in 2010 when they established their website to share the pleasure of cooking and to offer accessible, tasty recipes for home chefs of every skill level.
The couple’s cooking philosophy is grounded in the conviction that meal preparation ought to be a delightful and effortless activity. They prioritize crafting recipes that showcase fresh, seasonal ingredients, making it simple for anyone to savor nutritious and flavorful meals. Over time, Alex and Sonja have broadened their collection to include thousands of original recipes, each paired with breathtaking photography and comprehensive cooking advice.
Besides their website, Alex and Sonja have penned two cookbooks that have garnered positive reviews from critics and home chefs alike. These publications act as extensive resources for cooking with ease and ingenuity, providing readers with an abundance of ideas for meal planning and execution.
As busy parents, Alex and Sonja are aware of the difficulties in juggling family commitments with a passion for cooking. They often trial their recipes on their own children, ensuring that their meals are not only healthy but also appealing to kids. This hands-on approach resonates with many families looking for strategies to integrate nutritious eating into their everyday lives.
Through A Couple Cooks, Alex and Sonja have fostered a lively community of food lovers who share their fervor for cooking. Their website is a rich source of culinary ideas, presenting everything from quick weeknight dinners to elaborate weekend gatherings. With their friendly and relatable approach, Alex and Sonja keep inspiring numerous individuals to embrace the craft of cooking and to experience the happiness that comes from enjoying a meal with loved ones.
Read More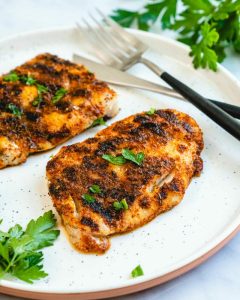
How to Attain Flawlessly Grilled Cod
This grilled cod dish is a delicious weeknight meal ready in just 25 minutes! Featuring a homemade blackened seasoning that brings a smoky, savory punch to each bite, grilling this fish makes for an effortless meal that everyone enjoys.
To be honest, cod wasn’t on my menu for years. When I thought of grilling fish, I would go for grilled salmon or shrimp. Cod seemed too mild or, dare I say, uneventful for the grill.
However, after Alex and I developed this pan-fried cod recipe, I figured grilled cod could actually be…thrilling? I opted to coat the cod with our homemade blackened seasoning, and the outcome was amazing. The mild fish burst with incredible smoky, spicy flavors and had a tender, flaky texture. Now, this often finds its way to our dining table during the summer!
Why You’ll Adore This Recipe
– Quick weeknight meal: 25 minutes total preparation: including heating time! The cooking duration is just 8 minutes
– Rich, layered flavors from a homemade blackened spice mix
– Nutritious dish that aligns with gluten-free, Mediterranean, and pescatarian diets
Ingredients for Grilled Cod
I appreciate how simple this healthy grilled cod recipe is and how it requires just a few ingredients. You’ll need to prepare a homemade spice mixture, but once you create it, you’ll have it ready for several more servings. Here’s what you’ll require for the recipe:
– Cod fillets: Fresh or frozen are both acceptable. Wild-caught is typically a sustainable option if accessible! Cod offers a mild, clean taste that isn’t fishy at all. In fact, it’s even milder than fish like salmon. Due to its delicate white flesh and subtle flavor, it’s sometimes dubbed “chicken of the sea.”
– Olive oil: A light drizzle to help the seasoning stick and prevent sticking.
– Homemade blackened seasoning or seafood seasoning: This is where the magic unfolds!
Tip: Cod serves as a perfect introductory fish for those who think they don’t enjoy fish! (Another beginner-friendly fish that’s not overly fishy is my favorite grilled ahi tuna.)
The Finest Spice Blend for Grilled Cod
In my view, the ultimate seasoning for cod is blackened seasoning. Blackening refers to a Cajun-style method of cooking fish in a cast iron skillet with a spice mixture. Every chef has their unique concoction for blackened seasoning, thus there is no official definition.
Most recipes feature spices typical of Cajun cuisine. My blackened seasoning includes smoked paprika, onion powder, garlic powder, oregano, celery seed, allspice, cloves, and cayenne. You can tweak the amount of cayenne to match your preferred heat level: this blend turns out mild to medium as described and my children love it. For an even hotter variation, consider using my Cajun seasoning instead.
If you lean towards a milder option, give my magic seafood seasoning a try! It’s genuinely the finest blend of flavors: a combination of savory, smoky, and aromatic spices that yield irresistible fish.
How to Grill Cod
You can grill cod directly on the grates: no foil needed! This infuses the cod with a smoky flavor and a crunchy exterior. Here are our tips to grill cod perfectly:
– Temperature: Preheat your grill to medium-high heat (375–450°F). Medium-high heat ensures a perfectly cooked piece of cod.
– Bring cod to room temperature: Allow the fillets to rest outside for roughly 15 minutes before grilling. Cold fish directly from the refrigerator may cook unevenly.
– Pat it thoroughly dry and season: Dry fish gets a superior sear.
– Timing: Grill for 4 minutes with the skin side down, then flip and cook 2–4 additional minutes. The best way to check if it’s done is by using an internal thermometer. Insert it into the thickest part of the fish and it should read 130 degrees Fahrenheit. This should coincide with the moment the cod begins to flake when pulled with a fork.
How to Avoid Sticking
Many people voice concerns about grilled fish sticking to the grill. Here’s our suggestion: Don’t attempt to turn it too early! When the cod is cooked sufficiently, it will release from the grill grates, making flipping a breeze.
If you turn it before that moment, it may stick and come apart. There’s no need to oil the grill grates. Just lightly oil the fish, and when cooking, wait until the cod is easy to release (around 5 minutes). Then it’s simple to flip!
What Goes Well with Grilled Cod
There are numerous wonderful ways to complement grilled cod to create a healthy meal! Here are some of my favorite suggestions to transform it into a delightful spring or summer dinner:
Storage
Grilled cod is best enjoyed fresh. However, if you have any leftovers, keep them refrigerated for up to 2 days. Reheat gently in a skillet over low heat with
Read More
Steps to Make a Crunchy Falafel Sandwich
**Discovering the Flexibility of Falafel Wraps: An Enjoyable Culinary Journey**
Falafel wraps are a cherished element of Middle Eastern dishes, renowned for their deep flavors and enjoyable textures. While classic pita pockets are commonly used to encase these delightful chickpea patties, numerous fans prefer the adaptability of pocketless pita bread or even naan bread as a wrap. This option not only provides a unique texture but also facilitates a more filling and satisfying meal. It’s advisable to wrap the sandwich in foil, as it helps keep the scrumptious ingredients contained and avoids any mess.
For those in search of a fast and easy choice, getting takeout falafel from your go-to Greek eatery can be a fantastic option. Combining these pre-made falafels with homemade tzatziki sauce and fresh toppings results in a wonderful mixture of flavors that is both pleasurable and simple to prepare. The homemade tzatziki introduces a cool and creamy aspect that pairs beautifully with the savory falafel.
Regarding storage, falafel sandwiches are best enjoyed fresh to truly savor their flavor and texture. However, if you have leftovers, it’s recommended to keep the falafel and sauce in separate containers in the refrigerator for up to three days. To preserve the crunchiness of the falafel, reheating them in a toaster oven or air fryer prior to assembling the sandwiches is suggested. This guarantees that each bite maintains its delightful crispness and warmth.
In summary, whether you decide to create your own falafel wraps or go for a speedy takeout version, the essence lies in relishing the vibrant flavors and textures this dish presents. With suitable bread, fresh components, and a sprinkle of creativity, falafel wraps can be a flexible and enjoyable meal for any occasion.
Read More
A Detailed 7-Day Meal Schedule for a High Protein Eating Plan
**A Detailed 7-Day Meal Schedule for a High Protein Diet**
A high protein diet is crucial for muscle development, weight loss, and overall well-being. This 7-day meal schedule is structured to offer you a range of tasty and nutrient-rich meals that are protein-dense. Each day features breakfast, lunch, dinner, and snacks to keep you fulfilled and energized.
**Day 1:**
– **Breakfast:** Scrambled eggs with spinach and feta cheese, accompanied by turkey bacon.
– **Lunch:** Grilled chicken salad featuring mixed greens, cherry tomatoes, cucumbers, and balsamic vinaigrette.
– **Dinner:** Baked salmon with lemon-dill sauce, quinoa, and steamed broccoli.
– **Snack:** Greek yogurt with a handful of almonds.
**Day 2:**
– **Breakfast:** Overnight oats prepared with almond milk, chia seeds, and topped with fresh berries.
– **Lunch:** Turkey and avocado wrap in a whole grain tortilla, with lettuce and tomato.
– **Dinner:** Beef stir-fry including bell peppers, broccoli, and brown rice.
– **Snack:** Cottage cheese paired with pineapple chunks.
**Day 3:**
– **Breakfast:** Protein smoothie made with banana, spinach, protein powder, and almond milk.
– **Lunch:** Tuna salad served on mixed greens with cherry tomatoes and a hard-boiled egg.
– **Dinner:** Grilled shrimp skewers served with quinoa and roasted asparagus.
– **Snack:** Edamame sprinkled with sea salt.
**Day 4:**
– **Breakfast:** Omelet containing mushrooms, bell peppers, and cheddar cheese.
– **Lunch:** Lentil soup complemented with a side of whole grain bread.
– **Dinner:** Baked chicken breast paired with sweet potato wedges and green beans.
– **Snack:** Hummus served with carrot and celery sticks.
**Day 5:**
– **Breakfast:** Whole grain toast spread with peanut butter and topped with banana slices.
– **Lunch:** Quinoa salad featuring black beans, corn, avocado, and lime dressing.
– **Dinner:** Grilled steak accompanied by roasted Brussels sprouts and mashed cauliflower.
– **Snack:** Hard-boiled eggs.
**Day 6:**
– **Breakfast:** Chia pudding created with coconut milk and topped with sliced almonds.
– **Lunch:** Chicken Caesar salad composed of romaine lettuce, Parmesan cheese, and croutons.
– **Dinner:** Baked cod served with wild rice and sautéed spinach.
– **Snack:** Protein bar.
**Day 7:**
– **Breakfast:** Pancakes made using protein powder and topped with fresh strawberries.
– **Lunch:** Egg salad sandwich on whole grain bread with lettuce and tomato.
– **Dinner:** Turkey meatballs served with marinara sauce and zucchini noodles.
– **Snack:** Mixed nuts.
This meal schedule provides a comprehensive approach to a high protein diet with diverse foods to ensure you receive all essential nutrients. Modify portion sizes and ingredients to suit your dietary requirements and preferences. Always seek advice from a healthcare provider or nutritionist before implementing significant alterations to your diet.
Read More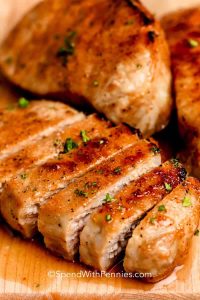
Oven-Roasted Pork Chops with Fast Brine for Improved Moisture
### Oven Baked Pork Chops: Always Juicy and Tender
Oven baked pork chops are an excellent choice for dinner, ensuring juicy and tender outcomes with little effort. The magic happens with a straightforward brine and a sweet, savory rub that elevates the meat’s flavor. This uncomplicated, no-fuss dish is perfect for busy families seeking robust flavor without the stress.
#### Reasons to Make It
These pork chops are perfect for evenings when you crave a hearty meal without spending hours in the kitchen. The quick brining guarantees that even the driest pork cuts remain tender and tasty, while the baking method makes cleanup easier.
#### Method
Brining is the essential technique that turns regular pork chops into a juicy treat. This method aids in breaking down tougher proteins, ensuring each bite is tender and bursting with flavor.
#### Suggestions for Serving
Oven baked pork chops go wonderfully with sides such as creamy mashed potatoes and roasted veggies. For a complete meal, try a sheet pan dinner where the pork chops and vegetables roast together, enhancing flavor while minimizing cleanup.
### Ingredient Insights
– **Pork Chops**: Opt for boneless pork chops approximately ¾-inch thick. Thicker pieces will need extra baking time, and a meat thermometer will help check for doneness.
– **Brine**: A simple blend of salt, sugar, and water. If using fine table salt, cut back on the quantity to avoid an overly salty brine. Peppercorns can impart a mild flavor, but ground pepper serves as a viable substitute.
– **Rub**: The dry mustard in the rub brings zing and complexity. For an alternate flavor, try Dijon mustard instead.
– **Variations**: Add a dash of cayenne for heat or blend in dried herbs like thyme or rosemary for an herby taste. If you want to skip the brine, just mix in 1 teaspoon of kosher salt with the rub.
### The Significance of the Brine & the Rub
**The Brine**: This combination of salt, sugar, and water not only enhances flavor but also tenderizes the meat. While it’s not mandatory, utilizing a brine will produce the juiciest pork chops.
**The Rub**: A mixture of brown sugar and spices, the rub amplifies the flavor and encourages caramelization during baking.
### Steps for Baking Pork Chops
1. **Make the Brine**: In a small saucepan, mix water, salt, brown sugar, and peppercorns. Bring to a boil until dissolved, then let it cool completely.
2. **Brine the Pork Chops**: Pour the cooled brine over the pork chops in a large bowl or a freezer bag. Chill for at least 30 minutes, up to 2 hours.
3. **Preheat the Oven**: Heat your oven to 400°F and line a baking sheet with aluminum foil for straightforward cleanup.
4. **Prepare the Chops**: Take the pork chops out of the brine and pat them dry. If they have a fat cap, score it to prevent curling during cooking.
5. **Apply the Rub**: In a small bowl, combine brown sugar, garlic powder, mustard powder, and paprika. Rub this blend onto both sides of the pork chops.
6. **Bake**: Arrange the seasoned pork chops on the prepared baking sheet and bake for 16 minutes.
7. **Broil**: Change the oven setting to broil and cook the pork chops for an additional 2-4 minutes, or until they hit an internal temperature of 140°F.
8. **Rest**: Take the pork chops from the oven and let them sit for 5 minutes before serving, allowing the temperature to reach 145°F.
### Juicy Leftovers
Store any leftover pork chops in an airtight container in the refrigerator for up to 4 days or freeze for 2-3 months. When reheating, cover with foil and warm in a 325°F to 350°F oven with a splash of broth to keep them moist.
### Ideal Sides for Baked Pork Chops
Think about pairing these tasty pork chops with sides like mashed potatoes, roasted vegetables, or a fresh salad for a balanced meal.
Savor your juicy and flavorful oven baked pork chops, a dish that is bound to delight the entire family!
Read More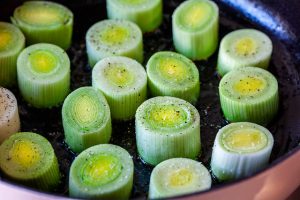
Braised Leeks and Lentils Accompanied by Arugula and Yogurt
### Braised Leeks and Lentils with Arugula and Yogurt
#### Introduction
Leeks are an exquisite vegetable, noted for their gradient shades that transition from buttery yellow to pea green. They encapsulate the spirit of spring with their mild, sweet taste that enriches numerous recipes. Nonetheless, their inconsistent sizes and gritty texture can pose some challenges when cooking. This article offers an easy, one-pot recipe that merges leeks and lentils, making it ideal for a weeknight meal.
#### Ingredients
– 1 bunch of leeks (typically 3 to 4)
– Olive oil
– Kosher salt
– Freshly cracked black pepper
– 3 cloves of garlic (two sliced thinly, one minced)
– 1 cup of dried lentils de puy (200 grams), rinsed
– 1 bunch of scallions (generally 4 to 6), sliced thinly (white and green parts)
– Finely grated zest and juice of 1 large lemon
– 3 cups (710 ml) vegetable broth
– 1 cup (230 grams) plain, unsweetened yogurt
– 2 to 3 ounces (55 to 85 grams) baby arugula leaves, or to taste
#### Instructions
1. **Preheat the Oven**: Set your oven temperature to 350°F (175°C).
2. **Prepare the Leeks**: Cut off the darker green parts and the roots of the leeks. Peel the layers to eliminate any visible dirt, rinse well, and slice the white and light green sections into 1-inch rings.
3. **Cook on the Stove**: In a large oven-safe pan, warm a couple of tablespoons of olive oil over medium-high heat. Incorporate the leek rings, lightly seasoning with salt and pepper. Sauté until one side is browned (about 4 to 5 minutes), then turn and brown the other side (about 3 to 4 minutes). Add the sliced garlic and dried lentils, then carefully pour in the broth. Sprinkle with lemon zest and scallions, seasoning with salt and pepper. Bring to a simmer, cover, and move to the oven.
4. **Bake**: Cook for 40 to 45 minutes, or until the leeks are tender and the lentils are cooked through. There should be a little broth left.
5. **Prepare the Yogurt Sauce**: In a small bowl, combine the yogurt with 1 tablespoon of lemon juice, the minced garlic, and salt and pepper to taste.
6. **Dress the Arugula**: In a large bowl, whisk together 2 tablespoons of lemon juice with 3 to 4 tablespoons of olive oil, seasoning with salt and pepper. Toss the arugula in the dressing, allowing any excess to settle at the bottom of the bowl.
7. **Serve**: Take the braised leeks and lentils from the oven. You can serve straight from the pan, garnishing with yogurt and sprinkling arugula on top, or plate it alongside a slice of toasted sourdough. Drizzle any leftover dressing over the dish for extra flavor.
#### Variations
Think about adding toasted hazelnuts, thinly sliced fennel, or shaved parmesan to the salad. For an added kick, spices like cumin or sumac can be added, and a poached egg on top provides a delightful touch.
#### Conclusion
This dish is not just simple and delicious but also offers the practicality of being a one-pot meal, making it perfect for hectic weeknights. Relish the comforting blend of braised leeks and lentils, paired with fresh arugula and a zesty yogurt sauce.