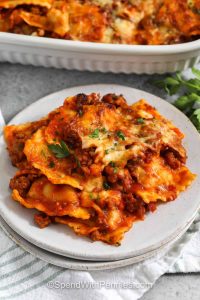
Fast and Simple Lasagna Recipe for Hectic Weeknights
### Ravioli Lasagna: The Pinnacle of Weeknight Comfort
Ravioli lasagna offers a delightful spin on the classic lasagna, merging the cozy components of cheesy ravioli, a robust meat sauce, and ample melted mozzarella. This recipe is ideal for hectic weeknights, delivering an easy yet gratifying meal that the entire family will adore.
#### Why Prepare It?
Ravioli lasagna stands out as a fantastic option for anyone in search of a low-effort baked pasta dish that can satisfy a crowd. With just a few ingredients, it encapsulates the traditional lasagna flavors without the need for boiling noodles or crafting a separate cheese layer.
#### Suggested Utensils
To whip up this simple dish, you will require:
– A skillet for sautéing the sausage and blending the sauce.
– A 9×13 baking dish for layering and cooking the lasagna.
#### Preparation Tip
No need to thaw the ravioli beforehand; you can layer it directly from the freezer.
#### Serving Ideas
For a fulfilling meal, pair your ravioli lasagna with homemade garlic bread and a crisp Caesar salad.
### Ingredient Highlights
– **Italian Sausage**: Mild sausage is great for families, while spicy sausage gives a little kick. Turkey or beef can be used too, but sausage brings the best flavor.
– **Cheese Ravioli**: Traditional cheese ravioli works well, but spinach ravioli can enhance both color and taste.
– **Marinara Sauce**: Choose a thicker sauce to ensure the casserole sets correctly. If using a large bag of ravioli, add more sauce to maintain moist layers.
– **Cheese**: For optimal melt, shred mozzarella from a block, or opt for pre-shredded cheese for ease. A sprinkle of Parmesan on top provides a delightful finishing touch.
– **Variations**: Think about incorporating baby spinach between the ravioli and sauce for added nutrition. For a touch of spice, add red pepper flakes or stir in a spoonful of pesto into the sauce.
### Steps to Make Ravioli Lasagna
1. **Sauté the Sausage**: In a skillet, brown the sausage over medium-high heat. Drain excess fat and mix in the marinara sauce.
2. **Prep the Baking Dish**: Spread a light layer of sauce on the bottom of a 9×13 baking dish.
3. **Layer the Components**: Add half of the ravioli, half of the sauce, and half of the mozzarella cheese. Repeat the layers.
4. **Bake**: Finish with Parmesan cheese on top, cover the dish, and bake. Uncover during the last few minutes to let the top brown slightly.
#### Success Tips
– **Utilize Frozen Ravioli**: No need to thaw; the ravioli cooks accurately in the oven.
– **Seal Tightly**: Cover the dish with foil during the initial baking phase to ensure the ravioli steams and softens properly.
– **Let It Sit**: After baking, allow the lasagna to rest for at least 10 minutes to help the layers firm up for easier serving.
– **Thicken Sauce**: If your sauce appears thin, let it simmer uncovered for a few minutes to achieve the desired consistency.
### Store for Later
Leftovers can be kept in an airtight container in the refrigerator for up to 4 days or frozen for as long as 3 months. Reheat in the oven at 350°F until warmed through, or in the microwave with a spoonful of extra sauce to avoid drying out.
### Nutritional Information
– **Calories**: 419
– **Carbohydrates**: 2g
– **Protein**: 23g
– **Fat**: 35g
– **Sodium**: 914mg
Ravioli lasagna is more than a dish; it’s a warm experience that brings joy to your dinner table. Relish this straightforward recipe that intertwines the finest of Italian flavors with minimal effort!
Read More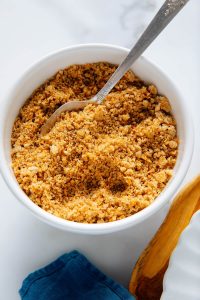
A Handbook for Preparing Bread Crumbs
These small homemade bread crumbs can have a significant effect on your dish! They serve as the ideal crunchy final touch for casseroles, salads, and more. Follow this recipe to create standard golden bread crumbs, or incorporate the optional seasonings, and your kitchen will smell like a top-notch Italian eatery.
This straightforward recipe offers far more taste than store-bought versions and lasts well for months. Choose your preferred bread, whether it’s a beloved crusty sourdough or whole wheat sandwich bread. If you have leftover bread that’s beginning to go stale, transform it into bread crumbs to save it for future use (or croutons or French toast)!
Bread Crumb Tips
You’ll find a concise instructional video and the full recipe below. Here’s how to create the finest bread crumbs!
Convert bread into crumbs in your food processor or blender. Yes, a blender works! Fresh or slightly stale bread will suffice (see note at the end of this section). Process until the bread is broken down into the smallest pieces—if uncertain, process longer.
Butter performs significantly better than olive oil. My bread crumbs clumped much more upon contact with olive oil, and the olive oil crumbs softened over time after cooking, while the buttered bread crumbs maintained their crispness.
Incorporate the bread crumbs at the correct time. Melt the butter in the skillet and wait until the foam is almost gone, then check the heat by dropping in a few bread crumbs. If they sizzle upon contact, the butter is hot enough to fry the crumbs.
Spread the freshly cooked bread crumbs on a plate to cool. This halts the cooking process before they burn and gives them space to remain nice and crisp.
Note: Many recipes recommend intentionally drying out your bread beforehand (methods include letting them sit overnight on the counter or baking on a rack at 275 degrees Fahrenheit for about 20 minutes). I successfully created bread crumbs using sandwich bread straight from the store, so this step is unnecessary unless your bread is particularly moist or soft.
Uses for Bread Crumbs
These tasty bread crumbs would serve as a wonderful breading, naturally. Alternatively, use them as a crispy topping on your casseroles and gratins, like my Better Broccoli Casserole and Creamy Roasted Brussels Sprout and Quinoa Gratin.
Consider these bread crumbs when aiming to add a crunchy component to pasta dishes, including mac and cheese. They’re also ideal for salads, providing a lighter substitute for croutons. Try them on my Caesar Salad or Lemony Kale Salad.
If you enjoy improvising your meals, here are some ingredients that especially benefit from a sprinkle of golden bread crumbs:
– Arugula
– Asparagus
– Brussels sprouts
– Cauliflower
– Cheese: goat, Parmesan, pecorino
– Fennel
– Green beans
– Kale
– Lentils
– Mushrooms
– Pistachios
– Parsley
– Pesto
– Tomatoes
– Zucchini
Bread Crumbs
These toasted, golden bread crumbs are the ultimate finishing touch! They taste significantly better than store-bought options. If your recipe requires seasoned bread crumbs, be sure to include the optional seasonings, or leave them plain for maximum versatility. Recipe yields about 1 ¼ cups and can be stored well for several months.
Instructions:
1. To make the breadcrumbs: Tear your bread into 2-inch pieces and place them in a food processor or blender. If desired, add the garlic powder, oregano, and red pepper flakes. Process until the bread has turned into very fine crumbs. If uncertain, process longer!
2. Set a large plate near the stove for later use. In a large stainless steel or cast iron skillet over medium heat, melt the butter until the foam is nearly dissipated, swirling the pan a couple of times for even distribution. Check to make sure that the pan is hot enough by dropping in a few bread crumbs—if they sizzle upon contact, it’s ready to proceed.
3. Incorporate the bread crumbs. Raise the heat to medium-high and cook for 3 to 5 minutes, stirring constantly and breaking up any clumps, until the crumbs begin to turn crispy and golden in certain areas.
4. Move the bread crumbs to the plate and spread them out in a single layer to cool. The crumbs will crisp further as they cool. Season with salt to taste before using. Once fully cooled, transfer any leftovers to a storage bag, gently squeeze out excess air, and seal. Store bread crumbs at room temperature for up to 3 months (inspect them and taste before using to ensure quality).
Notes:
*Types of bread: Use sourdough, baguettes, or sandwich bread (regular or whole wheat).
Read More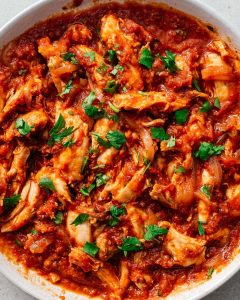
How to Prepare Chicken Tinga: An Illustrated Guide
# Tinga: A Savory Mexican Treat
Tinga is a cherished Mexican culinary creation featuring succulent pieces of chicken cooked in a tangy, mildly spicy tomato and chipotle sauce. Renowned for its robust flavors and adaptability, tinga can be relished in different formats, such as tacos, burritos, or even as an independent stew.
## What is Tinga?
Tinga, or *tinga de pollo* in Spanish, is a classic Mexican recipe primarily consisting of shredded chicken and onions prepared in a tasty sauce crafted from tomatoes and chipotle peppers in adobo. The dish is distinguished by its smoky taste and a touch of heat, appealing to spice aficionados. Tinga is frequently served in tacos or atop tostadas, accompanied by refried beans, lettuce, cheese, crema, and salsa. Its rich flavor and aroma make for a fulfilling meal that can stand alone or be paired with rice.
## How to Make Tinga
Making tinga at home is an uncomplicated task that leads to delightful outcomes. Here’s a straightforward recipe to create this dish:
1. **Puree the Sauce**: Blend chipotle in adobo, tomatoes, garlic, oregano, and cumin in a blender until smooth.
2. **Sauté the Onions**: Gently cook sliced onions in a pan until golden and aromatic.
3. **Cook the Stew**: Pour the pureed sauce into the pan with cooked chicken, bay leaves, and chicken broth. Simmer until the flavors combine.
## Ingredients for Chicken Tinga
To make chicken tinga, you will need the following components:
– **Chicken**: Shredded cooked chicken is preferable for speedy preparation. You can utilize rotisserie chicken or prepare your own.
– **Chipotle in Adobo**: This component adds richness and flavor. It is typically available in most supermarkets.
– **Tomatoes**: Fire-roasted tomatoes enhance the smokiness; however, regular canned tomatoes are acceptable as well.
– **Onions**: Crucial for sweetness and flavor, onions should be caramelized for optimal results.
– **Spices**: Mexican oregano and cumin are essential for an authentic taste. Mexican oregano differs from standard oregano, providing a distinct flavor.
## What are Chipotles in Adobo?
Chipotles in adobo are smoked and dried jalapeños rehydrated and packed in a sauce made from tomatoes, vinegar, garlic, and spices. They are a fundamental element in Mexican cuisine, contributing a deep, smoky flavor to a variety of dishes. Keep a few cans in your pantry for a quick boost of flavor in sauces, marinades, and soups.
## Cooking Methods for Chicken Tinga
### Instant Pot Chicken Tinga
1. Blend the sauce and set it aside.
2. Sauté onions using the sauté function, then add the sauce, raw chicken, and chicken broth.
3. Cook on high pressure for 5 minutes and then quickly release the pressure.
4. Shred the chicken and let it simmer in the sauce.
### Crockpot Chicken Tinga
1. Blend the sauce and set it aside.
2. Sauté onions, then place them in the slow cooker with raw chicken, sauce, and chicken broth.
3. Cook on low for 2-3 hours or high for 1-2 hours. Shred the chicken and stir it back into the sauce.
## Serving Suggestions
Tinga can be presented in various styles:
– In tacos or burritos topped with avocado, cheese, and salsa.
– Over rice or with warm tortillas.
– As a stuffing for flautas or served alongside beans and Mexican rice.
## Conclusion
Tinga is a tasty and adaptable dish that highlights the rich flavors of Mexican cooking. Whether you enjoy it in a burrito, taco, or as a stew, its blend of juicy chicken and smoky chipotle sauce is guaranteed to satisfy your hunger. With simple ingredients and accessible cooking techniques, you can recreate this traditional dish in your own home. Relish the delightful taste of tinga and share it with friends and family for an unforgettable dining experience.
Read More