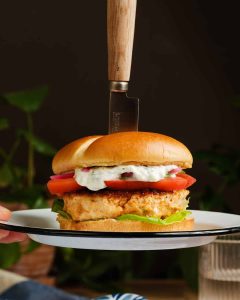
Easy and Tasty Chicken Burger Recipe
Alex & Sonja Overhiser: The Culinary Team Behind A Couple Cooks
Alex and Sonja Overhiser form the energetic pair behind the beloved food blog, A Couple Cooks. As writers of two acclaimed cookbooks, busy parents, and a genuine couple with a shared enthusiasm for cooking, they have motivated numerous home cooks with their straightforward, seasonal recipes and useful cooking tips.
The story of A Couple Cooks commenced in 2010 when Alex and Sonja opted to establish a platform to express their passion for cooking and the joy it brings into their lives. Over time, the website has transformed into a rich resource featuring thousands of unique recipes, cooking advice, and meal planning suggestions. Each recipe is carefully developed, penned, and photographed by Alex and Sonja, ensuring that their unique flair is present in every entry.
Their cooking philosophy highlights simplicity and seasonality, making it approachable for home cooks at any experience level. By prioritizing fresh, nutritious ingredients, they inspire their audience to appreciate the joy of home cooking. Their recipes are not just tested by the couple but also by their children, guaranteeing that they are suitable for families and all age groups.
Besides their blog, Alex and Sonja have written two cookbooks, further enhancing their standing as reliable voices in the culinary field. Their books contain mouthwatering recipes and valuable cooking insights, serving as essential tools for anyone eager to elevate their cooking abilities.
Through A Couple Cooks, Alex and Sonja Overhiser persist in motivating and empowering home cooks to delve into the delights of cooking. Their commitment to sharing their culinary experiences and knowledge has fostered a lively community of food lovers who seek their advice and encouragement in the kitchen.
Read More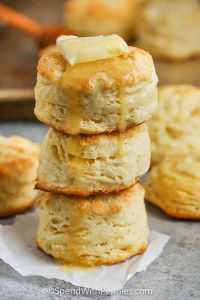
Ideally Flaky Warm Buttery Biscuits
# Homemade Buttermilk Biscuits: Light, Tender, and Simple to Prepare
Homemade buttermilk biscuits are a wonderful enhancement to any meal, recognized for their light, tender consistency and flavorful, buttery essence. With basic ingredients and a straightforward preparation method, these biscuits can be relished at breakfast with strawberry rhubarb preserves or served with a soothing bowl of tomato bisque for dinner.
## Holly’s Recipe Highlights: Buttermilk Biscuits
– **Flavor**: These biscuits feature a decadent, buttery taste with a hint of tang from the buttermilk.
– **Why Make It**: The fold-and-pat technique applied in this recipe results in flaky layers without requiring specialized tools or extended chilling periods.
– **Serving Suggestions**: Enjoy them warm with butter and strawberry freezer jam, pair them with easy sausage gravy, or serve next to split pea soup.
– **Total Time**: 30 minutes
– **Servings**: 10 biscuits
– **Cooking Method**: Oven
– **Difficulty**: Medium, using basic ingredients
## Ingredient Notes
– **Flour**: All-purpose flour is perfect for keeping the biscuits soft yet strong. Spoon it in and level for the lightest texture.
– **Butter**: Opt for cold butter, which is crucial for producing flaky layers. Chilling it for a few minutes before cutting into the flour helps keep it cold.
– **Buttermilk**: Contributes a tasty tang and helps maintain the tenderness of the biscuits while assisting them in rising. Begin with 1 cup and adjust as necessary.
– **Variations**: For a cheesy flair, mix in shredded cheddar to the dough, or include fresh herbs like chives or parsley. Brushing buttermilk on the tops prior to baking enhances coloration.
## How to Make Buttermilk Biscuits
1. **Preheat the Oven**: Set your oven to 450°F.
2. **Combine Dry Ingredients**: In a large bowl, combine flour, baking powder, sugar, baking soda, and salt.
3. **Cut in Butter**: Incorporate cold butter into the dry mixture and cut until it resembles coarse crumbs.
4. **Add Buttermilk**: Gradually mix in buttermilk until the dough is just damp.
5. **Knead the Dough**: Transfer the dough to a lightly floured surface and knead softly until it comes together.
6. **Fold the Dough**: Shape the dough into a square and fold it over itself 5 to 6 times to form layers.
7. **Cut Biscuits**: Pat the dough to about 1-inch thickness and cut out biscuits with a biscuit cutter.
8. **Bake**: Arrange the biscuits on an ungreased baking sheet and bake for 10 to 12 minutes until golden brown.
### Tips for Perfect Biscuits
– **Cold Butter**: Keep the butter very cold to produce steam during baking, facilitating flaky layers.
– **Don’t Overmix**: Combine the dough just until it’s moistened to ensure the biscuits remain tender.
– **Handle Gently**: Knead the dough enough for it to come together; excessive handling can result in tough biscuits.
– **Fold for Layers**: Folding the dough several times is essential for those flaky layers.
– **Cut Straight Down**: Utilize a biscuit cutter to press straight down without twisting to avoid sealing the edges.
– **Chill if Needed**: Should the butter soften, chill the cut biscuits in the freezer for 10 minutes before baking.
## Store, Freeze, Reheat
– **Storage**: Keep any leftovers in an airtight container at room temperature for up to 2 days or refrigerate for up to 4 days.
– **Freezing**: Baked biscuits can be frozen for as long as 3 months. Unbaked, cut biscuits can also be frozen and baked from frozen with a few additional minutes needed.
– **Reheating**: Warm in a 300°F oven for roughly 5 to 8 minutes or until heated through.
## Cozy Biscuit Pairings
These buttermilk biscuits are adaptable and can complement an array of dishes, making them an ideal addition to any meal. Whether enjoyed with sweet preserves or savory gravies, they are sure to delight.
Did you enjoy these Buttermilk Biscuits? Leave a comment and rating below!
Read More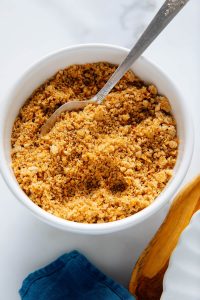
A Comprehensive Guide to Preparing Bread Crumbs
When you make a purchase through our links, we may receive a commission. [Learn More](https://cookieandkate.com/affiliate-discretion/)
**These small homemade bread crumbs can significantly enhance your dish!** They provide the ideal crispy finishing touch for casseroles, salads, and beyond. Use this recipe to create standard golden bread crumbs, or incorporate the optional spices to fill your kitchen with the aroma of a top-notch Italian eatery.
This straightforward recipe boasts far more flavor than store-bought varieties and can be preserved for months. Choose your preferred bread, whether it’s a beloved crusty sourdough or whole wheat sandwich bread. If you have stale bread left over, transform it into bread crumbs to use later (or [croutons](https://cookieandkate.com/croutons-recipe/) or [French toast](https://cookieandkate.com/french-toast-recipe/)!
## Bread Crumb Tips
You’ll find a concise instructional video and the complete recipe below. Here’s how to create the finest bread crumbs!
**Process bread into crumbs using your food processor or blender.** Indeed, a blender will suffice! Fresh or slightly stale bread can be used (refer to the note at the end of this section). Process until the bread is broken down into the smallest pieces—if uncertain, process longer.
**Butter is significantly more effective than olive oil.** My bread crumbs clumped much more when they made contact with olive oil, and those made with olive oil became soft over time after cooking, while the buttered crumbs remained delightfully crisp.
**Incorporate the bread crumbs at the right moment.** Melt the butter in the skillet and wait until the foam has mostly dissipated, then check the temperature by dropping in a few bread crumbs. If they sizzle upon contact, the butter is sufficiently hot for frying the crumbs.
**Transfer the freshly cooked bread crumbs onto a plate to cool.** This prevents the cooking process to avoid burning and gives them space to remain crisp.
**Note:** Many recipes recommend deliberately drying out your bread before usage (methods include leaving them out overnight or baking on a rack at 275 degrees Fahrenheit for approximately 20 minutes). I successfully created bread crumbs with sandwich bread directly from the store, making this step unnecessary unless the bread is *exceptionally* moist or soft.
## Uses for Bread Crumbs
These tasty bread crumbs are ideal for a **wonderful breading,** of course. Alternatively, use them as a crunchy topping on your **casseroles and gratins,** such as my [Better Broccoli Casserole](https://cookieandkate.com/better-broccoli-casserole-recipe/) and [Creamy Roasted Brussels Sprout and Quinoa Gratin](https://cookieandkate.com/brussels-sprout-quinoa-gratin/).
Think about these bread crumbs when you want to add a crispy touch to **pasta dishes,** including [mac and cheese](https://cookieandkate.com/butternut-squash-mac-and-cheese/). They’re also fantastic for **salads,** providing a lighter option compared to [croutons](https://cookieandkate.com/croutons-recipe/). Use them on my [Caesar Salad](https://cookieandkate.com/caesar-salad-recipe/) or [Lemony Kale Salad](https://cookieandkate.com/lemon-kale-salad-recipe/).
**If you enjoy experimenting with your meals,** here are some ingredients that particularly benefit from a sprinkle of golden bread crumbs:
– Arugula
– Asparagus
– Brussels sprouts
– Cauliflower
– Cheese: goat, Parmesan, pecorino
– Fennel
– Green beans
– Kale
– Lentils
– Mushrooms
– Pistachios
– Parsley
– Pesto
– Tomatoes
– Zucchini
## Bread Crumbs
These toasted, golden bread crumbs provide the ideal finishing touch! They are exponentially better than store-bought options. If your recipe calls for seasoned bread crumbs, be sure to include the optional seasonings, or leave them unseasoned for maximum flexibility. Recipe yields about 1 ¼ cups and stores well for several months.
### Instructions
1. **To create the breadcrumbs:** Tear your bread into 2-inch pieces and toss them into a food processor or blender. If desired, include the garlic powder, oregano, and red pepper flakes. Process until the bread has crumbled into very small pieces. If uncertain, process longer!
2. Place a large plate near the stove for later use. In a large stainless steel or cast iron skillet over medium heat, melt the butter until the foam has nearly disappeared, swirling the pan a few times for even distribution. Check to ensure that the pan is hot enough by dropping in a few bread crumbs—if they sizzle upon contact,

Chicken Salad with Spinach and Artichoke Hearts
**Spinach and Artichoke Chicken Salad: A Tasty Blend**
Spinach and artichoke dip is a cherished starter recognized for its rich flavors and creamy consistency. Envision fusing this timeless dip with a robust chicken salad to create a dish that is both fulfilling and delectable. This Spinach and Artichoke Chicken Salad unites the finest elements of both worlds, delivering a creamy, tangy, and savory sensation that’s ideal for any meal.
**Ingredients:**
– 4 cups chicken, cooked and shredded or sliced
– 1/2 cup celery, finely sliced
– 1/4 cup red onion, chopped
– 1 cup baby spinach, roughly chopped
– 1/2 cup artichoke hearts, roughly chopped
– 1/3 cup cottage cheese (or plain Greek yogurt)
– 1/3 cup mayonnaise
– 2 tablespoons parmigiano reggiano (parmesan cheese), grated
– 1 tablespoon lemon juice
– 1 teaspoon dijon mustard
– 1 clove garlic, minced/grated
– 2 tablespoons basil, finely sliced (optional)
– Salt and pepper to taste
**Directions:**
1. In a large bowl, mix the chicken, celery, red onion, spinach, and artichokes together.
2. In another bowl, blend the cottage cheese, mayonnaise, parmesan, lemon juice, dijon mustard, garlic, basil, salt, and pepper.
3. Drizzle the dressing over the chicken mixture and toss until all ingredients are evenly coated.
4. Serve at once or chill for later enjoyment.
**Serving Suggestions:**
This adaptable salad can be savored on its own, in lettuce wraps, sandwiches, tortilla wraps, or even quesadillas. It’s a quick and effortless meal that takes only 10 minutes to make, making it perfect for hectic days.
**Nutritional Information:**
– Calories: 246
– Fat: 19g (Saturated 4g)
– Cholesterol: 59mg
– Sodium: 187mg
– Carbohydrates: 2g (Fiber 1g, Sugars 0.8g)
– Protein: 15g
**Customization Options:**
– Puree the cottage cheese in a food processor for a smoother consistency.
– Swap cottage cheese with whipped cream cheese for a richer taste.
– Incorporate 1/4 cup sun-dried tomatoes or 1/4 cup bacon for added flavor.
This Spinach and Artichoke Chicken Salad is an enjoyable variation on classic chicken salad, providing an explosion of flavors and textures that are sure to satisfy any taste. Relish this dish as a quick lunch or a fulfilling dinner choice.
Read More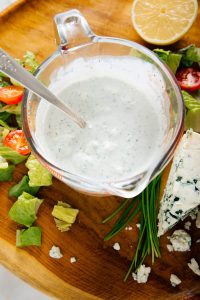
Velvety Blue Cheese Salad Dressing Recipe
**Blue Cheese Dressing: A Timeless Recipe**
Blue cheese dressing is a treasured classic, adored for its rich texture and unique tangy taste. Whether you’re a fan of blue cheese or just discovering its bold flavor, this dressing will definitely impress you. Here’s a guide to crafting a delightful blue cheese dressing that rivals top restaurant offerings.
**Ingredients:**
– **Sour Cream:** Delivers a creamy, tangy foundation without requiring mayonnaise.
– **Crumbled Blue Cheese:** Opt for a mild type like Gorgonzola dolce or Danish Blue for a gentle flavor, or choose a more robust cheese like Roquefort for a stronger taste.
– **Buttermilk:** Contributes tang and assists in achieving the ideal dressing thickness. Use authentic buttermilk for the best outcome, or replace it with milk and a squeeze of lemon juice.
– **Lemon Juice:** Fresh lemon juice imparts a vibrant zing to the dressing.
– **Chives and Garlic:** Finely chopped chives and crushed garlic provide a delightful allium flavor. Green onions can serve as a replacement for chives.
– **Salt and Pepper:** Crucial for harmonizing flavors and elevating the dressing’s profile.
**Instructions:**
1. In a small bowl, mix all the ingredients together. Taste and refine with extra salt and pepper as necessary.
2. For the best flavor, refrigerate the dressing for 30 minutes before serving.
3. Drizzle over your preferred salad or keep in an airtight container in the fridge for up to one week.
**Salad Suggestions:**
Begin with a base of fresh greens like romaine, iceberg, spinach, or arugula. Boost your salad with elements such as apples, beets, croutons, celery, cucumber, endive, fennel, grapes, nuts, peaches, pears, radishes, sunflower seeds, and tomatoes. The fusion of these components with blue cheese dressing creates a delightful salad experience.
**Explore More Dressings:**
If you relish this blue cheese dressing, think about trying other homemade dressings such as Ranch, Green Goddess, or Caesar. Each provides a distinct flavor profile to enhance your salads.
Share your blue cheese dressing results and salad creations in the comments!
Read More